Sponsored
OP
OP

JoHo

Badlands
Well-Known Member
First Name
Joseph
Joined
Aug 25, 2024
Threads
1
Messages
87
Reaction score
179
Location
Colorado
Vehicle(s)
Badlands, 2dr 7MT
Your Bronco Model
Badlands
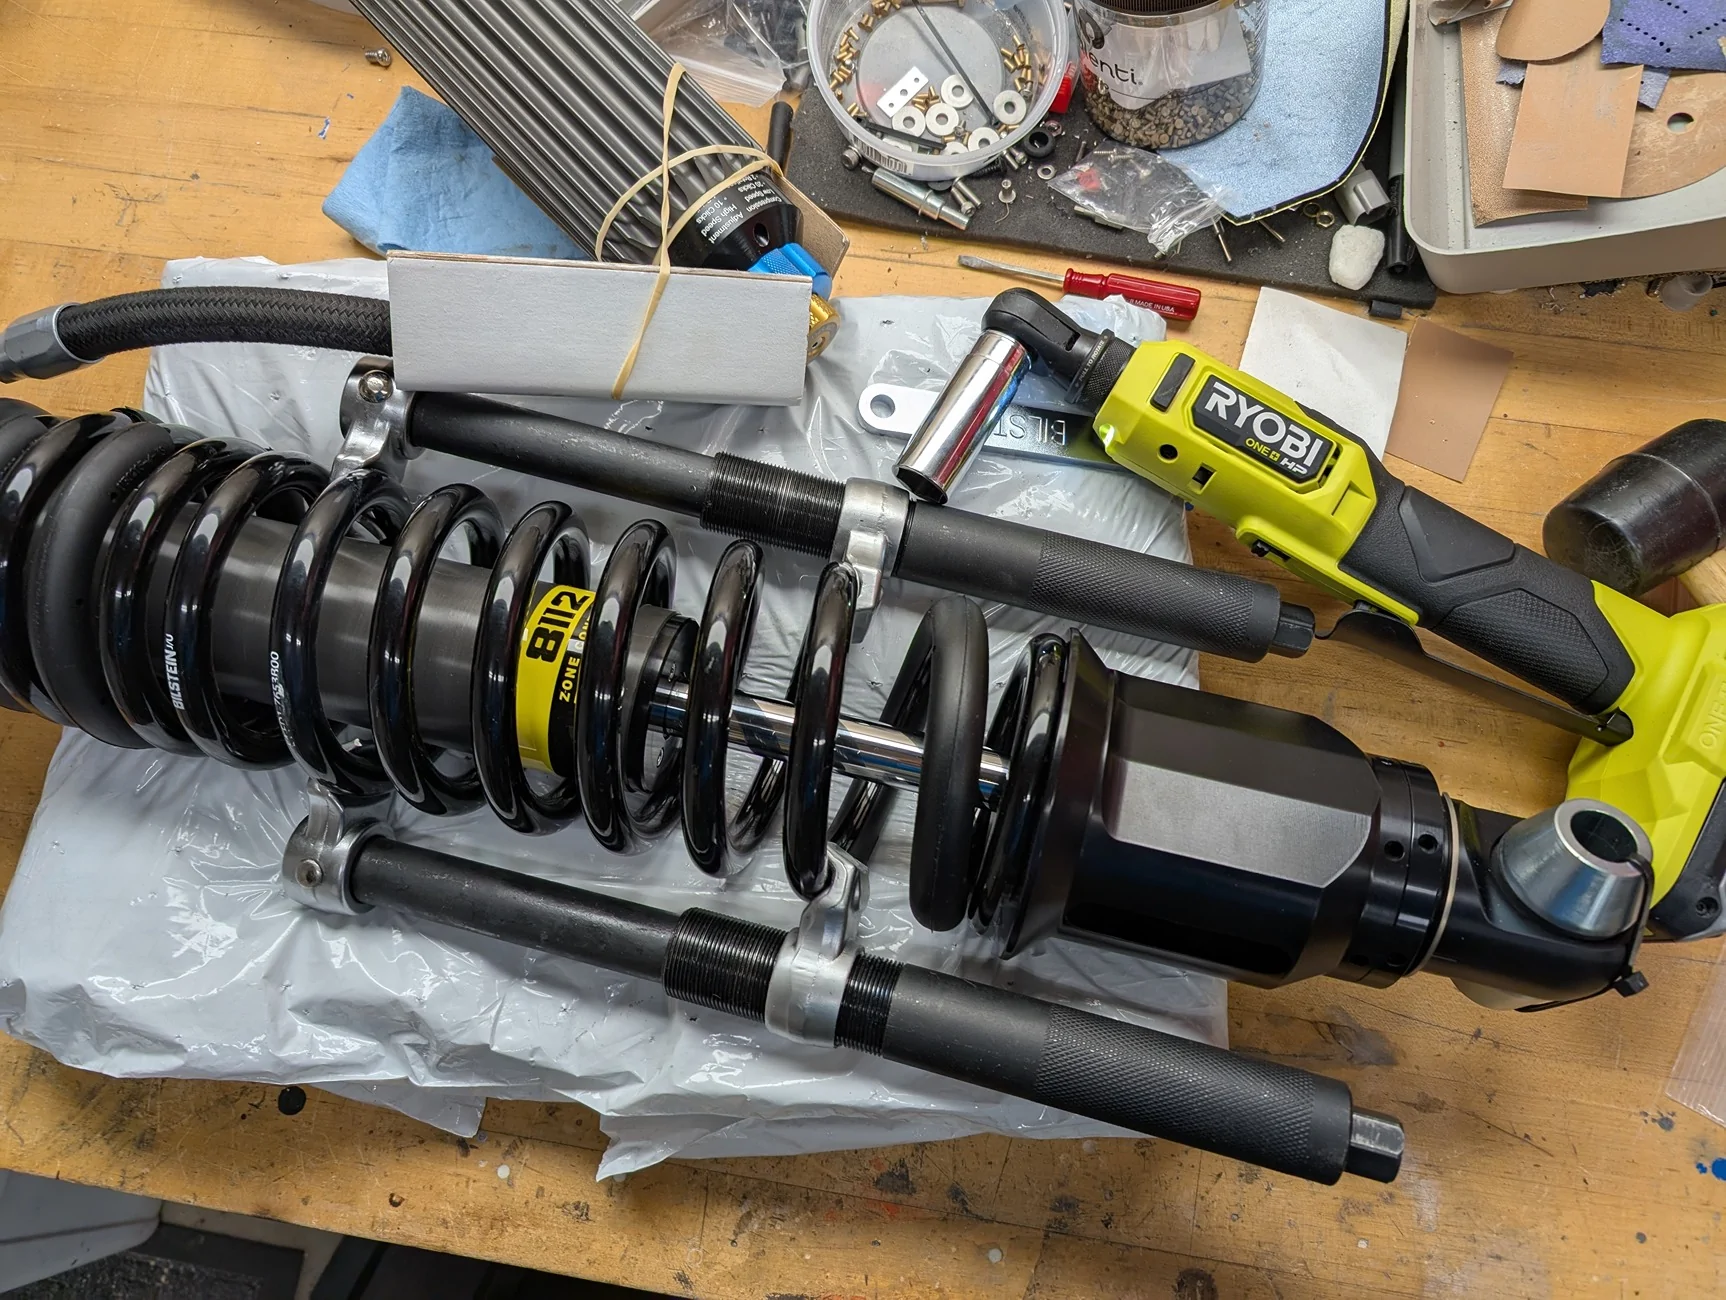
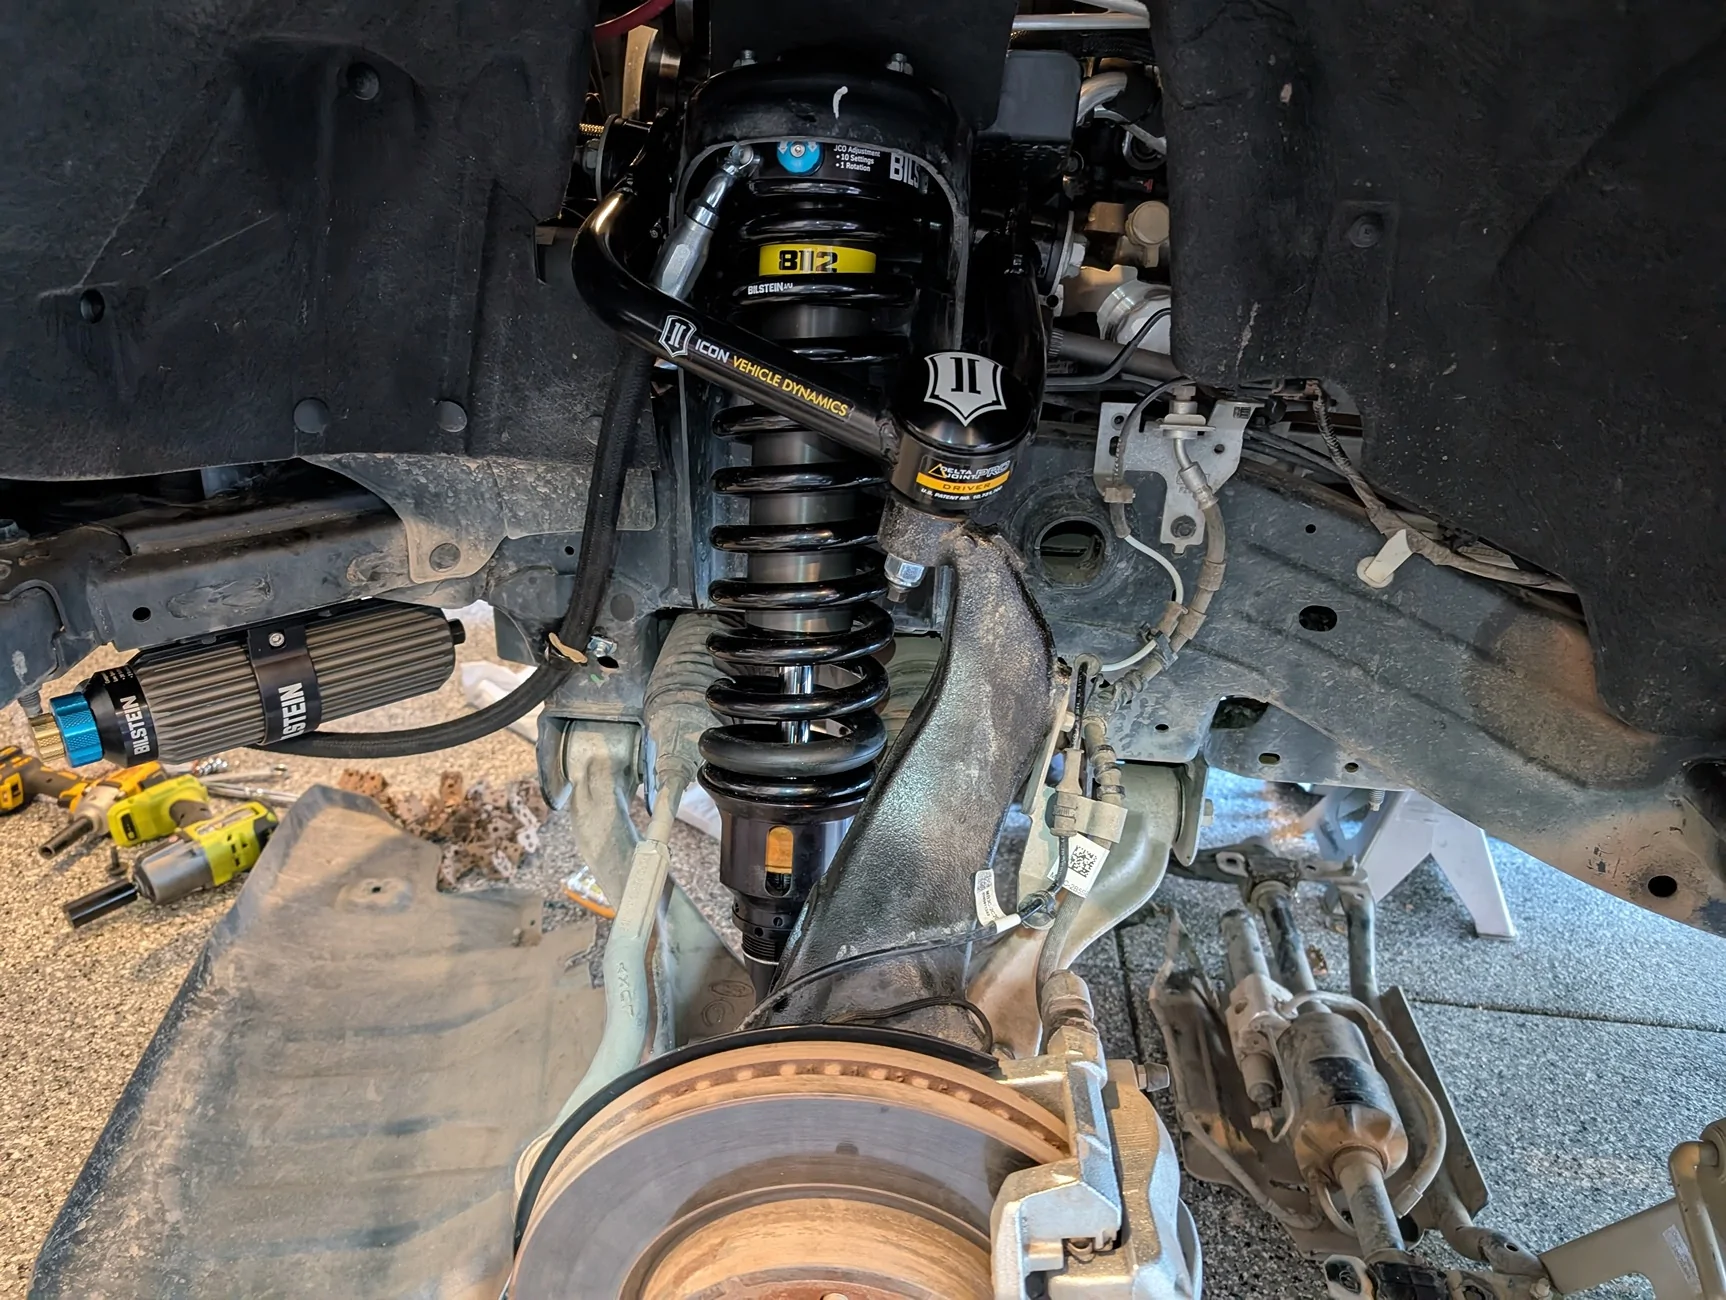
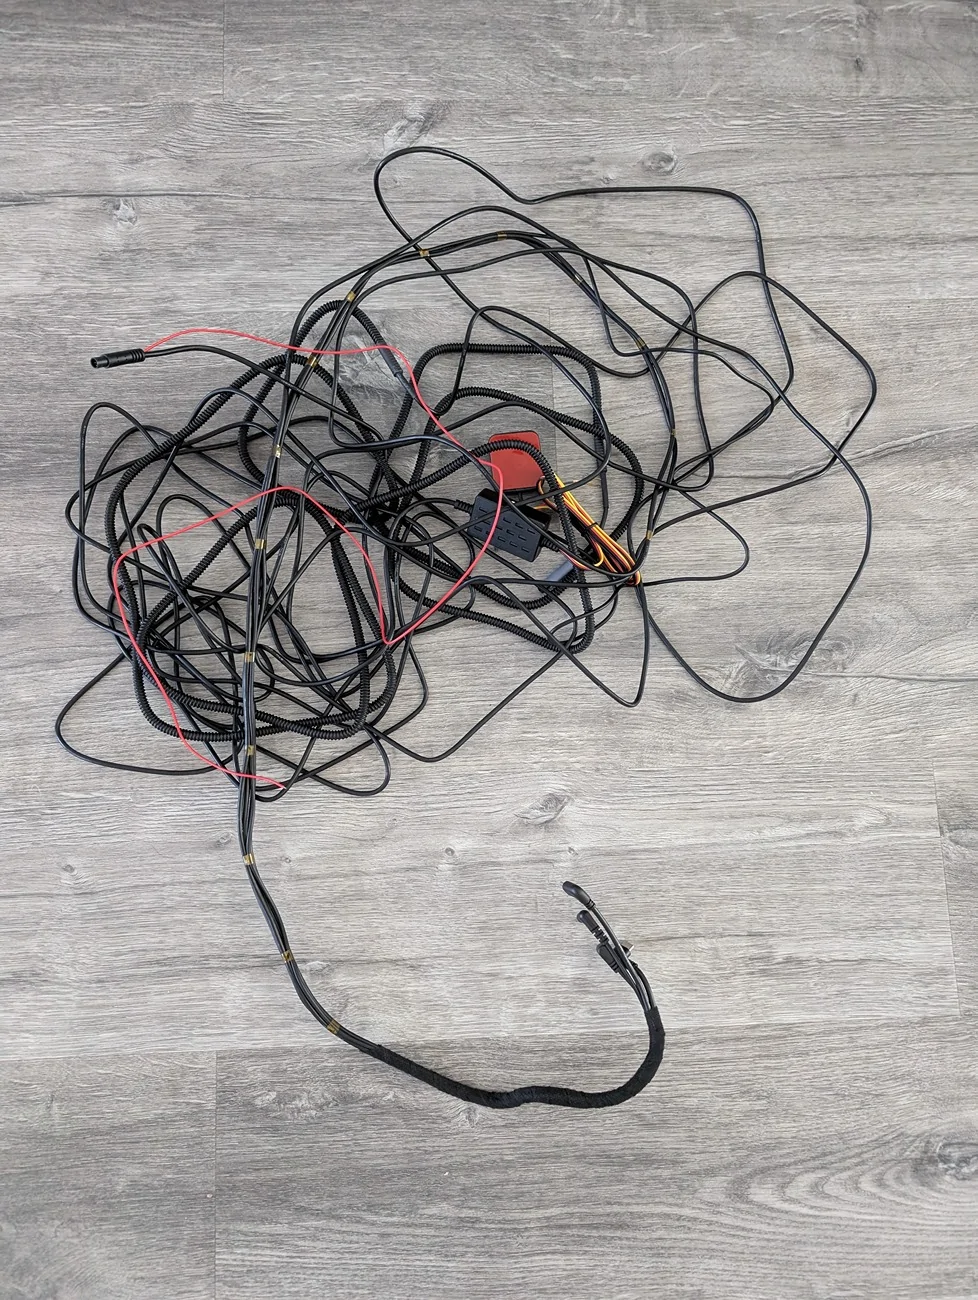
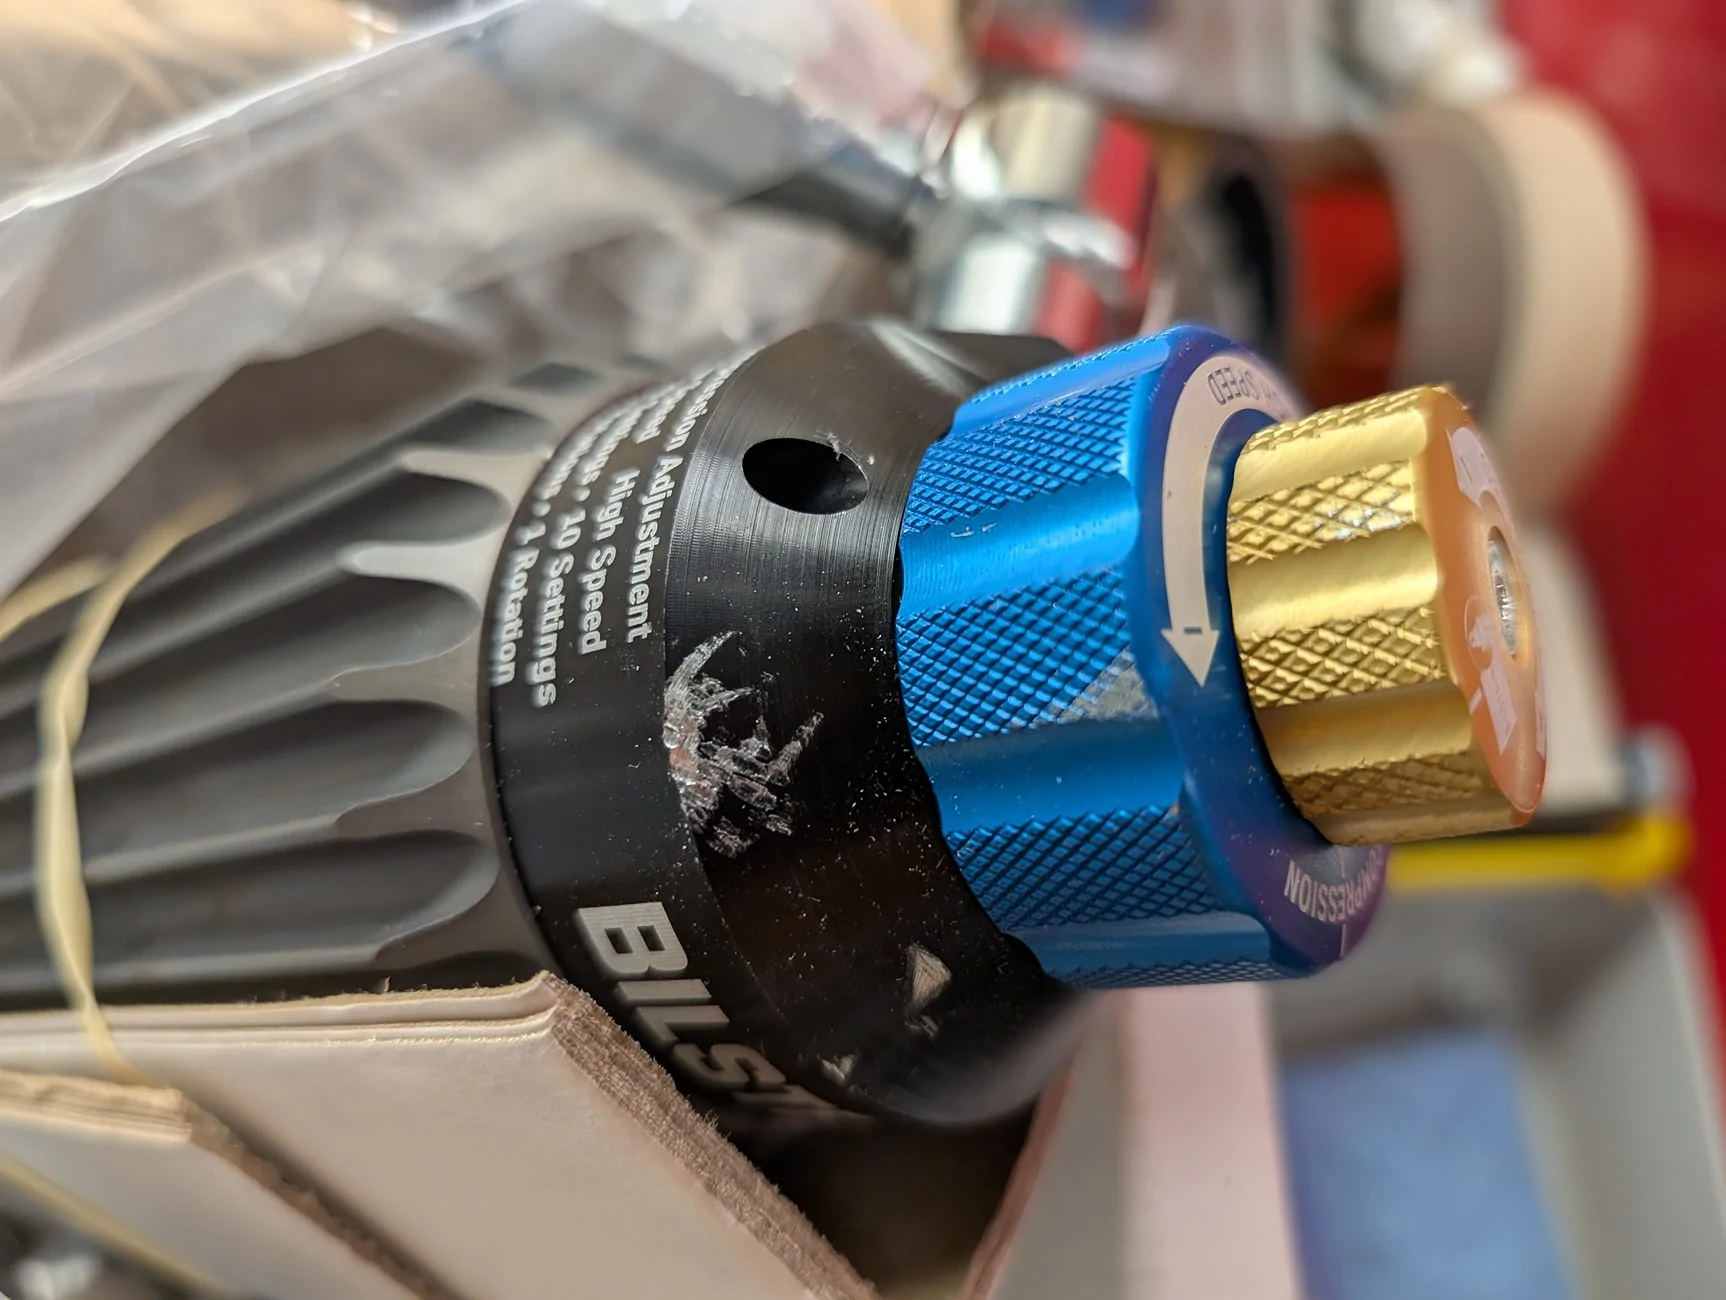
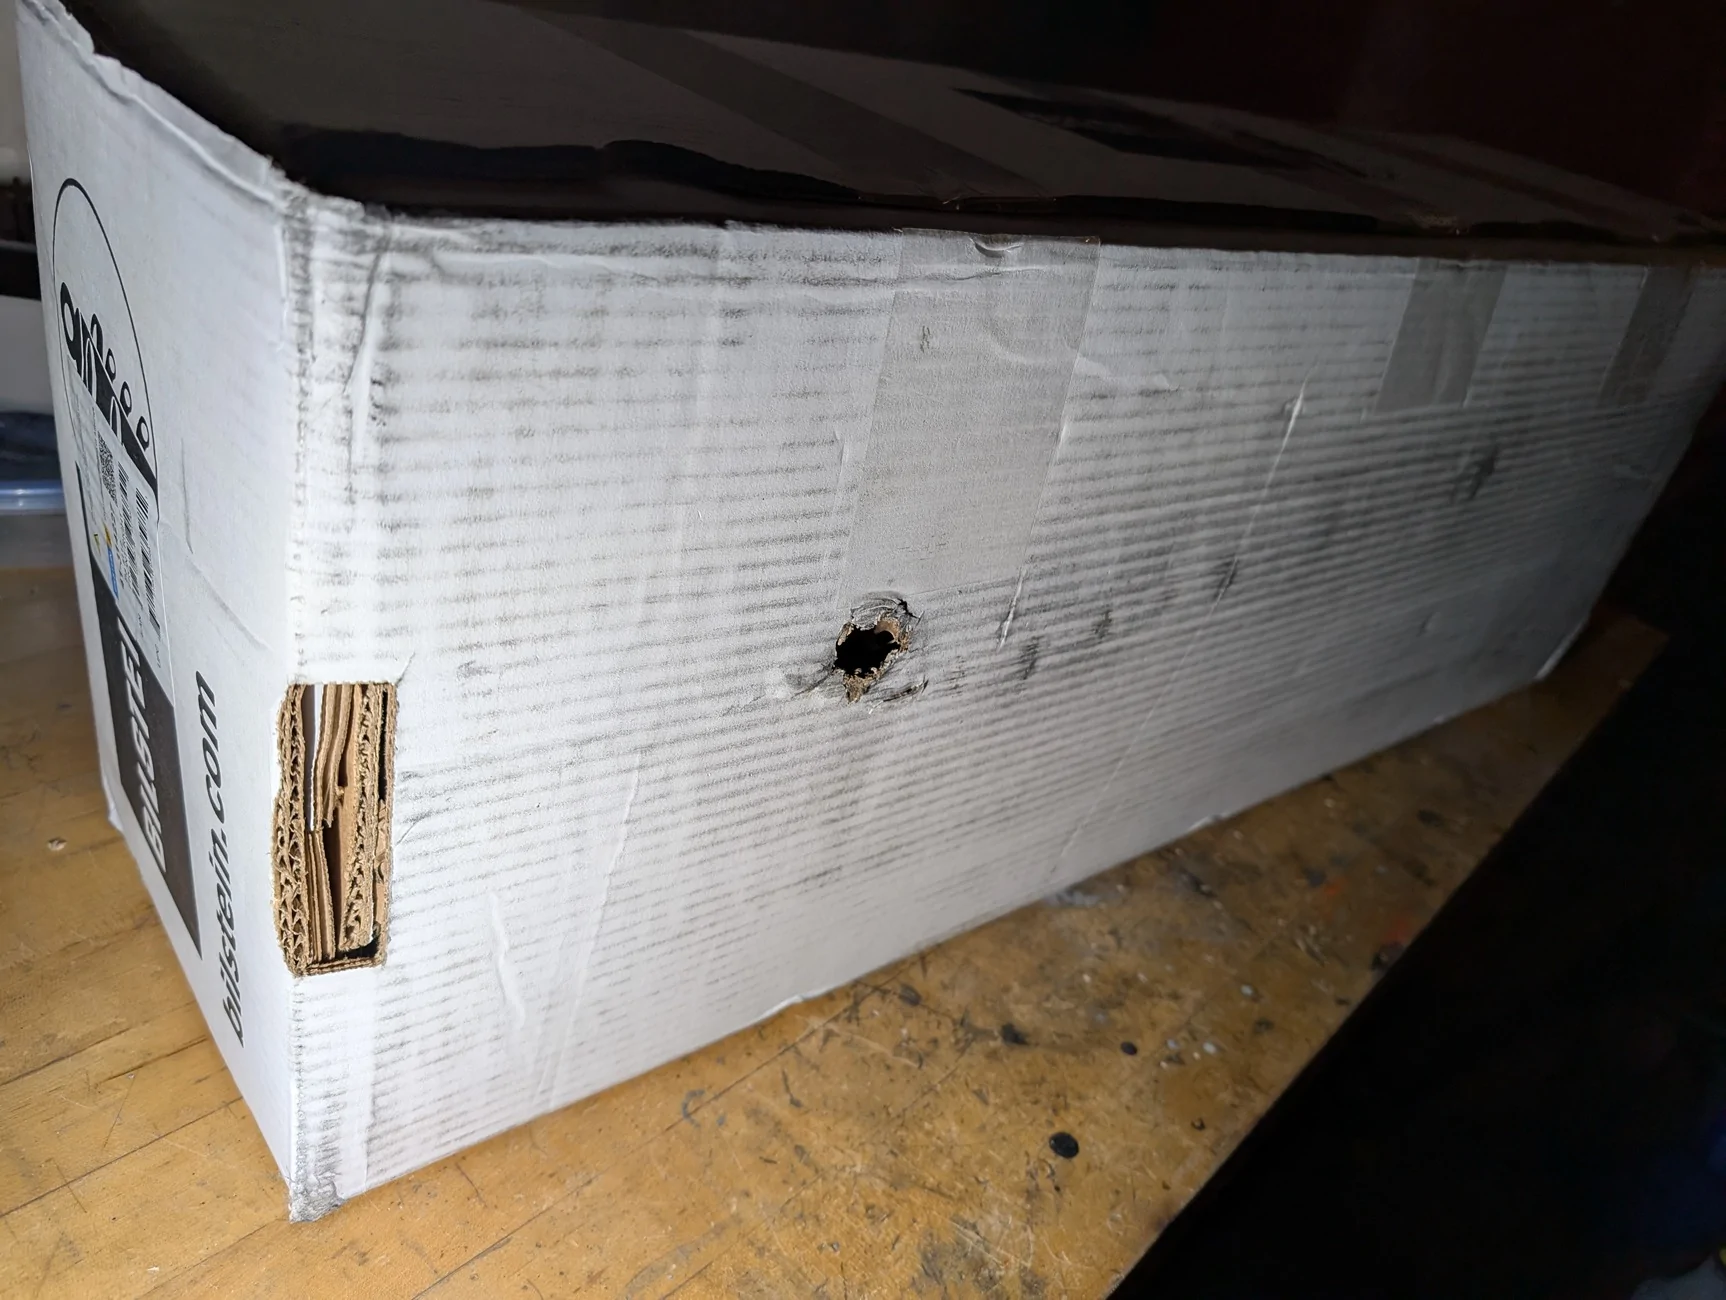
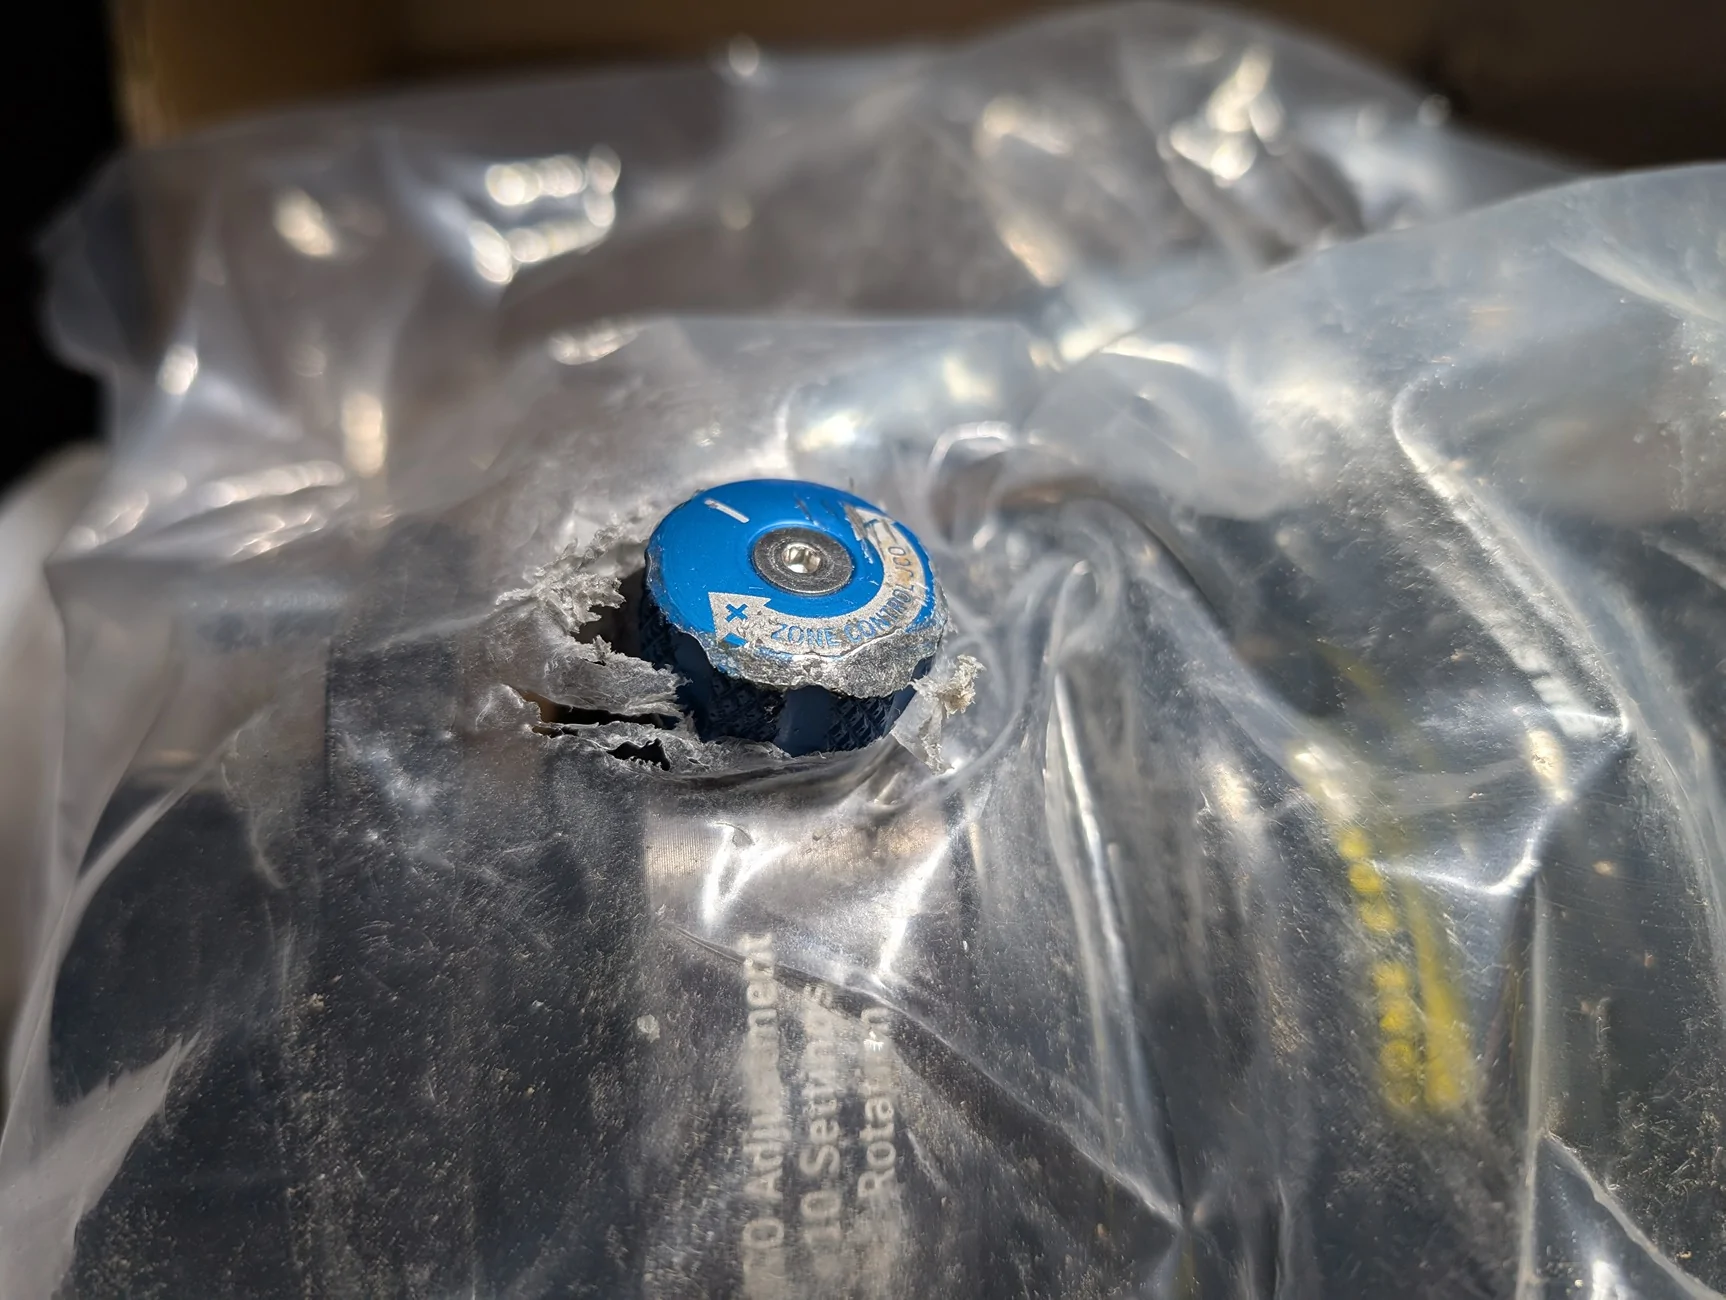
I wish I could say that everything went smoothly with Bilstein but there was no such luck. Even though these are a top of the marker product, they inexplicably get shipped in not much more than a box full of carboard peanuts. They also have weird supply chain timelines and get delivered one at a time strung out randomly over months. The first one to arrive was packed with the reservoir arranged differently than the others which allowed it to bang against another component on transit resulting in a chewed up reservoir and adjuster. As evident from this thread, I was taking frequent trips in the Bronco and getting tired of getting damaged thousand dollar products dropped off while I'm off in the middle of nowhere. I asked the retailer to receive the items at their place, inspect it all, pack it more sensibly, then ship it to me all at the same time when complete. They actually agreed on this but this didn't get very far in reality and I still received the rest one at a time, thankfully undamaged. There was still the replacement for the first one though; that one has no packing material on one side and one of the adjuster knobs punched a hole right through the box and had to get replaced a second time. In the end, I had to receive 9 separate shipments over 5 months to get 4 shocks to install.

In the background to all this, I ordered a set of Icon Tubular UCAs from Icon which as far as I could tell, were listed as in stock and ready to ship at the time. After a week of no shipping notifications I called them because I did not want them to arrive while I was away on an upcoming trip. They said they were behind on shipments, it was in the queue and would ship at the end of the week. I asked them to hold the shipment for a few more days after that so I could receive them when I get home again which they agreed to do after checking with the shipping department. After my trip, there was no shipping notification so I called them again to ask them to ship my order and at that point they tell me there was no stock and the next batch was months away. I asked what happened to my parts that were ready to go a week ago and they wouldn't give me a straight answer or admit they sold my parts to someone else. I ended up finding a set at a good price somewhere else which I received in a reasonable time but looking back, I think I should have gotten a different brand after being screwed around with like that.

Ford Bronco Sydney, the Oxford White 2024 2dr Badlands 7MT PXL_20250823_192714060


Ford Bronco Sydney, the Oxford White 2024 2dr Badlands 7MT PXL_20251019_201747147


Ford Bronco Sydney, the Oxford White 2024 2dr Badlands 7MT PXL_20251019_201505865
Sponsored

 
OP
OP

JoHo

Badlands
Well-Known Member
First Name
Joseph
Joined
Aug 25, 2024
Threads
1
Messages
87
Reaction score
179
Location
Colorado
Vehicle(s)
Badlands, 2dr 7MT
Your Bronco Model
Badlands
Bilstein 8112 install

The first part of the install was to decide how much lift I wanted and how to set the preload to achieve that. I did not measure my empty stock build for ride height and actually had not plans to upgrade the HOSS2 suspension package in the initial concept of my build. I could only make guesses about how much the vehicle was sagging due to accessories like the 45lb battery permanently mounted in the back. I ended going for +2.2 inch on the front and +2.5 on the back as far as the instructions are concerned. This was my best guess at what it would take to end up about an inch over a stock Sasquatch and about level. Using the charts, that put me at 0.6 inches of threads showing on the front adjusters and 0.2 inches for the back.

Setting the collars was pretty straightforward but there are 2 things to watch out for. The spring compressors need to be run a little at a time and switch sides often to avoid having the jaws scratch the shock bodies. once the spring is loose, the top and bottom of the shock are easy to rotate relative to each other but you really don't want to mess up the orientation, otherwise it will be really difficult to install later.

Removing the stock front shocks was a real bear. Me and my buddies just couldn't get the LCA down enough the get either the top studs or bottom studs out, even standing on the LCA and bouncing it. we ended up removing the entire sway bar and both LCA to get everything free which was more than I bargained for. The total swap ended up taking most of a day.

After the swap, the total lift was over 3 inches on the front which was absolutely not what I wanted, the CV drives where at a pretty ugly angle, I still had a squat, and I was concerned I was not near the center of the ride zone of the fancy dampers which would mean constantly hitting the RCOs.

The next day I hit one trail in the area with my neighbor who helped with the install. With all the adjustments in the middle, I didn't feel that the setup was significantly smoother but I also figured it could be due to being at the limits of the ride zone and having too much lift. Since I had hardly any appetite at this point for removing sway bars and LCAs again to get the preload readjusted, I tried everything I could think if to get the spring compressed in the car without taking stuff apart. after a couple of unpleasant moments I decided that some of that stuff was too stupid dangerous to make sense and started taking things back apart. Luckily, because the bottom end of the shocks have bolts instead of studs now, the new shocks came out with the LCAs in place and I reduced the front shocks to zero threads showing.

At this point, its winter in Colorado and I won't be doing much off-roading and overlanding for a while. I got an alignment done and even with the damping full open, the setup is certainly no smoother to a game changing level on the road. I can certainly trust the system a little bit when hooning the car into sporty corners but I need to get back onto some forest roads with some tire pressure adjustment before deciding if all this time, effort, and money was worth it.

Ford Bronco Sydney, the Oxford White 2024 2dr Badlands 7MT PXL_20251026_230032595


Ford Bronco Sydney, the Oxford White 2024 2dr Badlands 7MT PXL_20251115_222151214
 
OP
OP

JoHo

Badlands
Well-Known Member
First Name
Joseph
Joined
Aug 25, 2024
Threads
1
Messages
87
Reaction score
179
Location
Colorado
Vehicle(s)
Badlands, 2dr 7MT
Your Bronco Model
Badlands
Today's project : get with the times, 4 tire inflation hose set

I have been resisting the 4-tire inflation hose setup even though I really want the efficiency because of the bulk of all the hoses and fittings associated with them. I decided to piece together a kit using more carefully selected components to make something a little smaller than off the shelf sets on the market. I'm not sure I was able to make it smaller by much but it still fits ok in the same pouch as my old single hose.

inflation time is about 6 minutes to get from 15psi to 40psi and the 4 tires come up very evenly even though there is significant differences in hose length, the gauge also reads spot on with the TPMS when its getting close. The time to inflate with unraveling the hose, connecting, disconnecting, repacking and all the little things is still in the 10-12 minute range which is close to what it was inflating one tire at a time with a single hose except there is less a lot less time spent kneeling or hunched over at each tire to monitor the pressure one at a time.

Ford Bronco Sydney, the Oxford White 2024 2dr Badlands 7MT PXL_20260208_220715182


Ford Bronco Sydney, the Oxford White 2024 2dr Badlands 7MT PXL_20260208_220645851
 

2dork

Badlands
Member
First Name
Zak
Joined
May 5, 2023
Threads
1
Messages
10
Reaction score
29
Location
Denver
Vehicle(s)
2023 Bronco 2-Door
Your Bronco Model
Badlands
Bilstein 8112 install

The first part of the install was to decide how much lift I wanted and how to set the preload to achieve that. I did not measure my empty stock build for ride height and actually had not plans to upgrade the HOSS2 suspension package in the initial concept of my build. I could only make guesses about how much the vehicle was sagging due to accessories like the 45lb battery permanently mounted in the back. I ended going for +2.2 inch on the front and +2.5 on the back as far as the instructions are concerned. This was my best guess at what it would take to end up about an inch over a stock Sasquatch and about level. Using the charts, that put me at 0.6 inches of threads showing on the front adjusters and 0.2 inches for the back.

Setting the collars was pretty straightforward but there are 2 things to watch out for. The spring compressors need to be run a little at a time and switch sides often to avoid having the jaws scratch the shock bodies. once the spring is loose, the top and bottom of the shock are easy to rotate relative to each other but you really don't want to mess up the orientation, otherwise it will be really difficult to install later.

Removing the stock front shocks was a real bear. Me and my buddies just couldn't get the LCA down enough the get either the top studs or bottom studs out, even standing on the LCA and bouncing it. we ended up removing the entire sway bar and both LCA to get everything free which was more than I bargained for. The total swap ended up taking most of a day.

After the swap, the total lift was over 3 inches on the front which was absolutely not what I wanted, the CV drives where at a pretty ugly angle, I still had a squat, and I was concerned I was not near the center of the ride zone of the fancy dampers which would mean constantly hitting the RCOs.

The next day I hit one trail in the area with my neighbor who helped with the install. With all the adjustments in the middle, I didn't feel that the setup was significantly smoother but I also figured it could be due to being at the limits of the ride zone and having too much lift. Since I had hardly any appetite at this point for removing sway bars and LCAs again to get the preload readjusted, I tried everything I could think if to get the spring compressed in the car without taking stuff apart. after a couple of unpleasant moments I decided that some of that stuff was too stupid dangerous to make sense and started taking things back apart. Luckily, because the bottom end of the shocks have bolts instead of studs now, the new shocks came out with the LCAs in place and I reduced the front shocks to zero threads showing.

At this point, its winter in Colorado and I won't be doing much off-roading and overlanding for a while. I got an alignment done and even with the damping full open, the setup is certainly no smoother to a game changing level on the road. I can certainly trust the system a little bit when hooning the car into sporty corners but I need to get back onto some forest roads with some tire pressure adjustment before deciding if all this time, effort, and money was worth it.

PXL_20251026_230032595.webp


PXL_20251115_222151214.webp
CO based as well but now on my 2nd year of ownership with a very similar (heavy 2 door HOSS 2.0 > 8112) transition, just starting from Sasquatch.

I didn't do the UCA's because I was basically looking to be around stock (Sasquatch) or the lower end of the lift spec for the 8112s and figured it was overkill. I also have much more unsprung mass than you with 35x12 Baja Boss A/Ts all around. So, disclaimer, it is possible these differences in setup affect things.

I've gone back and forth on similar feelings to you re: the expense vs. my assumed "now this rides like a dream" reaction. Ultimately, I'm happy with them. I didn't want huge lift (or exploding shocks) and, even though I didn't really get to A/B test them, I hated how the stock shocks were comparatively harsh and rattly unless you really feed it to them on washboards or even just rough roads. Those edges are all definitely sanded down for me with the high speed on the lower side and the super spooky unweighting in the rear I got on panic braking is completely gone.

Where I can tell you that you'll for sure feel a huge improvement is bombing. I know most of our typical CO trails are a bit rocky and windy for that, but late last season I was able to send it like a rally driver on some of the straight high alpine sections of Saints John and on a few desert trips I was able to send it even more (including a few full blown jumps) and it's very clear that they're performing at a high level. Definitely make sure to soften them a bit for rocky slow CO trails and don't make the mistake I made a few times early on by losing track of which way was firm and which way was soft. The range is really high and I actually rattled out several skid plate bolts on an few day overlanding trip near St. Mary's because I had one nearly fully firm and the others soft.

So totally get the apprehension about the cost, but I've come to firmly decide they're not smoke and mirrors or a "luxury product" as I've tried more with them and reflected on my build. They eliminated my sag, won't explode, should last a very long time and give me confidence to brake, accelerate and turn with more zest both on and off road. It's possible they'd feel much smoother day to day for you with more unsprung mass, so maybe wheels, tires and fenders are on your short list of next mods. Note, I get like 15 MPG with my current setup though.

Ford Bronco Sydney, the Oxford White 2024 2dr Badlands 7MT 1770993993140-h5


Ford Bronco Sydney, the Oxford White 2024 2dr Badlands 7MT 1770993951140-qn
 
OP
OP

JoHo

Badlands
Well-Known Member
First Name
Joseph
Joined
Aug 25, 2024
Threads
1
Messages
87
Reaction score
179
Location
Colorado
Vehicle(s)
Badlands, 2dr 7MT
Your Bronco Model
Badlands
Did a little baby mod today. I got some 2mm aramid braid for a different project. While I was splicing stuff, I put a tether on my key. the end loop is big enough to pass the fob through so I can secure it onto belts or belt loops.

Ford Bronco Sydney, the Oxford White 2024 2dr Badlands 7MT PXL_20260222_211805936
 

Sponsored
OP
OP

JoHo

Badlands
Well-Known Member
First Name
Joseph
Joined
Aug 25, 2024
Threads
1
Messages
87
Reaction score
179
Location
Colorado
Vehicle(s)
Badlands, 2dr 7MT
Your Bronco Model
Badlands
Ski Season seems to be pretty much over so I'm starting on my springtime 'renovations' in the Bronco. The 2 big tasks are to improve cooling for the inverter under the cargo area and to trade off the rear seats for more organized packing in the back row. I planned multi-faceted solutions for each so it a matter of execution now but both are also going to be another big push to complete.

To start, I am taking away a major heat source at the inverter by ordering a muffler delete pipe since the stock muffler is right under the compartment. If that ends up being too loud, then I'll have to do a full cat-back system that has a mid mounted muffler. Additionally I plan to install a circulation system consisting of a filtered intake louver, exhaust blower, and temperature controlled switch.

For the back row organization, I actually ordered a Bison attic rack a year ago but didn't realize when ordering late at night that it would ruin the usability of the rear seats. I have been debating between a full rear seat delete or not an finally decided and took out the rear seats. I plan to make a plywood insert for the floor and ordered some L-track to install on it. The attic rack will then go above it.

both groups of mods involve pulling out the battery and cargo area installation which is a big hassle but it gives me a chance to inspect under the covers to see how things are holding up. It was dustier that I expected but I didn't find any concerning chafing in the wiring so its mostly awesome. I will put some weather stripping around the inverter compartment so all the airflow will get drawn in through the new filter. I'll also be installing a Victron smart shunt in there because the LiTime BMS android app is so awful.

Besides all that, I have added a whole bunch to my recovery gear. After being stuck for hours on a group trip with half a dozen folks running around to help and doing a winch pull from the back, I decided that I should have the capability to winch backwards if I'm going to run around solo the way I like to do most of the time. That is actually a lot of stuff to set up; 4 pulleys, 5 shackles, 3-4 tree straps/slings, and realistically an extension would likely be needed as well.

Ford Bronco Sydney, the Oxford White 2024 2dr Badlands 7MT PXL_20260322_002818046


Ford Bronco Sydney, the Oxford White 2024 2dr Badlands 7MT PXL_20260322_211143232.MP


Ford Bronco Sydney, the Oxford White 2024 2dr Badlands 7MT 1774323923035-d7


Ford Bronco Sydney, the Oxford White 2024 2dr Badlands 7MT PXL_20260322_012513141
 
OP
OP

JoHo

Badlands
Well-Known Member
First Name
Joseph
Joined
Aug 25, 2024
Threads
1
Messages
87
Reaction score
179
Location
Colorado
Vehicle(s)
Badlands, 2dr 7MT
Your Bronco Model
Badlands
I completed removing the rear seatbelts which involved loosening the huge interior side panels back there. While I had that open, I ran an additional network cable from the glovebox to the cargo area. When I swapped the radio, I put a network splitter on the control head cable so I could add this capability down the line. This will allow me to grab the control head and mic from the front and fire it up at the tailgate in the back. From other posts, I got that the seatbelt reels need to be replaced with 2.4 Ohm resistors to stop an airbag fault. A single resistor would be pretty delicate so I twisted together 2x 4.7 Ohm resistors for each side made little plugs out of them.

Construction of the load floor for the rear seat area is moving along. it was hard to get the hole locations accurately for the cargo area by just measuring so for this round I made the riders as separate pieces and put the over the studs in the back. I drilled undersize holes on the platform, large enough to look through and drop a router bit through, then lined it all up. With the placement set, I put glue between the risers and the floor and then shot nails though to lock the locations. then removed the hole thing to put screws in before letting the glue dry. The large holes in the riser blocks was used to guide a router bit to open up the undersized hole to match.

Knowing that installing the Bison Gear attic shelf will also block the rear view mirror, I also got a Wolfbox Tripro to install at the same time. Annoyingly, it comes has 4 separate cables going to the mirror instead of a single cable to a distribution box that would be hidden away somewhere else. I tried to combine the wires as best as I could so it doesn't end up as a rat's net right in front of my face every time I go for a drive.

Ford Bronco Sydney, the Oxford White 2024 2dr Badlands 7MT PXL_20260328_003001724


Ford Bronco Sydney, the Oxford White 2024 2dr Badlands 7MT PXL_20260328_003805410


Ford Bronco Sydney, the Oxford White 2024 2dr Badlands 7MT PXL_20260325_023835545


Ford Bronco Sydney, the Oxford White 2024 2dr Badlands 7MT PXL_20260329_224817191


Ford Bronco Sydney, the Oxford White 2024 2dr Badlands 7MT PXL_20260329_211527514


Ford Bronco Sydney, the Oxford White 2024 2dr Badlands 7MT PXL_20260329_212125804
 
OP
OP

JoHo

Badlands
Well-Known Member
First Name
Joseph
Joined
Aug 25, 2024
Threads
1
Messages
87
Reaction score
179
Location
Colorado
Vehicle(s)
Badlands, 2dr 7MT
Your Bronco Model
Badlands
Spent my whole Easter weekend making stuff happen in and out of the garage. Big milestones include getting the vent holes cut for the inverter, urethane coating the rear seat platform and touching up the rear cargo structure, wiring the Wolfbox Tripro, and installing the Bison Gear attic shelf.

When I designed the cargo area structure around the Iceco APL21, I didn't think I would bring much frozen stuff but since starting to the use the air fryer, that has turned into mostly frozen stuff but I still want things like butter, eggs, and yogurt. Last year, I tried a few trips where I split the difference where the stuff that was frozen wasn't always frozen solid and just figured it wouldn't go bad in a week. At the same time, I still occasionally got rock hard yogurt so I think the single zone fridge was a mistake. Unfortunately, the space is an inch too narrow for the APL35 and very nearly every dual zone fridge I could search up was even larger. I did find a few options to fit the footprint I had but they where from less reputable brands I don't want to let go of my Iceco and replace it with some white label thing. Instead I ordered a cheaper 10qt frige to use in tandem and installed another 12V plug on one of my custom platform brackets for the second row where the smaller fridge will be tied down on the new platform.

Ford Bronco Sydney, the Oxford White 2024 2dr Badlands 7MT PXL_20260404_013445315


Ford Bronco Sydney, the Oxford White 2024 2dr Badlands 7MT PXL_20260404_021302094


Ford Bronco Sydney, the Oxford White 2024 2dr Badlands 7MT PXL_20260404_205546605


Ford Bronco Sydney, the Oxford White 2024 2dr Badlands 7MT PXL_20260405_162350332.MP


Ford Bronco Sydney, the Oxford White 2024 2dr Badlands 7MT PXL_20260405_173321242


Ford Bronco Sydney, the Oxford White 2024 2dr Badlands 7MT PXL_20260405_224007252


Ford Bronco Sydney, the Oxford White 2024 2dr Badlands 7MT PXL_20260405_141248627


Ford Bronco Sydney, the Oxford White 2024 2dr Badlands 7MT PXL_20260406_004335719
 
Last edited:
OP
OP

JoHo

Badlands
Well-Known Member
First Name
Joseph
Joined
Aug 25, 2024
Threads
1
Messages
87
Reaction score
179
Location
Colorado
Vehicle(s)
Badlands, 2dr 7MT
Your Bronco Model
Badlands
Spring renovations are wrapping up, thank goodness!

The ventilation fan for the electronics bay got fully assembled with foam filter media in the inlet louver and a stainless steel mech screen in the outlet duct. I put the outlet duct on the fan inlet temporarily and confirmed that it pulls a good amount of air through the filter foam. The perimeter of the bay has a foam surround to prevent bypassing the filter. The fan is hooked up to a temperature controller that came with some awful wiring that we near impossible to put connectors on so I ended up popping it open and soldering my own wire to the board. I added 2 wired to the harness that had the timer circuit for the faucet pump, 1 to power the temp controller whenever the vehicle is parked and another that is in parallel with the pump power. I changed the pump timeout from 30 sec to 2.5 hours as well. I think for mid summer weather, I will run it on the timer so it doesn't just start circulating hot air for no benefit if the car is simply parked in the sun.

Inside the bay, a Victron smart shunt was added which also required redoing half of the 2 AWG wiring for the battery. The temperature monitor that is available for the shunt is connected to the inverter power terminal instead of the battery since I am much more curious about that than the battery.

The wolfbox camera bounded to the attic shelf was too low to have a sufficient view over the brake light so I relocated up to the roll bar. The wolfbox is also powered from the auxiliary battery so the parking mode time lapse is not pulling power from the starter battery like a typical installation.

there was some small changes to the water line as well to connect to the water bags more securely and have an easy place to disconnect the last section to get it out if the way. It was difficult to install screws from the bottom of the rear seat platform to secure it to the custom brackets but the holes are threaded all the way through so I installed long set screws from the top and put nuts on the bottom.

Ford Bronco Sydney, the Oxford White 2024 2dr Badlands 7MT PXL_20260410_234521336.MP


Ford Bronco Sydney, the Oxford White 2024 2dr Badlands 7MT PXL_20260411_005005206


Ford Bronco Sydney, the Oxford White 2024 2dr Badlands 7MT PXL_20260411_232936226


Ford Bronco Sydney, the Oxford White 2024 2dr Badlands 7MT PXL_20260412_002509293


Ford Bronco Sydney, the Oxford White 2024 2dr Badlands 7MT PXL_20260412_002526511


Ford Bronco Sydney, the Oxford White 2024 2dr Badlands 7MT PXL_20260412_013727089


Ford Bronco Sydney, the Oxford White 2024 2dr Badlands 7MT PXL_20260411_230832395.MP
 
Last edited:
OP
OP

JoHo

Badlands
Well-Known Member
First Name
Joseph
Joined
Aug 25, 2024
Threads
1
Messages
87
Reaction score
179
Location
Colorado
Vehicle(s)
Badlands, 2dr 7MT
Your Bronco Model
Badlands
Previously I put most of my kitchen stuff in a large gym bag and stacked it on top of my fridge and there was a couple annoying issues with that setup. First is that it slides around on the fridge even with a bungee net over it and now with the rear seat removed it could just slide off the fridge all together. Second is that in wet weather I don't want to put a big fabric bag in a puddle or out in the rain but I need to put it somewhere to get access to the fridge.

The solution is that my 3 piece Stoke Voltaics kit and small air fryer fit nicely in a Pelican V550 and with that in mind I made an interface plate that fits snug on top of the fridge and grabs the case so it can't slide around. The same bungee net over the top will keep it from popping out of the interface.

The crack on the top of the air fryer was because the old gym bag slid and fell off the fridge and then out of the car when moving some other cargo around. The new second fridge is also visible in one of the pictures.

Ford Bronco Sydney, the Oxford White 2024 2dr Badlands 7MT PXL_20260429_005427728


Ford Bronco Sydney, the Oxford White 2024 2dr Badlands 7MT PXL_20260429_005440855


Ford Bronco Sydney, the Oxford White 2024 2dr Badlands 7MT PXL_20260429_005506606


Ford Bronco Sydney, the Oxford White 2024 2dr Badlands 7MT PXL_20260429_022701712.MP
 
Last edited:
OP
OP

JoHo

Badlands
Well-Known Member
First Name
Joseph
Joined
Aug 25, 2024
Threads
1
Messages
87
Reaction score
179
Location
Colorado
Vehicle(s)
Badlands, 2dr 7MT
Your Bronco Model
Badlands
I set out on a big spring trip through parts of NM, AZ, and UT with dozens of day hikes and points of interest to hit over 10 days. I pack both the fridge and freezer full of food and loaded up 2 more 5 gallon totes with food before heading out. With clothes for multiple climates, my usual comprehensive photo gear set, and equipment for a night of backpacking, it was a very full little 2 door. Unfortunately, around the middle of the trip, the nut on the long bolt for the driver side UCA spun loose and fell away along with one of the poly bushings. After the suspension swap, this was a bolt that was loose after a few hundred miles when I rechecked all the fasteners I could reach. After re-torquing both sides as tight as I could with a pair of wrenches, they have seemed fine for thousands of miles. I had reinspected them both a different time when something felt wrong as well but they where both secure so I considered the issue resolved. On this trip, I drove dozens of miles of nasty washboard roads to get in and out of the Cutler Point trailhead and then a few says later I was 30 miles down another washboard road when I just knew something went wrong. I got out and found that the nut was totally gone and so was the bushing, the long bolt was slid back and against the steering shaft. At this point I knew I had an ordeal ahead of me and got back in the car to drink some water and get sunscreen on. I looked through my bag of spares and the nuts in there were too small to fit and even a Lugnut from the spare was too small. Since the bolt holds only shear and no tension, I decided I just needed to keep the bolt out of the steering system to get it back to town. Based on that, I wrapped a compound constrictor knot around the threads with nylon cord and made it super tight by looping another cord through the connected free ends and yanking it all tight with a mini sledge hammer. The longer loop was then removed and used to wrap around the head of the bolt on the other side as a backup. I then turned it around and drove back towards the highway slowly enough to make a legitimate effort to look for my lost parts along the way. 8 miles from the highway, there was another trailhead parking area with some cell service so I stopped to make some calls. The closest reasonable dealer was in Moab over 200 miles away, they did not have the nut and said I just missed being able to order it for the next day. I called a Blue Forge Offroad (formerly Epic Broncos) all the way back in Denver and they had a set of the same UCAs with all the bushings and hardware as takeoffs but that was basically at home over 500 miles away. I called the only mechanic in Escalante and asked if they had any 14mm nut, even a used one, and they immediately said no, they only have standard hardware. There was a Napa auto on google with no phone number so I decided to head there which was an 8 mile backtrack on the highway after finishing the last 8 miles of dirt road and airing back up only to find out that the Napa listing was the exact same place as the shop I called under a different name. After that, I went to the hardware store in town and found a new 14mm nyloc and washer for less than $2. At that point I was able to cut the cordage off and tighten up the bolt into real metal hardware. Even though I was still missing 1 of the 4 bushings, the bolt tightened up, took out the slop, and I was comfortable to drive home on paved roads fairly normally. It was late afternoon at this point, my planned camp in the area was 50 miles down the dirt road I abandoned earlier and another 9 miles past the end of that. My next camp after that was a reserved spot in Capitol Reef NP but wasn’t reserved for that night. I had some other points of interest along the way so I decided to go to those trailheads and asses of they where good for camping which they were not for various reasons but I did find a forest service side road with some dispersed camping spots so I stopped there for the night to rest. I had the option to take long drive home in one shot the next day but there was a spring snow storm coming down over the front range so it didn’t make much sense to go for it. Instead, I drove to Island in the Sky and got one of the last 2 sites in the Willow Flats campground but not before loosing the nut and bushing off the other side with hardly any offroading. I stopped by a recovery/repair shop that also denied having any metric hardware but let me look though their box of randoms where I found another 14mm nyloc on the first try and fixed the other side the same way as the first. After exploring Island in the Sky a good amount, I then drove home fairly with no further troubles finishing the trip with 1783 miles over 6 days of a planned 10. The next morning, I drove to Blue Forge where Wesley unmounted my UCAs, cleaned everything out, regreased it with the replacement parts he had on hand and torqued it back together to spec. overall, I still got to see and shoot a ton of stuff for a 1 week trip and got through everything mostly unsupported (no tow trucks and stuff like that). The sting was also mellowed out when I noticed I would have had a cloudy morning in Reflection Canyon anyways and rain over the following day would have put some of the points around Cainsville at risk as well. I have all the info I need to get to all those places in a remedial trip later.

[x] Lenhardy Cutoff

[x] Ah Shi Sle Pah Wilderness

[x] Bears Ears National Monument

[x] Monument Valley

[x] Horseshoe Bend

[x] Cutler Point

[x] Bryce Canyon NP

[ ] Reflection Canyon / Golden Cathedral

[ ] Capitol Reef NP

[ ] Factory Butte / Moon Overlook

[x] Island in the Sky, Canyonlands NP

[ ] Coffee Pot Road

Ford Bronco Sydney, the Oxford White 2024 2dr Badlands 7MT PXL_20260501_192416697


Ford Bronco Sydney, the Oxford White 2024 2dr Badlands 7MT PXL_20260501_192433631


Ford Bronco Sydney, the Oxford White 2024 2dr Badlands 7MT PXL_20260503_013651259


Ford Bronco Sydney, the Oxford White 2024 2dr Badlands 7MT PXL_20260504_132924729


Ford Bronco Sydney, the Oxford White 2024 2dr Badlands 7MT PXL_20260504_204508443


Ford Bronco Sydney, the Oxford White 2024 2dr Badlands 7MT PXL_20260505_121916867.MP


Ford Bronco Sydney, the Oxford White 2024 2dr Badlands 7MT PXL_20260505_184313052


Ford Bronco Sydney, the Oxford White 2024 2dr Badlands 7MT PXL_20260506_015211589


Ford Bronco Sydney, the Oxford White 2024 2dr Badlands 7MT PXL_20260507_015751912


Ford Bronco Sydney, the Oxford White 2024 2dr Badlands 7MT PXL_20260507_203331568


Ford Bronco Sydney, the Oxford White 2024 2dr Badlands 7MT web2048_DSC_0178


Ford Bronco Sydney, the Oxford White 2024 2dr Badlands 7MT web2048_DSC_2091


Ford Bronco Sydney, the Oxford White 2024 2dr Badlands 7MT web2048_DSC_2658


Ford Bronco Sydney, the Oxford White 2024 2dr Badlands 7MT web2048_DSC_3163


Ford Bronco Sydney, the Oxford White 2024 2dr Badlands 7MT web2048_DSC_3801


Ford Bronco Sydney, the Oxford White 2024 2dr Badlands 7MT web2048_DSC_3425
Sponsored

 
Last edited:


Top