
- First Name
- Aaron
- Joined
- Jun 1, 2025
- Threads
- 2
- Messages
- 12
- Reaction score
- 36
- Location
- Lowcountry South Carolina
- Vehicle(s)
- 2015 5.0 Mustang Manual
- Your Bronco Model
- Badlands
- Thread starter
- #1
I've seen plenty of simple joining the club bronco posts, but I wanted my post to be more than that. My experence from start to a bit over a month of ownership. I had already been researching this for a while and got a bonus at work so the bronco I ordered came in and I got to work ordering things. I will lay out what I bought and why as well as reviews of my experience interacting with support where I had to. I'll also be referencing the other posts that inspired some of my build and helped me out.
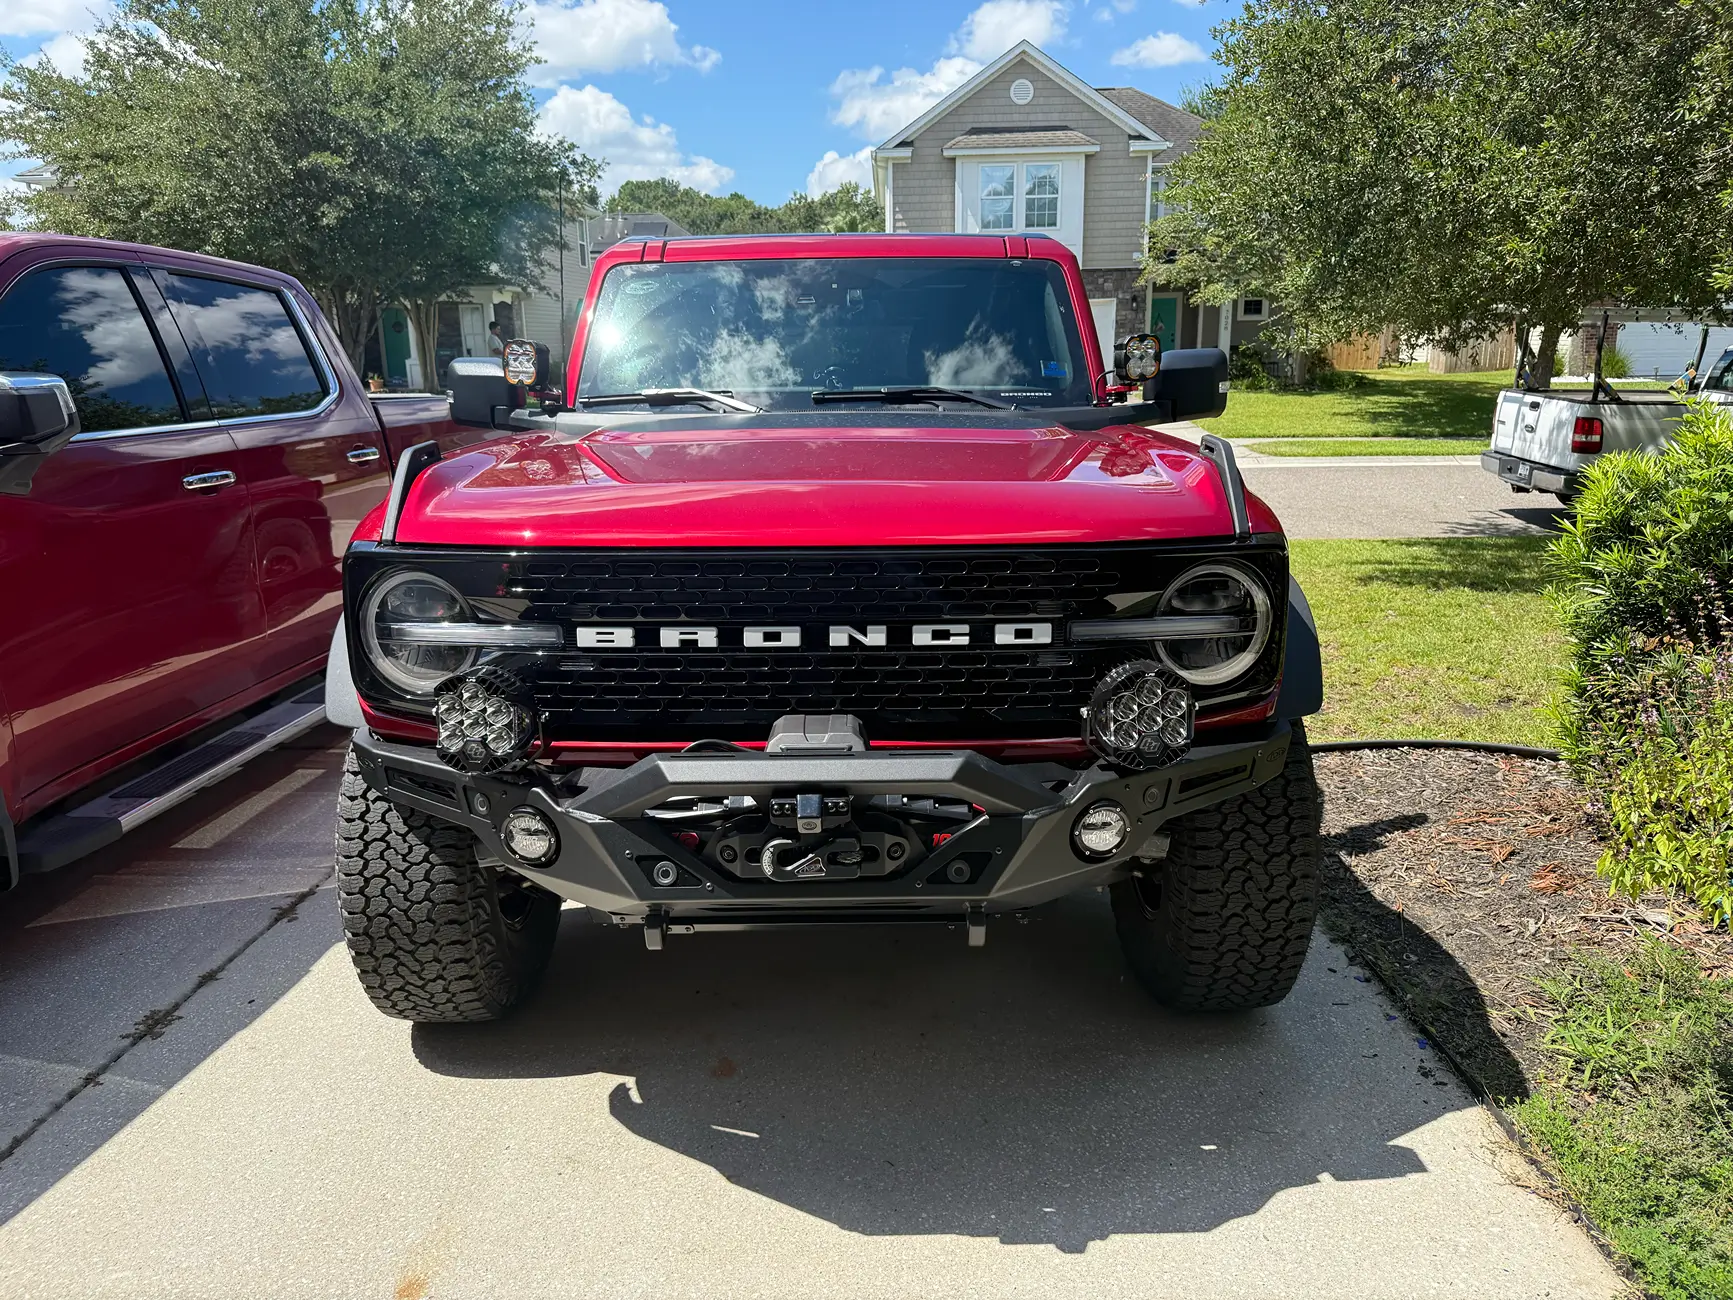
Straight off the bat, I wanted a manual so I had to order. I placed my order for the Badlands with Sasquatch package, most importantly 7MT, and black appearance package. I ordered this trim as I wanted the most offroad capability without going over board from the factory, this seemed like the sweetspot. And you might be asking: If you were looking for offroad capability, why a manual? Because manuals are fun and I am daily driving this, plus the added challenge on the trail has been fun to me... sure, I've stalled a few times as I learn what speeds, etc, work off the road. But back to the ordering summary - shout out Palmetto Bronco, they put no pressure, were easy to work with and pleasant to talk to. First look at this thing was love at first sight, with the slight sadness of realizing there are no rear vents in the manual, I was looking forward to that but not a deal breaker. The screen with an actual tach is appreciated in this year model.

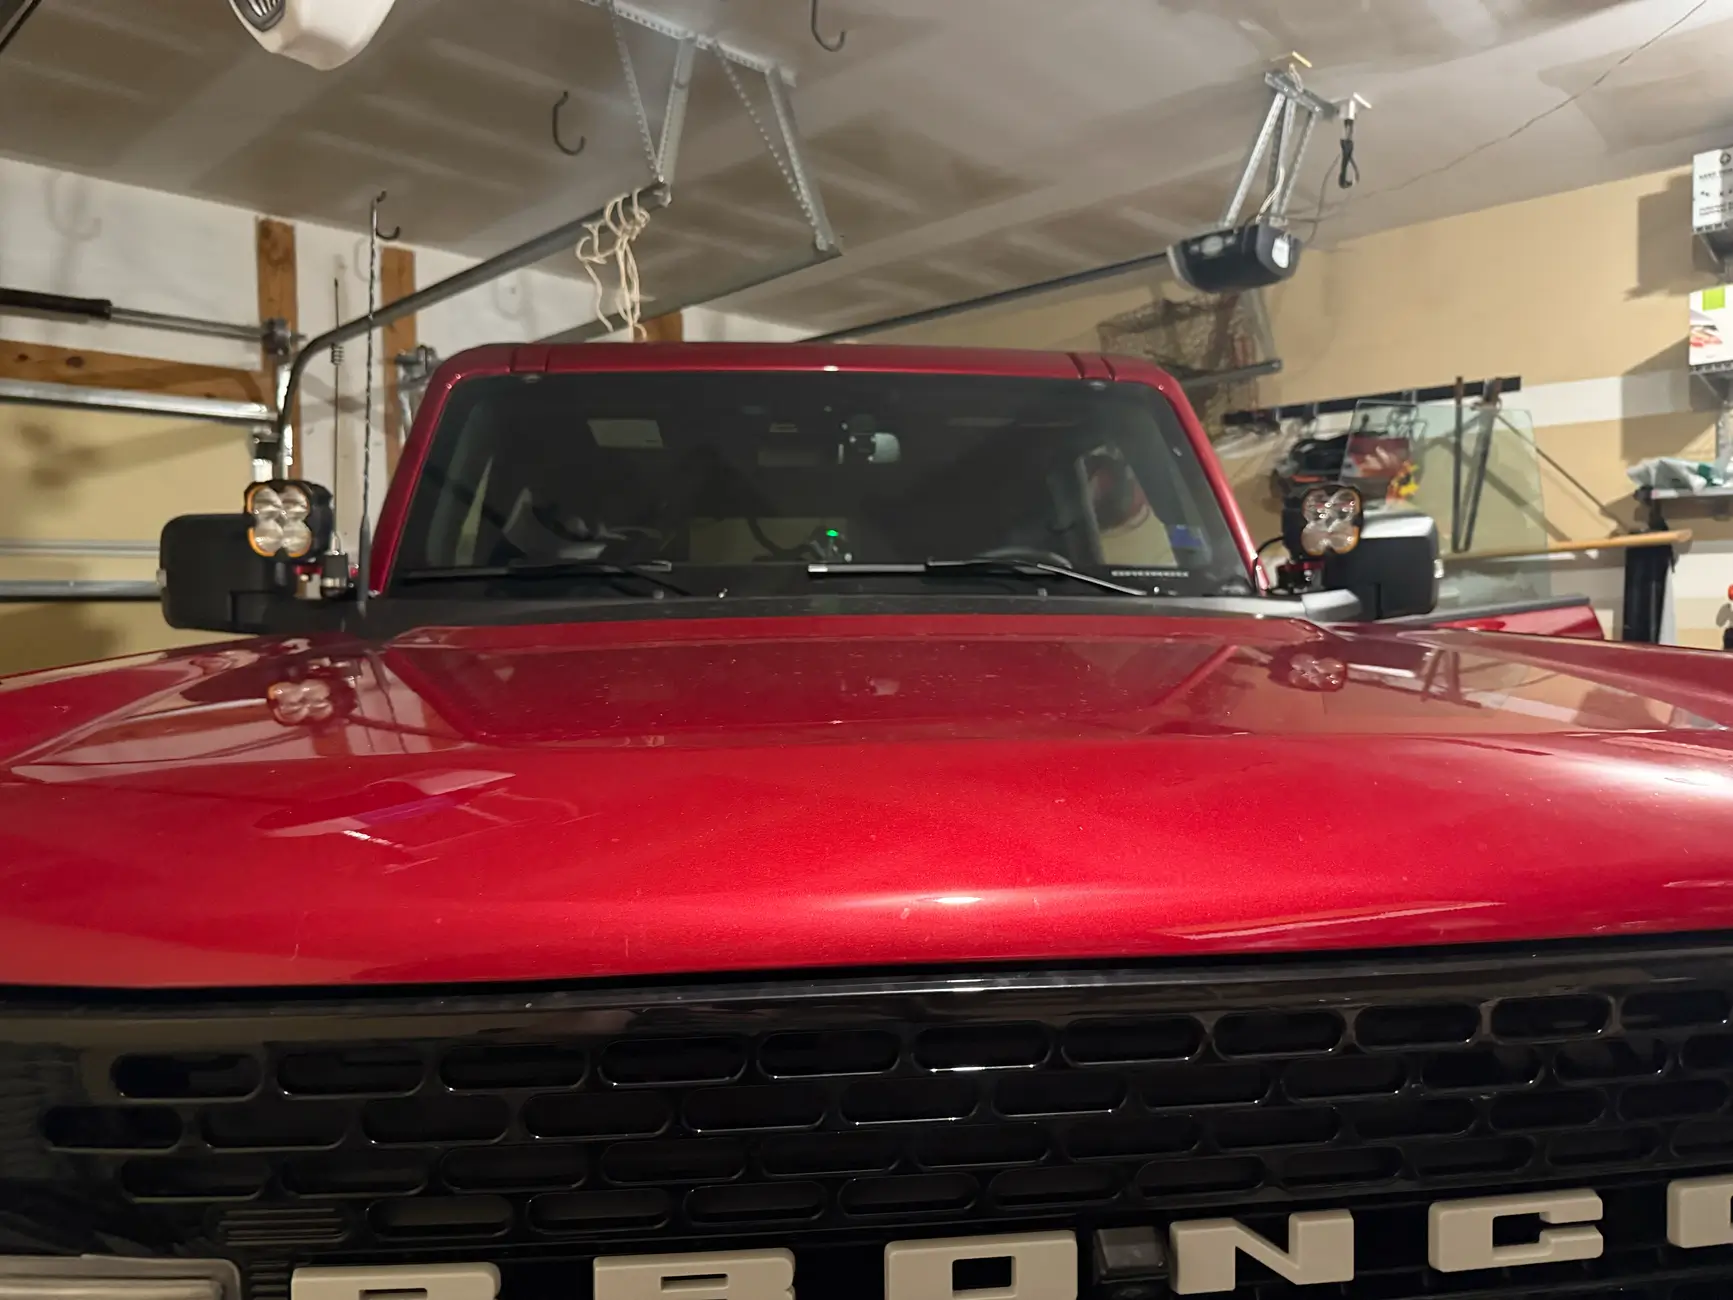
As you may notice here, I have the capable and not the modular bumper, I already knew I wanted to change out the bumper, I didn't really like how any of the winch add on's looked and wanted my own lighting, etc. That will come later in this post.
First thing I did was go test out the off roading in Francis Marion... if any of you are in the Low Country, you know that calling Francis Marion off roading is generous. But this was my first lesson in how badly these tires pick up rocks. I got back on the freeway and heard a few hit the vehicle at speed and it brought me physical pain. @rokblokz oredered. I went with the long at first and then realized I needed the XL with some more research as I have the sasquatch and the long would probably not cut it, contacted support and they got it swapped before it shipped out, nice! Putting them together was a bit of a pain and coming with no instructions for some reason I found the video on assembly online and got to work (which, these are a bit of work to put together). There was a discrepancy about the metal tabs needed, apparently they changed the front bracket design and the video didn't reflect that (maybe the instructions I didn't get would have said something?) - no problem, contacted support and they explained that to me, I switched a few things around and off to the races, I've been super happy since and able to remove them on the trail expensive, but great product that maintain the ease of going on the trail.
When I ordered my decision for hard top came down to all the complaints on noise I saw online, but I knew I wanted to enjoy taking the top off so two main products came into play here. @Rockworkx thumb screws for the top, they've made it super easy and I can take the top off in less than 10 minutes, no problem. I went with their bundle with the straps and they have been nice for holding my recovery rope/air hoses, etc. Bundle here. The second product I knew I had to have was a sunshade, if I'm gonna have the top off, I can't be getting too much sun as a bald man (and in general before the shade came in I'd have really hot seats, etc, the shade made it much better). I went with @JTopsUSA for this, the one other post I made was about trouble contacting them as I got a busy signal and no reply to my text when initially asking about my order after a few weeks (one of the first products I bought and last recieved, but it is a quality USA made item, I realize now they were waiting on a part - a crituqe I'd have here would maybe be some sort of order tracking system so I can at least see it's delayed/being worked on/something). To their credit, as soon as I made that post Mike responded, I got on the phone with him and he personally tracked down what was taking so long, offered me an explanation, and within a couple days had the order out to me, so I'd chalk the first support issue up to a fluke and still recommend them. I watched their install video and got after it, no issues and very much an improvement if you are going to take the top off often.
I also quickly realized that the Bronco being a taller vehicle, would require some steps to make it easier for the wife and other guests to hop in. Similar to my reasoning for the mud flaps, I needed something that could just go on the rock sliders and be taken off as needed for hitting the trail - @Mountains2Metal had the solution to my problem. These steps that go on the rock rail, held on by two screws each, not too hard to wrench off and put back on. Didn't have to contact support, just a good product and I didn't have any issues.
I wanted some easy way to charge my phone, there's no wireless charging in the '25, but I knew I wanted something slick that I could easily toss my iphone with magsafe on and have it charge, didn't really care about a holder, not trying to use the phone itself (apple car play has been great for me so far with no issues, knock on wood). I found this about a pretty low-profile puck that mounted on the dash - as a manual transmission owner, the other solutions I saw would have interfered with the stick. I ordered everything from that post and have been happy with the solution, easy place to toss my phone and doesn't really interfere with view out the windshield.
Early on I knew I wanted some ditch lighting, when doing some research about it I saw this post about the lights hitting the antenna and liked the 4" KC flex's and the badass mounts mentioned there do also give it some extra clearance. I like them. Installing the lights was my first indication of how good of a job Ford did making this the perfect platform to mod and add accessories to, was super easy to wire once I figured out how to do the aux switch wiring - turns out I was way over thinking it, it all runs to the drivers side firewall and simply have to wire ground to body and then positive to whichever wire corresponds with the switch, shoutout to those that posted the wiring diagram. And shout out to KC for making a super easy wiring harness, I simply cut off the part with their switch just under the connector and then wired white to auxiliary 5 (a post online said the pair with the backlights takes 10A) and the red to aux 1 (specs say each pod takes 15A) then black to ground. A little bit of reasearch about aux wiring and the wiring harness took more time than the actual install since I was over thinking it.

As you can see, I initially put my radio antenna by the light with the @Mountains2Metal antenna mount. Quality mount, but I hated the way it worked with the bracket and was kinda forced into the radio antenna so I ended up relocating it, will talk more about that more in a second. I knew I wanted a way to mount a radio as it's something nice to have incase you need it for talking in groups or just want to be able to communicate back with someone else at camp with a handheld, but I don't like the super obvious mounts with the extra molle pannels everywhere, this is a daily driver for me too, so I wanted it out of the way. This post described pretty much exactly what I wanted. Thanks @Jabaen. I wanted to mount the handheld out of the way though as I have a manual like @EveryDayBronco , so I stole their mounting location. Then finally I relocated the antenna to the trailsight with this $30 @TrailRax trail sight mount, works pretty well, I disconnected the trail sight and made a slight notch in it to run the cable out to the hood where it would be protected under the plastic of the trailsight and not get crunched in the hood. My perfect radio install complete... well, sorta, I accidentally mounted the radio the wrong way so the glove box rubs it a bit but since I didn't need to notch it, I'm calling it a win and didn't want to fight it back out. When doing the remote handset, this video made it super easy to pull everything apart!
While I was mounting the remote handset I went ahead and installed a dash cam, I watch Linus Tech Tips on youtube and they have a video comparing cameras, saying people are wasting money. Their suggestion a few years ago was the Viofo a119 V3, I went ahead and got the A119 Mini 2 (basically a newer version with a better camera sensor) and the viofo hardwire kit. Pretty easy to install, I just had some troubles from figuring out fuse taps - If anyone else struggles here let me know and I'll go look at what I ended up doing, but works great after fafing about over a few days with my power wiring.
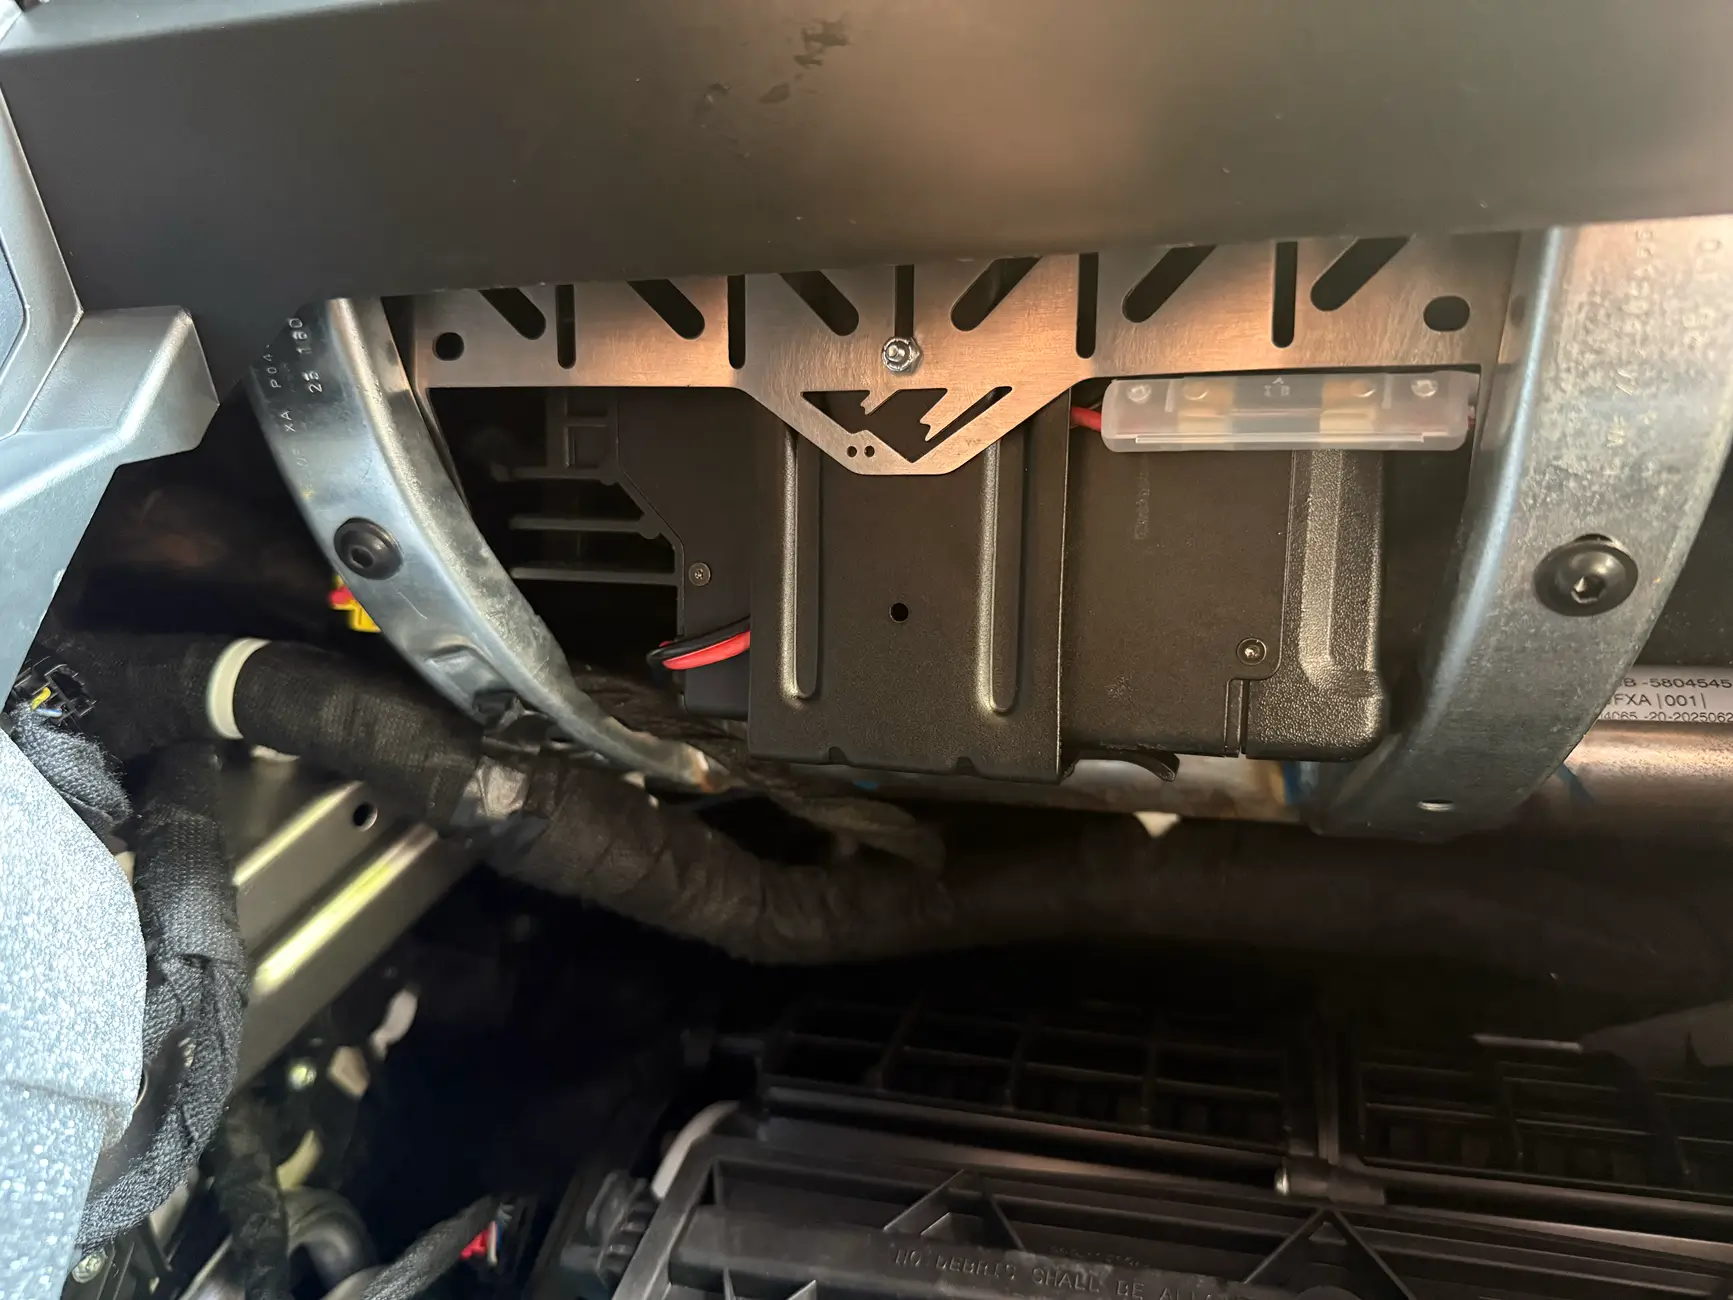
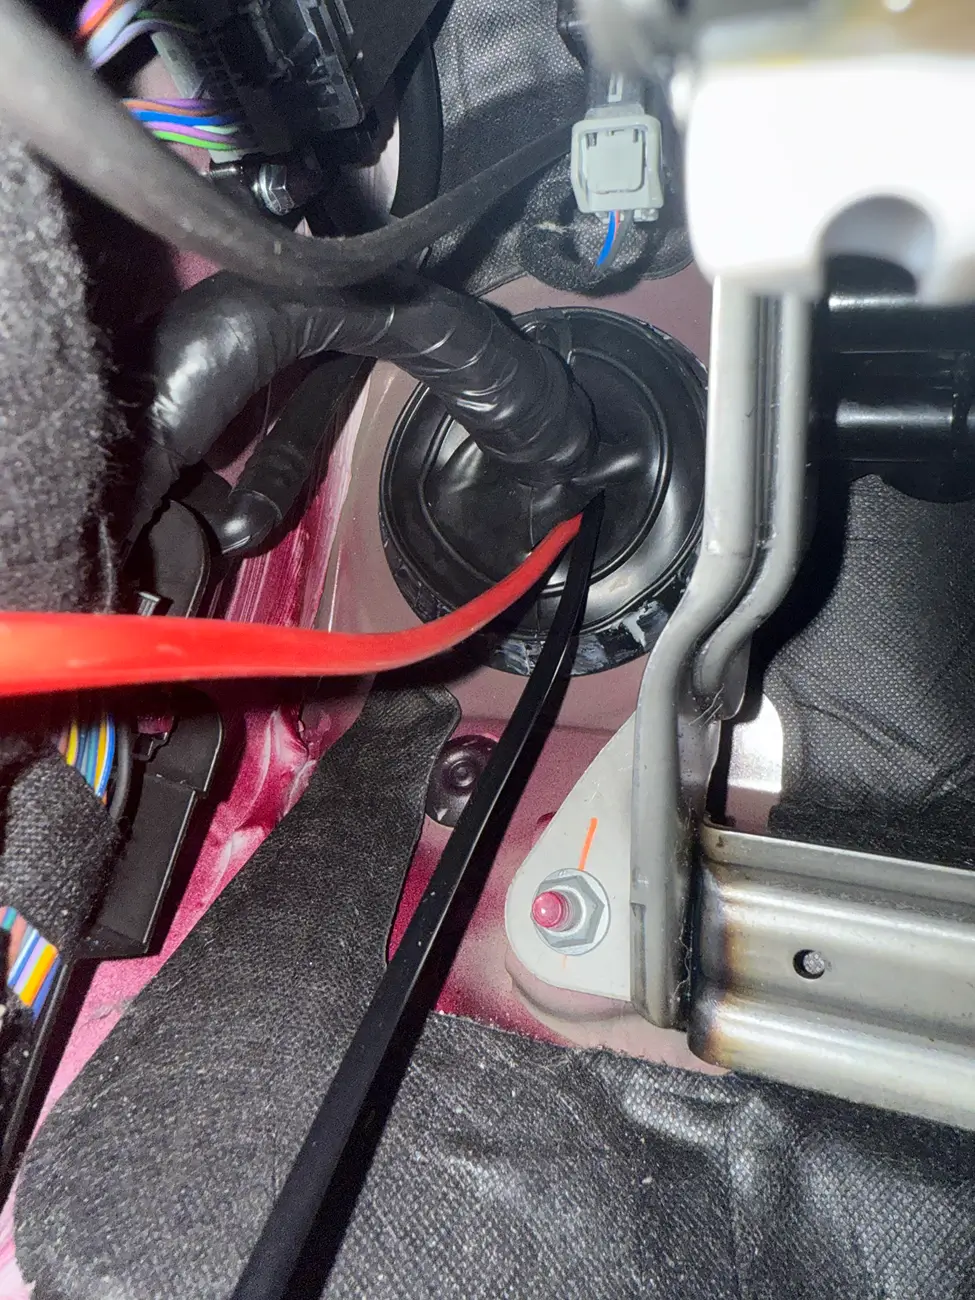
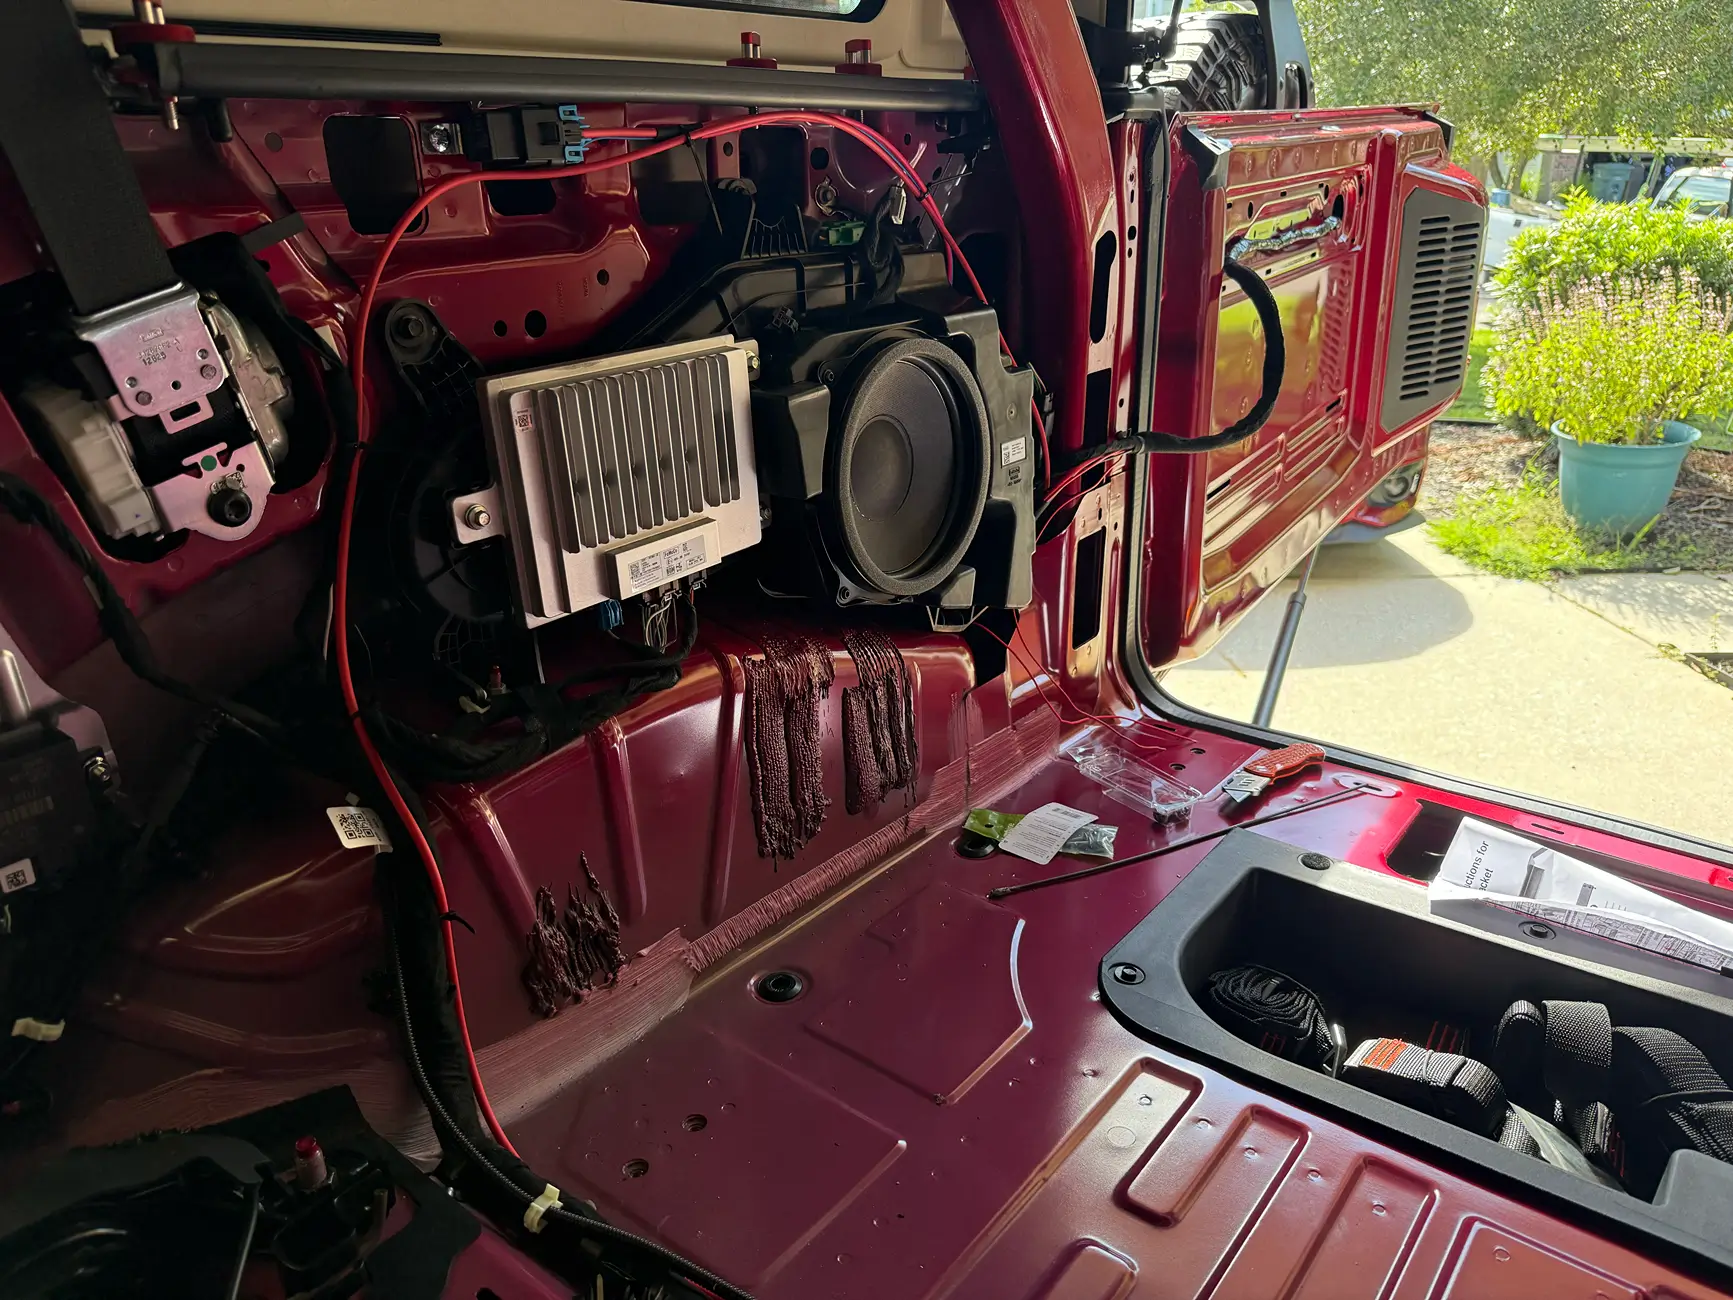
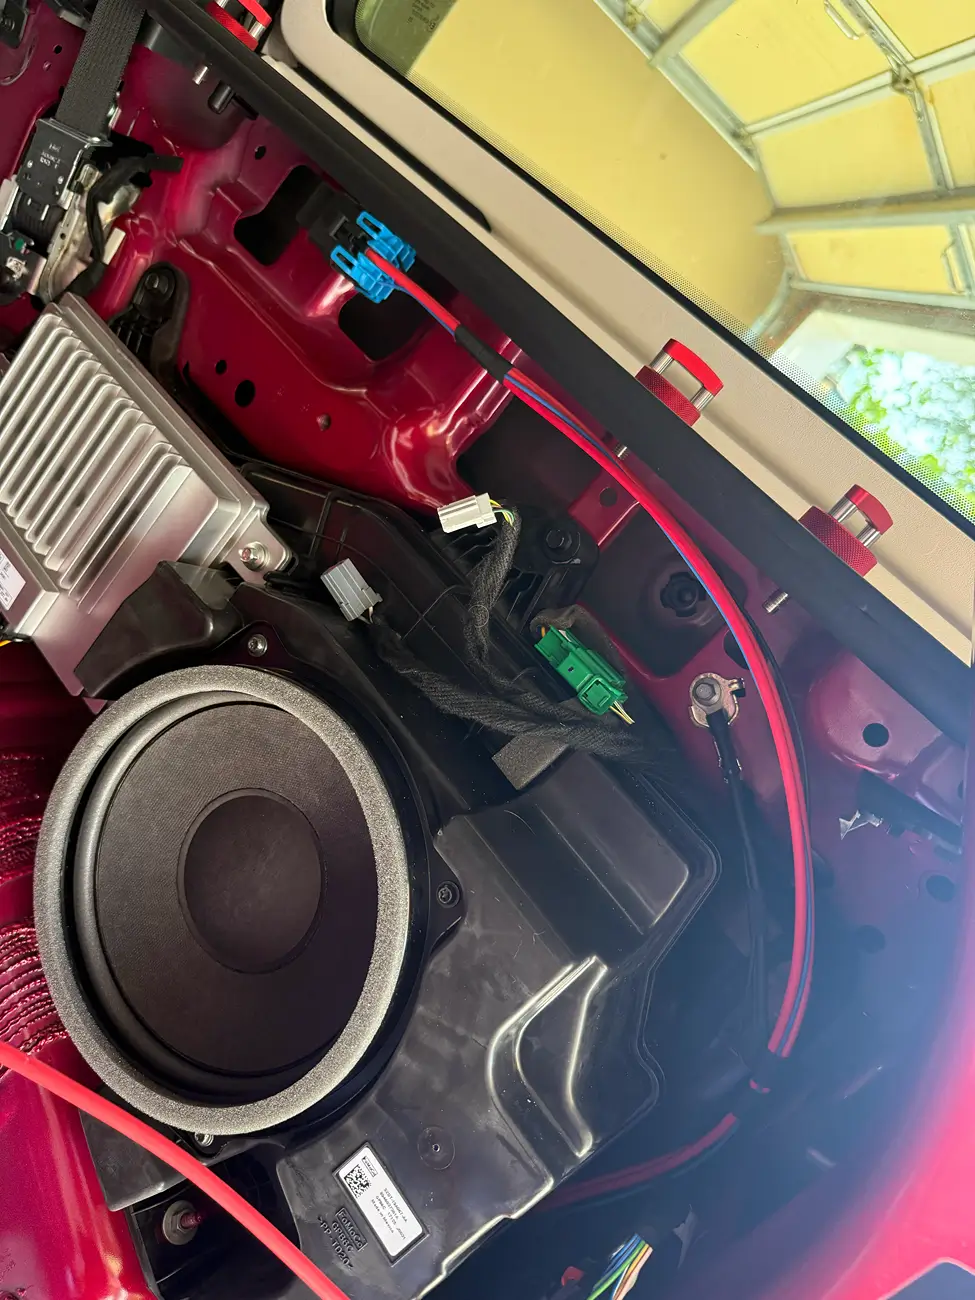
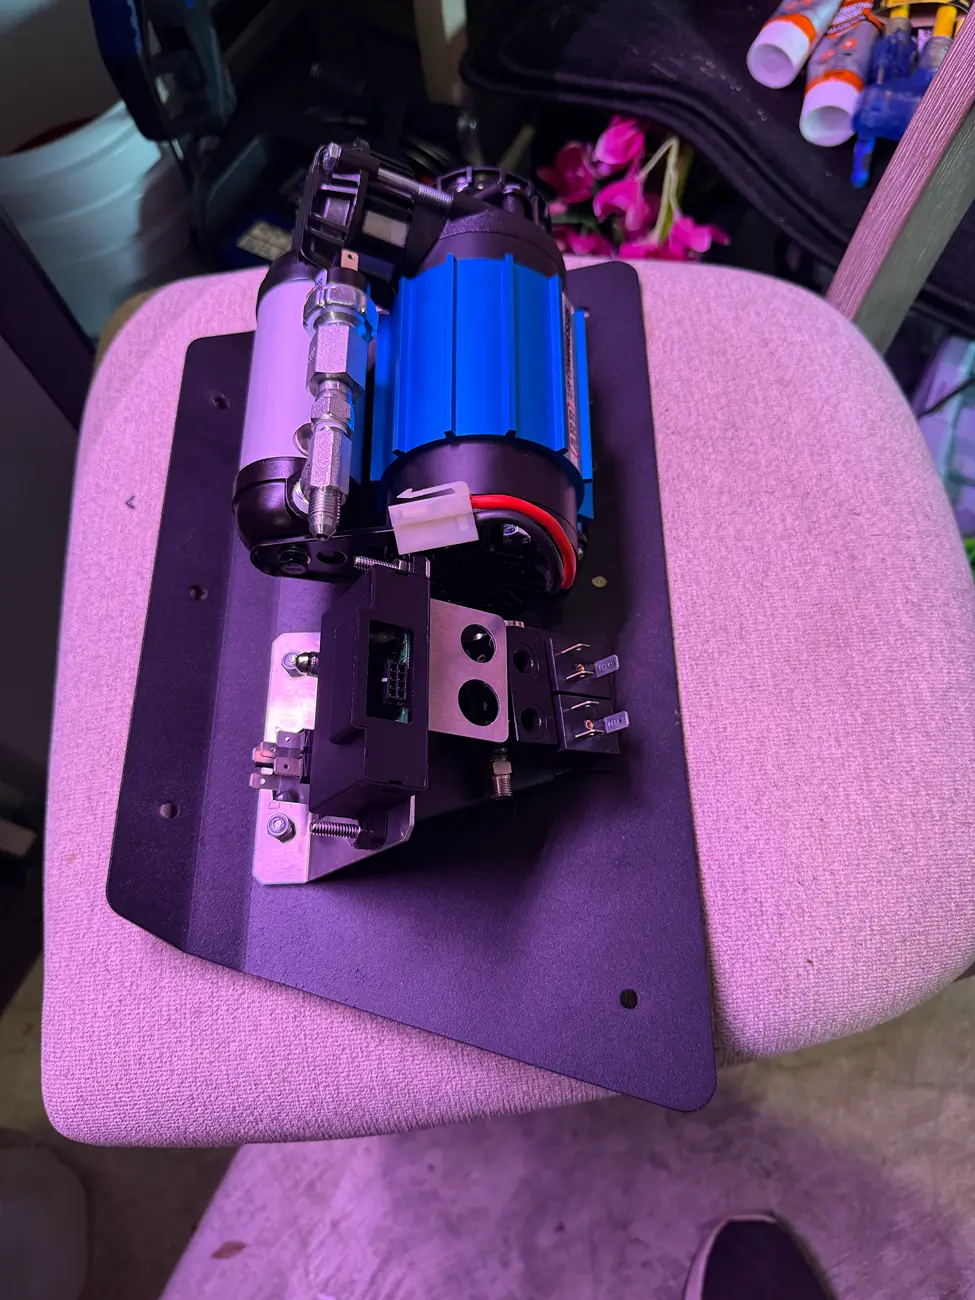
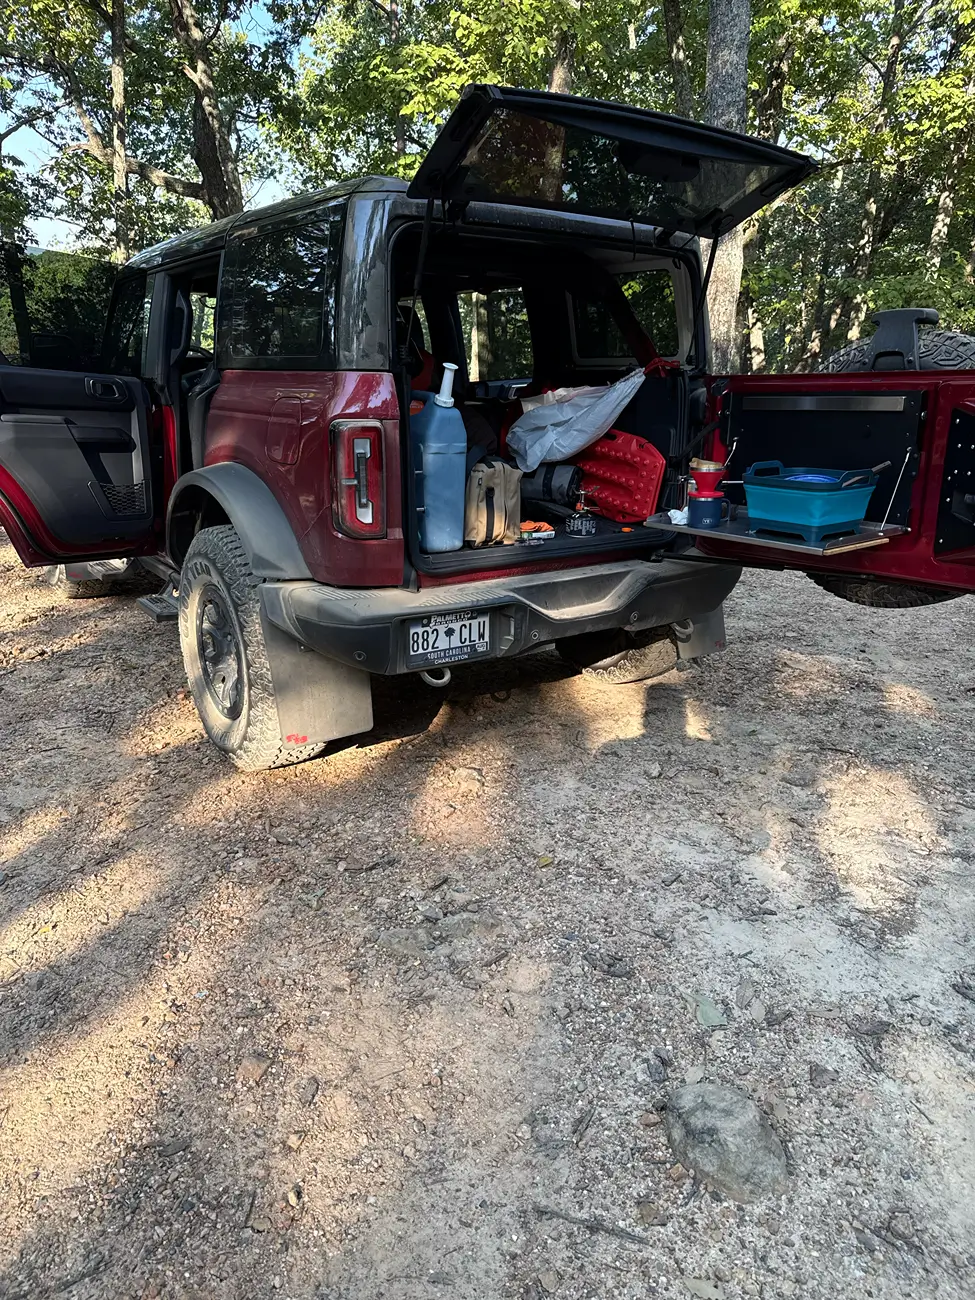
Then I wanted to have an air compressor in the car for airing down/up, I saw a bunch of solutions but the one from American Adventure Lab that sticks it in the tailgate seemed to be the cleanest one and used some otherwise empty space and keeps it clean/out of the way. I oredered everything that goes with the mount and it works well. When it arrived I ended up missing a few hoses and connectors that went with the pressure control module, which was a bummer. I contacted support and they were able to send me the missing pieces. As I did the install I ended up having to take things apart to fix how I did the "key on" wiring as that wasn't very clear in their instructions, this post and looking at the arb schematics helped me make sense of it all (make sure the red wire that is in the right rear pannel on it's own gets connected to something that gets 12v when the car is on, I tapped into the round 12V plug). It also took a good bit of my time looking at the install for the pump and the pressure control module, figuring out what parts I needed and didn't need, etc. Across the board with the missing parts and instructions it feels like AAL was also confused on what all is needed. To be fair they have stated they are updating the instructions due to my experience so hopefully you get the right set of parts/good instructions if you go this route. All that said, the final install is great and I'd do it again. Working all the wires through the wiring loom was a bit of a pain, but trying to tape them all so they were thin as possible and using a little patience worked well. A couple things to note, having the manual I don't get the "wire grommet" a lot of people talk about, as that's where my clutch cable goes, pictured below I just cut through and then electrical taped where the rest of the wires go through (the one with the nipple) for my antenna and the AAL wiring harness. Most of the pannels were easy to get off with a little careful prying, taking the drivers side kick pannel off was a tad tricky though, I found the solution in this post.
Then after getting the wires run to their cavity, I installed the Trailgater. I mostly got it because @RagnarKon spoke highly of it and I'd have to say I agree with him, it's great. Instructions were pretty clear and I haven't had any issues.
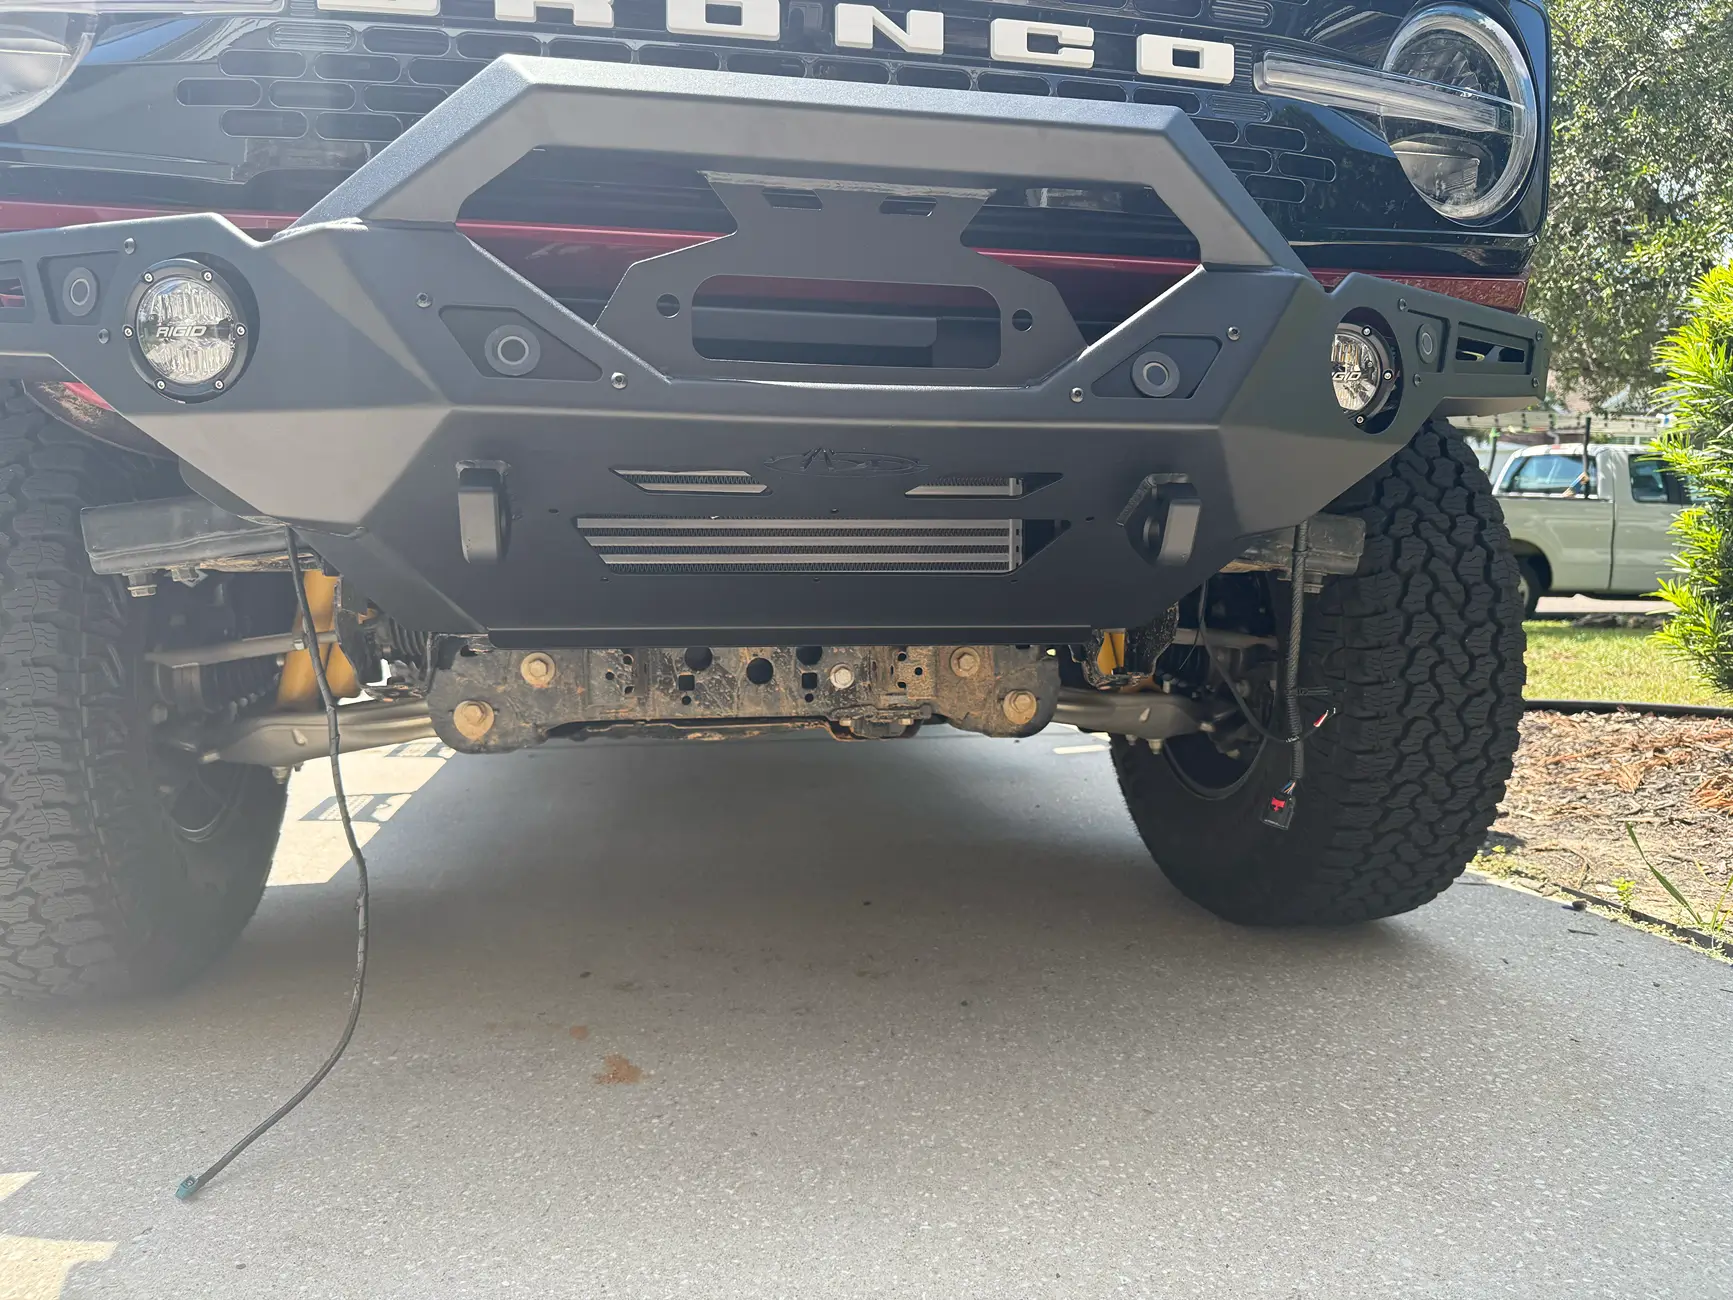
Finally on to the final boss, installing my winch bumper. I decided to go with the ADD Krawler, with the warn Evo 10S (bronco is 6k GVW and I've seen advice to go with 1.5 and the evo seemed to be the reasonable option - chose warn over the other options as people seemed to agree it's reliable), camera relocation bracket, cruise control bracket, skid plate, rigid 360-series 4" side lights, and Bajha Designs LP6 Pro Spot wing lights. Overall, very impressed with this bumper, instructions were mostly good with a couple exceptions 1 - tells you to use bolts from a previous step when installing the main bumper and the same bolts are said to be needed to install the skid plate, I'm working to find the right skid plate bolts to order a couple more and 2 - the camera relocation had no instructions, so I had to use chatgpt to find them. I also had the plate that covers the hole on the bottom over the intercooler missing, I contacted support and they got that sent out to me pretty quickly. The rigid 360-series 4" lights were pretty straightforward to install and came with a harness not quite as nice as the one from KC, but I had no issues. When it came time to install the Bajha designs LP6 Pro, I got a surprise, there was no wiring harness, they just give you a connector and tell you good luck. No problem, I had the wife run by the hardware store and get the gauge of wire suggested... in case anyone else was wondering, they don't give you a good diagram of how to assemble, the wiring/connector pins go through the rubber part and then the plastic part goes into the light. The process of putting this connector together drew some cursing from my lips. In general the bumper is very high quality and I was able to get it on in my driveway with a friends help. Let me know if you need a capable bumper/skid plate .
.
Finally, some preparedness items I needed because I'm an Eagle Scout (I think I went overboard on these):
Of course, I needed a few additional recovery tools, I went with the following:
I hit Uwharrie a couple weekends ago and the lights made night like day, the compressor worked well and I was so happy to be able to use it all together and see the vision working just as intended. The arb single didn't bother me as when it was air up time I was also putting the steps/flaps back on and was done airing up before I finished putting everything back for road use. I think it's the perfect setup other than maybe some additional storage some time down the road.
In summary Ford did a great job allowing modifications/making things easy. They didn't do a great job with the oil change situation - don't get me started there, was cussing the other night. But that's about the only thing I don't love so far, so I'll live haha.
Let me know if you're in the area and want to wheel
Straight off the bat, I wanted a manual so I had to order. I placed my order for the Badlands with Sasquatch package, most importantly 7MT, and black appearance package. I ordered this trim as I wanted the most offroad capability without going over board from the factory, this seemed like the sweetspot. And you might be asking: If you were looking for offroad capability, why a manual? Because manuals are fun and I am daily driving this, plus the added challenge on the trail has been fun to me... sure, I've stalled a few times as I learn what speeds, etc, work off the road. But back to the ordering summary - shout out Palmetto Bronco, they put no pressure, were easy to work with and pleasant to talk to. First look at this thing was love at first sight, with the slight sadness of realizing there are no rear vents in the manual, I was looking forward to that but not a deal breaker. The screen with an actual tach is appreciated in this year model.

As you may notice here, I have the capable and not the modular bumper, I already knew I wanted to change out the bumper, I didn't really like how any of the winch add on's looked and wanted my own lighting, etc. That will come later in this post.
First thing I did was go test out the off roading in Francis Marion... if any of you are in the Low Country, you know that calling Francis Marion off roading is generous. But this was my first lesson in how badly these tires pick up rocks. I got back on the freeway and heard a few hit the vehicle at speed and it brought me physical pain. @rokblokz oredered. I went with the long at first and then realized I needed the XL with some more research as I have the sasquatch and the long would probably not cut it, contacted support and they got it swapped before it shipped out, nice! Putting them together was a bit of a pain and coming with no instructions for some reason I found the video on assembly online and got to work (which, these are a bit of work to put together). There was a discrepancy about the metal tabs needed, apparently they changed the front bracket design and the video didn't reflect that (maybe the instructions I didn't get would have said something?) - no problem, contacted support and they explained that to me, I switched a few things around and off to the races, I've been super happy since and able to remove them on the trail expensive, but great product that maintain the ease of going on the trail.
When I ordered my decision for hard top came down to all the complaints on noise I saw online, but I knew I wanted to enjoy taking the top off so two main products came into play here. @Rockworkx thumb screws for the top, they've made it super easy and I can take the top off in less than 10 minutes, no problem. I went with their bundle with the straps and they have been nice for holding my recovery rope/air hoses, etc. Bundle here. The second product I knew I had to have was a sunshade, if I'm gonna have the top off, I can't be getting too much sun as a bald man (and in general before the shade came in I'd have really hot seats, etc, the shade made it much better). I went with @JTopsUSA for this, the one other post I made was about trouble contacting them as I got a busy signal and no reply to my text when initially asking about my order after a few weeks (one of the first products I bought and last recieved, but it is a quality USA made item, I realize now they were waiting on a part - a crituqe I'd have here would maybe be some sort of order tracking system so I can at least see it's delayed/being worked on/something). To their credit, as soon as I made that post Mike responded, I got on the phone with him and he personally tracked down what was taking so long, offered me an explanation, and within a couple days had the order out to me, so I'd chalk the first support issue up to a fluke and still recommend them. I watched their install video and got after it, no issues and very much an improvement if you are going to take the top off often.
I also quickly realized that the Bronco being a taller vehicle, would require some steps to make it easier for the wife and other guests to hop in. Similar to my reasoning for the mud flaps, I needed something that could just go on the rock sliders and be taken off as needed for hitting the trail - @Mountains2Metal had the solution to my problem. These steps that go on the rock rail, held on by two screws each, not too hard to wrench off and put back on. Didn't have to contact support, just a good product and I didn't have any issues.
I wanted some easy way to charge my phone, there's no wireless charging in the '25, but I knew I wanted something slick that I could easily toss my iphone with magsafe on and have it charge, didn't really care about a holder, not trying to use the phone itself (apple car play has been great for me so far with no issues, knock on wood). I found this about a pretty low-profile puck that mounted on the dash - as a manual transmission owner, the other solutions I saw would have interfered with the stick. I ordered everything from that post and have been happy with the solution, easy place to toss my phone and doesn't really interfere with view out the windshield.
Early on I knew I wanted some ditch lighting, when doing some research about it I saw this post about the lights hitting the antenna and liked the 4" KC flex's and the badass mounts mentioned there do also give it some extra clearance. I like them. Installing the lights was my first indication of how good of a job Ford did making this the perfect platform to mod and add accessories to, was super easy to wire once I figured out how to do the aux switch wiring - turns out I was way over thinking it, it all runs to the drivers side firewall and simply have to wire ground to body and then positive to whichever wire corresponds with the switch, shoutout to those that posted the wiring diagram. And shout out to KC for making a super easy wiring harness, I simply cut off the part with their switch just under the connector and then wired white to auxiliary 5 (a post online said the pair with the backlights takes 10A) and the red to aux 1 (specs say each pod takes 15A) then black to ground. A little bit of reasearch about aux wiring and the wiring harness took more time than the actual install since I was over thinking it.
As you can see, I initially put my radio antenna by the light with the @Mountains2Metal antenna mount. Quality mount, but I hated the way it worked with the bracket and was kinda forced into the radio antenna so I ended up relocating it, will talk more about that more in a second. I knew I wanted a way to mount a radio as it's something nice to have incase you need it for talking in groups or just want to be able to communicate back with someone else at camp with a handheld, but I don't like the super obvious mounts with the extra molle pannels everywhere, this is a daily driver for me too, so I wanted it out of the way. This post described pretty much exactly what I wanted. Thanks @Jabaen. I wanted to mount the handheld out of the way though as I have a manual like @EveryDayBronco , so I stole their mounting location. Then finally I relocated the antenna to the trailsight with this $30 @TrailRax trail sight mount, works pretty well, I disconnected the trail sight and made a slight notch in it to run the cable out to the hood where it would be protected under the plastic of the trailsight and not get crunched in the hood. My perfect radio install complete... well, sorta, I accidentally mounted the radio the wrong way so the glove box rubs it a bit but since I didn't need to notch it, I'm calling it a win and didn't want to fight it back out. When doing the remote handset, this video made it super easy to pull everything apart!
While I was mounting the remote handset I went ahead and installed a dash cam, I watch Linus Tech Tips on youtube and they have a video comparing cameras, saying people are wasting money. Their suggestion a few years ago was the Viofo a119 V3, I went ahead and got the A119 Mini 2 (basically a newer version with a better camera sensor) and the viofo hardwire kit. Pretty easy to install, I just had some troubles from figuring out fuse taps - If anyone else struggles here let me know and I'll go look at what I ended up doing, but works great after fafing about over a few days with my power wiring.
Then I wanted to have an air compressor in the car for airing down/up, I saw a bunch of solutions but the one from American Adventure Lab that sticks it in the tailgate seemed to be the cleanest one and used some otherwise empty space and keeps it clean/out of the way. I oredered everything that goes with the mount and it works well. When it arrived I ended up missing a few hoses and connectors that went with the pressure control module, which was a bummer. I contacted support and they were able to send me the missing pieces. As I did the install I ended up having to take things apart to fix how I did the "key on" wiring as that wasn't very clear in their instructions, this post and looking at the arb schematics helped me make sense of it all (make sure the red wire that is in the right rear pannel on it's own gets connected to something that gets 12v when the car is on, I tapped into the round 12V plug). It also took a good bit of my time looking at the install for the pump and the pressure control module, figuring out what parts I needed and didn't need, etc. Across the board with the missing parts and instructions it feels like AAL was also confused on what all is needed. To be fair they have stated they are updating the instructions due to my experience so hopefully you get the right set of parts/good instructions if you go this route. All that said, the final install is great and I'd do it again. Working all the wires through the wiring loom was a bit of a pain, but trying to tape them all so they were thin as possible and using a little patience worked well. A couple things to note, having the manual I don't get the "wire grommet" a lot of people talk about, as that's where my clutch cable goes, pictured below I just cut through and then electrical taped where the rest of the wires go through (the one with the nipple) for my antenna and the AAL wiring harness. Most of the pannels were easy to get off with a little careful prying, taking the drivers side kick pannel off was a tad tricky though, I found the solution in this post.

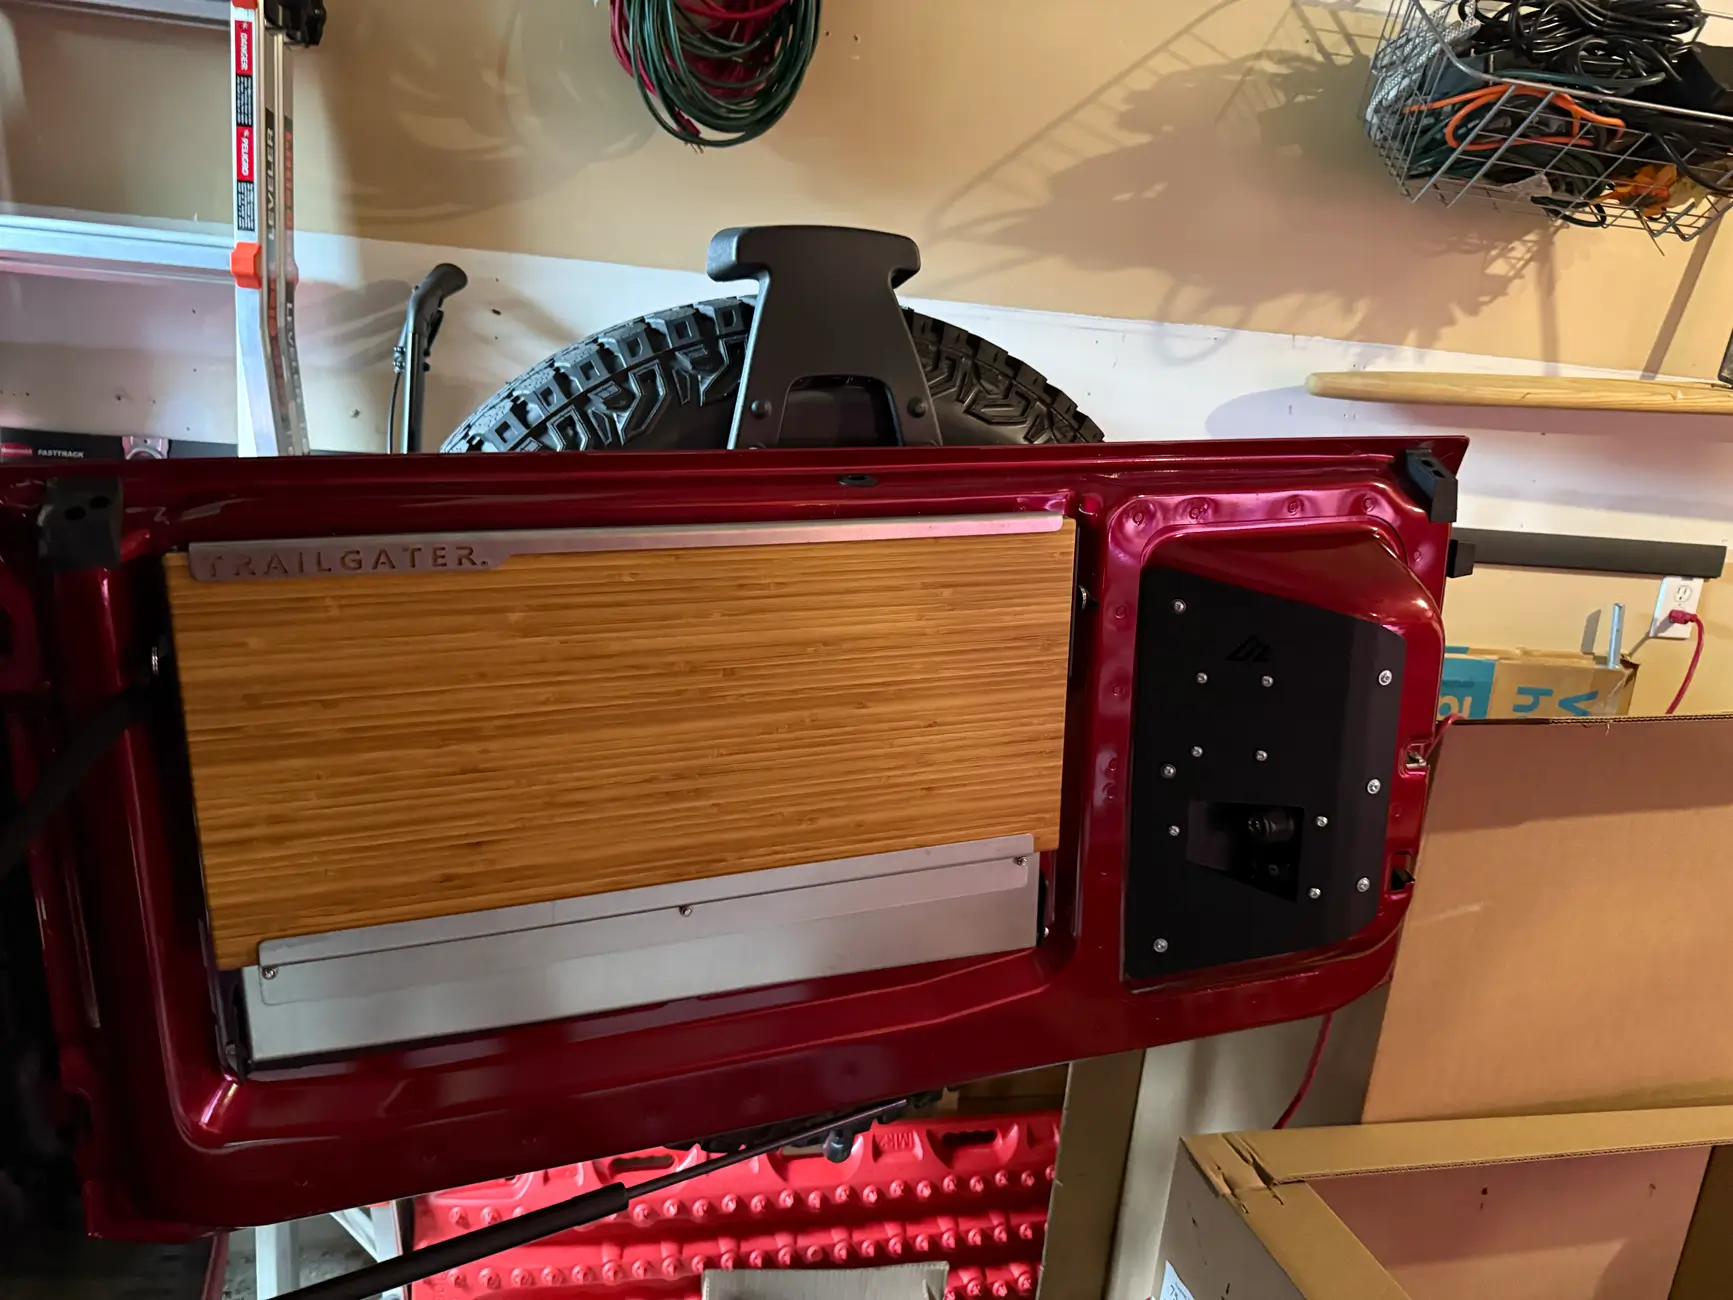
Then after getting the wires run to their cavity, I installed the Trailgater. I mostly got it because @RagnarKon spoke highly of it and I'd have to say I agree with him, it's great. Instructions were pretty clear and I haven't had any issues.
Finally on to the final boss, installing my winch bumper. I decided to go with the ADD Krawler, with the warn Evo 10S (bronco is 6k GVW and I've seen advice to go with 1.5 and the evo seemed to be the reasonable option - chose warn over the other options as people seemed to agree it's reliable), camera relocation bracket, cruise control bracket, skid plate, rigid 360-series 4" side lights, and Bajha Designs LP6 Pro Spot wing lights. Overall, very impressed with this bumper, instructions were mostly good with a couple exceptions 1 - tells you to use bolts from a previous step when installing the main bumper and the same bolts are said to be needed to install the skid plate, I'm working to find the right skid plate bolts to order a couple more and 2 - the camera relocation had no instructions, so I had to use chatgpt to find them. I also had the plate that covers the hole on the bottom over the intercooler missing, I contacted support and they got that sent out to me pretty quickly. The rigid 360-series 4" lights were pretty straightforward to install and came with a harness not quite as nice as the one from KC, but I had no issues. When it came time to install the Bajha designs LP6 Pro, I got a surprise, there was no wiring harness, they just give you a connector and tell you good luck. No problem, I had the wife run by the hardware store and get the gauge of wire suggested... in case anyone else was wondering, they don't give you a good diagram of how to assemble, the wiring/connector pins go through the rubber part and then the plastic part goes into the light. The process of putting this connector together drew some cursing from my lips. In general the bumper is very high quality and I was able to get it on in my driveway with a friends help. Let me know if you need a capable bumper/skid plate
.
Finally, some preparedness items I needed because I'm an Eagle Scout (I think I went overboard on these):
- First aid kit - MyFac Large Pro, a little big for where I originally planned to store it (behind the driver's seat), but has everything I could need, including emergency blankets, tourniquet, etc.
- Fire Extinguisher - 2x roll bar mount bracket, extreme duty bracket, and 5.0 Lb fire extinguisher (on the big side, but not bad once mounted) I heard many arguments for and against, but figured it can't hurt.
Of course, I needed a few additional recovery tools, I went with the following:
- Factor55 Sawtooth Recovery Kit Medium - various straps, shakles, etc that would come in handy winching, haven't needed them yet
- Safe Jack 6 ton kit - selected this kit in particular because it had a larger base in there for soft surfaces as well as chalks
- Yankum 7/8" / 30' recovery rope - from my research the appropriate sized rope and good quailty
- MaxTrax - seems like something most people have, probably more useful in the sand or something... maybe outer banks this April? and who knows how to store these? so far have just thrown them in the back with the seat down
I hit Uwharrie a couple weekends ago and the lights made night like day, the compressor worked well and I was so happy to be able to use it all together and see the vision working just as intended. The arb single didn't bother me as when it was air up time I was also putting the steps/flaps back on and was done airing up before I finished putting everything back for road use. I think it's the perfect setup other than maybe some additional storage some time down the road.
In summary Ford did a great job allowing modifications/making things easy. They didn't do a great job with the oil change situation - don't get me started there, was cussing the other night. But that's about the only thing I don't love so far, so I'll live haha.

Let me know if you're in the area and want to wheel
Sponsored


