
Sponsored
Status
Not open for further replies.

Ryan at ARB

Outer Banks
Well-Known Member
Squatch Sponsor (Level 3)
First Name
Ryan
Joined
Apr 27, 2022
Threads
28
Messages
161
Reaction score
833
Location
Auburn, HI
Website
arbusa.com
Vehicle(s)
Jeep LJ, Ford Ranger, Ford Bronco
Your Bronco Model
Outer Banks
Ford Bronco How to DIY install an ARB Compressor in a Ford Bronco (+GIVEAWAY!) 1665445380563

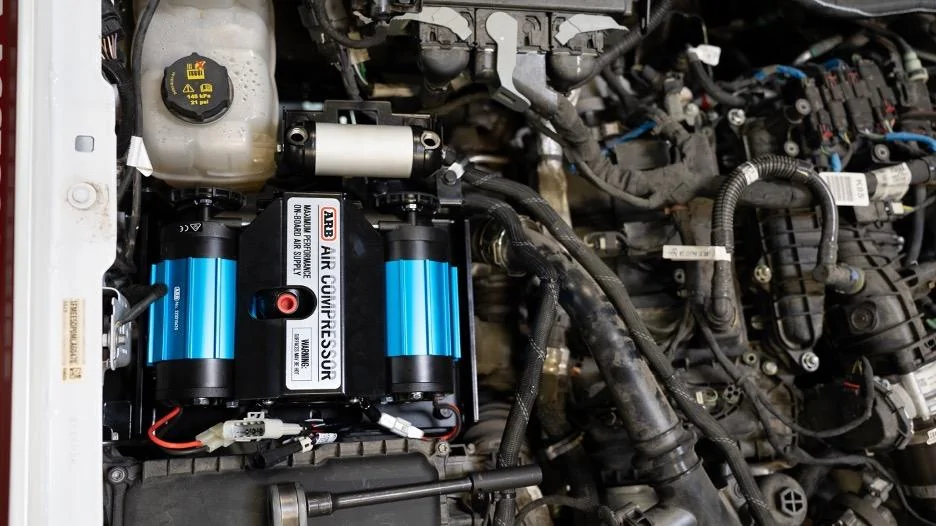
Whether you’re a seasoned overlander or a newbie off-roader – we can all reap the benefits of an onboard air compressor. Its many capabilities include actuating Air Lockers, inflating tires after deflating, setting tire beads, drying off cookware at camp, pumping up inflatable paddle boards and kayaks, and blowing the sand off your boots and floor mats.

What’s even better? This invaluable adventure upgrade can easily be installed under the hood of your Ford Bronco with our new mounting bracket that has been validated by Ford engineers. Follow along for a step-by-step guide and pre-order your own by contacting any ARB or Ford dealer.

Requires:
ARB Twin Compressor Mounting Bracket #3580030 (Contact an ARB dealer to preorder)
ARB Twin Compressor #CKMTA12
ARB Manifold #171503
ARB Hose Coupling #0740112

Instructions:
Ford Bronco How to DIY install an ARB Compressor in a Ford Bronco (+GIVEAWAY!) 1665445445140

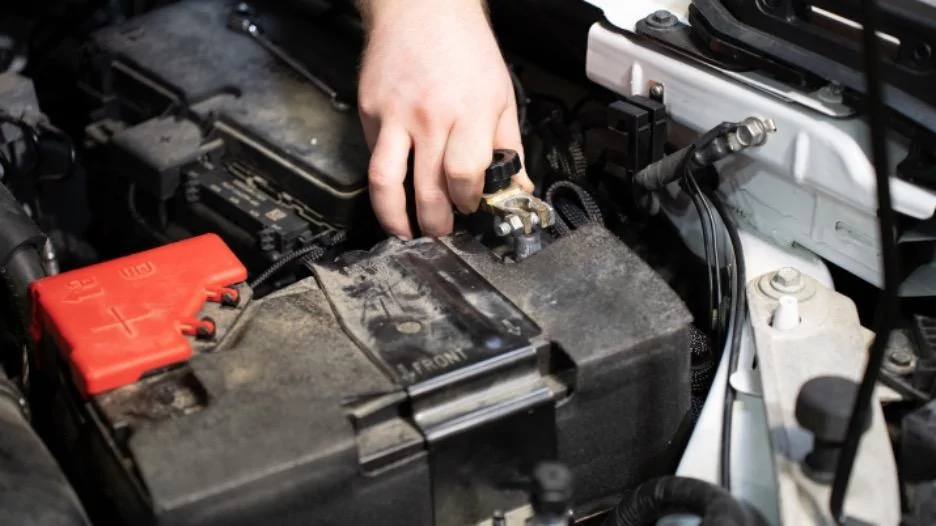
1. Disconnect the negative battery terminal.
Ford Bronco How to DIY install an ARB Compressor in a Ford Bronco (+GIVEAWAY!) 1665445494923

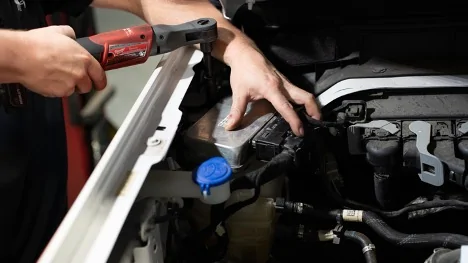
2. Unplug the DLCM and remove the two M6 bolts holding the mount to the body.
DO NOT DROP.
Ford Bronco How to DIY install an ARB Compressor in a Ford Bronco (+GIVEAWAY!) 1665445522921

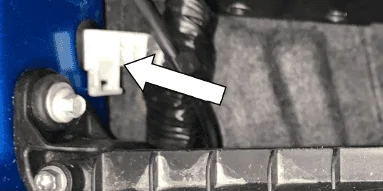
3. Remove and discard the harness plug and earthing harness.
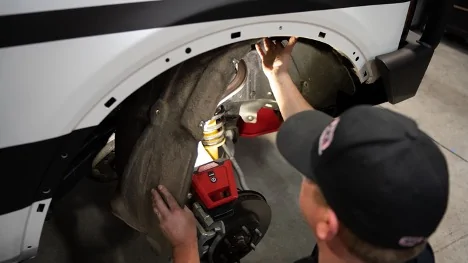
Ford Bronco How to DIY install an ARB Compressor in a Ford Bronco (+GIVEAWAY!) 1665445560267

4. Remove fasteners (rear half only) for RHS inner guard and lower.
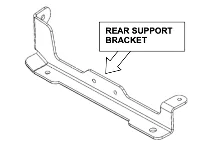
Ford Bronco How to DIY install an ARB Compressor in a Ford Bronco (+GIVEAWAY!) 1665445585231

Ford Bronco How to DIY install an ARB Compressor in a Ford Bronco (+GIVEAWAY!) 1665445595510

5. Fit the rear support bracket (4655173) using the factory OE M8 flange bolt. Leave loose at this stage.

Ford Bronco How to DIY install an ARB Compressor in a Ford Bronco (+GIVEAWAY!) 1665445627108

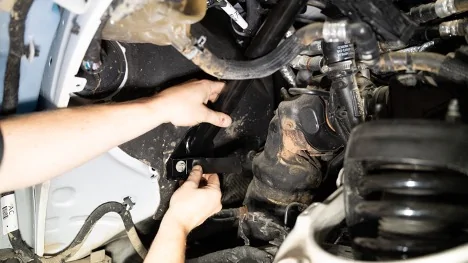
6. Feed support tube weldment to the firewall and locate it onto the M6 stud. Once on, place the inner guard support bracket over the same OE factory stud, and fasten the OE M6 nut.

Torque: M6 – 7ft/lb

Ford Bronco How to DIY install an ARB Compressor in a Ford Bronco (+GIVEAWAY!) 1665445679185

7. Use an M8 FL BOLT to temporarily brace the support tube to the rear support bracket.

Ford Bronco How to DIY install an ARB Compressor in a Ford Bronco (+GIVEAWAY!) 1665445698529

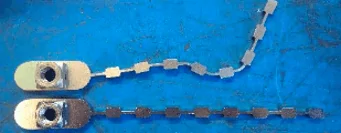
8. Fix the support arm to the firewall using the M10 Nut stick (bent profile shown below) and one M10 SEMS bolt.

Torque: M10 – 32ft/lbs

Ford Bronco How to DIY install an ARB Compressor in a Ford Bronco (+GIVEAWAY!) 1665445797756

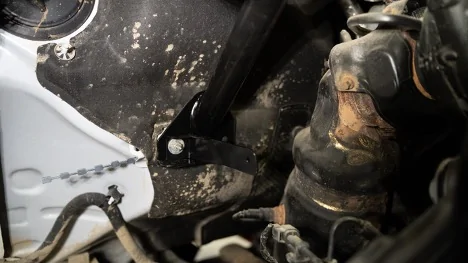
9. Once the support arm is fixed, remove the M8 bolt from step 6.

Ford Bronco How to DIY install an ARB Compressor in a Ford Bronco (+GIVEAWAY!) 1665445842350

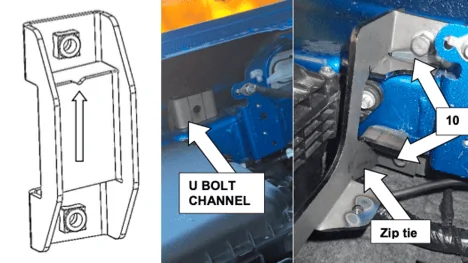
10. Feed the U BOLT CHANNEL behind the chassis from the top

Note: the notch in the part faces toward the top.

11. Fasten the front support bracket to the U channel with two M10 FL bolts. Leave loose at this stage
12. Support Wiring harness to mount with a Zip Tie.

Ford Bronco How to DIY install an ARB Compressor in a Ford Bronco (+GIVEAWAY!) 1665445927458

Ford Bronco How to DIY install an ARB Compressor in a Ford Bronco (+GIVEAWAY!) 1665445937404

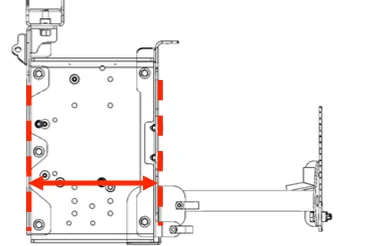
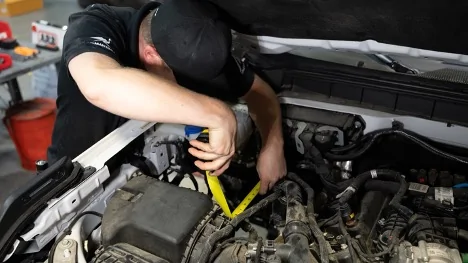
13. Measure outside to outside of the two support brackets. They Should measure 220mm (8.6”). If not, adjust accordingly.

Ford Bronco How to DIY install an ARB Compressor in a Ford Bronco (+GIVEAWAY!) 1665445959669

14. Torque - M10 bolts to 32ft/lbs.
15. Torque OE M8 bolt from Step 4 to 16ft/lbs.

Ford Bronco How to DIY install an ARB Compressor in a Ford Bronco (+GIVEAWAY!) 1665446017699

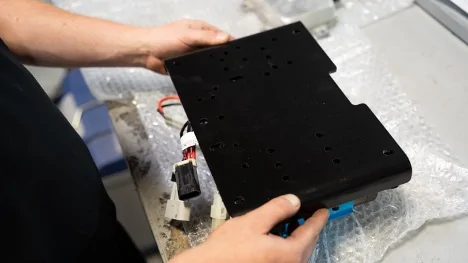
16. Remove Twin Compressor from the box and place it upside down on a soft surface.

Ford Bronco How to DIY install an ARB Compressor in a Ford Bronco (+GIVEAWAY!) 1665446036171

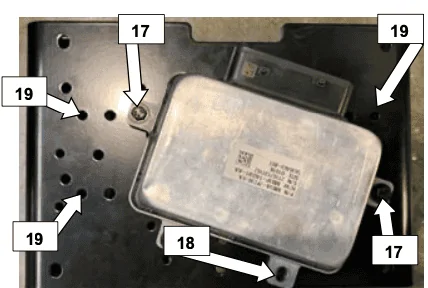
17. Place the base plate onto the Compressor along with the DLCM.
18. Using two M6 x 25 bolts, two M6 Flat washers attach the DLCM to the Compressor.
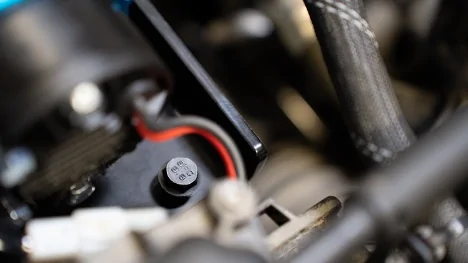
19. Use one M6 x 25, one M6 Flat washer, and one M6 FL nut on the third position of the DLCM.

Ford Bronco How to DIY install an ARB Compressor in a Ford Bronco (+GIVEAWAY!) 1665446068630

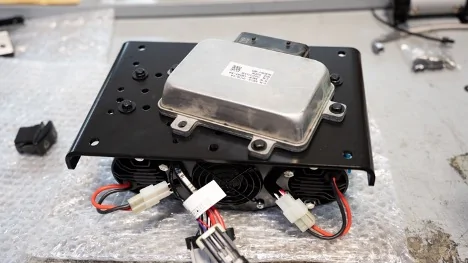
20. Use three fasteners supplied with the Compressor to complete the mounting, and torque to spec.

Torque: M6 – 7ft/lbs

Ford Bronco How to DIY install an ARB Compressor in a Ford Bronco (+GIVEAWAY!) 1665446093905

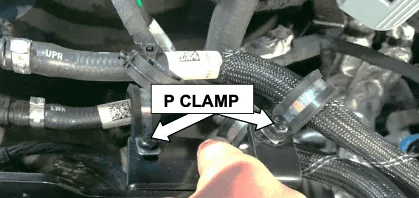
21. Secure the coolant hoses with two P clamps, M6x16mm bolts, washers, and flange nuts.

Torque: M6 – 7ft/lbs

Ford Bronco How to DIY install an ARB Compressor in a Ford Bronco (+GIVEAWAY!) 1665446114432

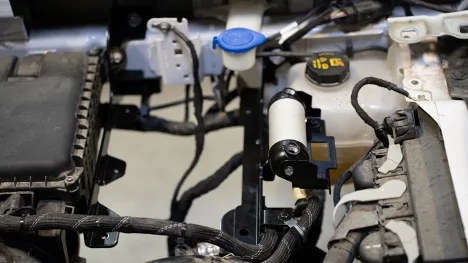
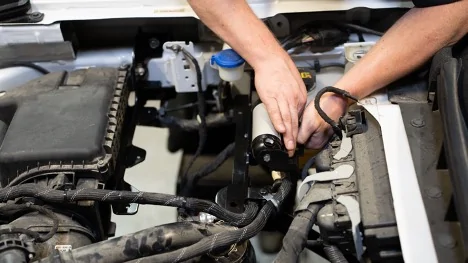
22. Using 2 x M6 x 16 bolts, washers, and flange nuts, fit the Compressor Manifold bracket to the rear mount.

Ford Bronco How to DIY install an ARB Compressor in a Ford Bronco (+GIVEAWAY!) 1665446142824

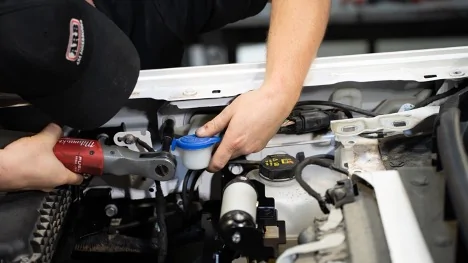
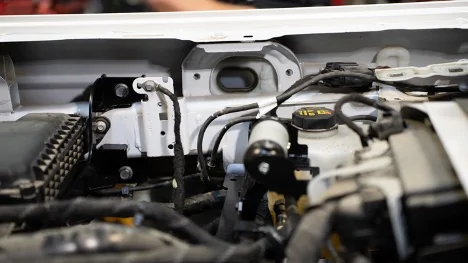
23. Fit the Manifold feet to the manifold mounting bracket using M6x16 bolts, washers, and flange nuts.

Torque: M6 – 7ft/lbs

Ford Bronco How to DIY install an ARB Compressor in a Ford Bronco (+GIVEAWAY!) 1665446164646

Ford Bronco How to DIY install an ARB Compressor in a Ford Bronco (+GIVEAWAY!) 1665446173865

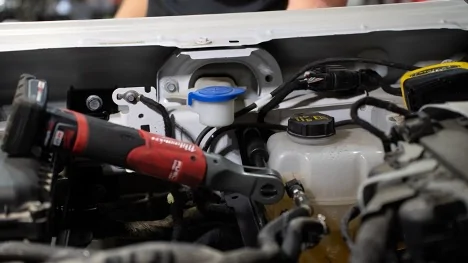
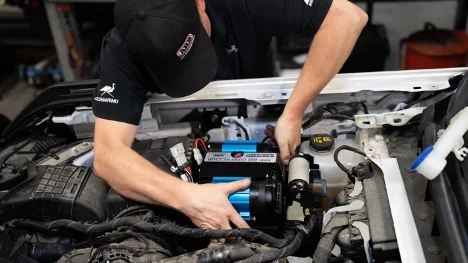
24. Temporarily remove the washer bottle filler neck by removing the bolts retaining them to the vehicle body.

Ford Bronco How to DIY install an ARB Compressor in a Ford Bronco (+GIVEAWAY!) 1665446199322

Ford Bronco How to DIY install an ARB Compressor in a Ford Bronco (+GIVEAWAY!) 1665446207267

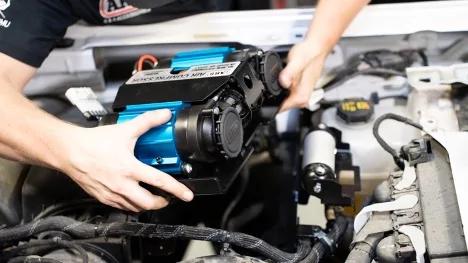
25. Carefully install the assembled Compressor, base plate, and DLCM onto the support brackets.

Ford Bronco How to DIY install an ARB Compressor in a Ford Bronco (+GIVEAWAY!) 1665446230719

Ford Bronco How to DIY install an ARB Compressor in a Ford Bronco (+GIVEAWAY!) 1665446239621

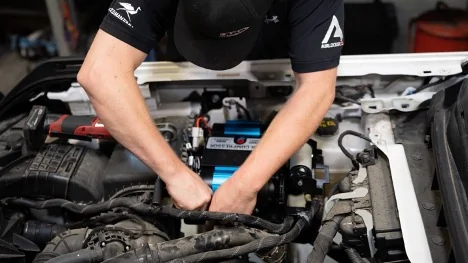
26. Use 5 x M8 FL BOLTS to secure the base mounting plate to the Front and Rear support brackets.

Torque: M8 - 16ft/lbs

Ford Bronco How to DIY install an ARB Compressor in a Ford Bronco (+GIVEAWAY!) 1665446261025

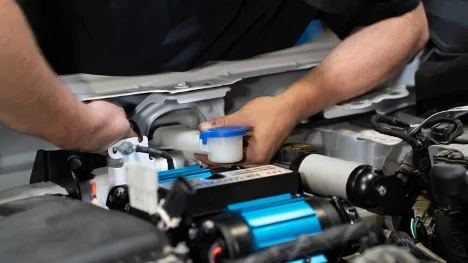
27. Reinstall washer bottle filler neck 27. Plug in the DLCM by gaining access

Ford Bronco How to DIY install an ARB Compressor in a Ford Bronco (+GIVEAWAY!) 1665446277137

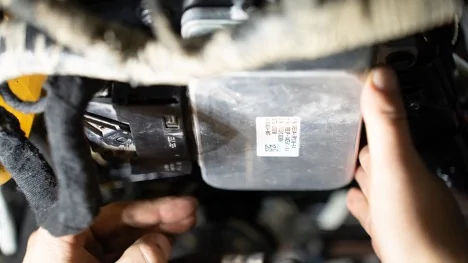
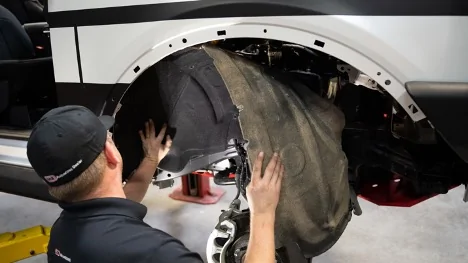
28. Plug in the DLCM by gaining access through the inner guard.

Ford Bronco How to DIY install an ARB Compressor in a Ford Bronco (+GIVEAWAY!) 1665446297419

29. Reinstall the inner guard.

Note: Ensure to install the OE scrivet into ARB inner guard support bracket.

Ford Bronco How to DIY install an ARB Compressor in a Ford Bronco (+GIVEAWAY!) 1665446326879

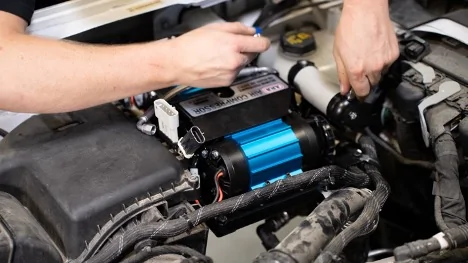
30. Using the fittings provided in kit 171503, fit 1 x JIC4 - 1/4 NPT fitting to the inboard manifold port (as shown in the image to the left).

Note: Ensure to use thread sealant on all 1/4 NPT threads.

Ford Bronco How to DIY install an ARB Compressor in a Ford Bronco (+GIVEAWAY!) 1665446372515

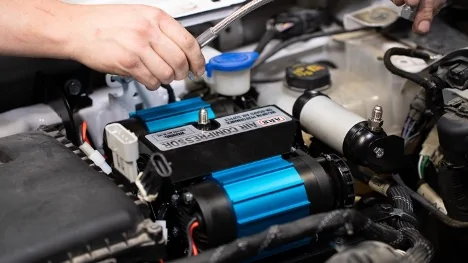
31. Repeat the same process for the compressor outlet port.

Ford Bronco How to DIY install an ARB Compressor in a Ford Bronco (+GIVEAWAY!) 1665446396500

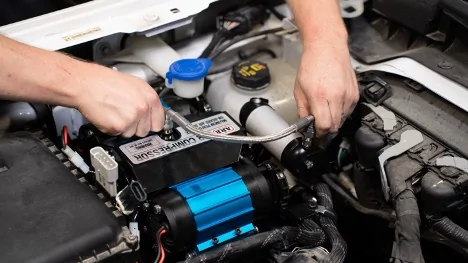
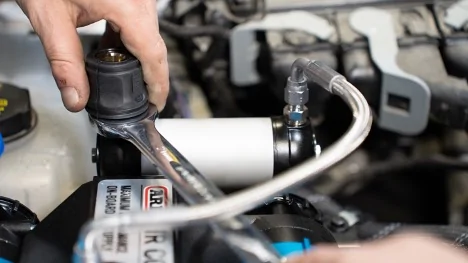
32. Connect the manifold to the compressor using the braided hose and tighten.

Ford Bronco How to DIY install an ARB Compressor in a Ford Bronco (+GIVEAWAY!) 1665446425090

33. Attach the hose coupling (0740112) to the outboard port on the manifold.

Ford Bronco How to DIY install an ARB Compressor in a Ford Bronco (+GIVEAWAY!) 1665446453317

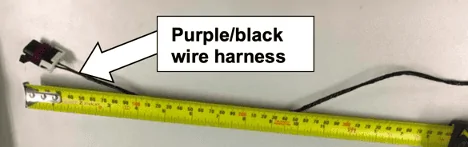
34. Using the wiring harness 180415, measure and cut 400mm of wire (purple/black) connected to the purple plug.

Note: Ensure the plug is retained (as shown above)

Ford Bronco How to DIY install an ARB Compressor in a Ford Bronco (+GIVEAWAY!) 1665446476938

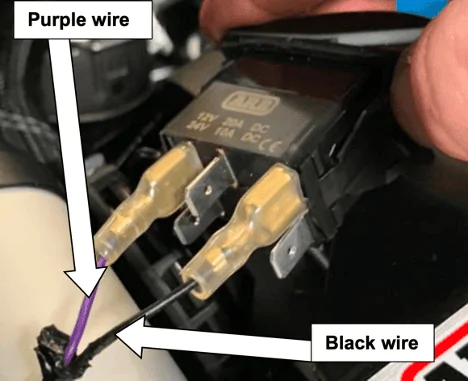
35. Connect spade connectors to the cut ends.

Ford Bronco How to DIY install an ARB Compressor in a Ford Bronco (+GIVEAWAY!) 1665446497352

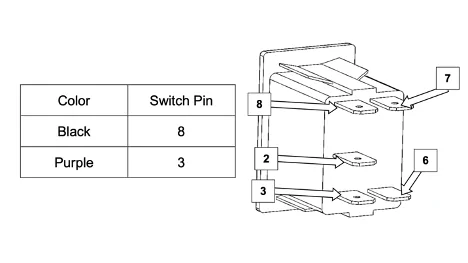
36. Connect spade connectors to the switch as followed:

Ford Bronco How to DIY install an ARB Compressor in a Ford Bronco (+GIVEAWAY!) 1665446515972

37. Pickup power from the stability bar module fuse (10A) located in the engine bay fuse box. Fuse reference #158 in the owner’s manual.

Ford Bronco How to DIY install an ARB Compressor in a Ford Bronco (+GIVEAWAY!) 1665446535469

38. Run wiring around the rear section of the engine bay to the compressor switch.

Note: Ensure to insulate the wiring in the conduit.

Ford Bronco How to DIY install an ARB Compressor in a Ford Bronco (+GIVEAWAY!) 1665446560550

39. Connect spade connectors to switch pin 2.

Ford Bronco How to DIY install an ARB Compressor in a Ford Bronco (+GIVEAWAY!) 1665446605405

Ford Bronco How to DIY install an ARB Compressor in a Ford Bronco (+GIVEAWAY!) 1665446616279

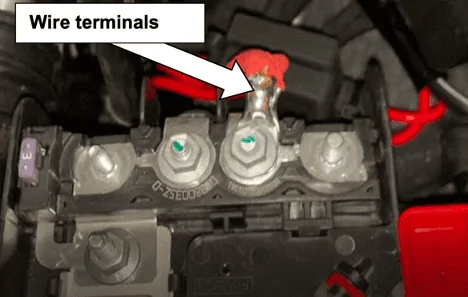
40. Crimp a terminal to the end of each of the two red wires on the compressor wiring harness (pn. 180414), and then connect to the positive battery terminal.

Ford Bronco How to DIY install an ARB Compressor in a Ford Bronco (+GIVEAWAY!) 1665446644553

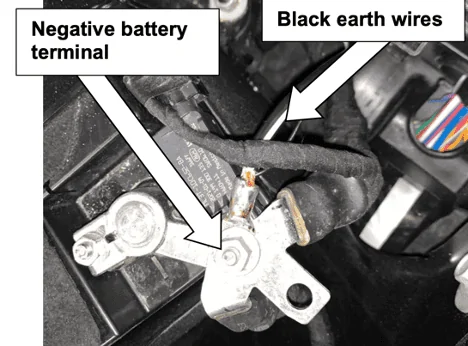
41. Connect the 2 black earth wires from the compressor wiring harness to the negative battery terminal.

Ford Bronco How to DIY install an ARB Compressor in a Ford Bronco (+GIVEAWAY!) 1665446669933

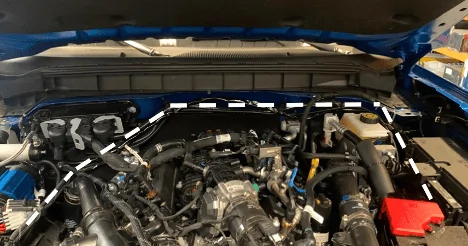
42. Route the harness around the back of the engine bay. Cable tie every 400mm.

Ford Bronco How to DIY install an ARB Compressor in a Ford Bronco (+GIVEAWAY!) 1665446693265

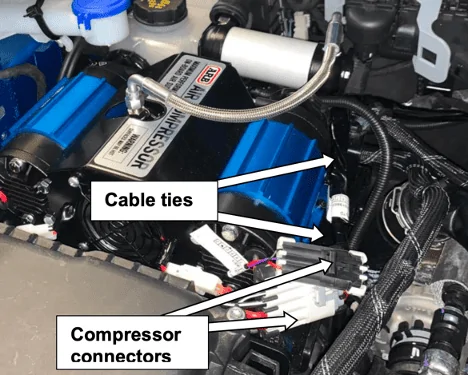
43. Plug the two harnesses into the compressor connectors.
44. Cable tie the harness to the base plate.

Suits 2.3L & 2.7L Ford Broncos - Not compatible with Bronco Raptor and Everglades models

GIVEAWAY

If you made it this far, you’re in luck! We are giving away one new ARB compressor bracket to one of you lucky 6G members.

TO ENTER
1. Reply to this thread.
2. Follow/subscribe to at least one of our social channels.

Instagram: @arb4x4usa
Facebook: www.facebook.com/arbusa
YouTube: www.youtube.com/c/ARB4x4USA

The last day for entries is October 14, 2022, 11:59PST. The winner will be chosen randomly and will be notified in this thread

*ARB will never message you directly and ask for your credit card information*

Good luck!
Sponsored

 
Last edited:

mcinfantry

Badlands
Well-Known Member
First Name
Lee
Joined
Jun 2, 2021
Threads
35
Messages
2,412
Reaction score
3,960
Location
Louisiana
Vehicle(s)
Badlands 2 door
Your Bronco Model
Badlands
Clubs
 
Neat.
 

Grayeti

Badlands
Well-Known Member
First Name
Greg
Joined
Apr 15, 2021
Threads
3
Messages
131
Reaction score
420
Location
Illinois
Vehicle(s)
21 4dr Badlands, 22 2dr badlands, & 23 Braptor
Your Bronco Model
Badlands
Looks like a nice option. Already following your Insta.
 

Sponsored

Razorback

Badlands
Well-Known Member
First Name
Bill
Joined
Jul 14, 2020
Threads
73
Messages
1,774
Reaction score
4,588
Location
Dallas
Vehicle(s)
Lincoln MKX
Your Bronco Model
Badlands
Clubs
 
I'm in. Been waiting for more options to choose from for mounting.
 

Deleted member 31057

Guest
GIVEAWAY

Count me in. I hope it'll fit a Bronco Raptor!
 

Stewkc

Wildtrak
Active Member
First Name
Stew
Joined
Jul 24, 2020
Threads
1
Messages
35
Reaction score
189
Location
Kansas City MO
Vehicle(s)
07 Trailblazer SS
Your Bronco Model
Wildtrak
Clubs
 
1665445380563.webp

Whether you’re a seasoned overlander or a newbie off-roader – we can all reap the benefits of an onboard air compressor. Its many capabilities include actuating Air Lockers, inflating tires after deflating, setting tire beads, drying off cookware at camp, pumping up inflatable paddle boards and kayaks, and blowing the sand off your boots and floor mats.

What’s even better? This invaluable adventure upgrade can easily be installed under the hood of your Ford Bronco with our new mounting bracket! Follow along for a step-by-step guide.

Requires:
ARB Twin Compressor Mounting Bracket #3580030 (Contact an ARB dealer to preorder)
ARB Twin Compressor #CKMTA12
ARB Manifold #171503
ARB Hose Coupling #0740112

Instructions:

1665445445140.webp

1. Disconnect the negative battery terminal.

1665445494923.webp

2. Unplug the DLCM and remove the two M6 bolts holding the mount to the body.
DO NOT DROP.

1665445522921.webp

3. Remove and discard the harness plug and earthing harness.

1665445560267.webp

4. Remove fasteners (rear half only) for RHS inner guard and lower.
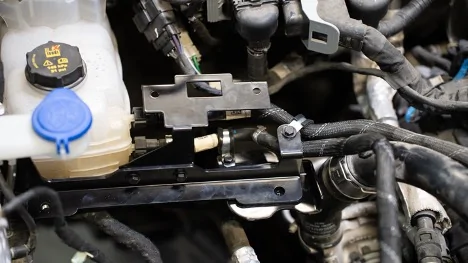
1665445585231.webp

1665445595510.webp

5. Fit the rear support bracket (4655173) using the factory OE M8 flange bolt. Leave loose at this stage.
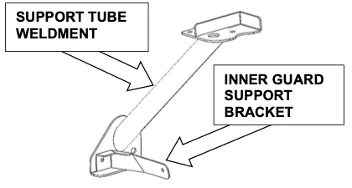
1665445627108.webp

6. Feed support tube weldment to the firewall and locate it onto the M6 stud. Once on, place the inner guard support bracket over the same OE factory stud, and fasten the OE M6 nut.

Torque: M6 – 7ft/lb
1665445679185.webp

7. Use an M8 FL BOLT to temporarily brace the support tube to the rear support bracket.
1665445698529.webp

8. Fix the support arm to the firewall using the M10 Nut stick (bent profile shown below) and one M10 SEMS bolt.

Torque: M10 – 32ft/lbs
1665445797756.webp

9. Once the support arm is fixed, remove the M8 bolt from step 6.
1665445842350.webp

10. Feed the U BOLT CHANNEL behind the chassis from the top

Note: the notch in the part faces toward the top.

11. Fasten the front support bracket to the U channel with two M10 FL bolts. Leave loose at this stage
12. Support Wiring harness to mount with a Zip Tie.
1665445927458.webp

1665445937404.webp

13. Measure outside to outside of the two support brackets. They Should measure 220mm (8.6”). If not, adjust accordingly.
1665445959669.webp

14. Torque - M10 bolts to 32ft/lbs.
15. Torque OE M8 bolt from Step 4 to 16ft/lbs.
1665446017699.webp

16. Remove Twin Compressor from the box and place it upside down on a soft surface.
1665446036171.webp

17. Place the base plate onto the Compressor along with the DLCM.
18. Using two M6 x 25 bolts, two M6 Flat washers attach the DLCM to the Compressor.
19. Use one M6 x 25, one M6 Flat washer, and one M6 FL nut on the third position of the DLCM.
1665446068630.webp

20. Use three fasteners supplied with the Compressor to complete the mounting, and torque to spec.

Torque: M6 – 7ft/lbs
1665446093905.webp

21. Secure the coolant hoses with two P clamps, M6x16mm bolts, washers, and flange nuts.

Torque: M6 – 7ft/lbs
1665446114432.webp

22. Using 2 x M6 x 16 bolts, washers, and flange nuts, fit the Compressor Manifold bracket to the rear mount.
1665446142824.webp

23. Fit the Manifold feet to the manifold mounting bracket using M6x16 bolts, washers, and flange nuts.

Torque: M6 – 7ft/lbs
1665446164646.webp

1665446173865.webp

24. Temporarily remove the washer bottle filler neck by removing the bolts retaining them to the vehicle body.

1665446199322.webp

1665446207267.webp

25. Carefully install the assembled Compressor, base plate, and DLCM onto the support brackets.

1665446230719.webp

1665446239621.webp

26. Use 5 x M8 FL BOLTS to secure the base mounting plate to the Front and Rear support brackets.

Torque: M8 - 16ft/lbs

1665446261025.webp

27. Reinstall washer bottle filler neck 27. Plug in the DLCM by gaining access

1665446277137.webp

28. Plug in the DLCM by gaining access through the inner guard.

1665446297419.webp

29. Reinstall the inner guard.

Note: Ensure to install the OE scrivet into ARB inner guard support bracket.

1665446326879.webp

30. Using the fittings provided in kit 171503, fit 1 x JIC4 - 1/4 NPT fitting to the inboard manifold port (as shown in the image to the left).

Note: Ensure to use thread sealant on all 1/4 NPT threads.

1665446372515.webp

31. Repeat the same process for the compressor outlet port.

1665446396500.webp

32. Connect the manifold to the compressor using the braided hose and tighten.

1665446425090.webp

33. Attach the hose coupling (0740112) to the outboard port on the manifold.

1665446453317.webp

34. Using the wiring harness 180415, measure and cut 400mm of wire (purple/black) connected to the purple plug.

Note: Ensure the plug is retained (as shown above)

1665446476938.webp

35. Connect spade connectors to the cut ends.

1665446497352.webp

36. Connect spade connectors to the switch as followed:

1665446515972.webp

37. Pickup power from the stability bar module fuse (10A) located in the engine bay fuse box. Fuse reference #158 in the owner’s manual.

1665446535469.webp

38. Run wiring around the rear section of the engine bay to the compressor switch.

Note: Ensure to insulate the wiring in the conduit.

1665446560550.webp

39. Connect spade connectors to switch pin 2.

1665446605405.webp

1665446616279.webp

40. Crimp a terminal to the end of each of the two red wires on the compressor wiring harness (pn. 180414), and then connect to the positive battery terminal.

1665446644553.webp

41. Connect the 2 black earth wires from the compressor wiring harness to the negative battery terminal.

1665446669933.webp

42. Route the harness around the back of the engine bay. Cable tie every 400mm.

1665446693265.webp

43. Plug the two harnesses into the compressor connectors.
44. Cable tie the harness to the base plate.

GIVEAWAY

If you made it this far, you’re in luck! We are giving away one new ARB compressor bracket to one of you lucky 6G members.

TO ENTER
1. Reply to this thread.
2. Follow/subscribe to at least one of our social channels.

Instagram: @arb4x4usa
Facebook: www.facebook.com/arbusa
YouTube: www.youtube.com/c/ARB4x4USA

The last day for entries is October 14, 2022, 11:59PST. The winner will be chosen randomly and will be notified in this thread

*ARB will never message you directly and ask for your credit card information*

Good luck!
Very well done!
 

Sponsored

UtahBrandon

Badlands
Well-Known Member
Base Sponsor (Level 1)
First Name
Brandon
Joined
Oct 5, 2020
Threads
53
Messages
679
Reaction score
1,613
Location
Utah
Website
www.puravidaoffroad.com
Vehicle(s)
a number of classics and my 4dr Badlands
Your Bronco Model
Badlands
Clubs
 
1665445380563.jpeg

Whether you’re a seasoned overlander or a newbie off-roader – we can all reap the benefits of an onboard air compressor. Its many capabilities include actuating Air Lockers, inflating tires after deflating, setting tire beads, drying off cookware at camp, pumping up inflatable paddle boards and kayaks, and blowing the sand off your boots and floor mats.

What’s even better? This invaluable adventure upgrade can easily be installed under the hood of your Ford Bronco with our new mounting bracket! Follow along for a step-by-step guide.

Requires:
ARB Twin Compressor Mounting Bracket #3580030 (Contact an ARB dealer to preorder)
ARB Twin Compressor #CKMTA12
ARB Manifold #171503
ARB Hose Coupling #0740112

Instructions:

1665445445140.jpeg

1. Disconnect the negative battery terminal.

1665445494923.jpeg

2. Unplug the DLCM and remove the two M6 bolts holding the mount to the body.
DO NOT DROP.

1665445522921.png

3. Remove and discard the harness plug and earthing harness.

1665445560267.jpeg

4. Remove fasteners (rear half only) for RHS inner guard and lower.

1665445585231.png

1665445595510.jpeg

5. Fit the rear support bracket (4655173) using the factory OE M8 flange bolt. Leave loose at this stage.

1665445627108.png

6. Feed support tube weldment to the firewall and locate it onto the M6 stud. Once on, place the inner guard support bracket over the same OE factory stud, and fasten the OE M6 nut.

Torque: M6 – 7ft/lb

1665445679185.jpeg

7. Use an M8 FL BOLT to temporarily brace the support tube to the rear support bracket.

1665445698529.png

8. Fix the support arm to the firewall using the M10 Nut stick (bent profile shown below) and one M10 SEMS bolt.

Torque: M10 – 32ft/lbs

1665445797756.jpeg

9. Once the support arm is fixed, remove the M8 bolt from step 6.

1665445842350.png

10. Feed the U BOLT CHANNEL behind the chassis from the top

Note: the notch in the part faces toward the top.

11. Fasten the front support bracket to the U channel with two M10 FL bolts. Leave loose at this stage
12. Support Wiring harness to mount with a Zip Tie.

1665445927458.png

1665445937404.jpeg

13. Measure outside to outside of the two support brackets. They Should measure 220mm (8.6”). If not, adjust accordingly.

1665445959669.jpeg

14. Torque - M10 bolts to 32ft/lbs.
15. Torque OE M8 bolt from Step 4 to 16ft/lbs.

1665446017699.jpeg

16. Remove Twin Compressor from the box and place it upside down on a soft surface.

1665446036171.png

17. Place the base plate onto the Compressor along with the DLCM.
18. Using two M6 x 25 bolts, two M6 Flat washers attach the DLCM to the Compressor.
19. Use one M6 x 25, one M6 Flat washer, and one M6 FL nut on the third position of the DLCM.

1665446068630.jpeg

20. Use three fasteners supplied with the Compressor to complete the mounting, and torque to spec.

Torque: M6 – 7ft/lbs

1665446093905.png

21. Secure the coolant hoses with two P clamps, M6x16mm bolts, washers, and flange nuts.

Torque: M6 – 7ft/lbs

1665446114432.jpeg

22. Using 2 x M6 x 16 bolts, washers, and flange nuts, fit the Compressor Manifold bracket to the rear mount.

1665446142824.jpeg

23. Fit the Manifold feet to the manifold mounting bracket using M6x16 bolts, washers, and flange nuts.

Torque: M6 – 7ft/lbs
1665446164646.jpeg

1665446173865.jpeg

24. Temporarily remove the washer bottle filler neck by removing the bolts retaining them to the vehicle body.
1665446199322.jpeg

1665446207267.jpeg

25. Carefully install the assembled Compressor, base plate, and DLCM onto the support brackets.
1665446230719.jpeg

1665446239621.jpeg

26. Use 5 x M8 FL BOLTS to secure the base mounting plate to the Front and Rear support brackets.

Torque: M8 - 16ft/lbs
1665446261025.jpeg

27. Reinstall washer bottle filler neck 27. Plug in the DLCM by gaining access
1665446277137.jpeg

28. Plug in the DLCM by gaining access through the inner guard.
1665446297419.jpeg

29. Reinstall the inner guard.

Note: Ensure to install the OE scrivet into ARB inner guard support bracket.
1665446326879.jpeg

30. Using the fittings provided in kit 171503, fit 1 x JIC4 - 1/4 NPT fitting to the inboard manifold port (as shown in the image to the left).

Note: Ensure to use thread sealant on all 1/4 NPT threads.
1665446372515.jpeg

31. Repeat the same process for the compressor outlet port.
1665446396500.jpeg

32. Connect the manifold to the compressor using the braided hose and tighten.
1665446425090.jpeg

33. Attach the hose coupling (0740112) to the outboard port on the manifold.
1665446453317.png

34. Using the wiring harness 180415, measure and cut 400mm of wire (purple/black) connected to the purple plug.

Note: Ensure the plug is retained (as shown above)
1665446476938.png

35. Connect spade connectors to the cut ends.
1665446497352.png

36. Connect spade connectors to the switch as followed:
1665446515972.png

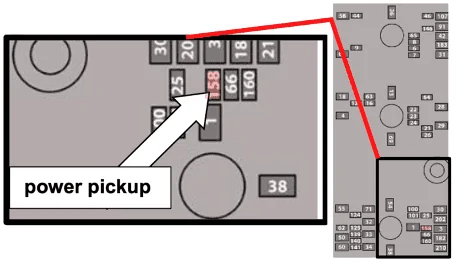
37. Pickup power from the stability bar module fuse (10A) located in the engine bay fuse box. Fuse reference #158 in the owner’s manual.
1665446535469.png

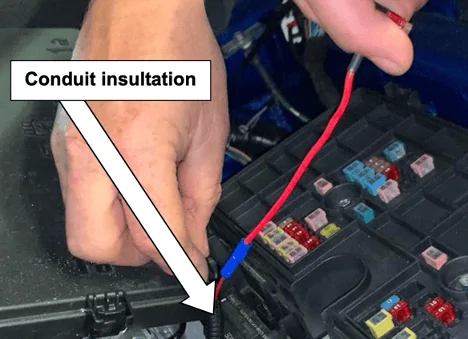
38. Run wiring around the rear section of the engine bay to the compressor switch.

Note: Ensure to insulate the wiring in the conduit.
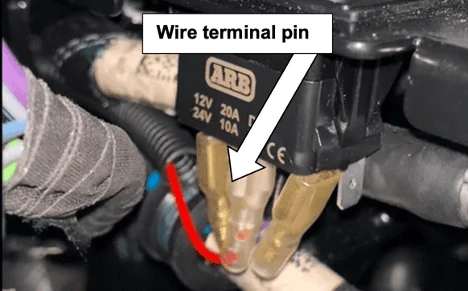
1665446560550.png

39. Connect spade connectors to switch pin 2.
1665446605405.png

1665446616279.png

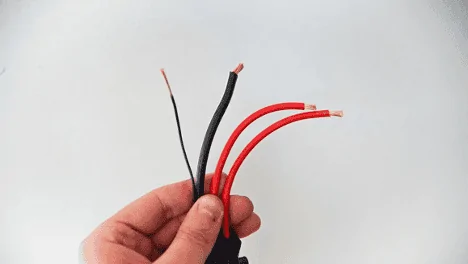
40. Crimp a terminal to the end of each of the two red wires on the compressor wiring harness (pn. 180414), and then connect to the positive battery terminal.
1665446644553.png

41. Connect the 2 black earth wires from the compressor wiring harness to the negative battery terminal.
1665446669933.png

42. Route the harness around the back of the engine bay. Cable tie every 400mm.
1665446693265.png

43. Plug the two harnesses into the compressor connectors.
44. Cable tie the harness to the base plate.

GIVEAWAY

If you made it this far, you’re in luck! We are giving away one new ARB compressor bracket to one of you lucky 6G members.

TO ENTER
1. Reply to this thread.
2. Follow/subscribe to at least one of our social channels.

Instagram: @arb4x4usa
Facebook: www.facebook.com/arbusa
YouTube: www.youtube.com/c/ARB4x4USA

The last day for entries is October 14, 2022, 11:59PST. The winner will be chosen randomly and will be notified in this thread

*ARB will never message you directly and ask for your credit card information*

Good luck!
I’m already following all of your channels as I was waiting for the compressor bracket release.
 

Turning Blue

Badlands
Active Member
First Name
Chuck
Joined
Feb 17, 2022
Threads
1
Messages
25
Reaction score
24
Location
Northern Illinois
Vehicle(s)
2019 F-150 Raptor, 2021 Mustang GT/CS
Your Bronco Model
Badlands
Enter to win a bracket? At least there's no fine print...lol. How about a group buy? Maybe then I'll try signing up for twit book face or whatever...lol.
 

Mario3241

Base
Well-Known Member
First Name
Mario
Joined
Jul 19, 2020
Threads
4
Messages
291
Reaction score
336
Location
Las Vegas
Vehicle(s)
Ford Focus
Your Bronco Model
Base
Fingers crossed. Following you on Instagram. This looks great!
 

mikec426

Outer Banks
Well-Known Member
First Name
Mike
Joined
Feb 9, 2022
Threads
22
Messages
1,185
Reaction score
1,849
Location
Russellville, AR
Vehicle(s)
22 4dr Sqtch, '04 Yam FZ1, 22 Versys 1k, 19 Ninja
Your Bronco Model
Outer Banks
Pretty sure I already follow you on Instagram, but I'll make sure I do.
Sponsored

 
Status
Not open for further replies.


Top