OP
OP

- Thread starter
- #46
Step one. Connect your FORSCAN to your truck. Ignition on engine off.
Step two. Open the live read of your shock heights you will have to go into the screen with a squiggly lines and you’ll see a bunch of empty boxes double click the empty box and then you will have to select VDM from the drop-down menu then find RF LF etc. you’ll click the arrows over to the right and then hit play. You will now see all four of your shocks ride height live.
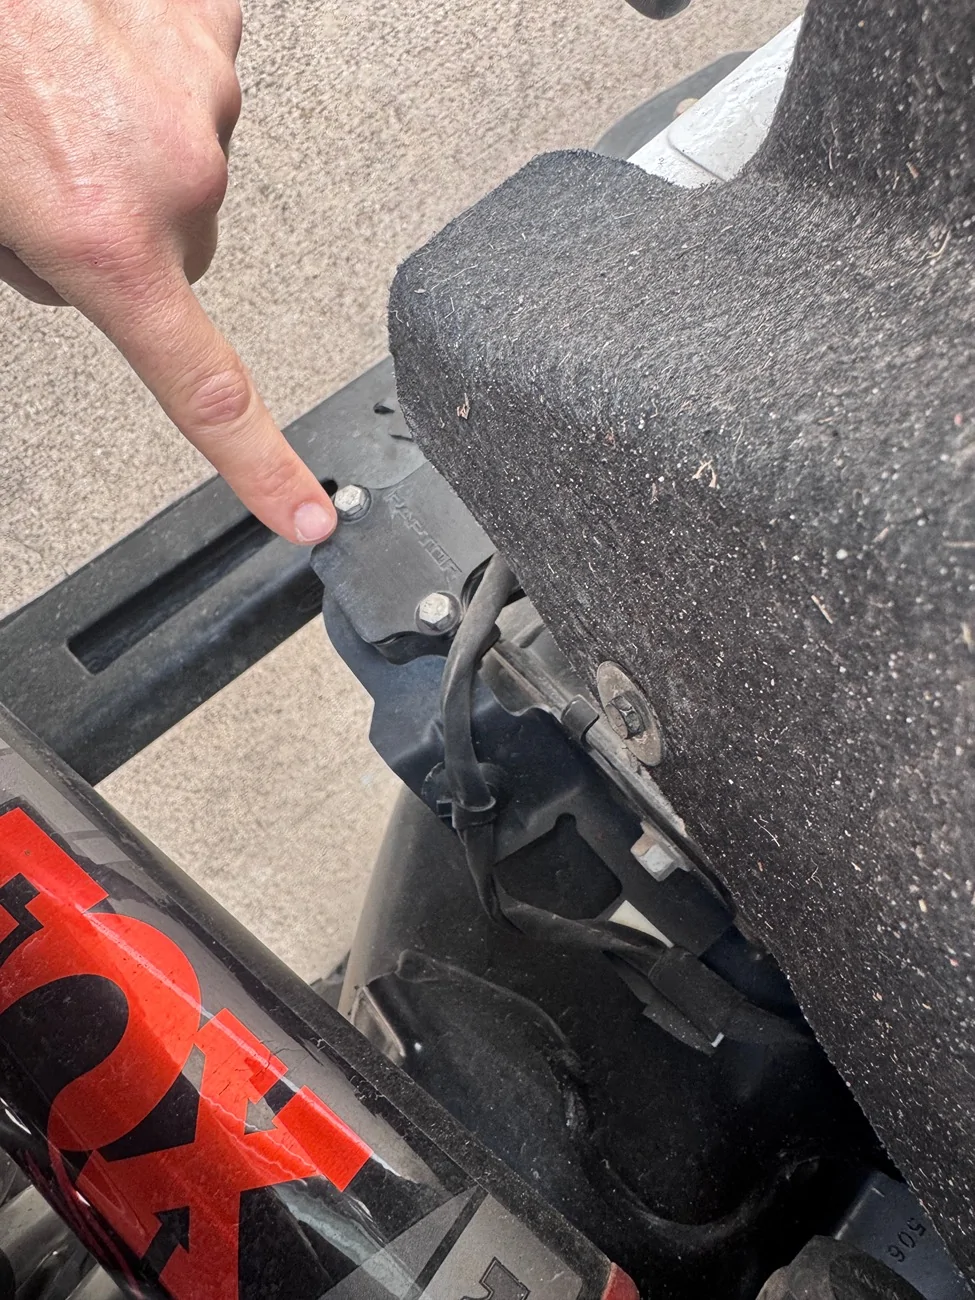
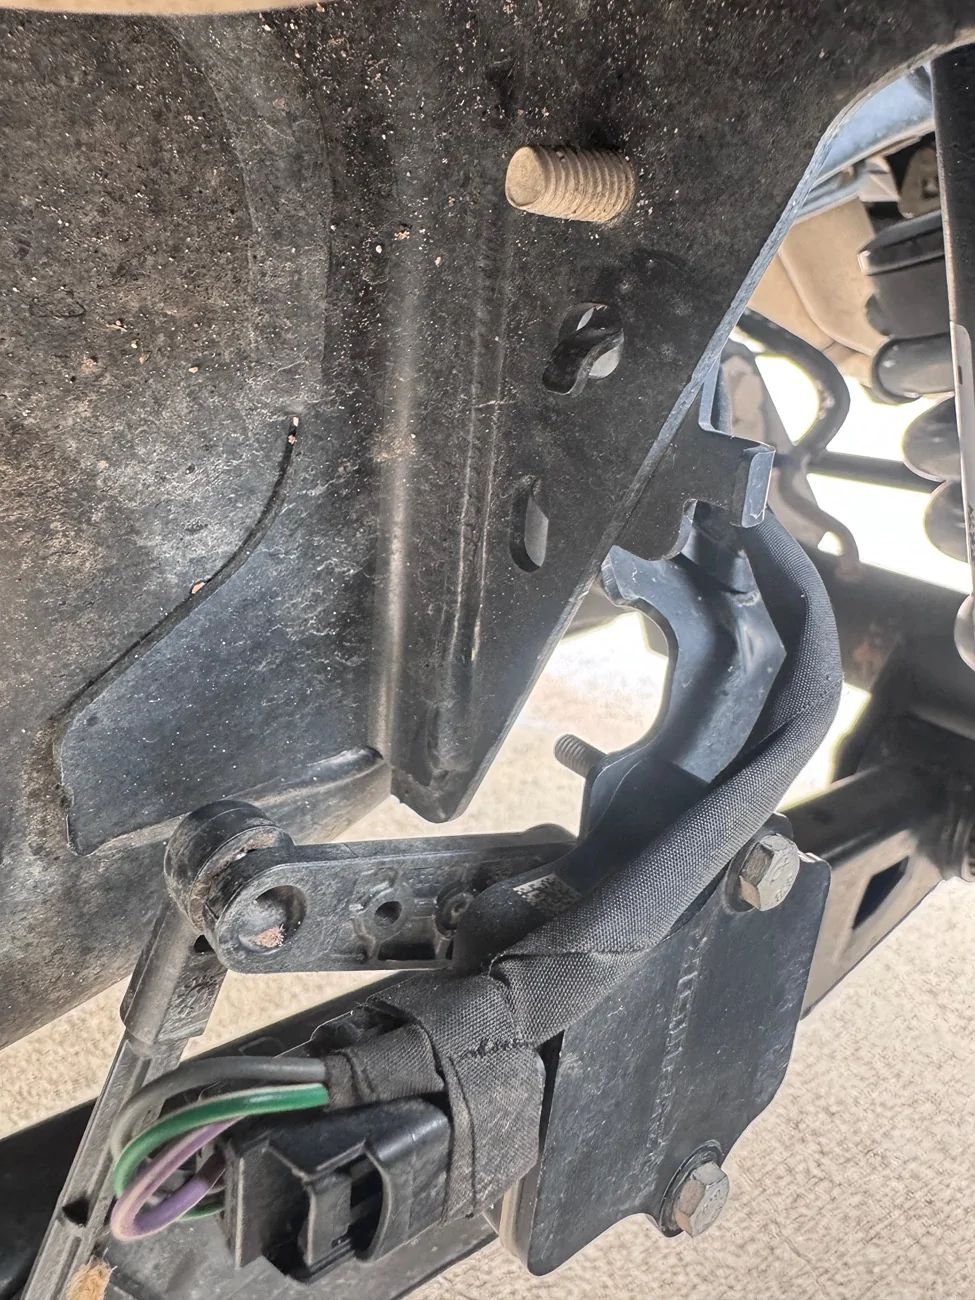
step three. Using the pictures I sent as reference you will disconnect the two metal bolts off of the ride height bracket. I had to disconnect the connector to manipulated it enough to pull the bolt out but be careful. The sensor is plastic. You will disconnect all four of your ride height sensors.
step four. Now move the sensor around while you’re looking at your laptop with FOR scan and start moving the dial until you can get it to zero on all four corners or at least plus or minus one.
Step five. Verify that all four sensors are reading at zero or close to it. I would say plus or -1 max of two.
step six. With the ignition on engine off, depress the brake and put your vehicle in neutral. Make sure you either have the E brake on or your wheels chalked so it does not roll away from you.
Step seven. Turn the ignition off and wait for all your screens to go black. Then on your steering wheel, hold down the OK button for about 8 to 10 seconds. While still holding down the OK button press the ignition on the engine off continue holding down OK on the steering wheel. Keep in mind your vehicle is still a neutral. After about 4 to 5 seconds, you’ll see in the lower right hand corner of your dash ET. This is letting you know that you are in engineering mode. As soon as you see ET come up press the gas pedal three times fully depressing it and letting it spring back completely.
step eight. Go back on your for scan and verify that you are still close to zero on your right height. You will now go into the wrench tab on FORSCAN click the VDM drop-down and then look for ride height calibration. You’re going to click on it and then hit the play button.
step nine. Once you hit the play button, it’s gonna come up with a warning and then explain to you that you need to put it ET mode. But you have already done that verifying your dash that it still says ET in the bottom, right hand corner. And then hit OK. It will now calibrate your suspension and it will be successful.
Step 10. Put your Bronco Raptor back in park and Click on the DTC icon on FORSCAN. And clear all of your codes and follow the prompts exactly.
Step 11. Once all your codes are cleared. Cycle your ignition fully off and then back on. You will now have access to all of your goat, modes again, and no error codes.
step 12. Make sure your ignition is off and re-bolt up all of your ride height sensors back onto the brackets. Again, be careful they are plastic and obviously remember how you took them off. I would recommend disconnecting the connector so you can rotate it around enough to fit the bolts back in.
step 13. Once everything is snug on the brackets, do another walk around and make sure all of your connections are plugged in to the right height sensors. Then turn your ignition on and start your vehicle. You should not have any error codes and have access to all of your goat modes again.
Step two. Open the live read of your shock heights you will have to go into the screen with a squiggly lines and you’ll see a bunch of empty boxes double click the empty box and then you will have to select VDM from the drop-down menu then find RF LF etc. you’ll click the arrows over to the right and then hit play. You will now see all four of your shocks ride height live.
step three. Using the pictures I sent as reference you will disconnect the two metal bolts off of the ride height bracket. I had to disconnect the connector to manipulated it enough to pull the bolt out but be careful. The sensor is plastic. You will disconnect all four of your ride height sensors.
step four. Now move the sensor around while you’re looking at your laptop with FOR scan and start moving the dial until you can get it to zero on all four corners or at least plus or minus one.
Step five. Verify that all four sensors are reading at zero or close to it. I would say plus or -1 max of two.
step six. With the ignition on engine off, depress the brake and put your vehicle in neutral. Make sure you either have the E brake on or your wheels chalked so it does not roll away from you.
Step seven. Turn the ignition off and wait for all your screens to go black. Then on your steering wheel, hold down the OK button for about 8 to 10 seconds. While still holding down the OK button press the ignition on the engine off continue holding down OK on the steering wheel. Keep in mind your vehicle is still a neutral. After about 4 to 5 seconds, you’ll see in the lower right hand corner of your dash ET. This is letting you know that you are in engineering mode. As soon as you see ET come up press the gas pedal three times fully depressing it and letting it spring back completely.
step eight. Go back on your for scan and verify that you are still close to zero on your right height. You will now go into the wrench tab on FORSCAN click the VDM drop-down and then look for ride height calibration. You’re going to click on it and then hit the play button.
step nine. Once you hit the play button, it’s gonna come up with a warning and then explain to you that you need to put it ET mode. But you have already done that verifying your dash that it still says ET in the bottom, right hand corner. And then hit OK. It will now calibrate your suspension and it will be successful.
Step 10. Put your Bronco Raptor back in park and Click on the DTC icon on FORSCAN. And clear all of your codes and follow the prompts exactly.
Step 11. Once all your codes are cleared. Cycle your ignition fully off and then back on. You will now have access to all of your goat, modes again, and no error codes.
step 12. Make sure your ignition is off and re-bolt up all of your ride height sensors back onto the brackets. Again, be careful they are plastic and obviously remember how you took them off. I would recommend disconnecting the connector so you can rotate it around enough to fit the bolts back in.
step 13. Once everything is snug on the brackets, do another walk around and make sure all of your connections are plugged in to the right height sensors. Then turn your ignition on and start your vehicle. You should not have any error codes and have access to all of your goat modes again.
Sponsored

")