- First Name
- Jeanette
- Joined
- Sep 25, 2022
- Threads
- 24
- Messages
- 238
- Reaction score
- 154
- Location
- Mid-Michigan
- Vehicle(s)
- Bronco
- Your Bronco Model
- Raptor
- Thread starter
- #1
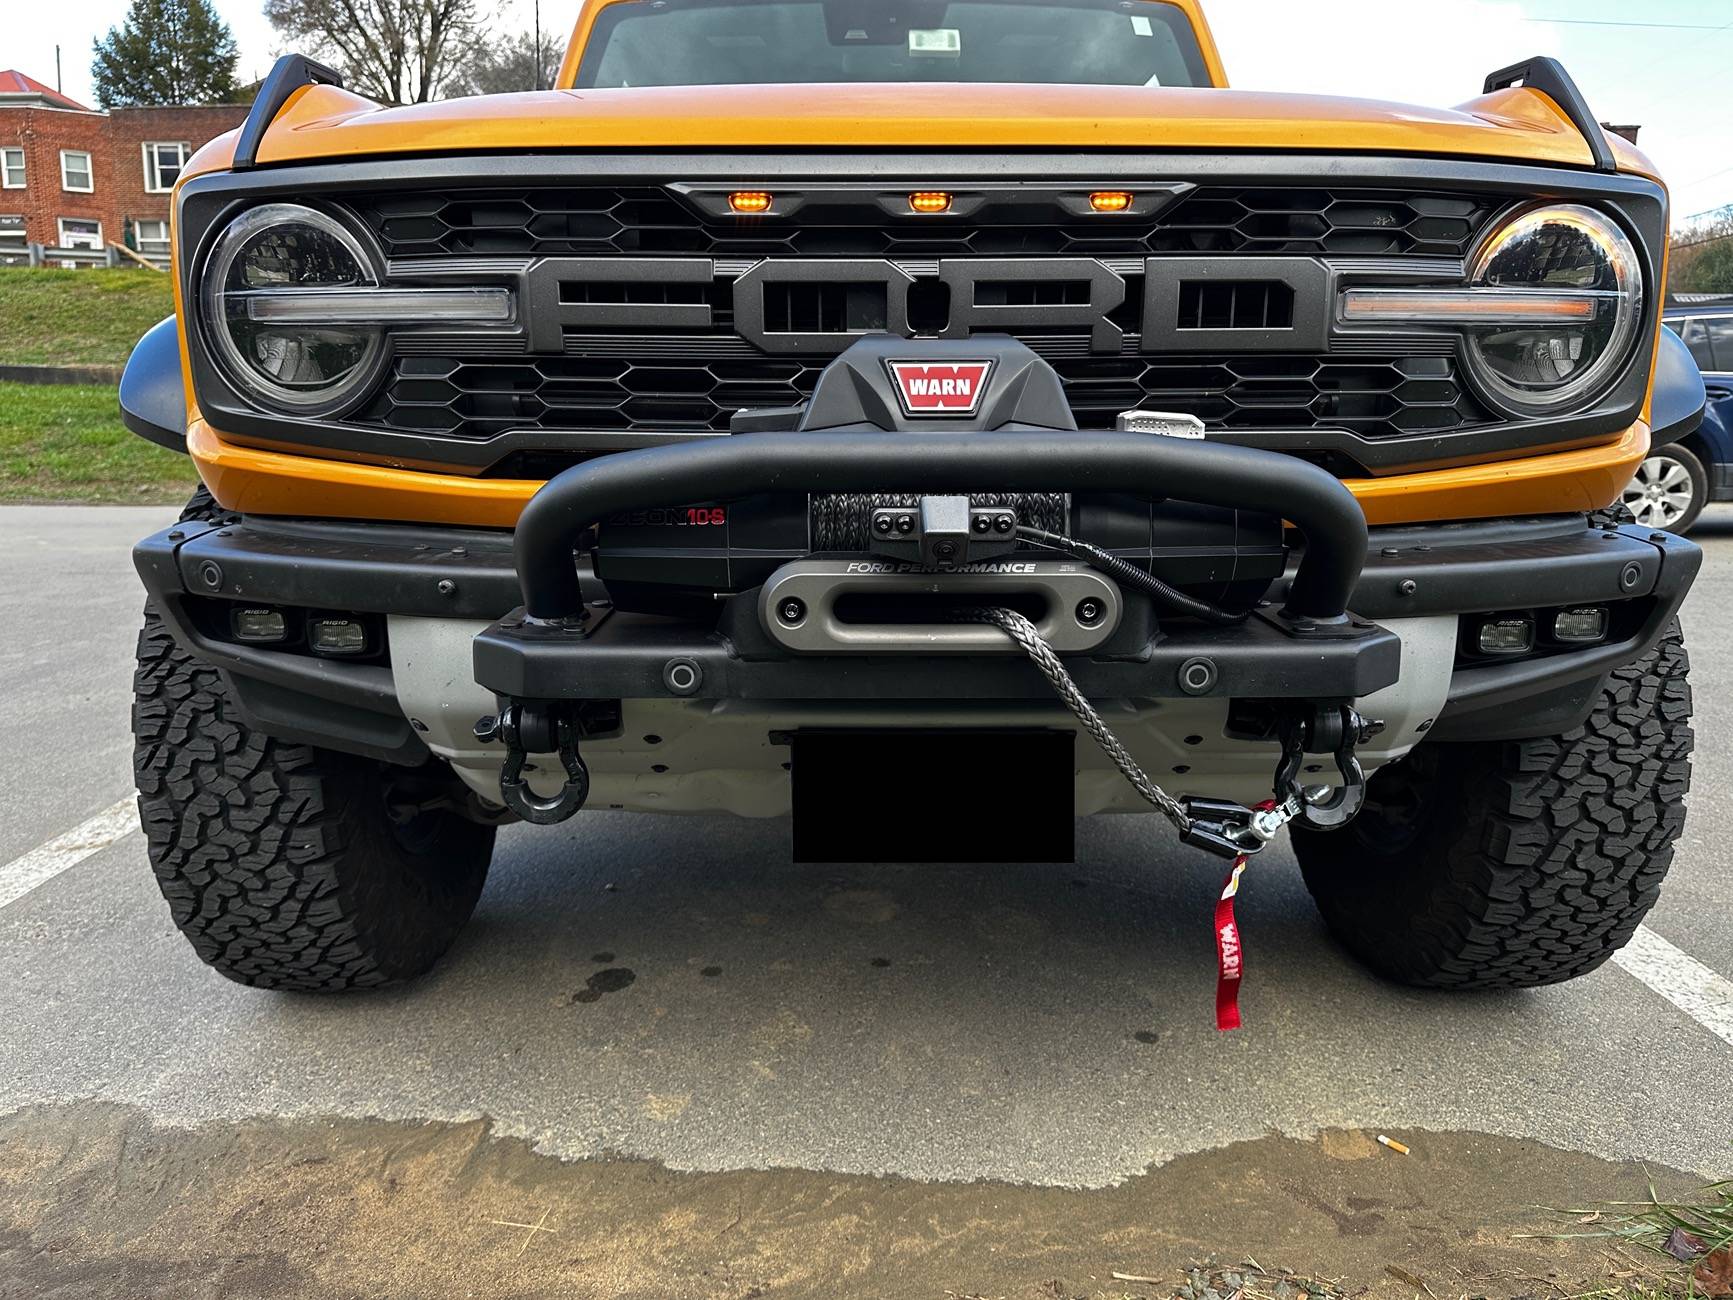
After having planned a series of mods for my previous Badlands which included a winch plate on the modular bumper, I ended up starting over with the build of my Raptor and took a completely different path. When I traded in my Badlands, I still had a stack of parts yet to be installed for the Badlands waiting for some more skilled assistance, of which most were quick to find homes with other Bronco enthusiasts.
My thanks to folks on the forum who readily answered questions and provided additional pictures of their builds as I navigated what I wanted to do with the Raptor.
Unlike the mods I had done on the Badlands, I opted to have a garage do all of it this time around. Some of it I could have, others I knew were out of my skillset (and toolset and garage accommodations). Having done most of the mods on my Badlands, I had already checked that box and being able to have it all done at once, and with less time do to so was just more appealing this time around. And frankly, since I wanted to make sure everything related to the winch was done right with safety in mind – I wanted someone with more experience to tackle all of the components related to that.

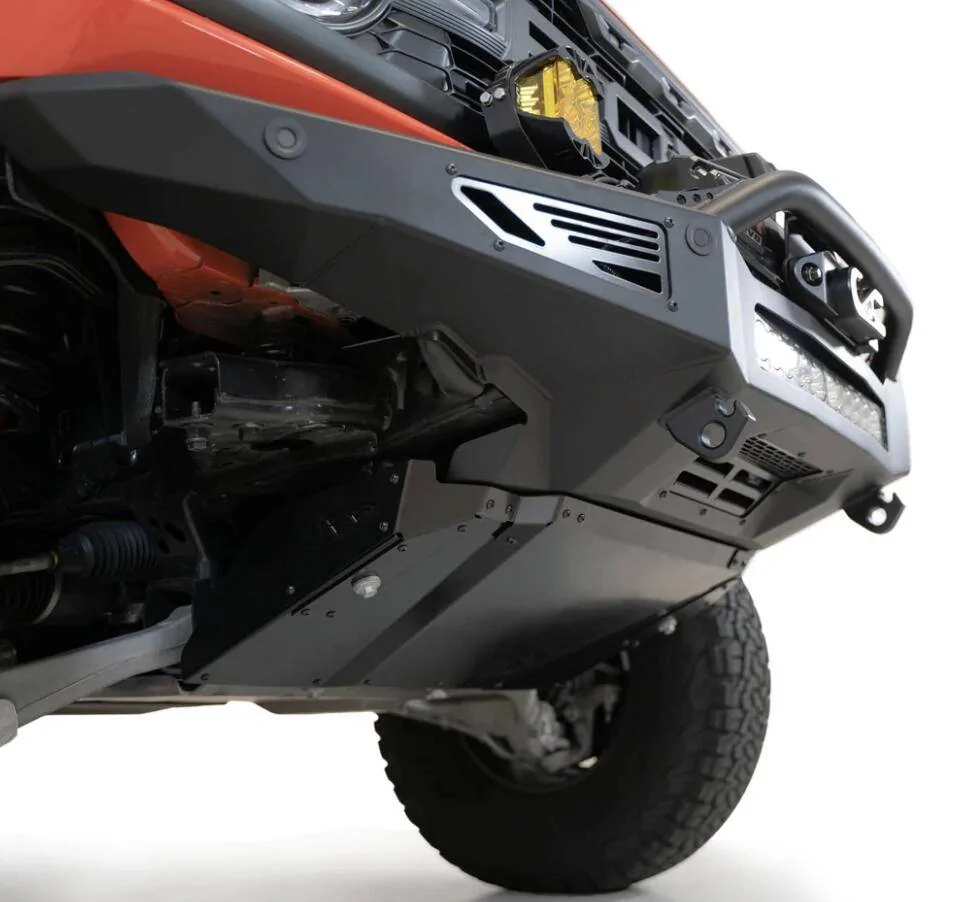
The driving reason for the mods was accommodating a winch and for this I went with swapping the OEM bumper and skid plate for the Rock Fighter offering from ADD. Sounds easy enough – but on the Raptor, that meant accounting for the parking sensors, ACC and camera. I also didn’t want to give up having fog lights, so that meant a custom solution to mount them, and as it turns out, custom wiring that by-passed the OEM wiring harness because I wanted my off-road fogs on a different aux switch then the OEM fogs (on the Raptor, the OEM wiring harness has driving fog lights on the round light switch to the left of the steering wheel, and off-road fogs on aux 1).
I’m a researcher by nature – evaluate every option, try to find something someone else may not have, and then land on a game plan. It can be a curse. For this build, I spent hours on forums, chatting and emailing with vendors, talking with others at events and had done my due diligence that my parts would work together. Despite that, there were multiple fitment issues and customizations we hadn’t planned on.
RE FRONT BUILD
For the front – my parts list included –
My prep work with ADD had validated that their camera relocation kit was compatible with the Rock Fighter bumper. What I didn’t know when I had that discussion with ADD, is that that meant turning the camera bracket that goes behind the fairlead around 180 degrees and mounting the camera BELOW the fairlead. For a build that I was keeping as off road survivable as feasible, putting it in that location really wasn’t an option I wanted to do – it just feels like a vulnerable place to mount the camera. I also envisioned having that one time where I have a winch pull angled below the bumper and the line pulls down over that area, or the hook drops when I disengage the winch clutch and bangs on the camera, etc.
Not my build, but a reference picture I found for the camera install below the fairlead using the ADD bracket on the ADD bumper.

Here comes in the first need for a custom bracket. Essentially, if ADD would offer a version of the camera bracket with extended uprights to the bracket section that fits behind the fairlead, the camera could be high enough to be above the bull bar. But they don’t (or didn’t at the time of this build).
If you don’t have the option for a custom bracket that does, another solution is to drill a second set of holes in the bumper fairlead mounting plate, above the fairlead mounting points that line up with the camera bracket in their kit. Note if you go this route, you are drilling through steel and will need a means to protect the exposed surface from exposure to the elements – like re-powder coating (I am aware of one build that had their bumpers sprayed with bedliner coating after these holes were drilled). I opted to go the custom bracket route and I was fortunate that my garage had a resource and interest in solving this riddle. The garage wanted a solution that both protected the camera and hid the hose and wiring. The garage also needed to use some of the parts from the ADD relocation kit for this, specifically the washer hose extension and some mounting hardware, so in hindsight, having just found a source for those would have been a more cost-effective option than using parts out of the kit.
The initial CAD rendering for the custom bracket (there were a few versions)–

The “dry fit” of the first run of the custom bracket –

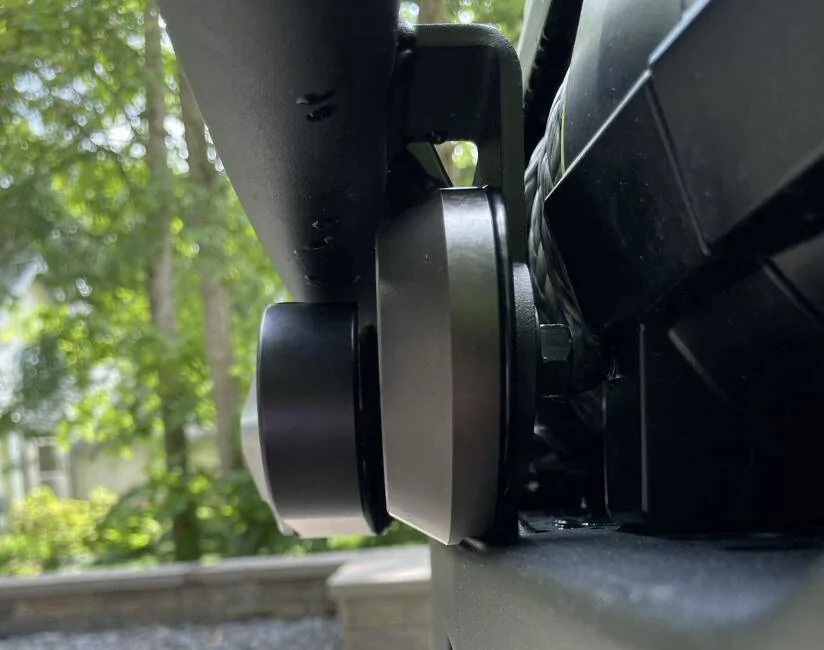
And here’s the finished camera bracket with camera installed.


And the view from the relocated camera.

RE FARILEAD
Next fitment issue we ran into is that the bumper bracket plate for the fairlead only really allows 1.5” from the bottom edge to the center of the mounting holes for the fairlead. What this equates to is needing a fairlead that is 3” tall (with additional tolerance to account for any raised top that manufactures use for their logo, etc.). Most offerings are 3.5” with a few that are 3.25” – unless you venture into the unbranded offerings from Amazon, etc. Yes, you can shoehorn in a 3.25” tall one, but it will be on an angle and not sit flush to the bumper fairlead plate. It will function and I’m aware of a few builds that have done this without issue.
The fairlead that comes with the Warn Zeon XD will not fit. The Warn Elite fairlead will not fit. The Factory 55 fairlead (which is the offering from Ford Performance as well) can be shoehorned to fit (the angle scenario mentioned earlier). Of course, the “Capture” fairlead from ADD/DV8 will fit – but that limits you to their style hook, which I didn’t want, and my research found some folks had operational issues with the rope line getting hung up on the uneven fairlead line opening surface (because it is shaped to the outline of the partially recessed hook when not in use).
The solution I worked with my garage for is to remove about 3/8” material from the bottom back edge of the Factor 55 fairlead (no need to powder coat since the fairlead is aluminum and the exposed side was hidden by the adjacent bumper section). This was definitely a more extreme solution than I had intended – but it mattered to me that the fairlead was a proven and known option – so I opted to stick with Factor 55 versus an unknown brand whose coating may not hold up, or the line opening not be as smooth for the line, etc.. Before committing to that solution, I did reach out to several other known manufactures (beyond just Warn and Factor 55) and of those that responded, none were any shorter than Factor 55 – and I had already purchased the Factor 55 as my 3rd fairlead option hoping it would fit.
This is the Factor 55 before modification. You can see if you line up the bottom of the fairlead with the clearance on the bumper fairlead plate that neither the mounting holes or the opening for the line are quite lined up.

Here is the modified Factor 55 fairlead installed. It’s tight to the bottom area of the bumper fairlead mounting plate and flat to the same plate on the back.

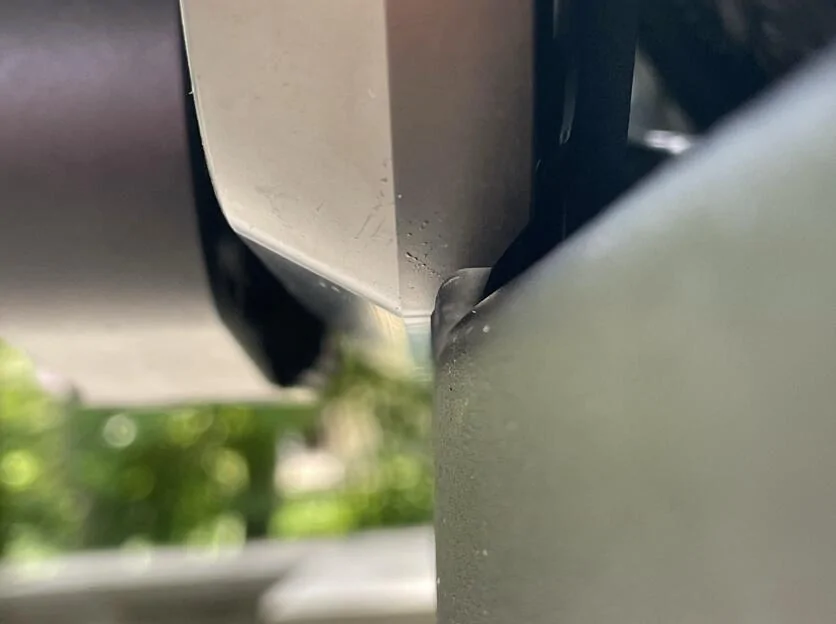
With the thickness of the new camera bracket behind the fairlead, the shop only needed to trim a bit off the lower backside of the fairlead for the needed clearance.

RE FOG LIGHTS
Going into the build, I knew the ADD bumper did not have fog light tabs and we would need to come up with a custom solution. This was the only actual custom bracket and fitment issue we were expecting. I was also aware from my research of at least 2 different builds that had accommodated putting fog lights in the wings of the bumper.
The overall design approach from ADD for these bumpers are to maximize clearance and approach angles – so they are clean and tight. The build I found to mimic included a custom bracket that would secure to the top holes in the bumper for the back plate in the wings, use of mounting brackets from Baja Designs that comes in their fog light kit (that you can order separately if you contact them – they are not on their web site), and mounting the lights upside down (so the thickest part of the fin is on the bottom). For those that are OCD like me, that also means taking off the lens cover and flipping it so that the writing is still right side up.
Note that my garage did a custom plate design different than my research found was used for the same approach, but the installation and result are essentially the same and they spent quite a bit of time with various adjustments to accommodate placement, light spread/pattern and allowing for some adjustability. This ended up being more involved than I was expecting, so ADD, if you are reading this – consider offering a solution for this as an add on product – based on the various posts I read when researching options, there is definitely a market for it.
This is the custom bracket as it was being built and dry fit by my garage (before powder coat and flipping the lenses). The silver top slotted “L” brackets are the ones that are usually included in the Baja fog light kit that you can order separately if you contact them. Note there are separate part numbers for the right and left sides, and I ordered 2 of each.


RE AUX SWITCH WIRING
From a wiring perspective, I prefer to have same color lights adjacent to each other on the aux switches – as I would most likely be using them together for the specific driving conditions – and in case I forget what is where, I like to have the most “road safe” option on one of the end switches. Since I had already wired my XL80 ditch lights to aux 2, that was the constraint I was running with for the rest of the lights. In hindsight, having learned that aux 1 to the OEM off-road fogs are part of the OEM wiring harness on the Raptor, I would have done this differently. But my garage opted to work with my original plan and by-pass the OEM wiring harness for my lighting plan.
I also have the amber rock guards for the XL80s on the A-pillar, so if needed, I can run those with other amber for appropriate conditions.
My garage also added relays where needed, as 2 of the pairing of lights to the aux switches are more than the amp ratings of the switches.
I’m favoring the Baja Design linked XL roof bar for a future add - but wanted to run with the new lights to validate if I feel like I’m missing light coverage before investing/installing. I had a lower lumen 20” light bar on the bumper of my Badlands and felt I was missing down trail lighting. The OnX6 is a different beast – so I wanted to run with that first before committing to roof lights.
In addition, the Baja S2 clear wide cornering in the fog pockets were wired to the OEM driving fog switch on the Raptor, and I added a pair of Baja Squadron clear wide cornering on the rear bumper that were wired to the reverse light circuit.
I did not wire the winch to an Aux switch. If you go with a different winch, you may have a need to have it on a switch (e.g. the Warn Zeon Platinum is best on a switch to control power to the wireless remote receiver).
I had no functional reason to swap out the rear bumper – other than aesthetics to match the front bumper – so down the slippery slope I went for an ADD rear bumper.
RE REAR BUILD
For the rear – my parts list included –
Note that that ADD lists 3 rear bumpers specific for the Raptor, but there are some additional offerings not listed specific for the Raptor that will accommodate a 37” spare tire and in my research, have been installed on a Raptor.
I stuck with options listed for the Raptor, and of those, wanted one that kept the license plate out of harm’s way (the Rock Fighter rear has the license plate extending below the bumper and my research found many with that bumper have bent their plate on more than one occasion). The compromise of blocking the “Raptor” badge below the door handle and sticking out when the tailgate open isn’t ideal, but for my needs, it was a compromise I was willing to make. I also mount my recovery boards horizontal on the rear tire using the American Adventure Labs recovery board mount for the spare tire, so I’ve gotten used to needing a bit more clearance when operating the tailgate (I’ve learned that the hard way by catching the recovery boards on my shoulder a few times – and now I can relearn that by hitting my side/hip with the license plate).
The rear install and fitment was pretty straight forward, which was well welcomed after the various unplanned items that came up for the front. The parking sensors were plug and play and the license plate electrical still feeds to the new bumper (the light shines up, versus sideways – so I’ll need to be conscious about keeping that clear of snow in the winter). Some other 3rd party offering to mount the license plate behind the spare tire include re-routing the electrical for the light through the tailgate for a side light that is secured to the relocation plate. As I have the Trailgater table installed, along with wiring for the GMRS Midland Ghost antenna already through the tailgate – I was trying to avoid needing to have that taken that apart to have another wire join them.
My WeatherTech license plate cover however was not compatible with the ADD plate relocation bracket and couldn’t be re-used.
Picture of the rear with recovery boards prior to the mods for reference.

I’m initially opting to not re-install the rear mudflaps. The ADD Bomber bumper will accommodate them, but functionally, they aren’t a necessity and since I have body color painted fender flares, like the look of the new bumper without them a bit better. If you ride behind me on muddy or rocky trails, I apologize now.
The completed mods from the back –

INTERIOR LIGHTS
The last item on this set of mods was adding some interior task lights. I wanted both additional lighting for the cargo area, as well as an easy way to have lights behind the vehicle when trailgating.
As a side note, one of the reasons for the TrailRax Half Rack on the roof was to have a location to secure a MoonShade – which is the portable canopy option I went with instead of a ROAM 4’ pull out canopy that you keep mounted to the roof rack. After being at SuperCell East and being in a group that had various portable shade rooms, etc., I wanted an option that was small to carry, easy to setup, and allowed me multiple use case scenarios other than just from the rear of my Raptor. My plans to use the Moonshade over the rear of the vehicle in a tailgating setup prompted looking at lighting options with that in mind.
After seeing some various solutions for this that mainly included RGB light strip options I ended up going with offerings from Kingpin. I selected them for 2 main features – they had swivel mounts so I could direct the light interior or exterior and they have a red light mode for use in scenarios when you don’t want to interfere with you adjusted night vision.
For my interior lights – my parts list included-
I had planned to have 12v connected to each of the dimmer switches and then have each of the dimmers connected to each of the 12” bars, one installed in the cargo area above the lift gate and the other on the lower lip of the liftgate. In full disclosure, I left it up to my shop to figure out the best option for an engine independent 12v power source to wire them to and they ran 16/2 wire to a 15-amp weatherproof fuse holder directly to the battery.
What my shop recommended is using only one dimmer since I can control the red/white and on/off individually at each light, and it made for a cleaner install.
Granted, this isn’t a very difficult install but having a shop do it that is meticulous with wiring definitely made it clean install. They leveraged the “accessory” access points to interior channels in the hard top (I have the newer OEM painted hard top that was first offered late 2024 model year) and a few supplemental holes to accommodate some of the specific wire locations.
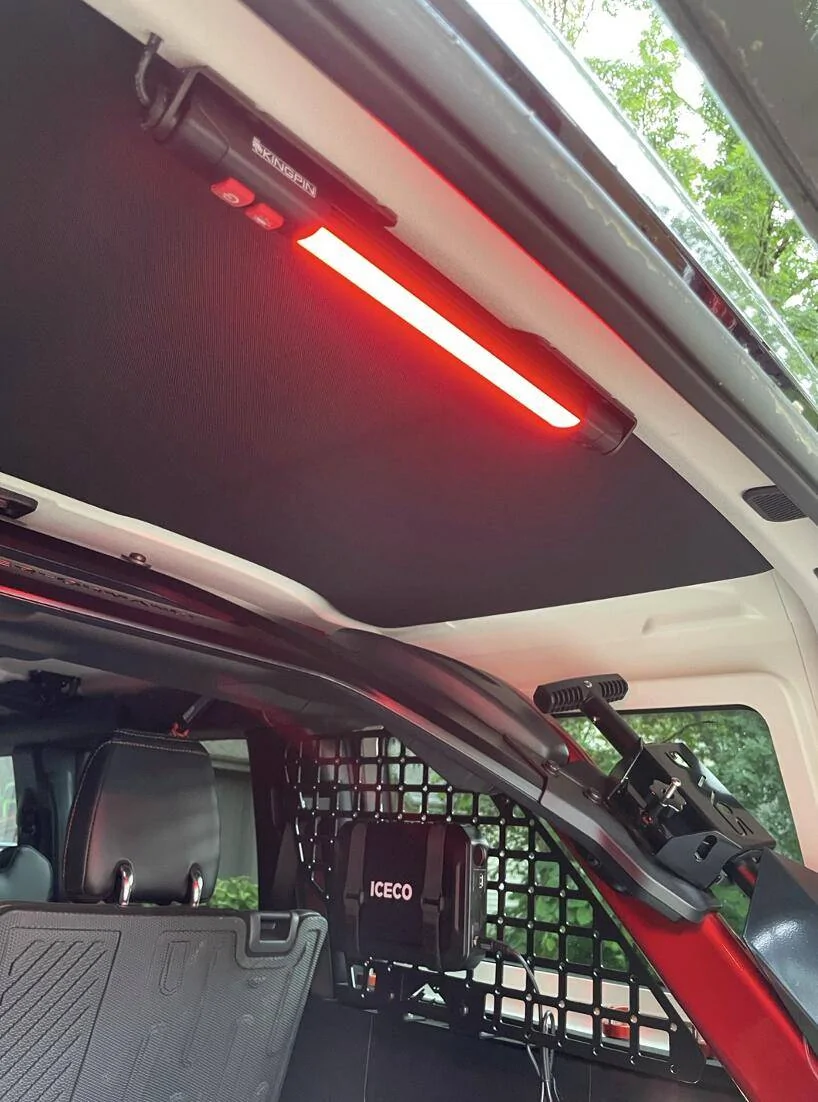
12” light on interior of hard top – red mode

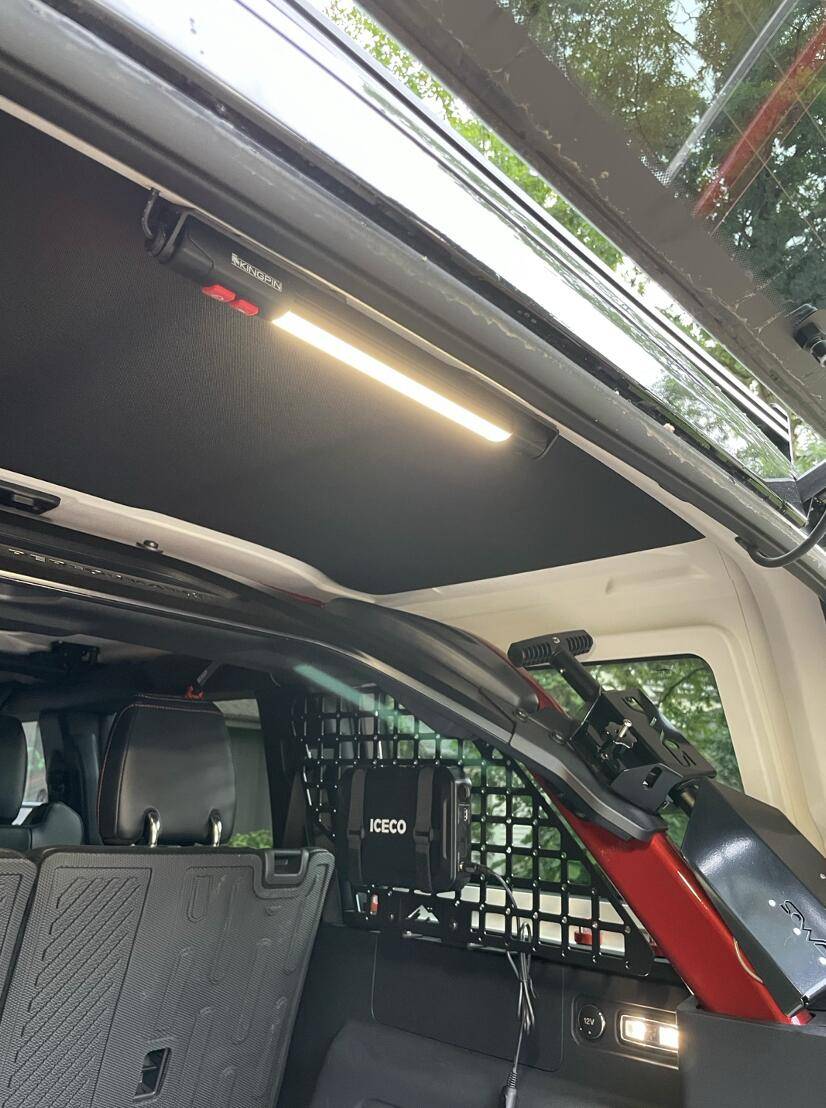
12” light on interior of hard top – white mode

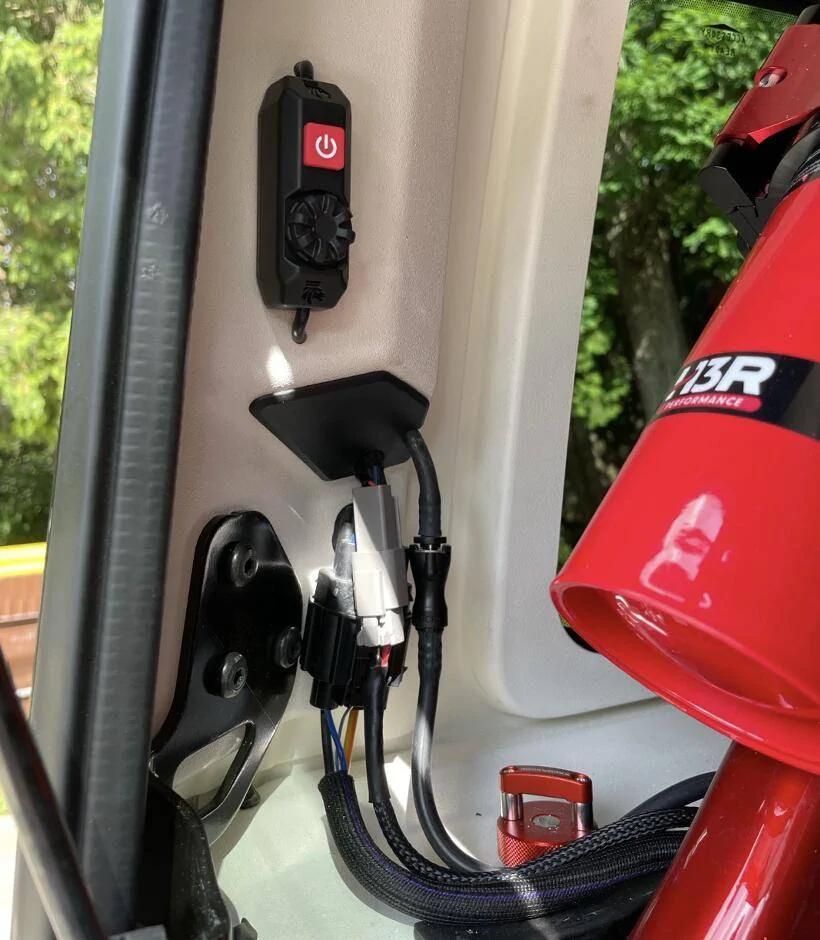
Control dimmer switch mounted on interior side of hard top and a quick disconnect to allow for the removal of the top.

Evening picture with both of the 12” bars on – red mode

My thanks to folks on the forum who readily answered questions and provided additional pictures of their builds as I navigated what I wanted to do with the Raptor.
Unlike the mods I had done on the Badlands, I opted to have a garage do all of it this time around. Some of it I could have, others I knew were out of my skillset (and toolset and garage accommodations). Having done most of the mods on my Badlands, I had already checked that box and being able to have it all done at once, and with less time do to so was just more appealing this time around. And frankly, since I wanted to make sure everything related to the winch was done right with safety in mind – I wanted someone with more experience to tackle all of the components related to that.

The driving reason for the mods was accommodating a winch and for this I went with swapping the OEM bumper and skid plate for the Rock Fighter offering from ADD. Sounds easy enough – but on the Raptor, that meant accounting for the parking sensors, ACC and camera. I also didn’t want to give up having fog lights, so that meant a custom solution to mount them, and as it turns out, custom wiring that by-passed the OEM wiring harness because I wanted my off-road fogs on a different aux switch then the OEM fogs (on the Raptor, the OEM wiring harness has driving fog lights on the round light switch to the left of the steering wheel, and off-road fogs on aux 1).
I’m a researcher by nature – evaluate every option, try to find something someone else may not have, and then land on a game plan. It can be a curse. For this build, I spent hours on forums, chatting and emailing with vendors, talking with others at events and had done my due diligence that my parts would work together. Despite that, there were multiple fitment issues and customizations we hadn’t planned on.
RE FRONT BUILD
For the front – my parts list included –
- ADD Rock Fighter Bumper (Raptor version)
- ADD front skid plate (Raptor version)
- ADD ACC relocation bracket/kit
- ADD/DV8 camera relocation kit
- ADD shoehorn reinforcement brackets
- **you’ll notice a theme here – I tried to keep as many parts from the same manufacturer to help mitigate any fitment or compatibility issues – to have included talking with ADD to confirm the above would work together
- Warn Zeon XD 12S winch
- Warn Elite fairlead (more on this below, I had to go with something different)
- Factor 55 hook and rope guard
- Baja Designs Onx6 20” clear combo light bar (my shop ordered a Baja Design wiring harness after the original parts order)
- Baja Designs LP4 amber combo lights
- Baja Designs Squadron wide cornering amber lights
- Baja Designs S2 wide cornering clear lights
- Baja Designs brackets from their fog light kit (brackets only – more to come on that later)
- **note I had already had the Baja Designs XL80 clear combo installed on my A-pillars with the powder coated black brackets from 4x4truckleds.com
My prep work with ADD had validated that their camera relocation kit was compatible with the Rock Fighter bumper. What I didn’t know when I had that discussion with ADD, is that that meant turning the camera bracket that goes behind the fairlead around 180 degrees and mounting the camera BELOW the fairlead. For a build that I was keeping as off road survivable as feasible, putting it in that location really wasn’t an option I wanted to do – it just feels like a vulnerable place to mount the camera. I also envisioned having that one time where I have a winch pull angled below the bumper and the line pulls down over that area, or the hook drops when I disengage the winch clutch and bangs on the camera, etc.
Not my build, but a reference picture I found for the camera install below the fairlead using the ADD bracket on the ADD bumper.

Here comes in the first need for a custom bracket. Essentially, if ADD would offer a version of the camera bracket with extended uprights to the bracket section that fits behind the fairlead, the camera could be high enough to be above the bull bar. But they don’t (or didn’t at the time of this build).
If you don’t have the option for a custom bracket that does, another solution is to drill a second set of holes in the bumper fairlead mounting plate, above the fairlead mounting points that line up with the camera bracket in their kit. Note if you go this route, you are drilling through steel and will need a means to protect the exposed surface from exposure to the elements – like re-powder coating (I am aware of one build that had their bumpers sprayed with bedliner coating after these holes were drilled). I opted to go the custom bracket route and I was fortunate that my garage had a resource and interest in solving this riddle. The garage wanted a solution that both protected the camera and hid the hose and wiring. The garage also needed to use some of the parts from the ADD relocation kit for this, specifically the washer hose extension and some mounting hardware, so in hindsight, having just found a source for those would have been a more cost-effective option than using parts out of the kit.
The initial CAD rendering for the custom bracket (there were a few versions)–

The “dry fit” of the first run of the custom bracket –

And here’s the finished camera bracket with camera installed.


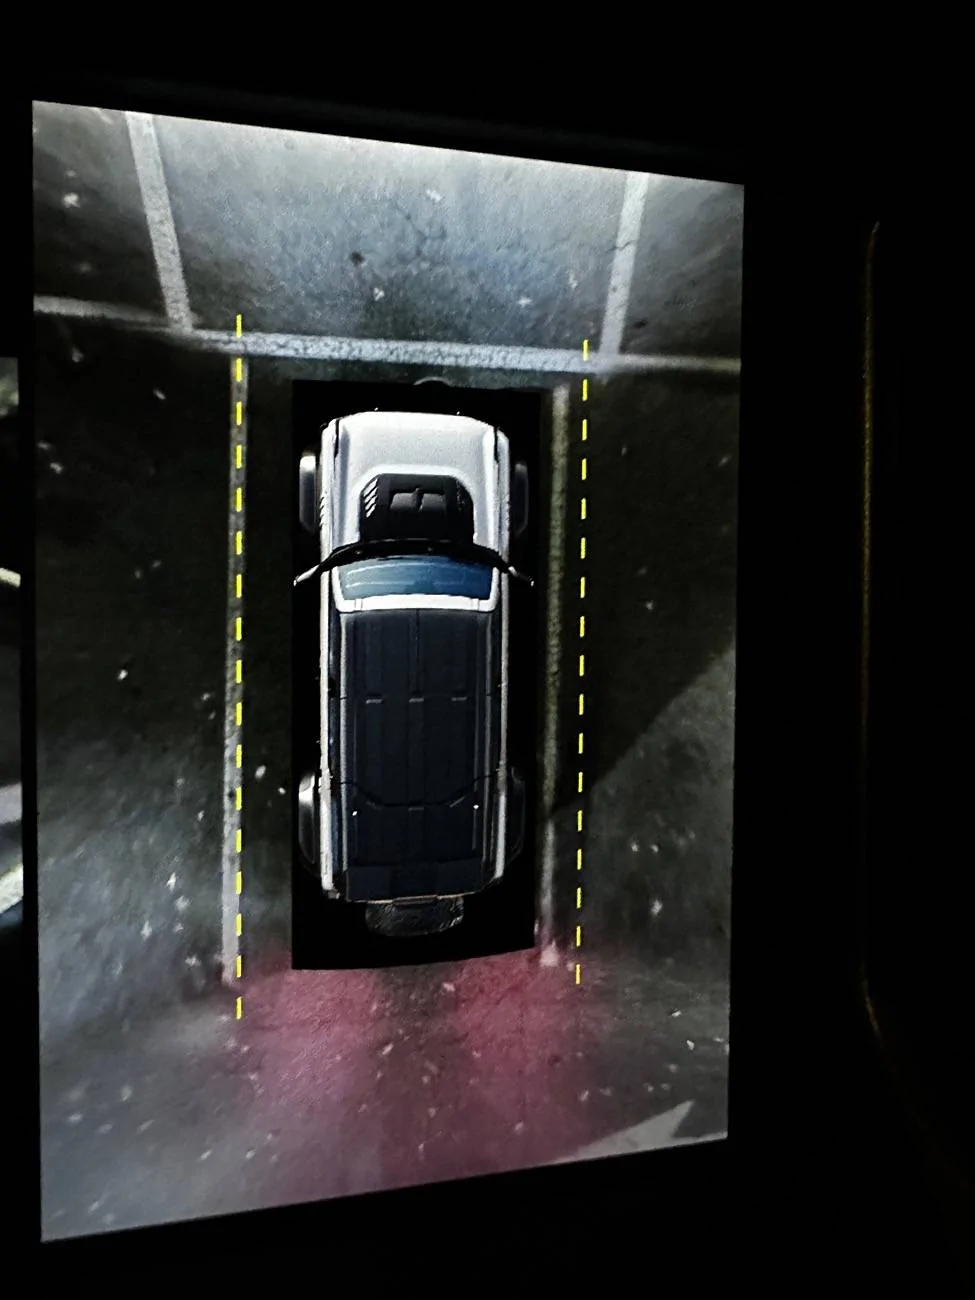
And the view from the relocated camera.

RE FARILEAD
Next fitment issue we ran into is that the bumper bracket plate for the fairlead only really allows 1.5” from the bottom edge to the center of the mounting holes for the fairlead. What this equates to is needing a fairlead that is 3” tall (with additional tolerance to account for any raised top that manufactures use for their logo, etc.). Most offerings are 3.5” with a few that are 3.25” – unless you venture into the unbranded offerings from Amazon, etc. Yes, you can shoehorn in a 3.25” tall one, but it will be on an angle and not sit flush to the bumper fairlead plate. It will function and I’m aware of a few builds that have done this without issue.
The fairlead that comes with the Warn Zeon XD will not fit. The Warn Elite fairlead will not fit. The Factory 55 fairlead (which is the offering from Ford Performance as well) can be shoehorned to fit (the angle scenario mentioned earlier). Of course, the “Capture” fairlead from ADD/DV8 will fit – but that limits you to their style hook, which I didn’t want, and my research found some folks had operational issues with the rope line getting hung up on the uneven fairlead line opening surface (because it is shaped to the outline of the partially recessed hook when not in use).
The solution I worked with my garage for is to remove about 3/8” material from the bottom back edge of the Factor 55 fairlead (no need to powder coat since the fairlead is aluminum and the exposed side was hidden by the adjacent bumper section). This was definitely a more extreme solution than I had intended – but it mattered to me that the fairlead was a proven and known option – so I opted to stick with Factor 55 versus an unknown brand whose coating may not hold up, or the line opening not be as smooth for the line, etc.. Before committing to that solution, I did reach out to several other known manufactures (beyond just Warn and Factor 55) and of those that responded, none were any shorter than Factor 55 – and I had already purchased the Factor 55 as my 3rd fairlead option hoping it would fit.
This is the Factor 55 before modification. You can see if you line up the bottom of the fairlead with the clearance on the bumper fairlead plate that neither the mounting holes or the opening for the line are quite lined up.
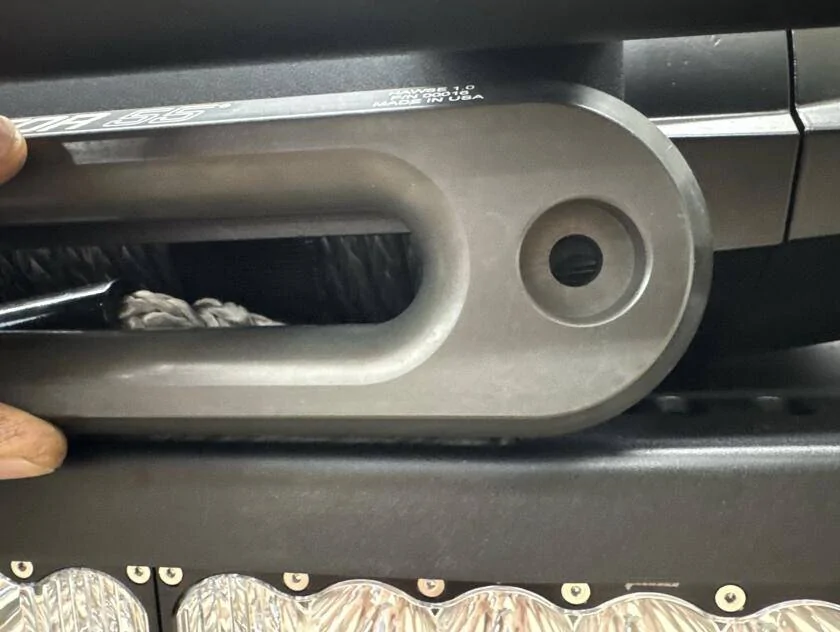
Here is the modified Factor 55 fairlead installed. It’s tight to the bottom area of the bumper fairlead mounting plate and flat to the same plate on the back.
With the thickness of the new camera bracket behind the fairlead, the shop only needed to trim a bit off the lower backside of the fairlead for the needed clearance.
RE FOG LIGHTS
Going into the build, I knew the ADD bumper did not have fog light tabs and we would need to come up with a custom solution. This was the only actual custom bracket and fitment issue we were expecting. I was also aware from my research of at least 2 different builds that had accommodated putting fog lights in the wings of the bumper.
The overall design approach from ADD for these bumpers are to maximize clearance and approach angles – so they are clean and tight. The build I found to mimic included a custom bracket that would secure to the top holes in the bumper for the back plate in the wings, use of mounting brackets from Baja Designs that comes in their fog light kit (that you can order separately if you contact them – they are not on their web site), and mounting the lights upside down (so the thickest part of the fin is on the bottom). For those that are OCD like me, that also means taking off the lens cover and flipping it so that the writing is still right side up.
Note that my garage did a custom plate design different than my research found was used for the same approach, but the installation and result are essentially the same and they spent quite a bit of time with various adjustments to accommodate placement, light spread/pattern and allowing for some adjustability. This ended up being more involved than I was expecting, so ADD, if you are reading this – consider offering a solution for this as an add on product – based on the various posts I read when researching options, there is definitely a market for it.
This is the custom bracket as it was being built and dry fit by my garage (before powder coat and flipping the lenses). The silver top slotted “L” brackets are the ones that are usually included in the Baja fog light kit that you can order separately if you contact them. Note there are separate part numbers for the right and left sides, and I ordered 2 of each.


RE AUX SWITCH WIRING
From a wiring perspective, I prefer to have same color lights adjacent to each other on the aux switches – as I would most likely be using them together for the specific driving conditions – and in case I forget what is where, I like to have the most “road safe” option on one of the end switches. Since I had already wired my XL80 ditch lights to aux 2, that was the constraint I was running with for the rest of the lights. In hindsight, having learned that aux 1 to the OEM off-road fogs are part of the OEM wiring harness on the Raptor, I would have done this differently. But my garage opted to work with my original plan and by-pass the OEM wiring harness for my lighting plan.
- Aux 1 – clear OnX6 light bar on the bumper (high setting)
- Aux 2 – clear XL80 on the A-pillar
- Aux 3 – reserved for future roof light bar
- Aux 4 – open
- Aux 5 – amber LP4s on the bumper
- Aux 6 – amber fogs
I also have the amber rock guards for the XL80s on the A-pillar, so if needed, I can run those with other amber for appropriate conditions.
My garage also added relays where needed, as 2 of the pairing of lights to the aux switches are more than the amp ratings of the switches.
I’m favoring the Baja Design linked XL roof bar for a future add - but wanted to run with the new lights to validate if I feel like I’m missing light coverage before investing/installing. I had a lower lumen 20” light bar on the bumper of my Badlands and felt I was missing down trail lighting. The OnX6 is a different beast – so I wanted to run with that first before committing to roof lights.
In addition, the Baja S2 clear wide cornering in the fog pockets were wired to the OEM driving fog switch on the Raptor, and I added a pair of Baja Squadron clear wide cornering on the rear bumper that were wired to the reverse light circuit.
I did not wire the winch to an Aux switch. If you go with a different winch, you may have a need to have it on a switch (e.g. the Warn Zeon Platinum is best on a switch to control power to the wireless remote receiver).
I had no functional reason to swap out the rear bumper – other than aesthetics to match the front bumper – so down the slippery slope I went for an ADD rear bumper.
RE REAR BUILD
For the rear – my parts list included –
- ADD Bomber rear bumper (Raptor version) – this comes with the license plate relocation bracket that mounts behind the spare tire)
- Baja Design Squadron, clear wide cornering lights
Note that that ADD lists 3 rear bumpers specific for the Raptor, but there are some additional offerings not listed specific for the Raptor that will accommodate a 37” spare tire and in my research, have been installed on a Raptor.
I stuck with options listed for the Raptor, and of those, wanted one that kept the license plate out of harm’s way (the Rock Fighter rear has the license plate extending below the bumper and my research found many with that bumper have bent their plate on more than one occasion). The compromise of blocking the “Raptor” badge below the door handle and sticking out when the tailgate open isn’t ideal, but for my needs, it was a compromise I was willing to make. I also mount my recovery boards horizontal on the rear tire using the American Adventure Labs recovery board mount for the spare tire, so I’ve gotten used to needing a bit more clearance when operating the tailgate (I’ve learned that the hard way by catching the recovery boards on my shoulder a few times – and now I can relearn that by hitting my side/hip with the license plate).
The rear install and fitment was pretty straight forward, which was well welcomed after the various unplanned items that came up for the front. The parking sensors were plug and play and the license plate electrical still feeds to the new bumper (the light shines up, versus sideways – so I’ll need to be conscious about keeping that clear of snow in the winter). Some other 3rd party offering to mount the license plate behind the spare tire include re-routing the electrical for the light through the tailgate for a side light that is secured to the relocation plate. As I have the Trailgater table installed, along with wiring for the GMRS Midland Ghost antenna already through the tailgate – I was trying to avoid needing to have that taken that apart to have another wire join them.
My WeatherTech license plate cover however was not compatible with the ADD plate relocation bracket and couldn’t be re-used.
Picture of the rear with recovery boards prior to the mods for reference.

I’m initially opting to not re-install the rear mudflaps. The ADD Bomber bumper will accommodate them, but functionally, they aren’t a necessity and since I have body color painted fender flares, like the look of the new bumper without them a bit better. If you ride behind me on muddy or rocky trails, I apologize now.
The completed mods from the back –

INTERIOR LIGHTS
The last item on this set of mods was adding some interior task lights. I wanted both additional lighting for the cargo area, as well as an easy way to have lights behind the vehicle when trailgating.
As a side note, one of the reasons for the TrailRax Half Rack on the roof was to have a location to secure a MoonShade – which is the portable canopy option I went with instead of a ROAM 4’ pull out canopy that you keep mounted to the roof rack. After being at SuperCell East and being in a group that had various portable shade rooms, etc., I wanted an option that was small to carry, easy to setup, and allowed me multiple use case scenarios other than just from the rear of my Raptor. My plans to use the Moonshade over the rear of the vehicle in a tailgating setup prompted looking at lighting options with that in mind.
After seeing some various solutions for this that mainly included RGB light strip options I ended up going with offerings from Kingpin. I selected them for 2 main features – they had swivel mounts so I could direct the light interior or exterior and they have a red light mode for use in scenarios when you don’t want to interfere with you adjusted night vision.
For my interior lights – my parts list included-
- 2 Kingpin 12” F-series lights
- 2 Kingpin F-series search mount kits
- 2 Kingpin Rotary Dimmer switches (only one used)
I had planned to have 12v connected to each of the dimmer switches and then have each of the dimmers connected to each of the 12” bars, one installed in the cargo area above the lift gate and the other on the lower lip of the liftgate. In full disclosure, I left it up to my shop to figure out the best option for an engine independent 12v power source to wire them to and they ran 16/2 wire to a 15-amp weatherproof fuse holder directly to the battery.
What my shop recommended is using only one dimmer since I can control the red/white and on/off individually at each light, and it made for a cleaner install.
Granted, this isn’t a very difficult install but having a shop do it that is meticulous with wiring definitely made it clean install. They leveraged the “accessory” access points to interior channels in the hard top (I have the newer OEM painted hard top that was first offered late 2024 model year) and a few supplemental holes to accommodate some of the specific wire locations.
12” light on interior of hard top – red mode
12” light on interior of hard top – white mode
Control dimmer switch mounted on interior side of hard top and a quick disconnect to allow for the removal of the top.
Evening picture with both of the 12” bars on – red mode

Sponsored

")