
- First Name
- Nicholas
- Joined
- Apr 28, 2025
- Threads
- 5
- Messages
- 123
- Reaction score
- 236
- Location
- Avon Colorado
- Vehicle(s)
- 2024 bronco
- Your Bronco Model
- Badlands
- Thread starter
- #1
My previous build was an F150 that I loved and hated at the same time. For this build I decided to have everything planned out well in advance instead of adding one thing at a time and hoping it would fit with the other stuff. This is a 2024 Sasquatch Badlands.
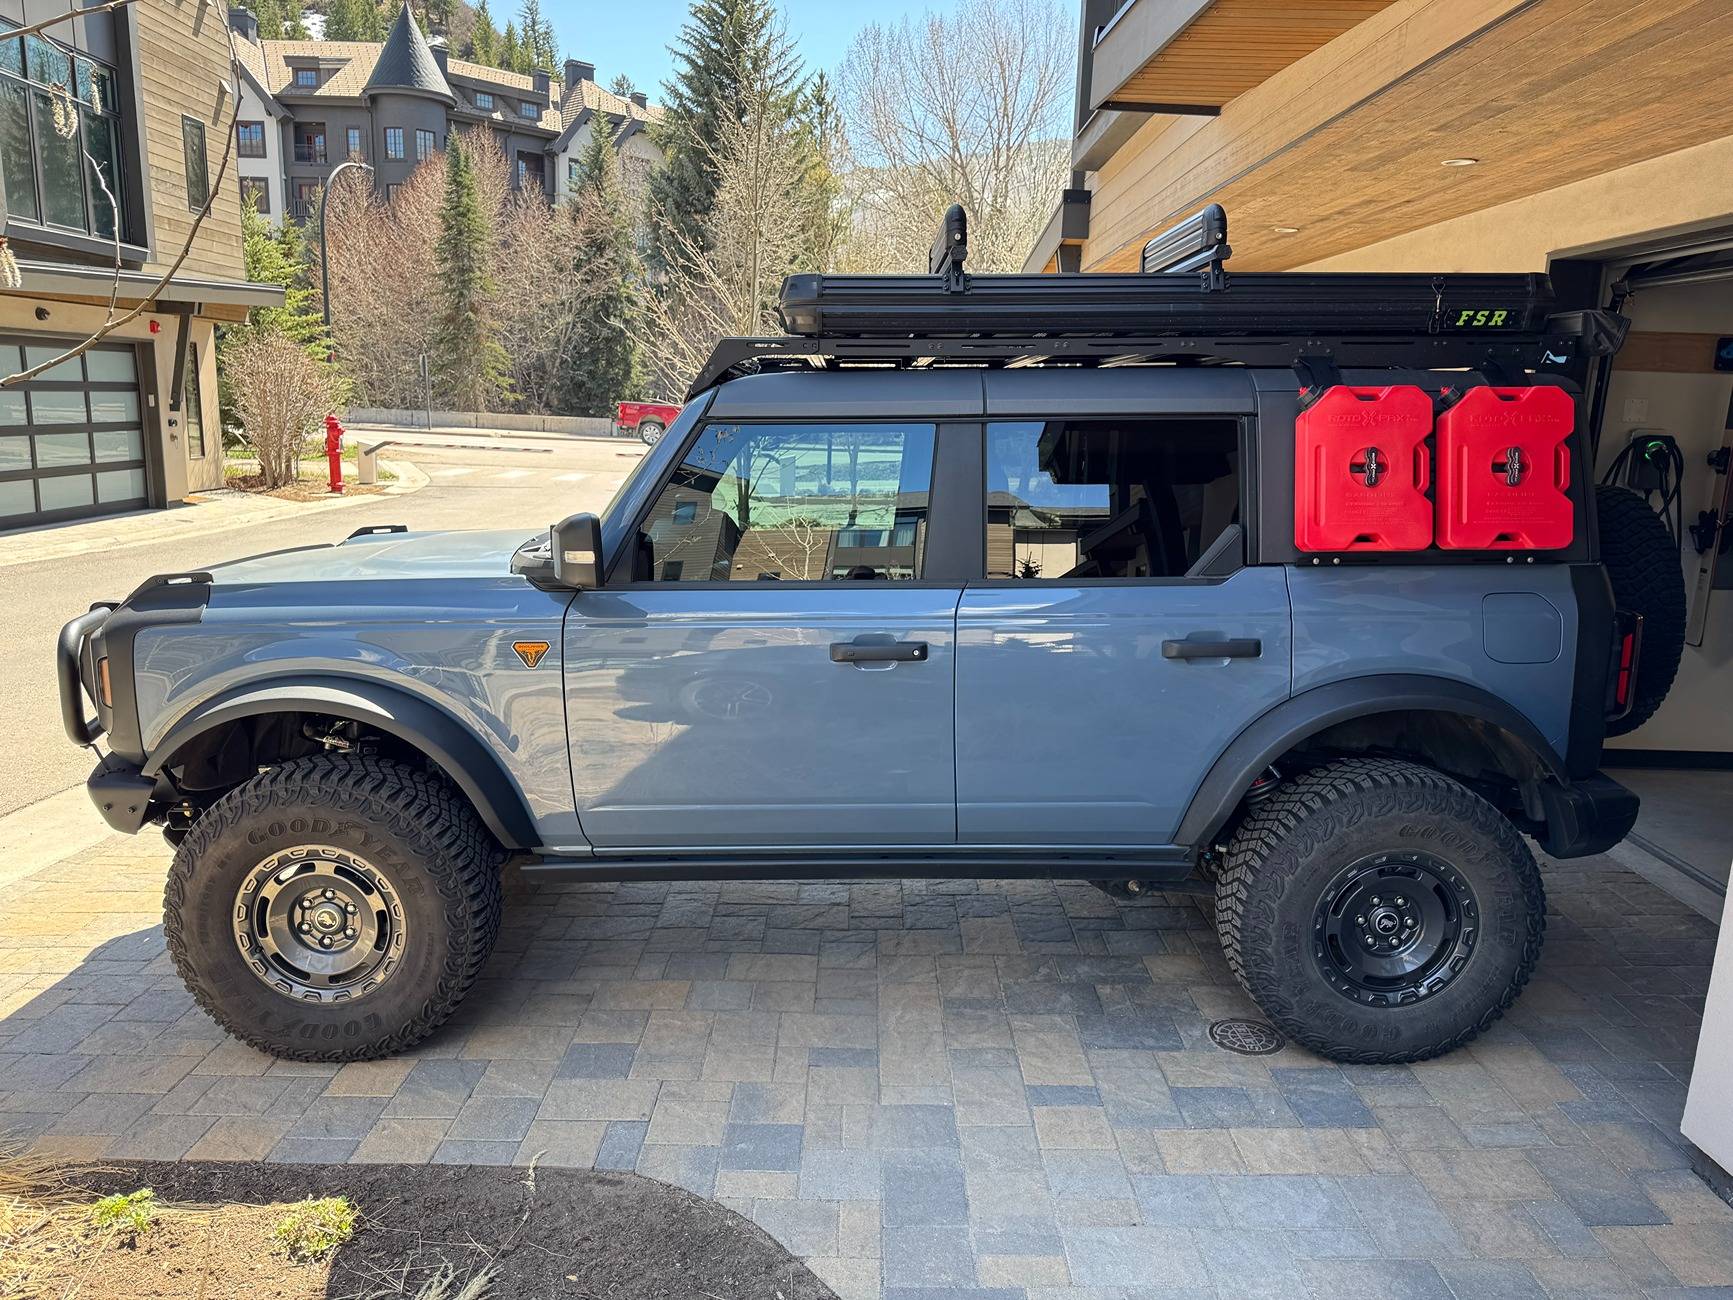
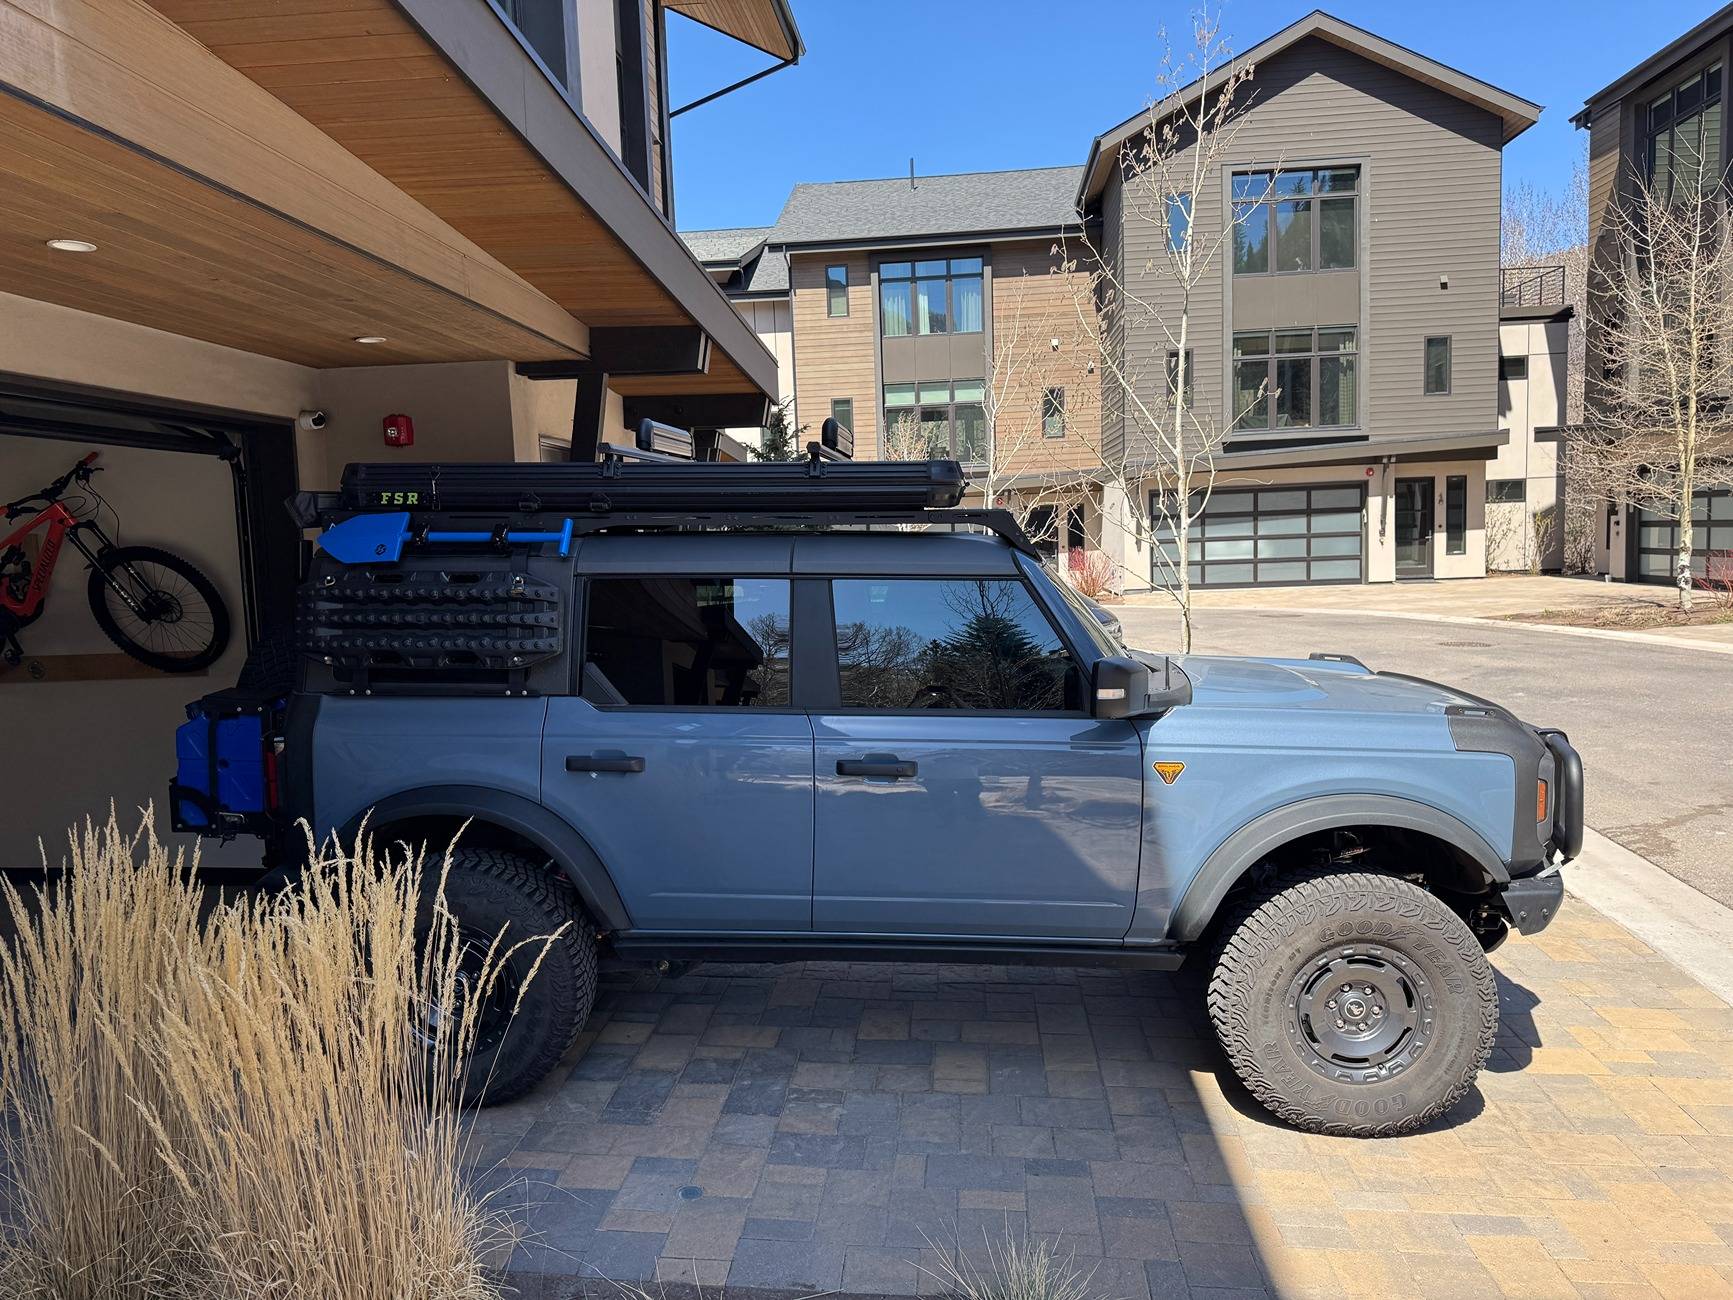
I'm using a trailrax roofrack with Heretic light bar and Freespirit Recreation Aspen V2 tent, 2 rotopax gas cans on the drivers side. The ski carriers are only on during the winter.

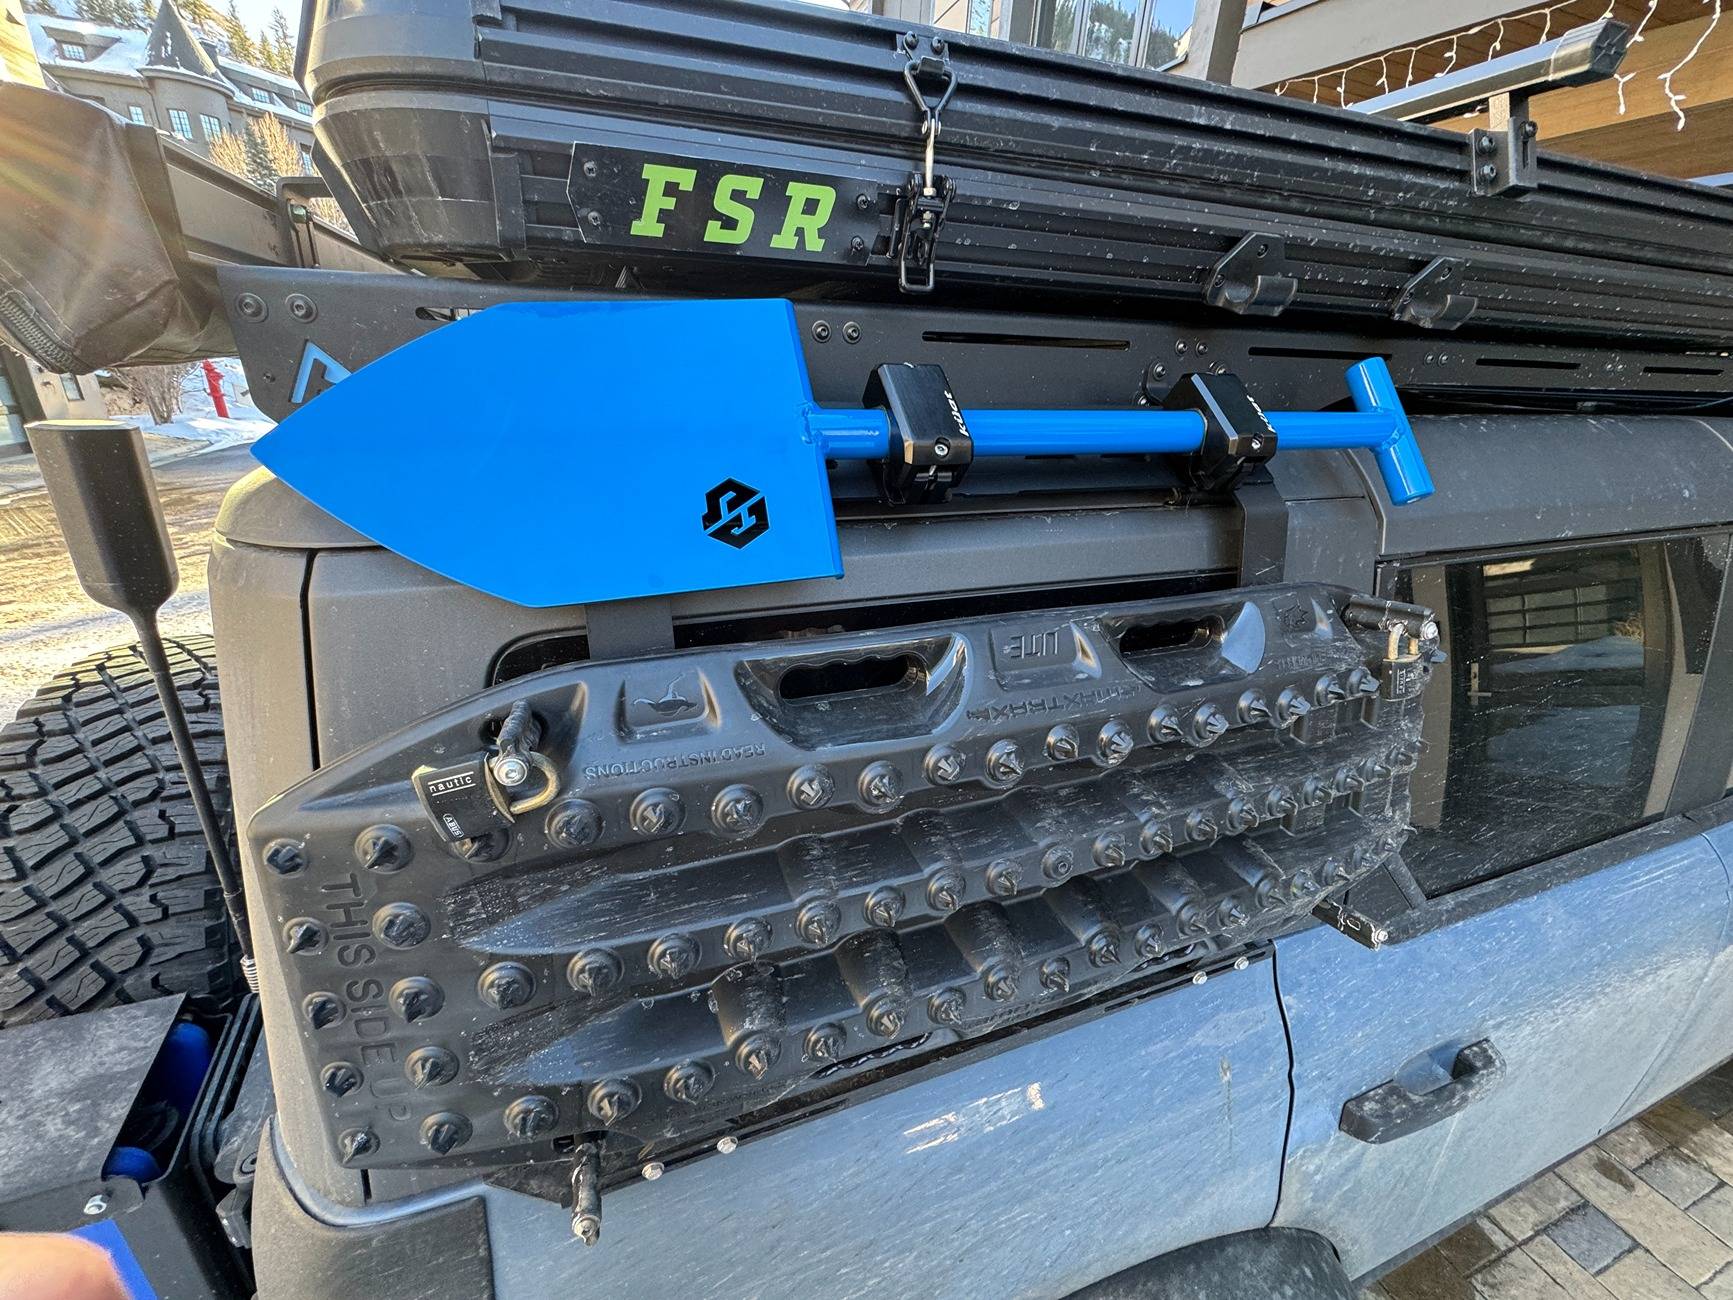
On the passenger side I have the new maxtrax lites and a GP factor shovel using the Kuat shovel/axe mounts. The shovel was a bit too short to be bolted directly to the crossbars of the roofrack so I used some scrap aluminum to make a crossbar between the two supports and bolt the shovel mount to those.
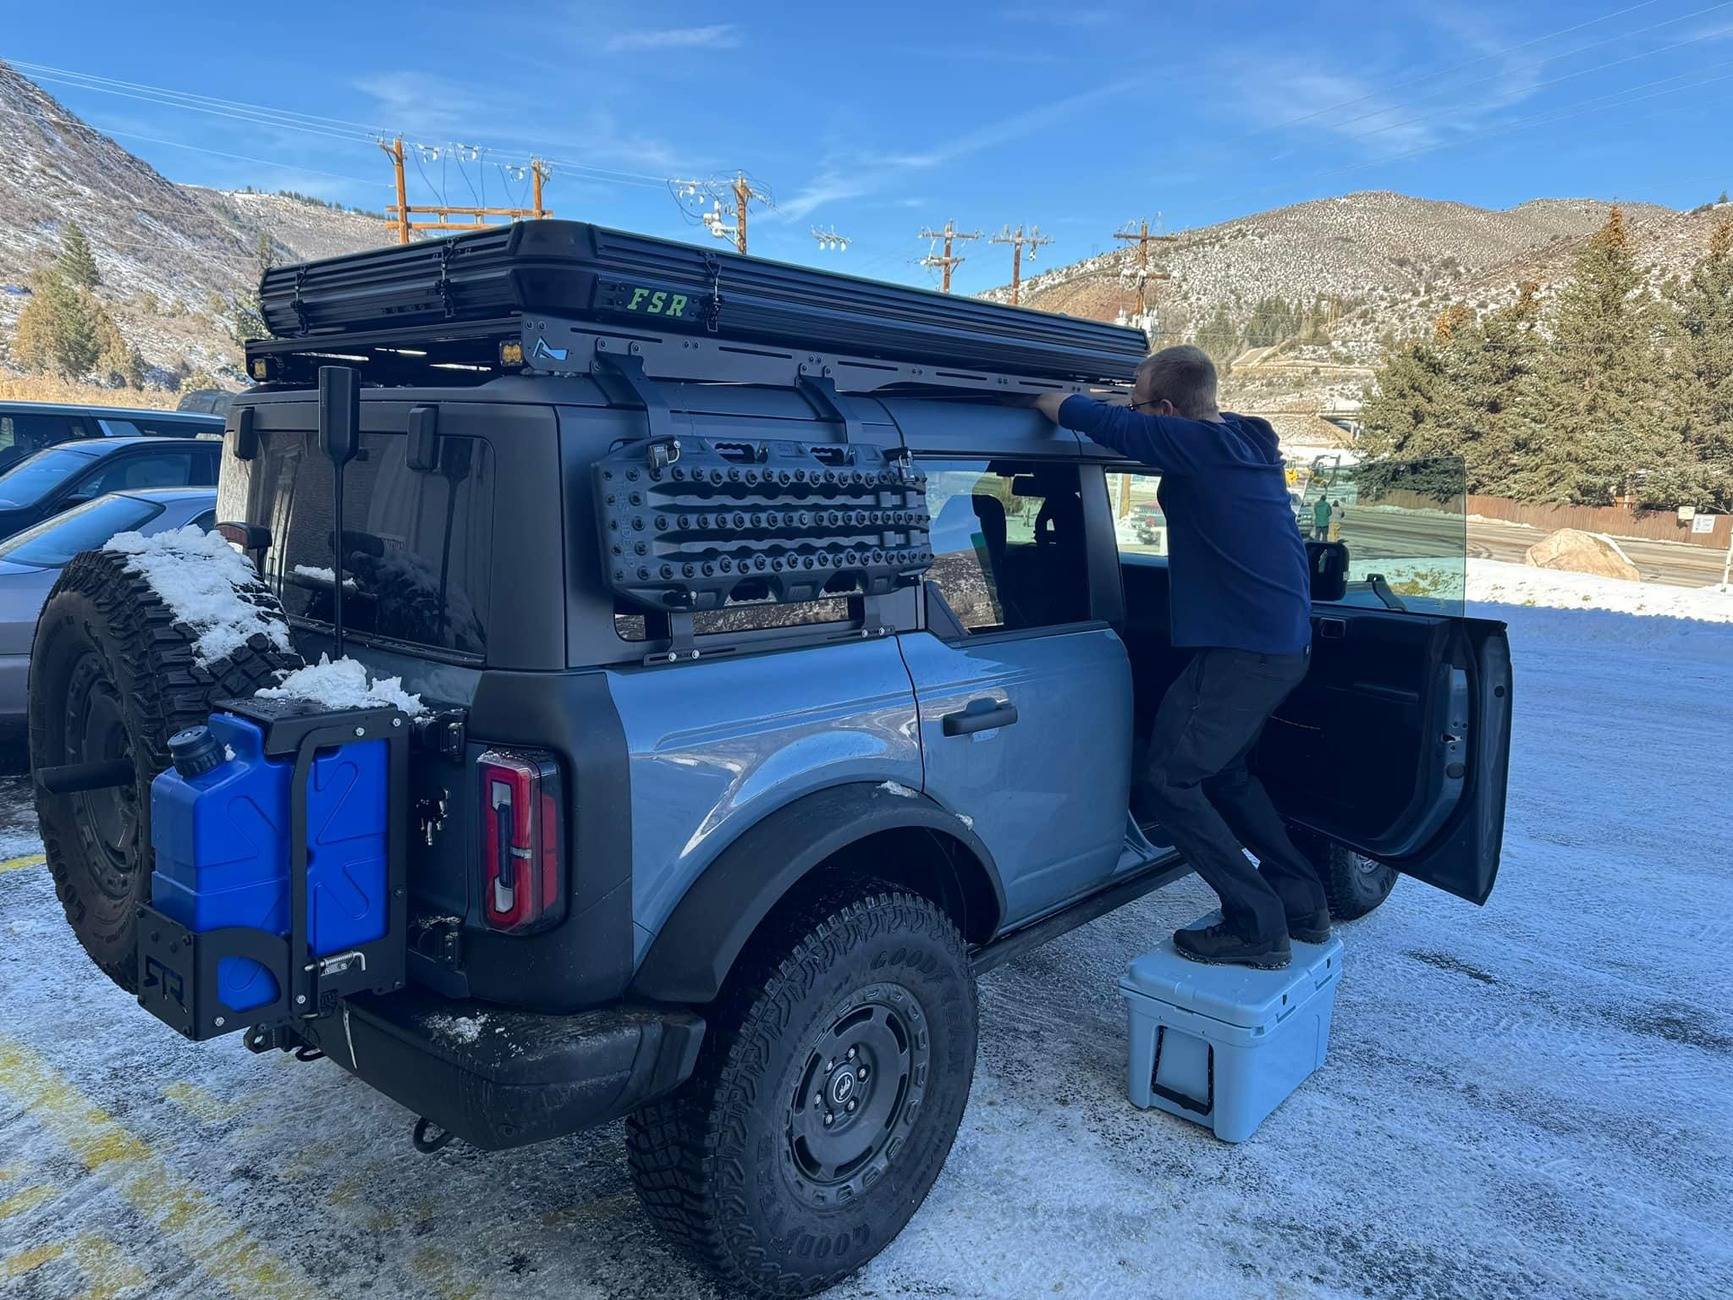
On the rear of the truck, I replaced the stock tire carrier with the RTR spare tire carrier. This allowed me to also mount their jerry can mount and antenna/flag mount. The jerry can mount had to be modified to fit the Lifesaver water purifier jerry can. This thing rattles a LOT so I had to put rubber bushings in all the moving parts and attach some thick rubber strips to the jerry can to keep it quiet. The antenna is for my Weboost cellular booster. It works surprisingly well, especially living up in the mountains in Colorado. The awning is a 4ft wide Roam awning bolted directly to the back of the rooftop tent using FSR's awning mounts (awning not in some photos) I also have two rear mounted amber baja designs S2 mounted to my roofrack for my dont tailgate me/dust lights.
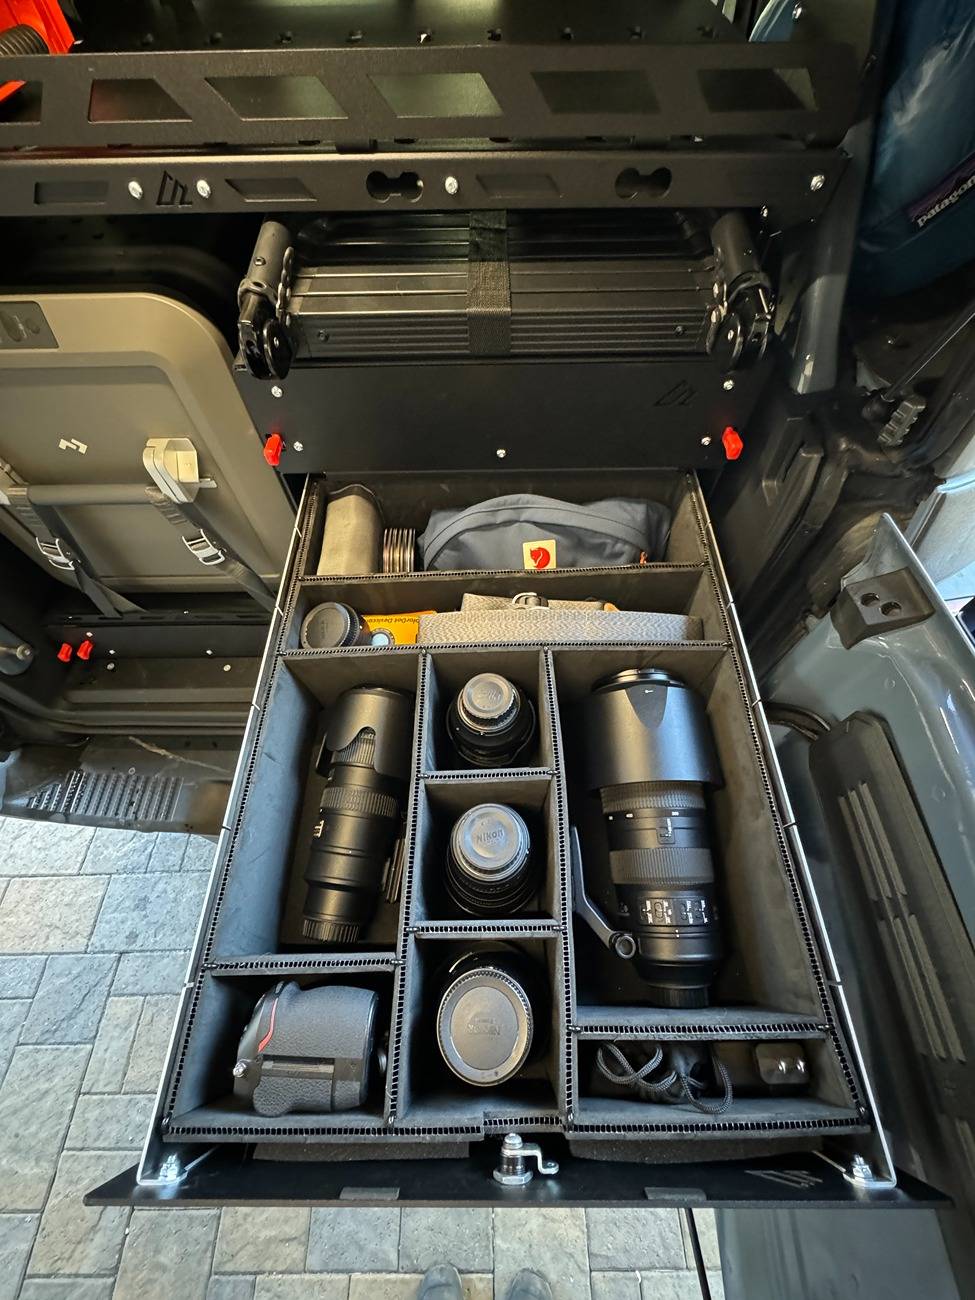
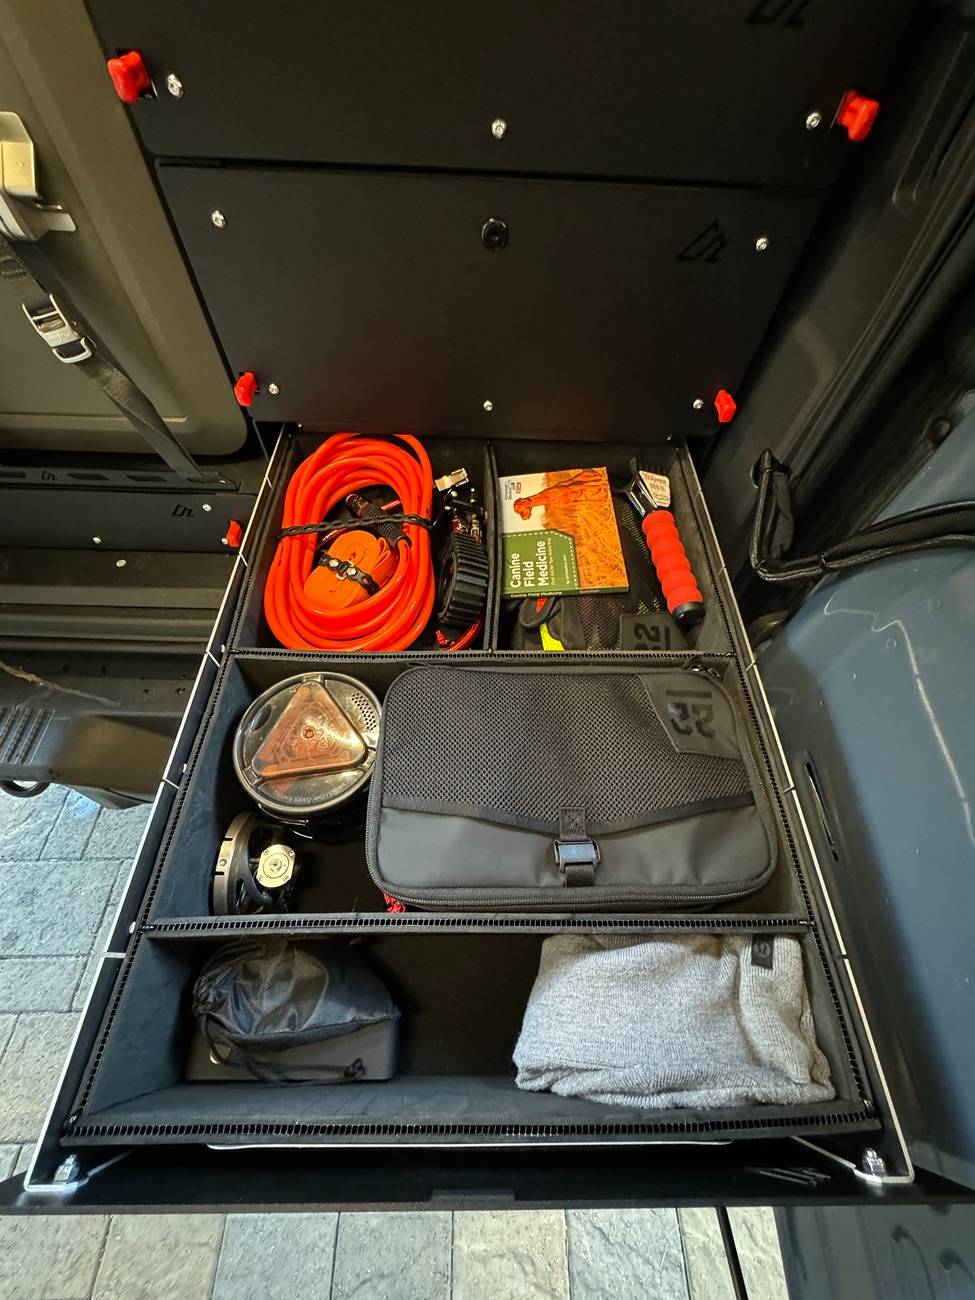
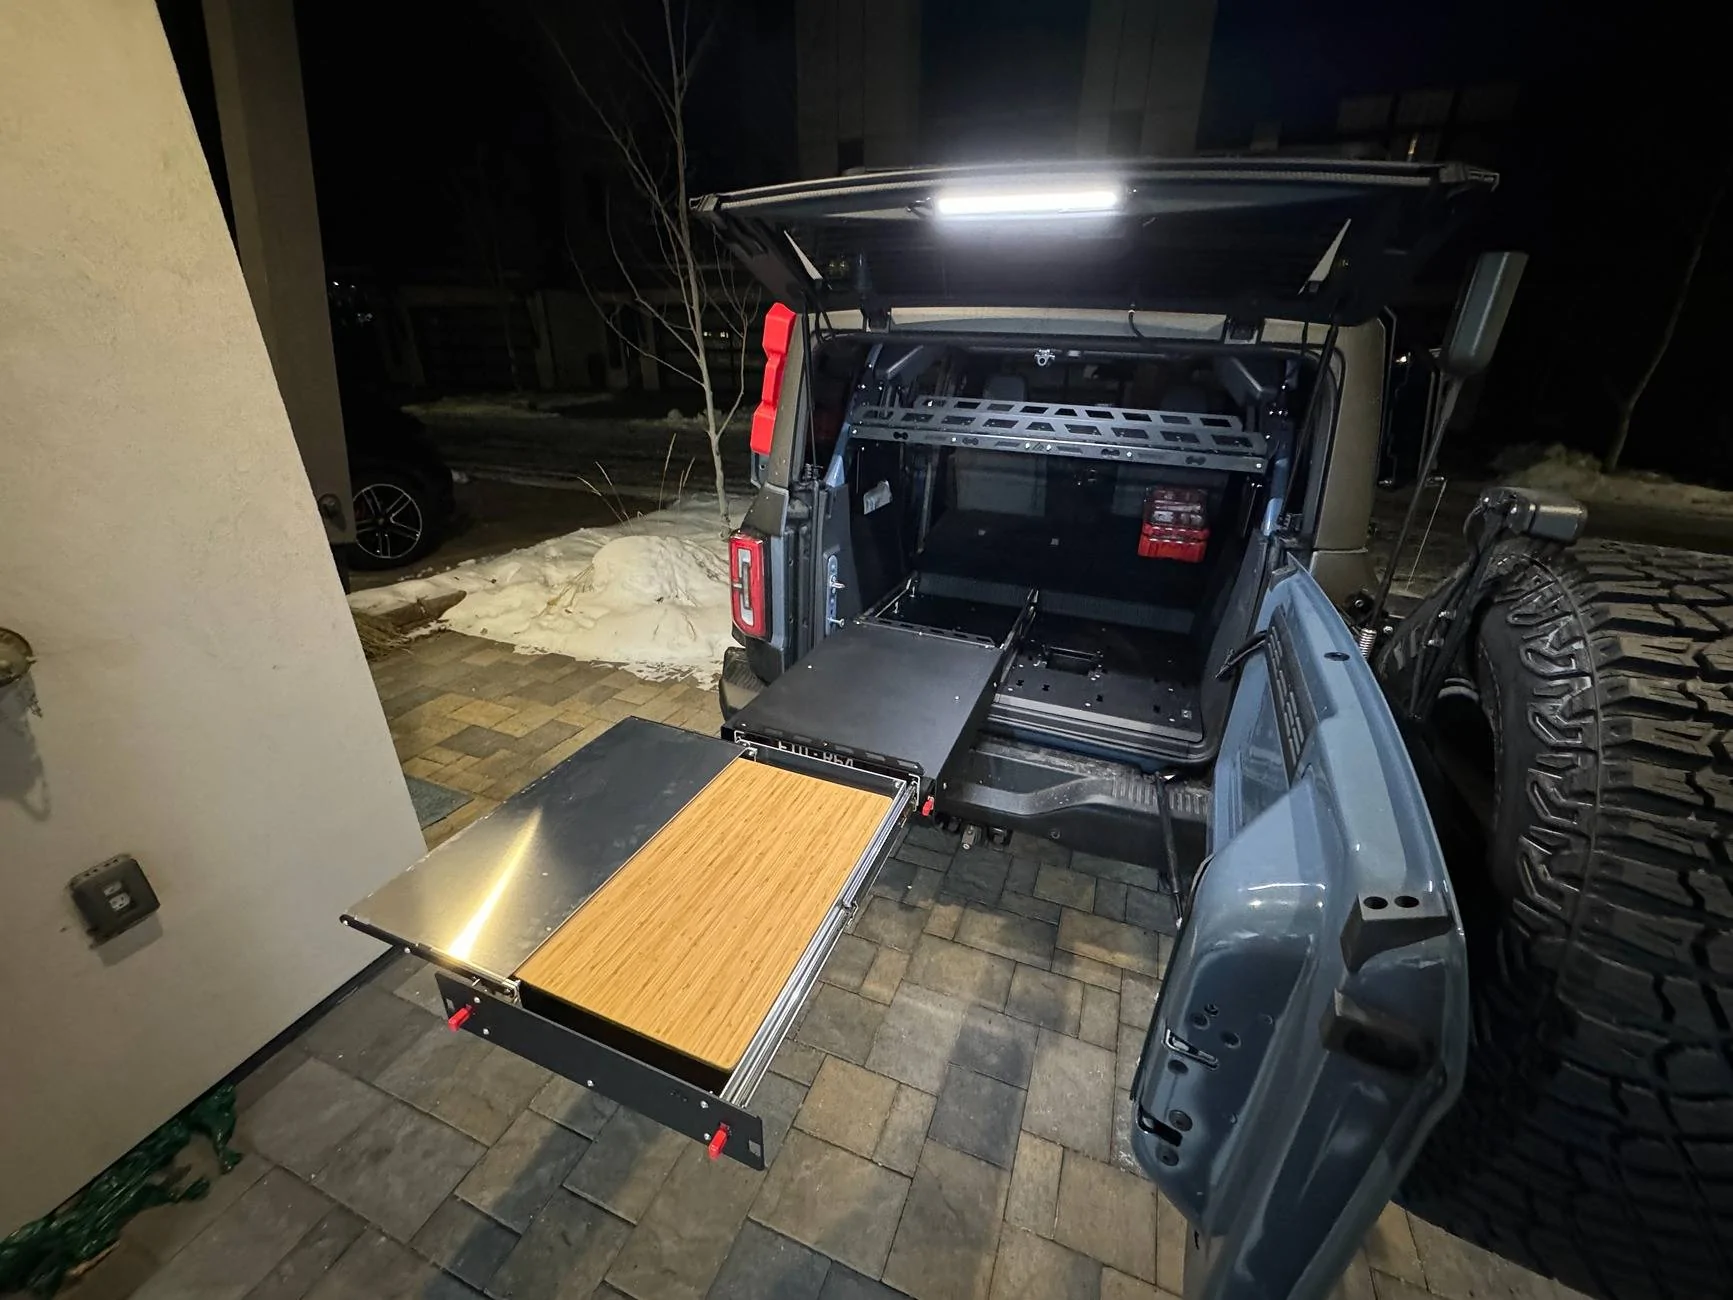
Inside the rear is where things get pretty cool. I have a drawer system, fridge slider, shelf and air compressor mount made by American Adventure Labs. One of my drawers has a lock on it for keeping my camera equipment secure (though I usually dont leave it in the truck for very long) The fridge slider opens up to be a table with some storage inside it. I made a DIY version of pelicans trekpak dividers for the drawers and used Step 22 bags for organization of tools etc. On top of the drawers is where I have the ladder for my tent. Its secured using those modl infinity tool strap things we keep getting ads for on facebook. They are actually pretty awesome. The Fridge is a Dometic CFX5 55L and that red thing is two milwaukee packouts. The top one is a First aid kit and the larger bottom one is a trauma kit.

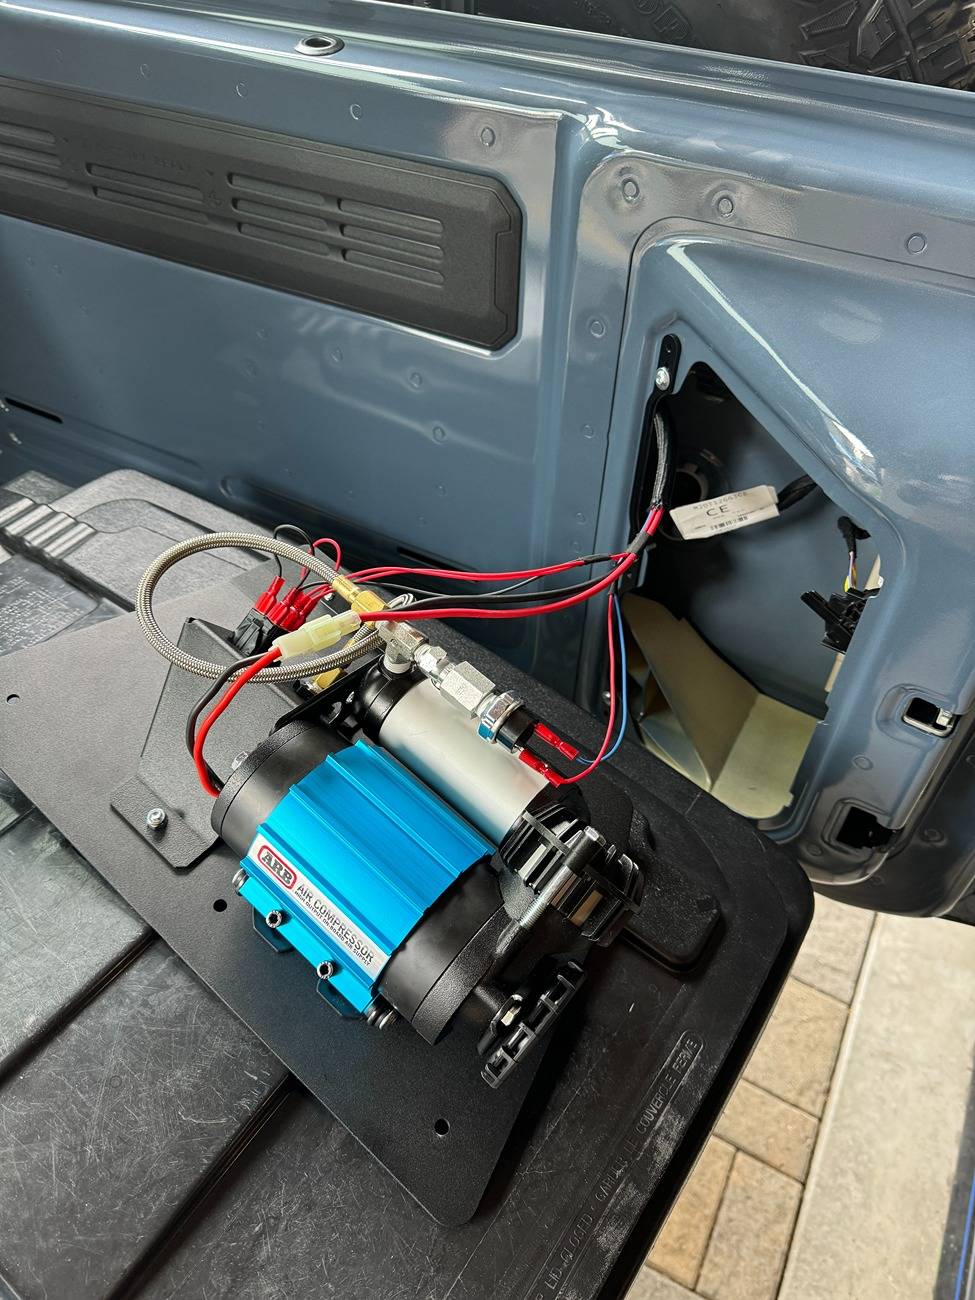
This is my onboard air supply, again by american adventure labs. Its using an ARB compressor.
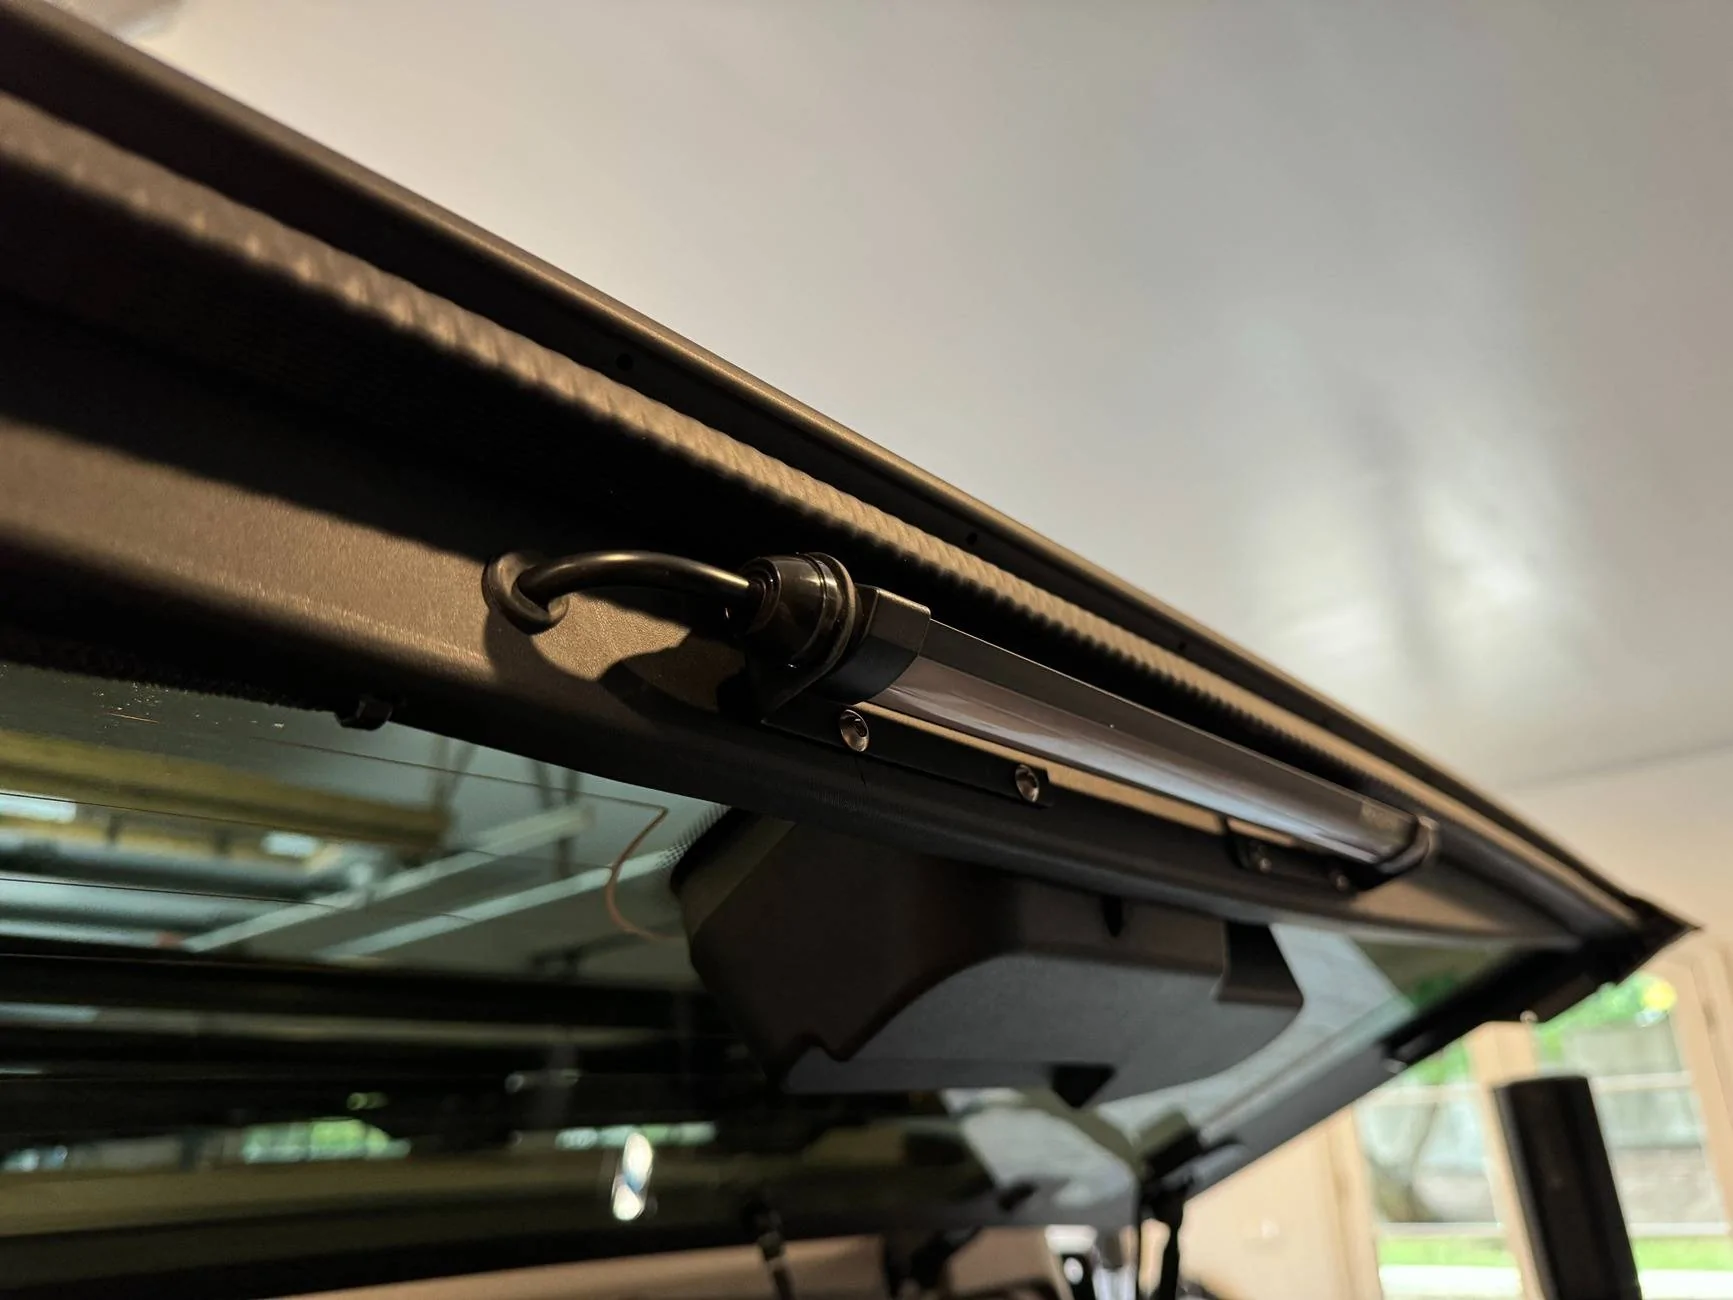
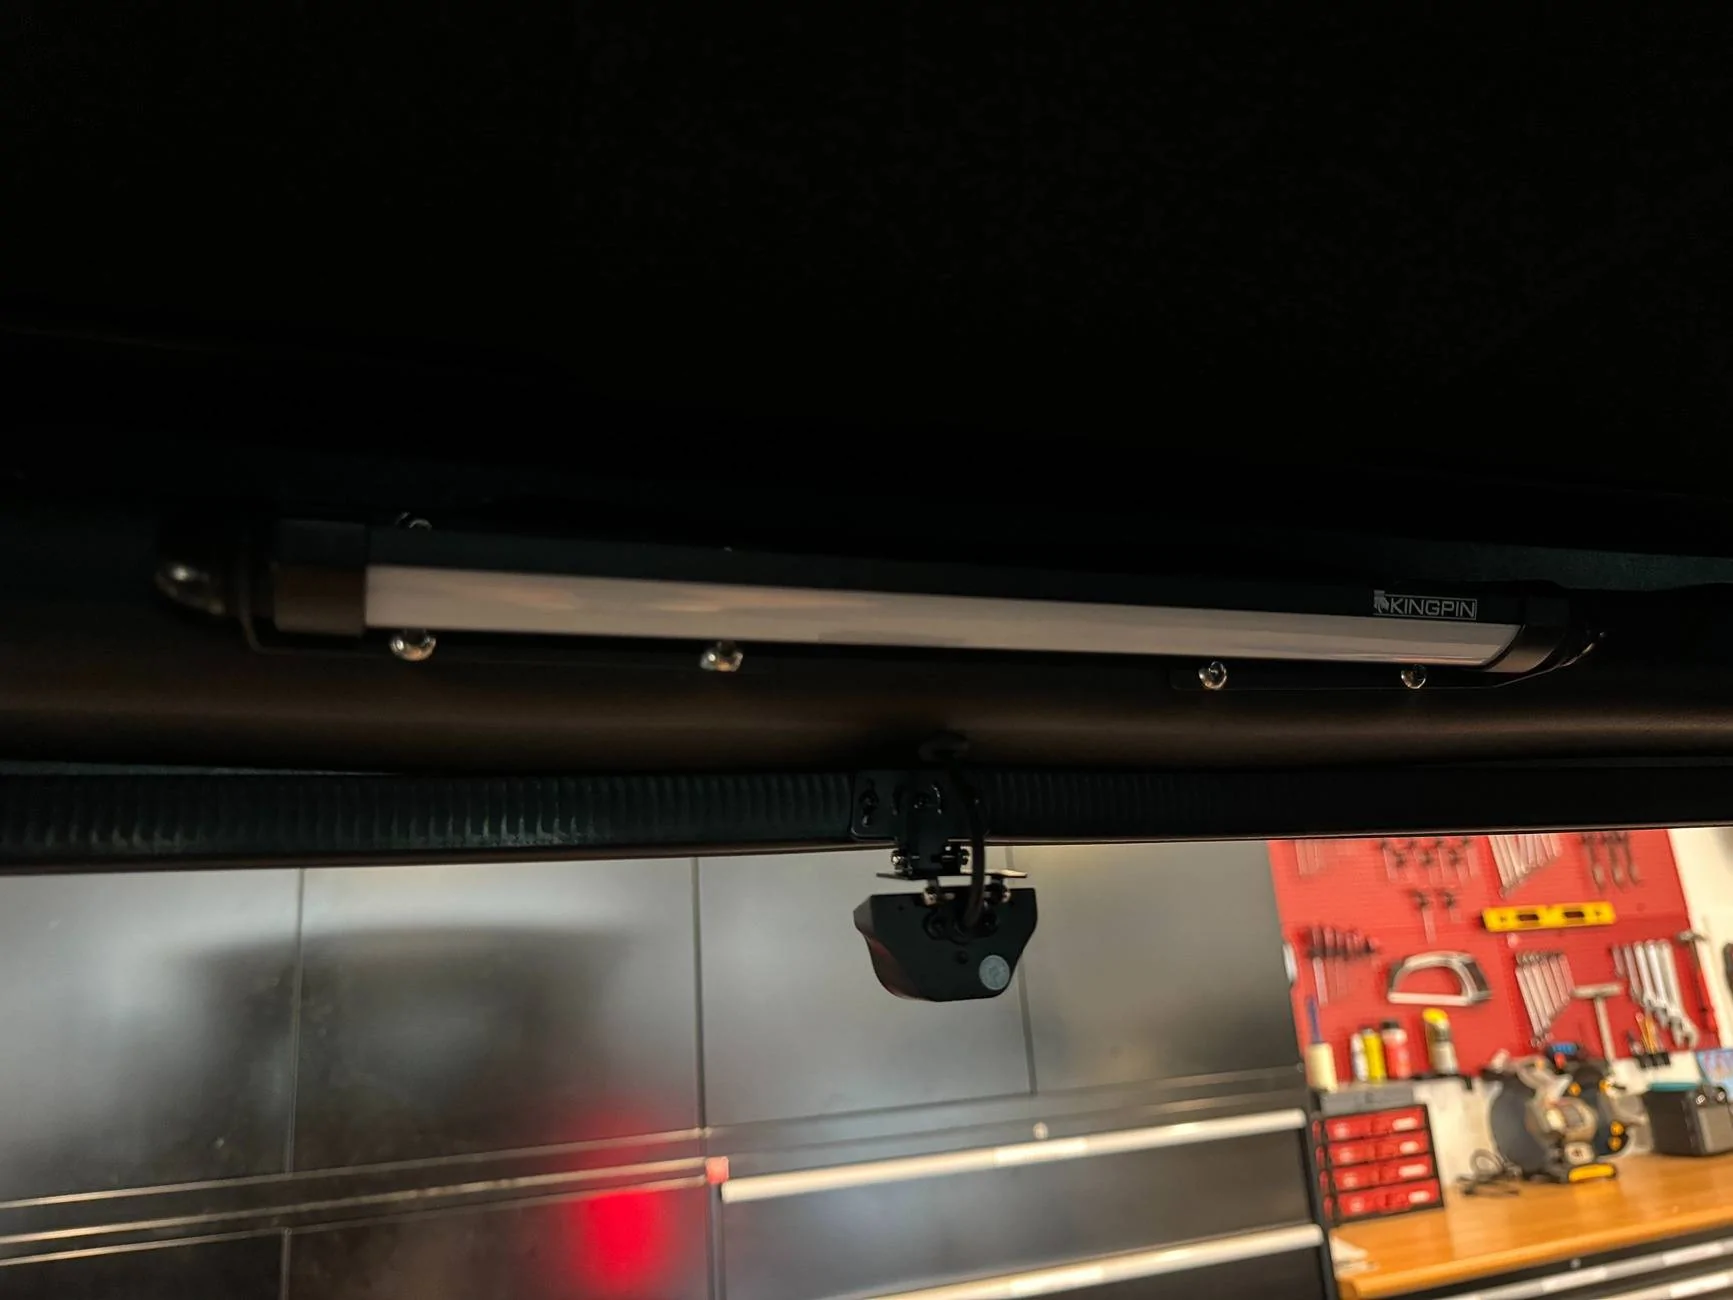
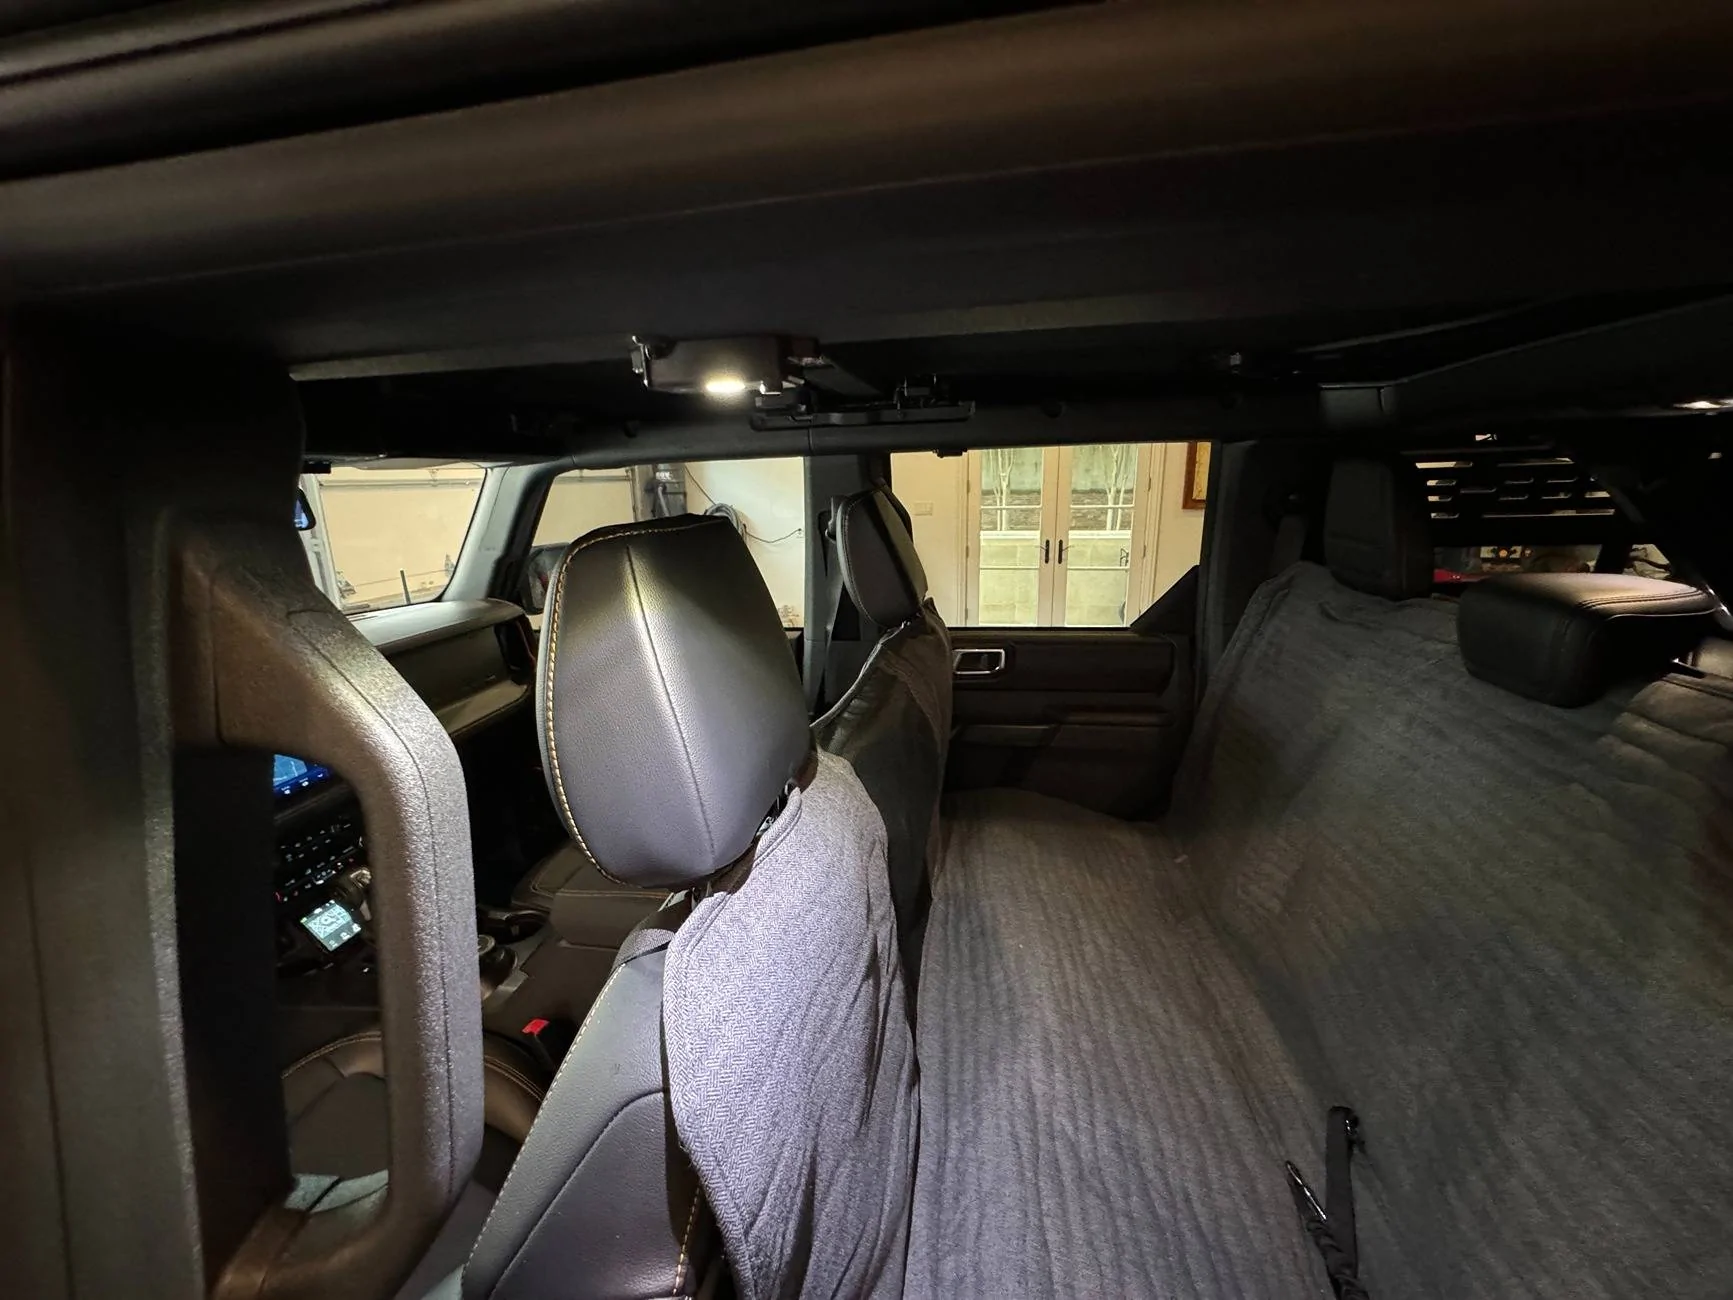
I installed 2 Kingpin lightbars, one on the bottom of the trim of the rear glass and the other to the panel below the roof in the trunk. Its wired to a small switch. It lights up the interior and everything below the glass when its raised. I also added two Baja designs dome lights (the one with the buttons) to the backseat since it gets really dark in there. You have to be careful with the wirerun on this as thats were airbags are and you dont want the wire to interfere with their deployment. The hammoc in the back seat is from Orvis, to keep my dog from getting the truck all muddy/hairy.
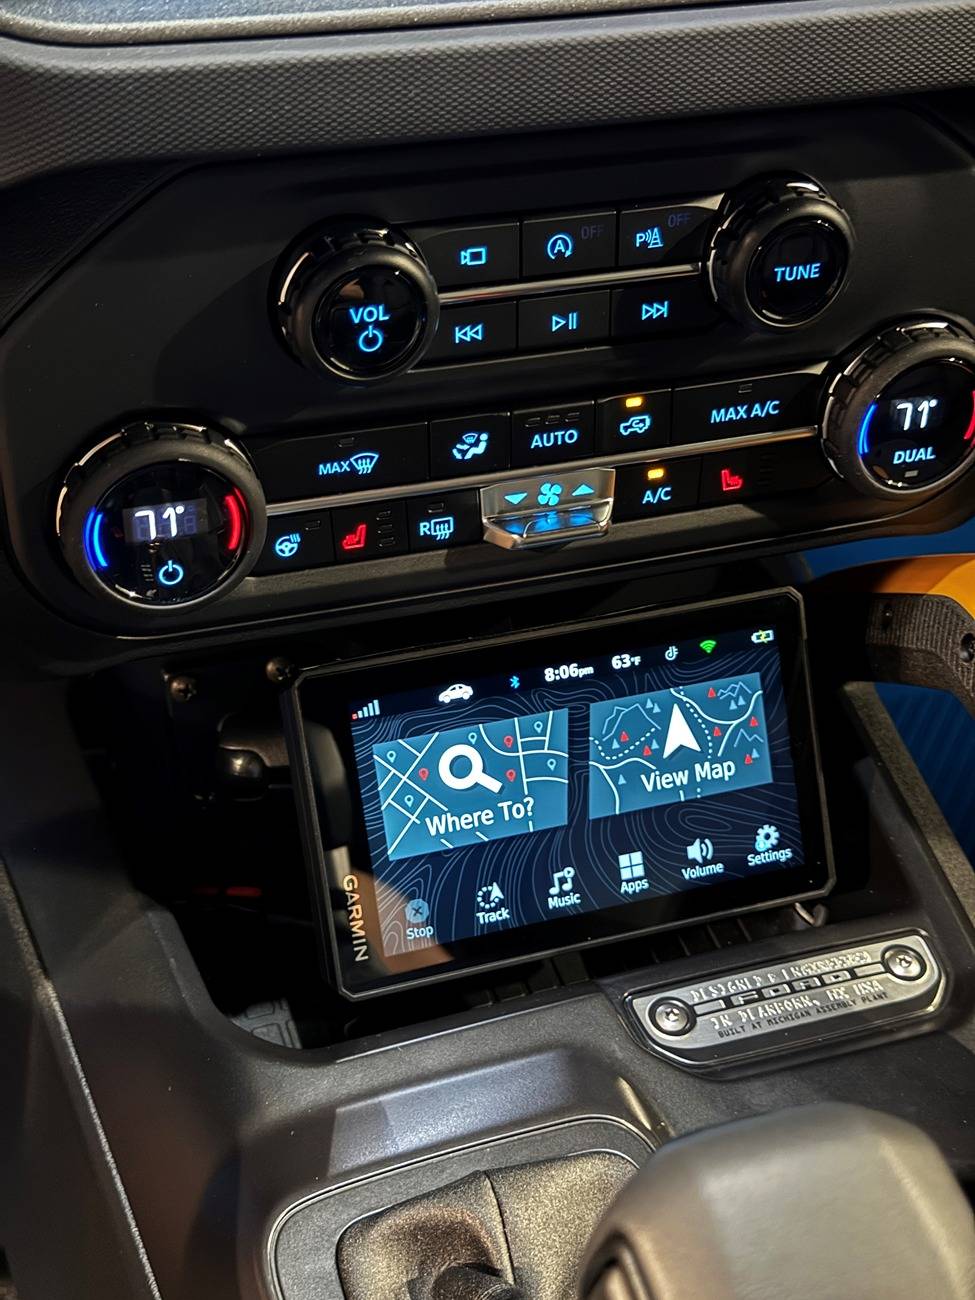
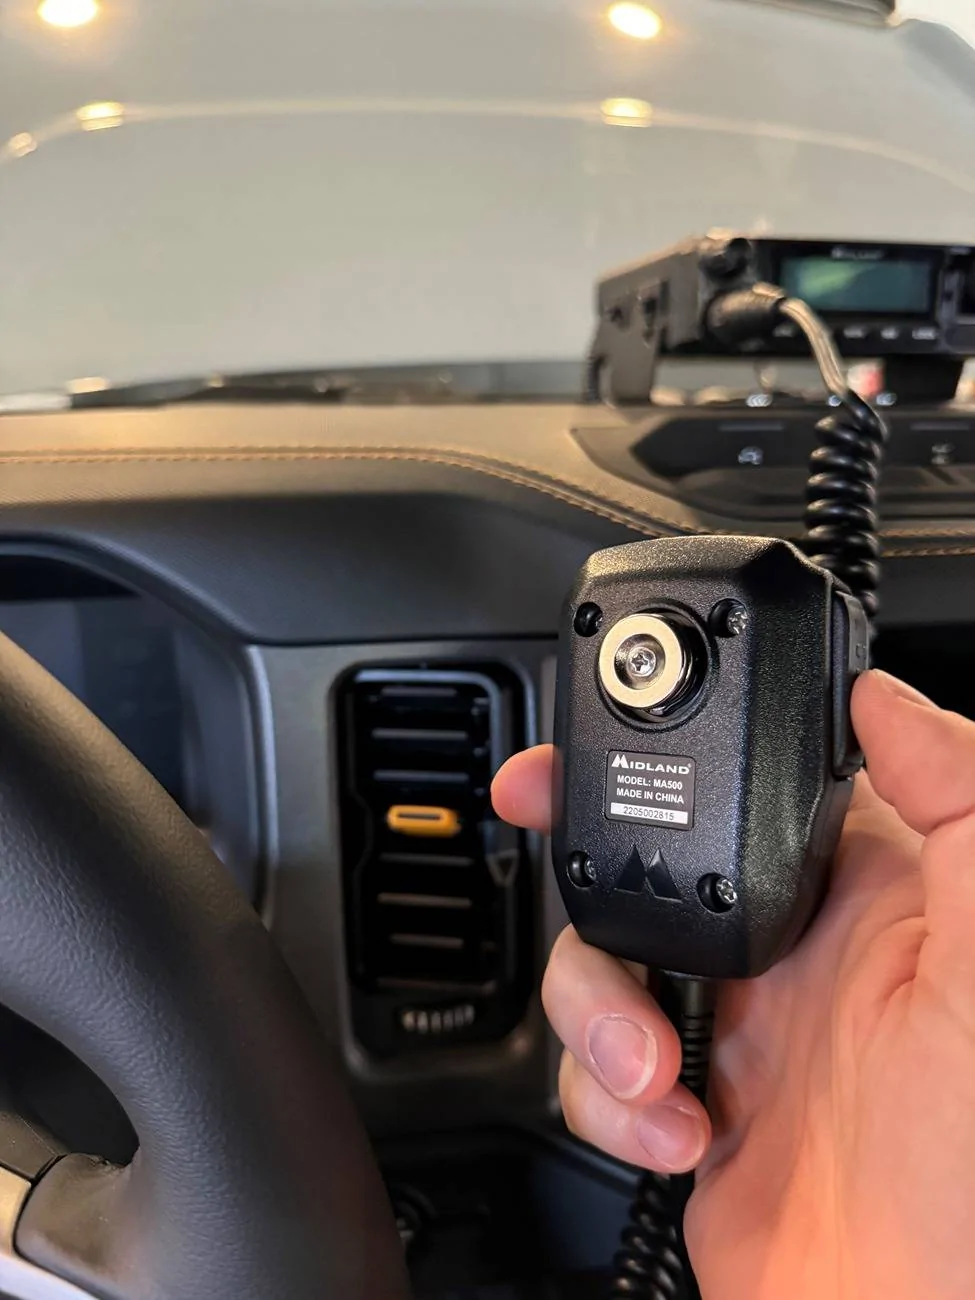
In the front seat I have the Garmin Xumo as a secondary GPS and the Midland 50 watt gmrs radio mounted to the Builtright dash molle panel. A guy on one of the facebook groups told me about this awesome setup he did where he glued a magnet behind the dash board and attached one to the radio mic(unfortunately I forgot his name but he was super helpful). Totally hidden when not in use and easy to store it when it is. I used the rugged radios mount for the stubby antenna. It did need to be modified slightly since the midland antenna had a wider base than the rugged radios one.
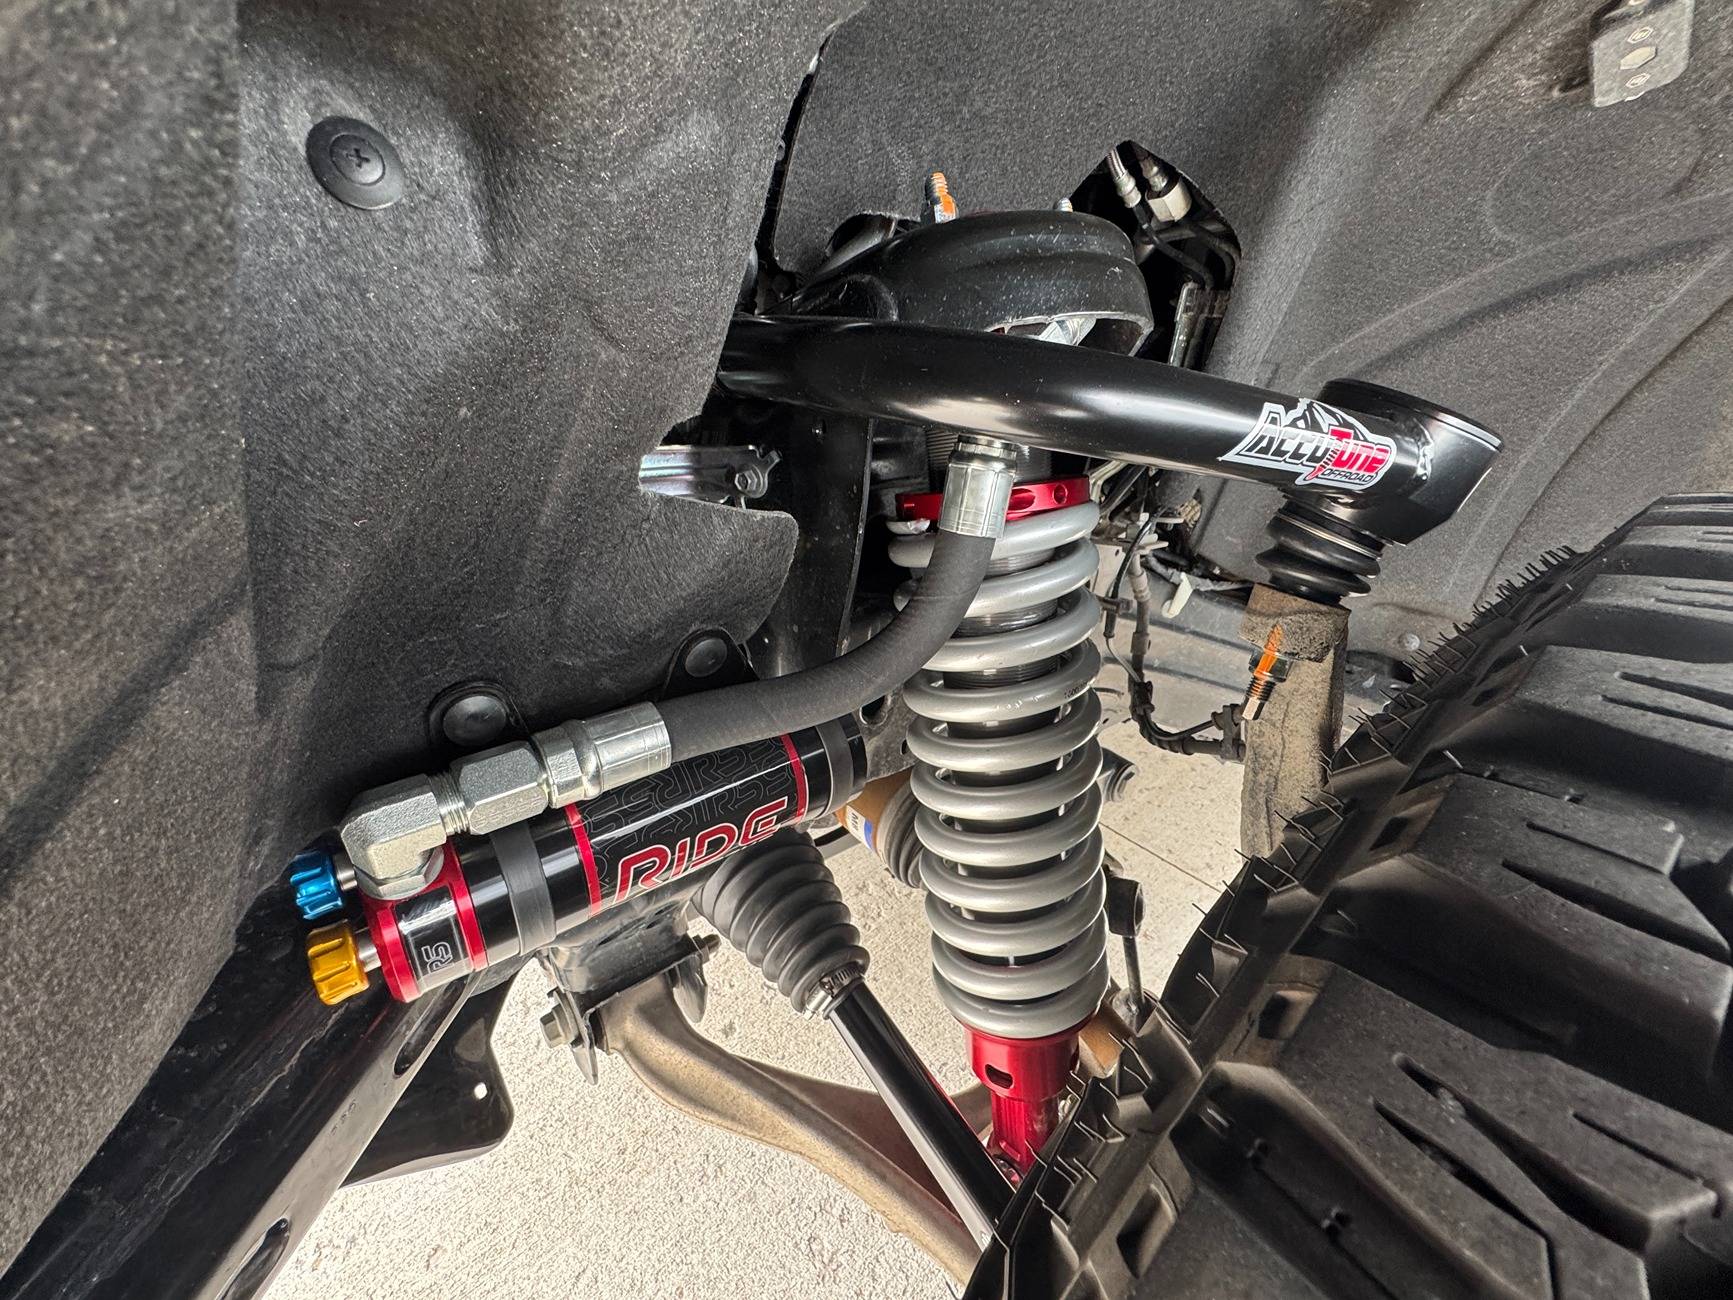
For suspension, the guys at Colorado Bronco Upfitters installed some Accutune Ride shocks and upper control arms to accommodate the increase in weight I've added as well as RPG tie rods. You'll also notice in the upper right corner of the photo the rock lights I mounted to the wheel well. These were a bit tricky as theyre attached the the fabric wheel liners. I used some plumbers rubber on the backside of the wheel well to thicken it up before running the bolts through it and using very large washers to bolt down to a larger surface area.
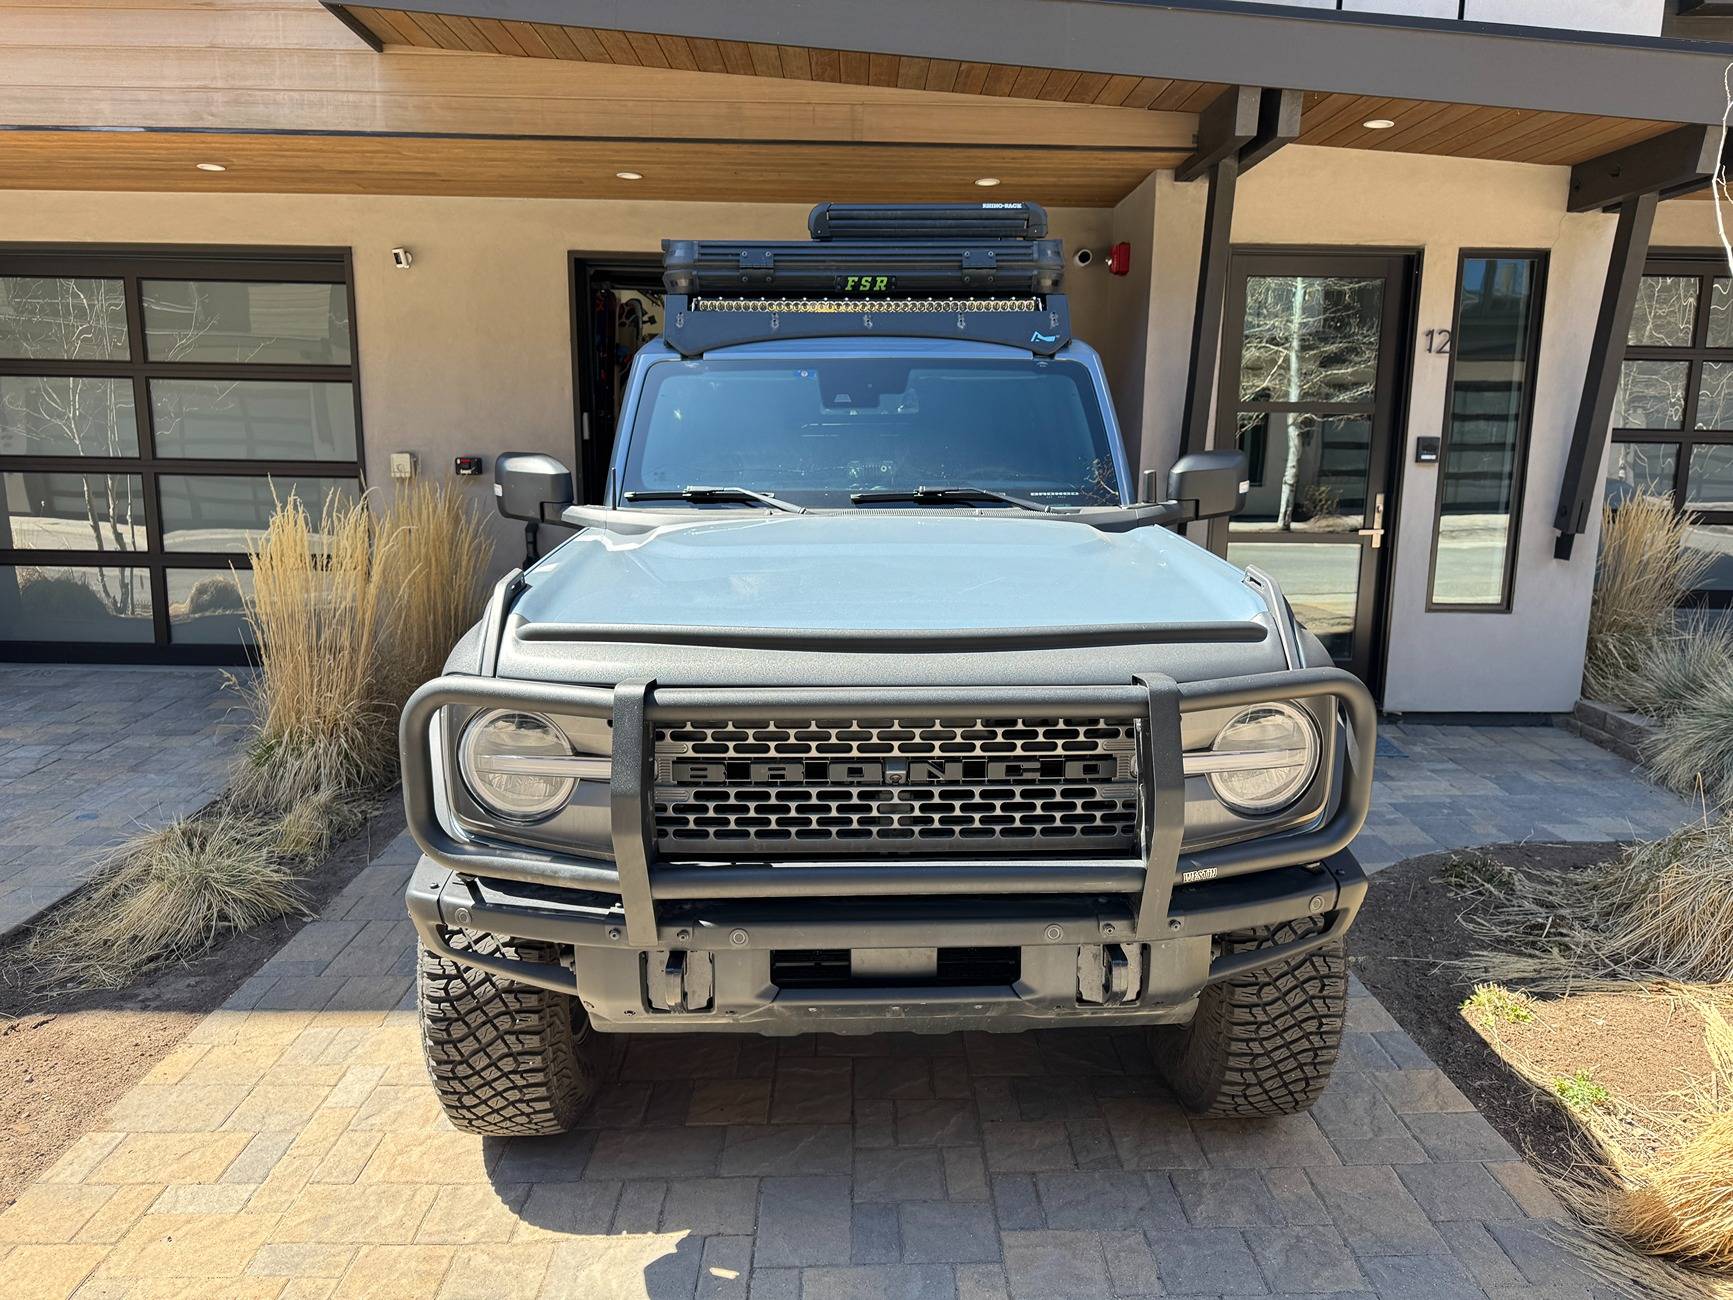
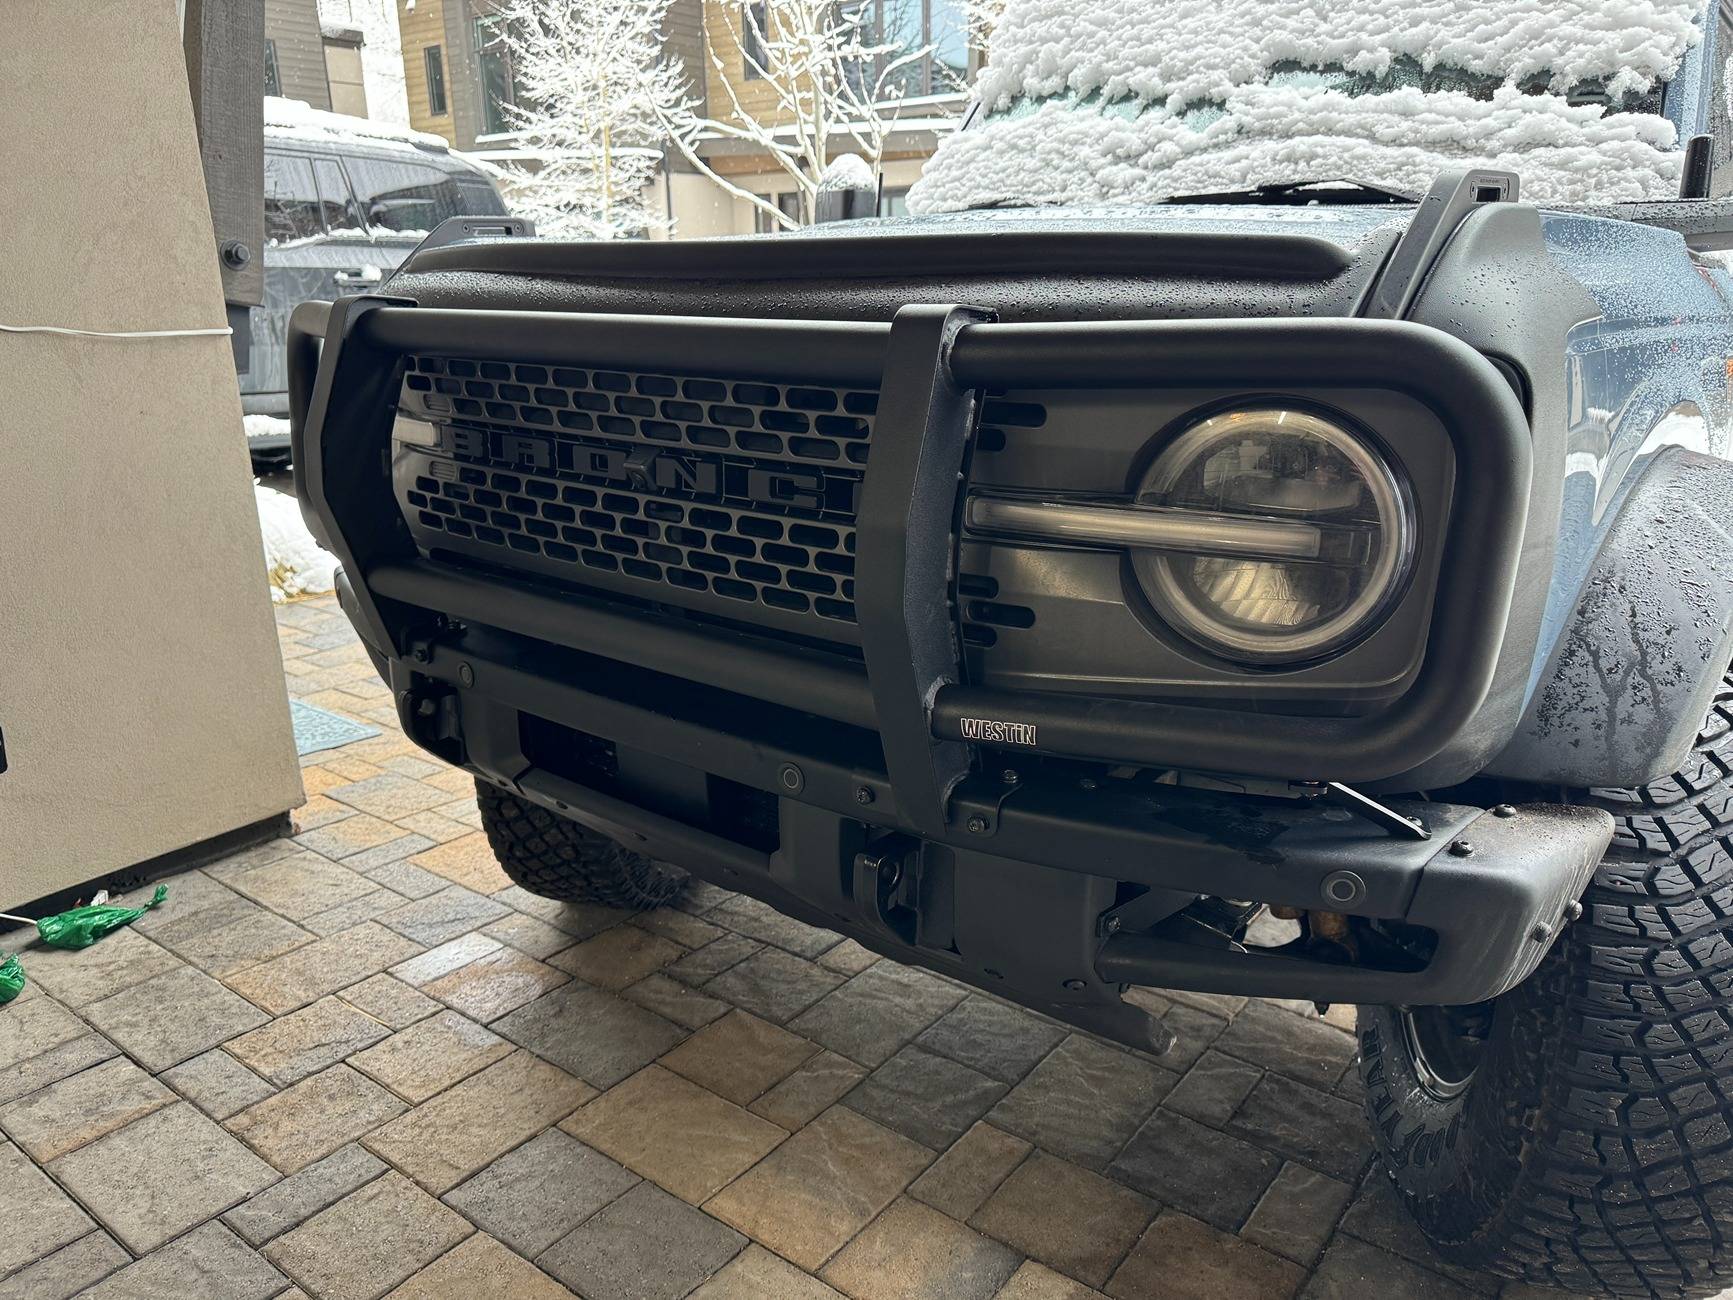
On the front, I mounted the Westin brush guard directly to the stock metal bumper. I have two yellow Baja LP6s I will be mounting to it soon as well as a Warn Winch mounted via Lobo Offroads Hidden winch mount. I'm still waiting on some parts for that though. I'm also going to be installing American adventure labs dual battery setup under the drawers in the trunk but also waiting on that.
I'm using a trailrax roofrack with Heretic light bar and Freespirit Recreation Aspen V2 tent, 2 rotopax gas cans on the drivers side. The ski carriers are only on during the winter.
On the passenger side I have the new maxtrax lites and a GP factor shovel using the Kuat shovel/axe mounts. The shovel was a bit too short to be bolted directly to the crossbars of the roofrack so I used some scrap aluminum to make a crossbar between the two supports and bolt the shovel mount to those.
On the rear of the truck, I replaced the stock tire carrier with the RTR spare tire carrier. This allowed me to also mount their jerry can mount and antenna/flag mount. The jerry can mount had to be modified to fit the Lifesaver water purifier jerry can. This thing rattles a LOT so I had to put rubber bushings in all the moving parts and attach some thick rubber strips to the jerry can to keep it quiet. The antenna is for my Weboost cellular booster. It works surprisingly well, especially living up in the mountains in Colorado. The awning is a 4ft wide Roam awning bolted directly to the back of the rooftop tent using FSR's awning mounts (awning not in some photos) I also have two rear mounted amber baja designs S2 mounted to my roofrack for my dont tailgate me/dust lights.
Inside the rear is where things get pretty cool. I have a drawer system, fridge slider, shelf and air compressor mount made by American Adventure Labs. One of my drawers has a lock on it for keeping my camera equipment secure (though I usually dont leave it in the truck for very long) The fridge slider opens up to be a table with some storage inside it. I made a DIY version of pelicans trekpak dividers for the drawers and used Step 22 bags for organization of tools etc. On top of the drawers is where I have the ladder for my tent. Its secured using those modl infinity tool strap things we keep getting ads for on facebook. They are actually pretty awesome. The Fridge is a Dometic CFX5 55L and that red thing is two milwaukee packouts. The top one is a First aid kit and the larger bottom one is a trauma kit.
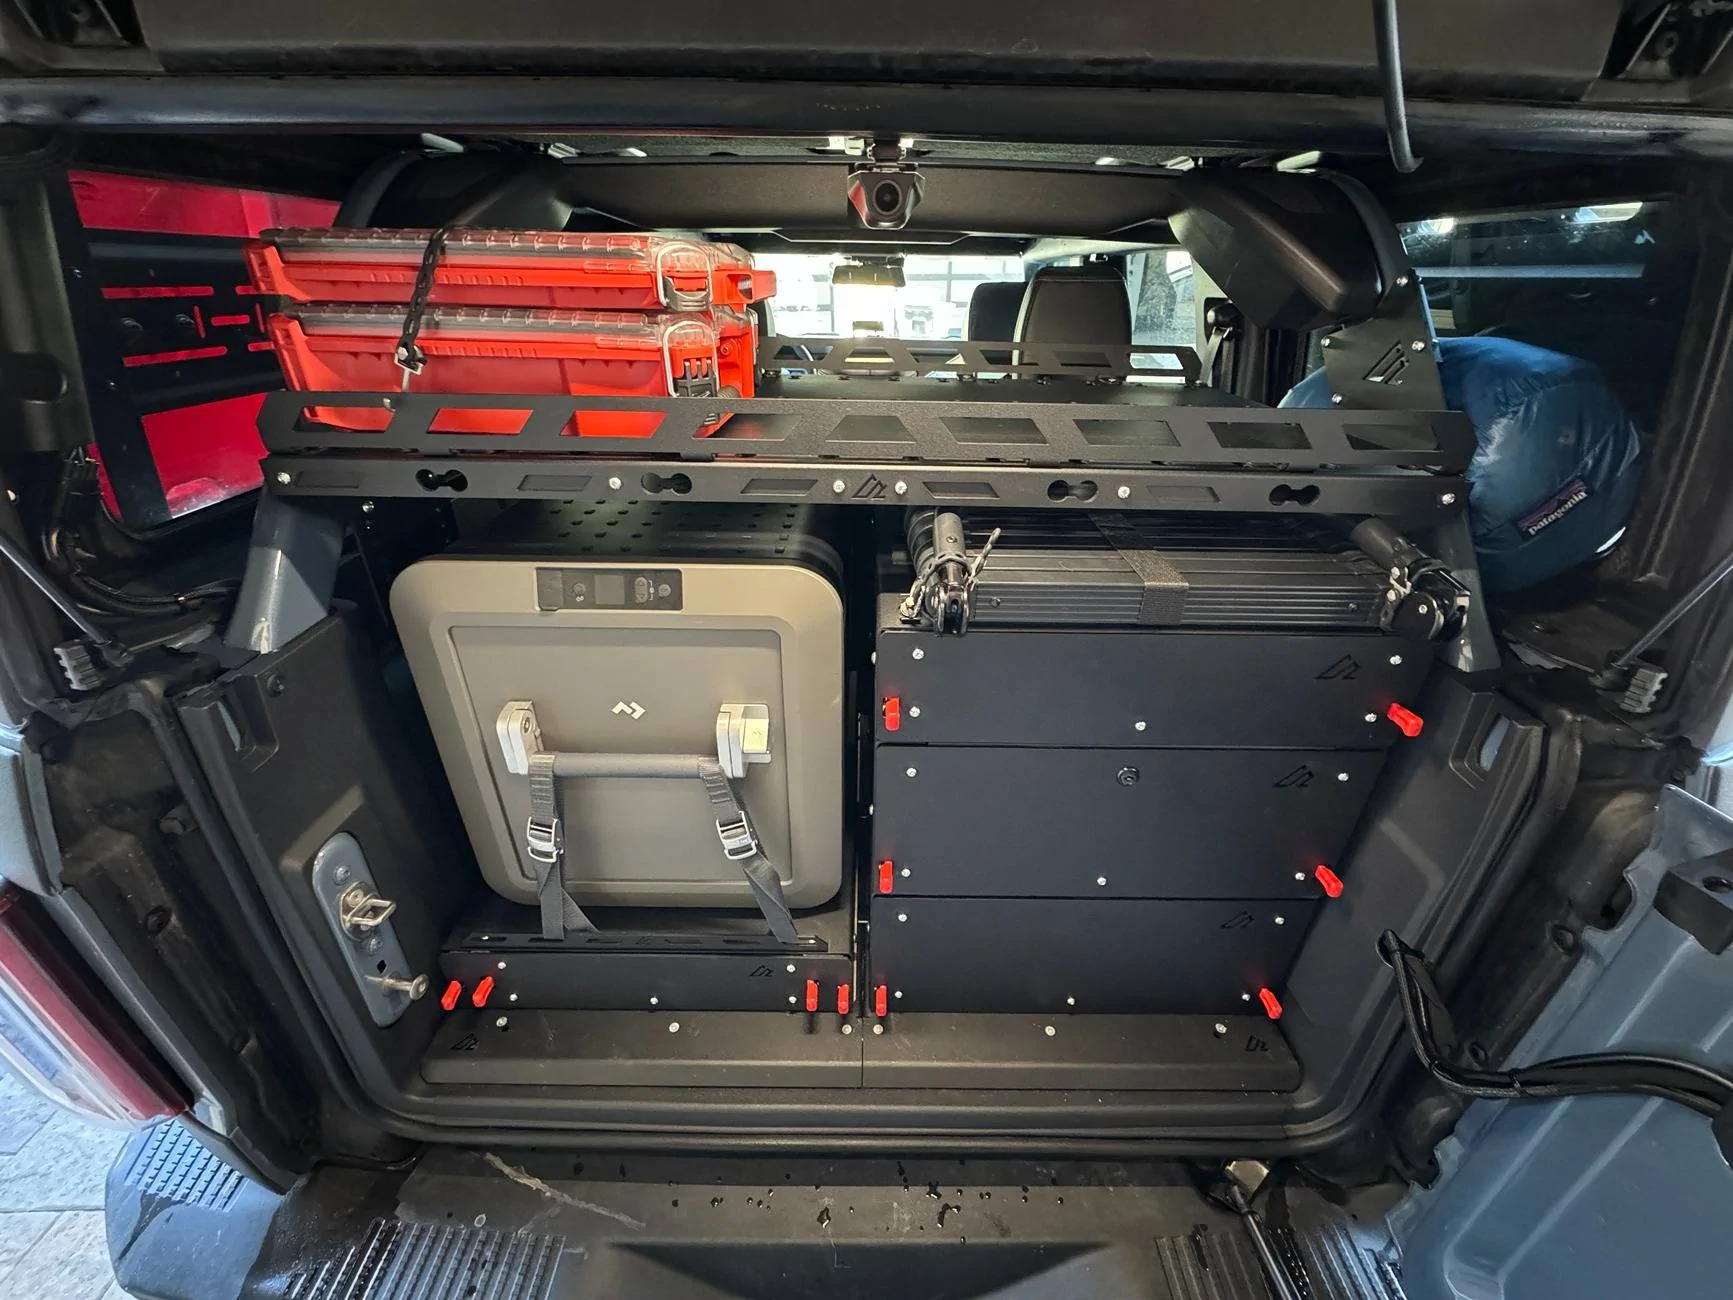

This is my onboard air supply, again by american adventure labs. Its using an ARB compressor.

I installed 2 Kingpin lightbars, one on the bottom of the trim of the rear glass and the other to the panel below the roof in the trunk. Its wired to a small switch. It lights up the interior and everything below the glass when its raised. I also added two Baja designs dome lights (the one with the buttons) to the backseat since it gets really dark in there. You have to be careful with the wirerun on this as thats were airbags are and you dont want the wire to interfere with their deployment. The hammoc in the back seat is from Orvis, to keep my dog from getting the truck all muddy/hairy.
In the front seat I have the Garmin Xumo as a secondary GPS and the Midland 50 watt gmrs radio mounted to the Builtright dash molle panel. A guy on one of the facebook groups told me about this awesome setup he did where he glued a magnet behind the dash board and attached one to the radio mic(unfortunately I forgot his name but he was super helpful). Totally hidden when not in use and easy to store it when it is. I used the rugged radios mount for the stubby antenna. It did need to be modified slightly since the midland antenna had a wider base than the rugged radios one.

For suspension, the guys at Colorado Bronco Upfitters installed some Accutune Ride shocks and upper control arms to accommodate the increase in weight I've added as well as RPG tie rods. You'll also notice in the upper right corner of the photo the rock lights I mounted to the wheel well. These were a bit tricky as theyre attached the the fabric wheel liners. I used some plumbers rubber on the backside of the wheel well to thicken it up before running the bolts through it and using very large washers to bolt down to a larger surface area.
On the front, I mounted the Westin brush guard directly to the stock metal bumper. I have two yellow Baja LP6s I will be mounting to it soon as well as a Warn Winch mounted via Lobo Offroads Hidden winch mount. I'm still waiting on some parts for that though. I'm also going to be installing American adventure labs dual battery setup under the drawers in the trunk but also waiting on that.
Sponsored


