
- First Name
- Caleb
- Joined
- Nov 14, 2021
- Threads
- 61
- Messages
- 1,542
- Reaction score
- 5,138
- Location
- Sacramento
- Vehicle(s)
- 2021 Bronco/1996 Jeep XJ/1957 FC-150
- Your Bronco Model
- Big Bend
- Thread starter
- #1
So for a long time I have wanted a chase light on my Bronco. I often wheel in white-out blizzards, dusty deserts and at night in a variety of conditions. The one thing that has always stood out to me during these events are peoples chase lights. Now for me, having a chase light became a priority early on after seeing how useful it was to be able to see the vehicle in front of you during these conditions, especially at speed. Our Reno to Vegas run finally cemented the idea and I begin to look.
Unfortunately, there were not many options at the time. I did not want something over my spare after having experience on the same R2V run having to remove a bunch of spare mounted lights when changing a tire on the trail. It added a lot of time, tools and work having to remove 2 pod mounted chase lights and associated wiring mounted to the spare.
I also couldn't do the typical lightbar as it wouldn't look good in my opinion on the Bronco. Having something in the 3rd brake light area seemed perfect but nothing existed... yet.
In almost perfect timing, 3 different companies came out with a 3rd brake light/chase light option at similar times. Rad Designs, Turn Off-road, and Hammerbuilt.
Rad Designs is a nifty plug-n-play option that goes into the stock housing. It's 3D printed but does not strobe the chase lights or include reverse lights.
The Turn Off-Road option I initially really liked and even purchased but quickly decided to give to my neighbor for install in favor of the Hammerbuilt. The Turn Off-Road looks good but its very top-heavy, wobbles over washboards and bumps as it lacks support and also doesn't strobe its chase lights. The lights are also pretty cheap though you can opt to swap them for Baja Designs S2 Pros. The wiring on the Turn option requires cutting of your factory wiring harness as well which I wasn't excited about. Otherwise its a great option and can be modified to strobe if you are smart like that.
Finally, Hammerbuilt reached out as they heard I was looking at chase lights and asked if I wanted to try their latest product in the works (3rd Brake Light) and give feedback. I agreed but elected to maintain my own opinion on it. Thankfully, Tyson is and has always been super cool and awesome and so he agreed.
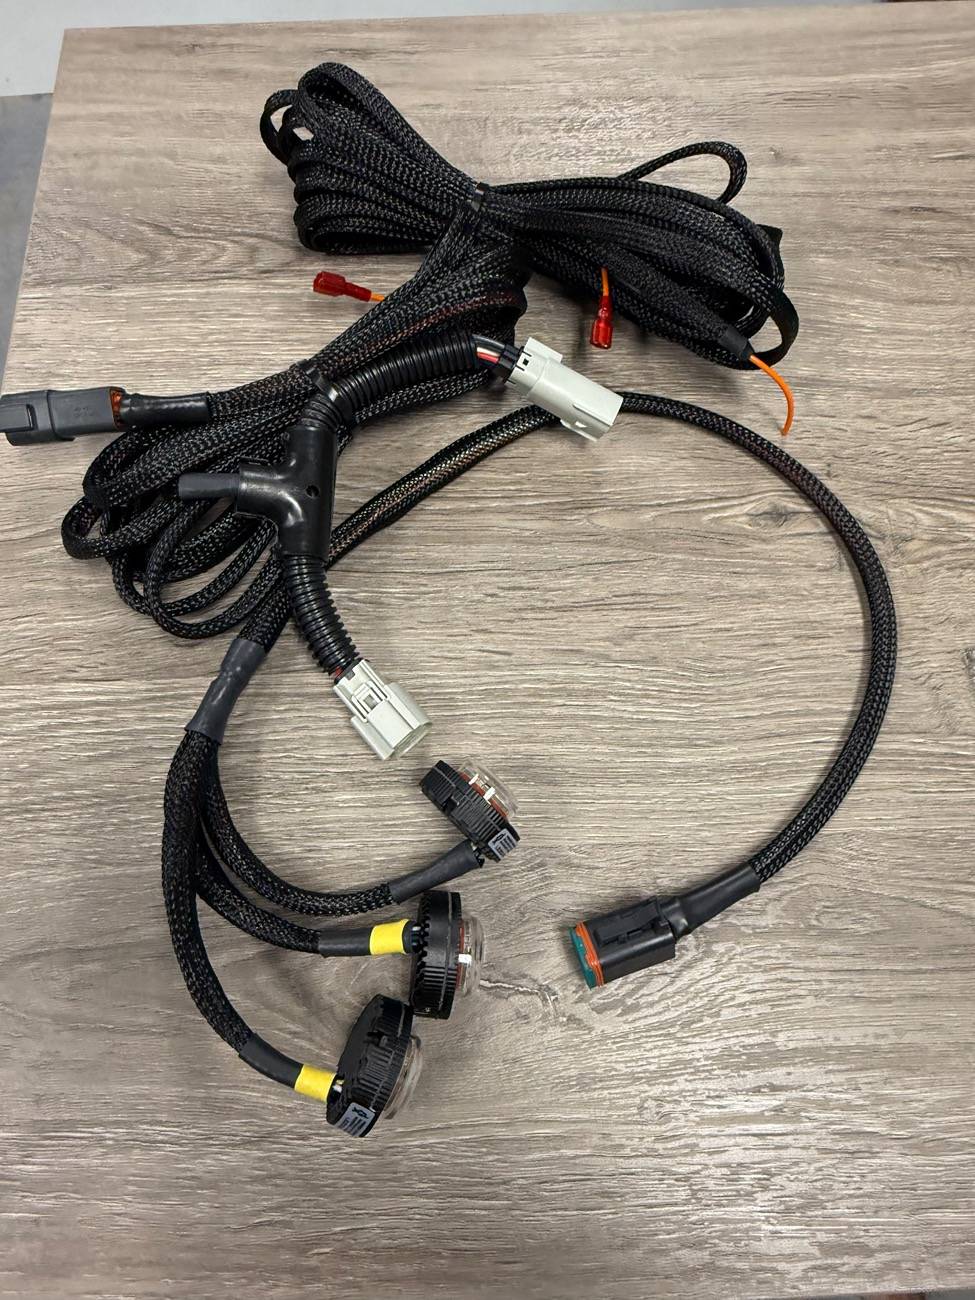
I received the new product and opened it up:

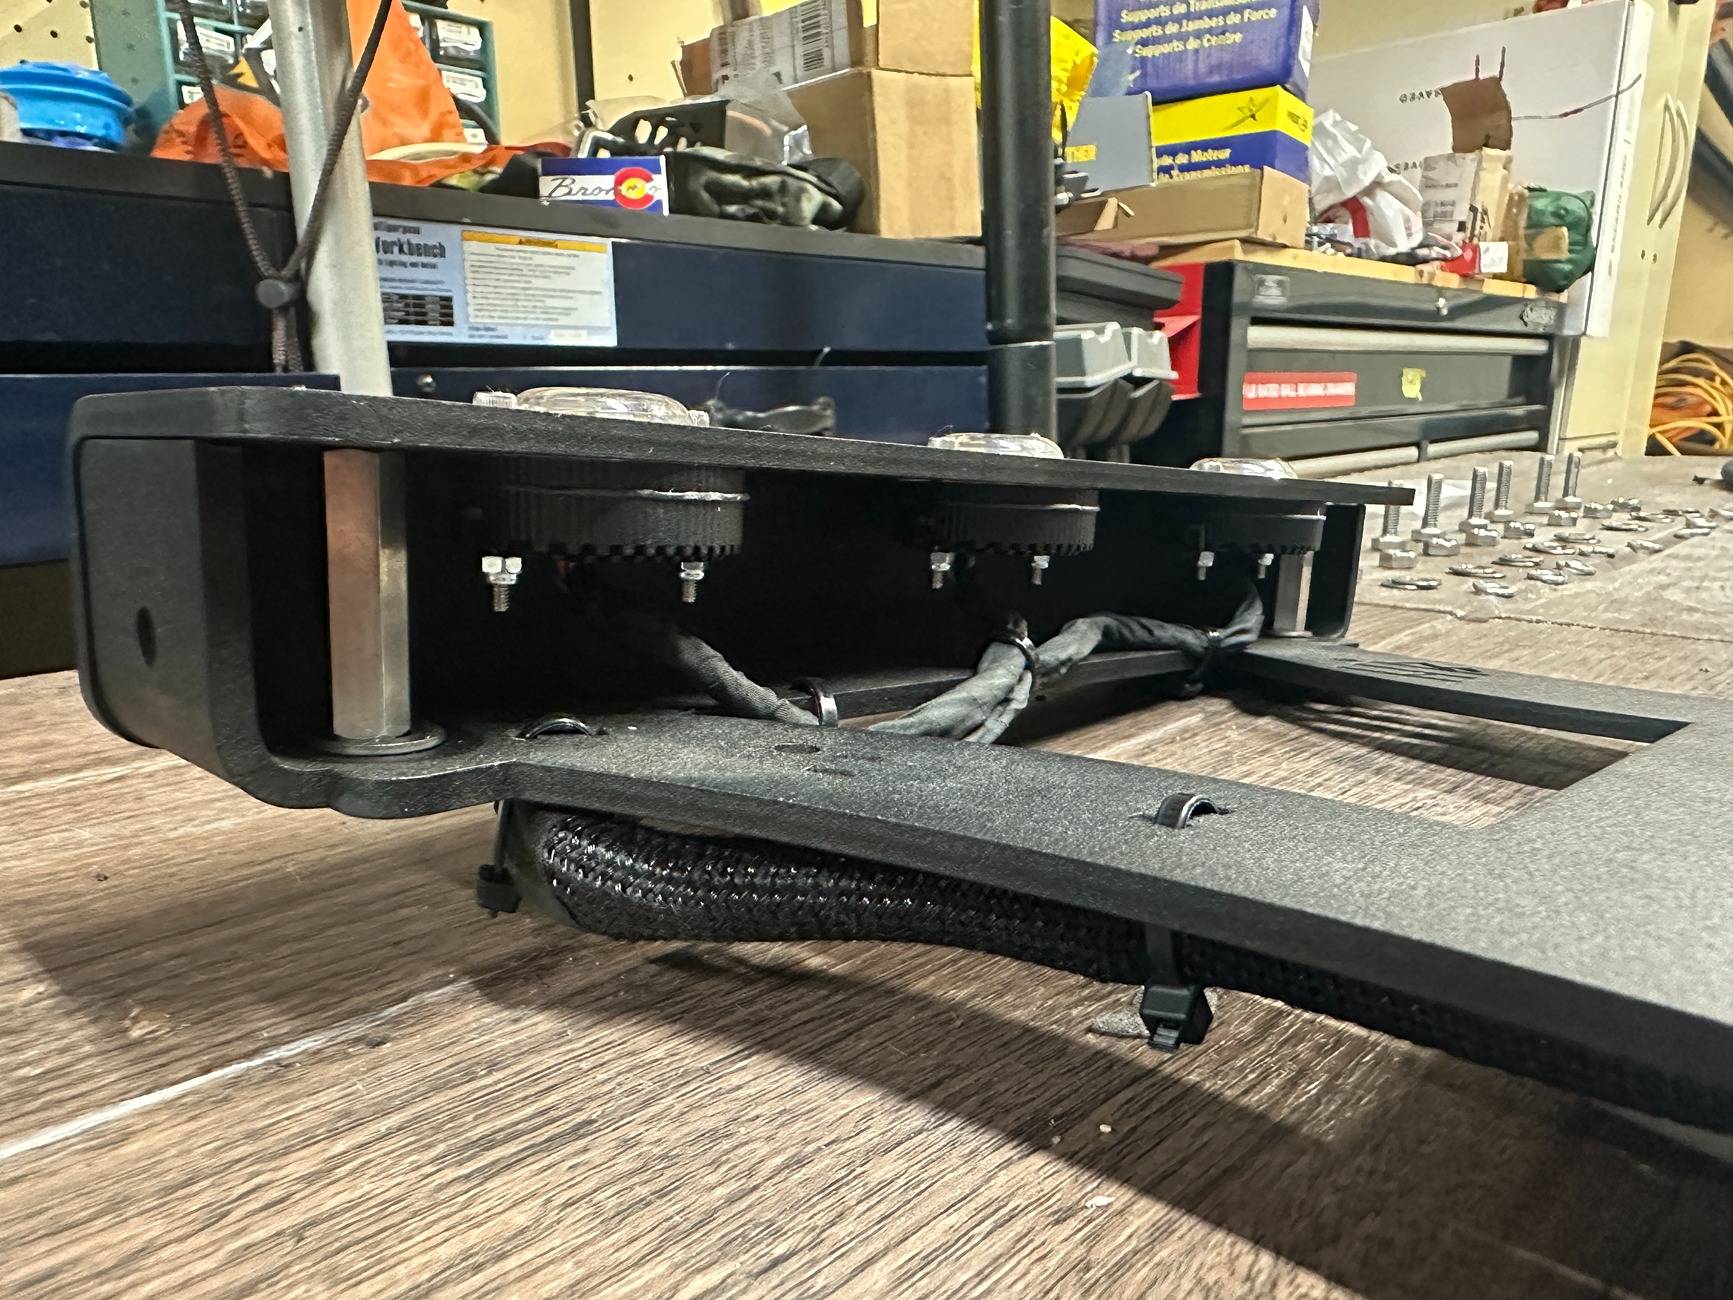
Now before we dive in I want to give a few specs: The product is entirely sourced, assembled, made in-house. The metal is American aluminum and powder-coated. The lights are Feniex lights which are an American light brand made in America and are the go-to for many 1st responder agencies for their lighting needs. Its a multi-purpose light that can be reconfigured to be several different colors or brightness levels. As-is, they are set to be running lights (dim), brake lights (bright), reverse lights (bright white), and chase lights (outer lights strobe amber while center light maintains 3rd brake light function). The light housing is assembled and then powdercoated which hides a lot of the assembly making it look like a single piece design.
The lights are easily accessible for replacement without removing the assembly.
The kit is very well put together and includes an adjustable section to set to your tire size. The assembly maintains the curvature of the tire for asthetics and tries not to be a in-your-face design. The attention to detail on the wiring is very impressive and is designed to be a mostly plug-n-play design with NO CUTTING of the factory harness. This will require more work on the install end to make things more seamless.
I ended up taking some extra time on the wiring and what I ended up with is a perfectly invisible wiring that can not be distinguished from the factory wiring.
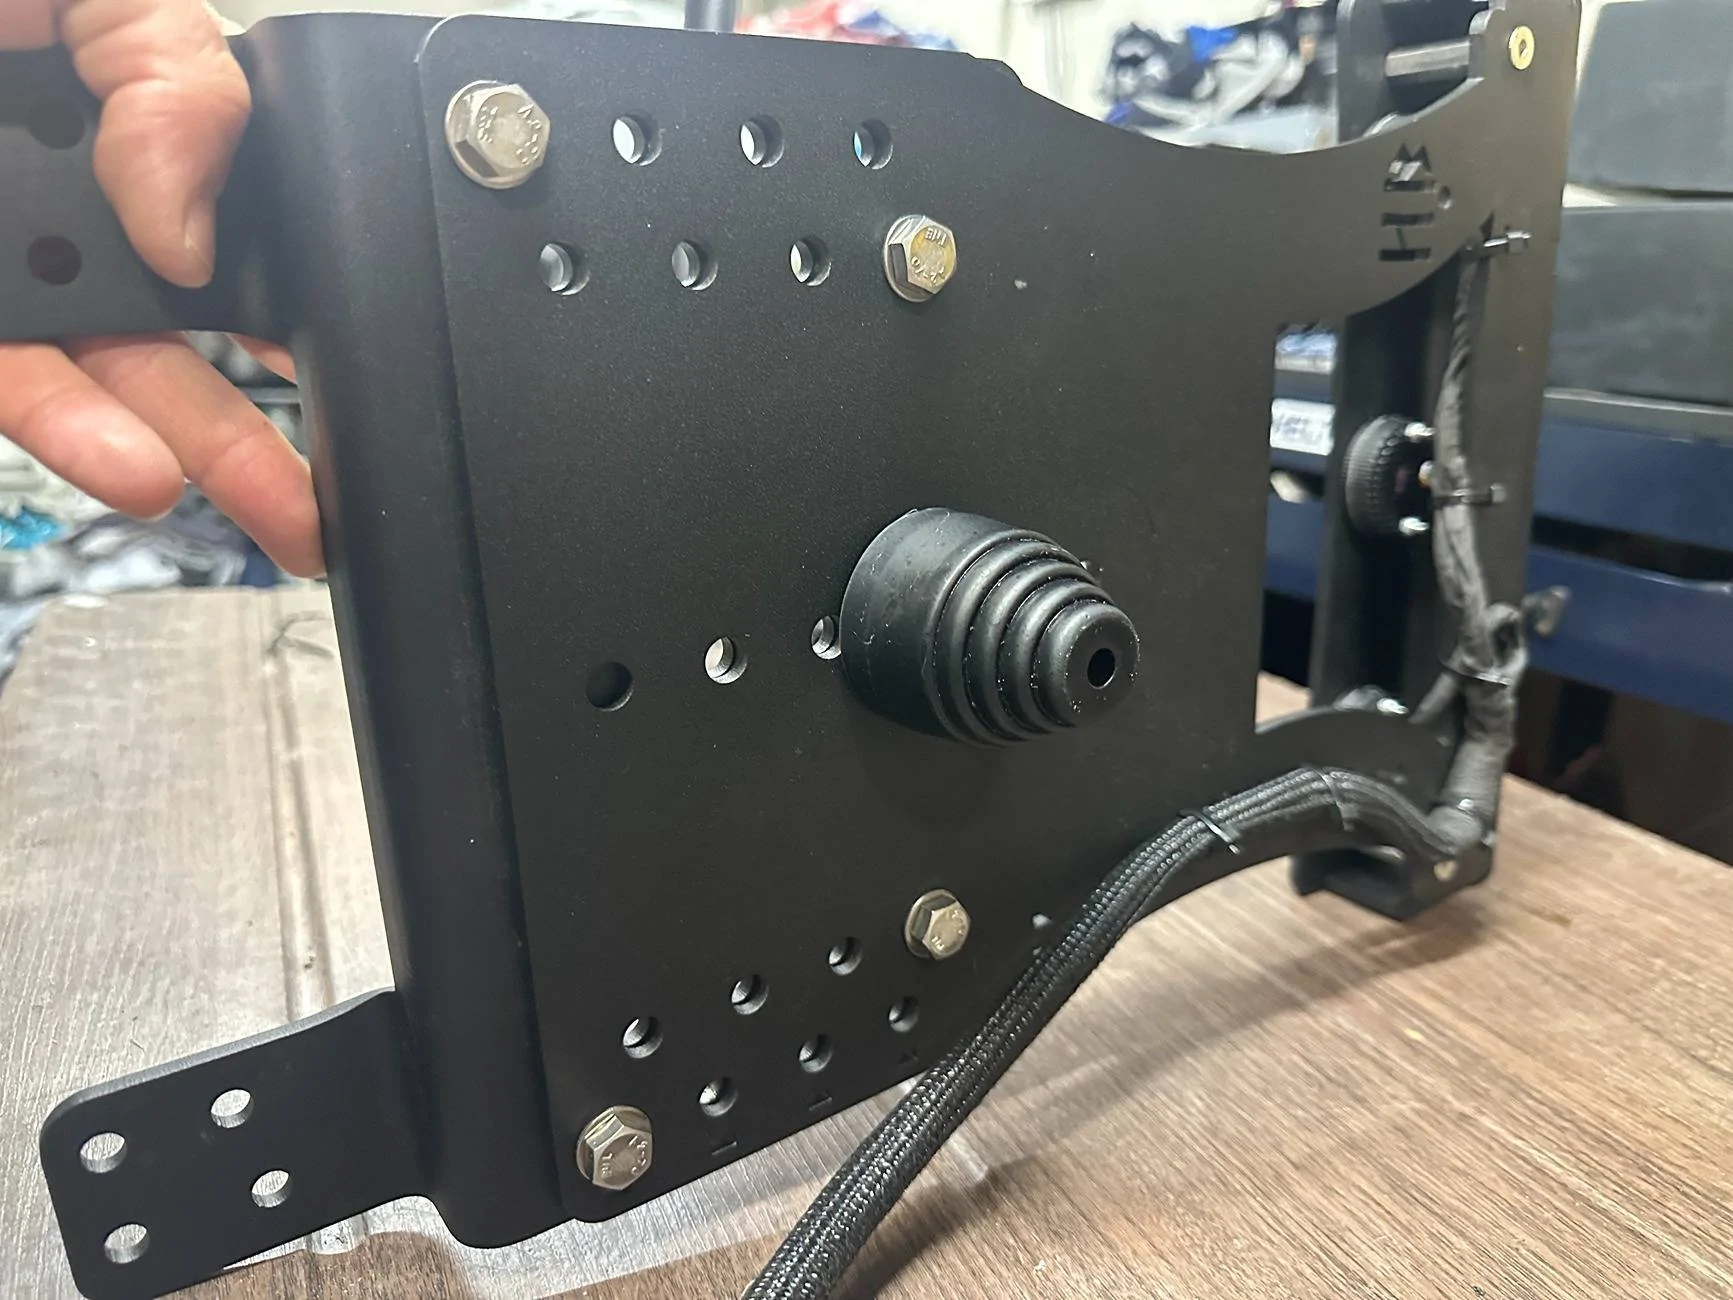
The kit also includes an adjustable support that braces the kit from wobbling. I tested after install and its pretty freaking rigid in place.
Now for the install , give yourself several hours and take your time. Remove the OEM 3rd brake light and pull off the rear cover, accessing the OEM plug and unplug it from the 3rd brake light.
Assemble your Hammerbuilt assembly with your center support, support bracket and main light assembly in the configuration best for your needs/tire size.

Install it on the spare tire carrier in the stock location and zip tie the OEM harness that you disconnected out of the way and out of sight. The great thing about this kit is that you don't ruin your oem harness in case you ever go back.
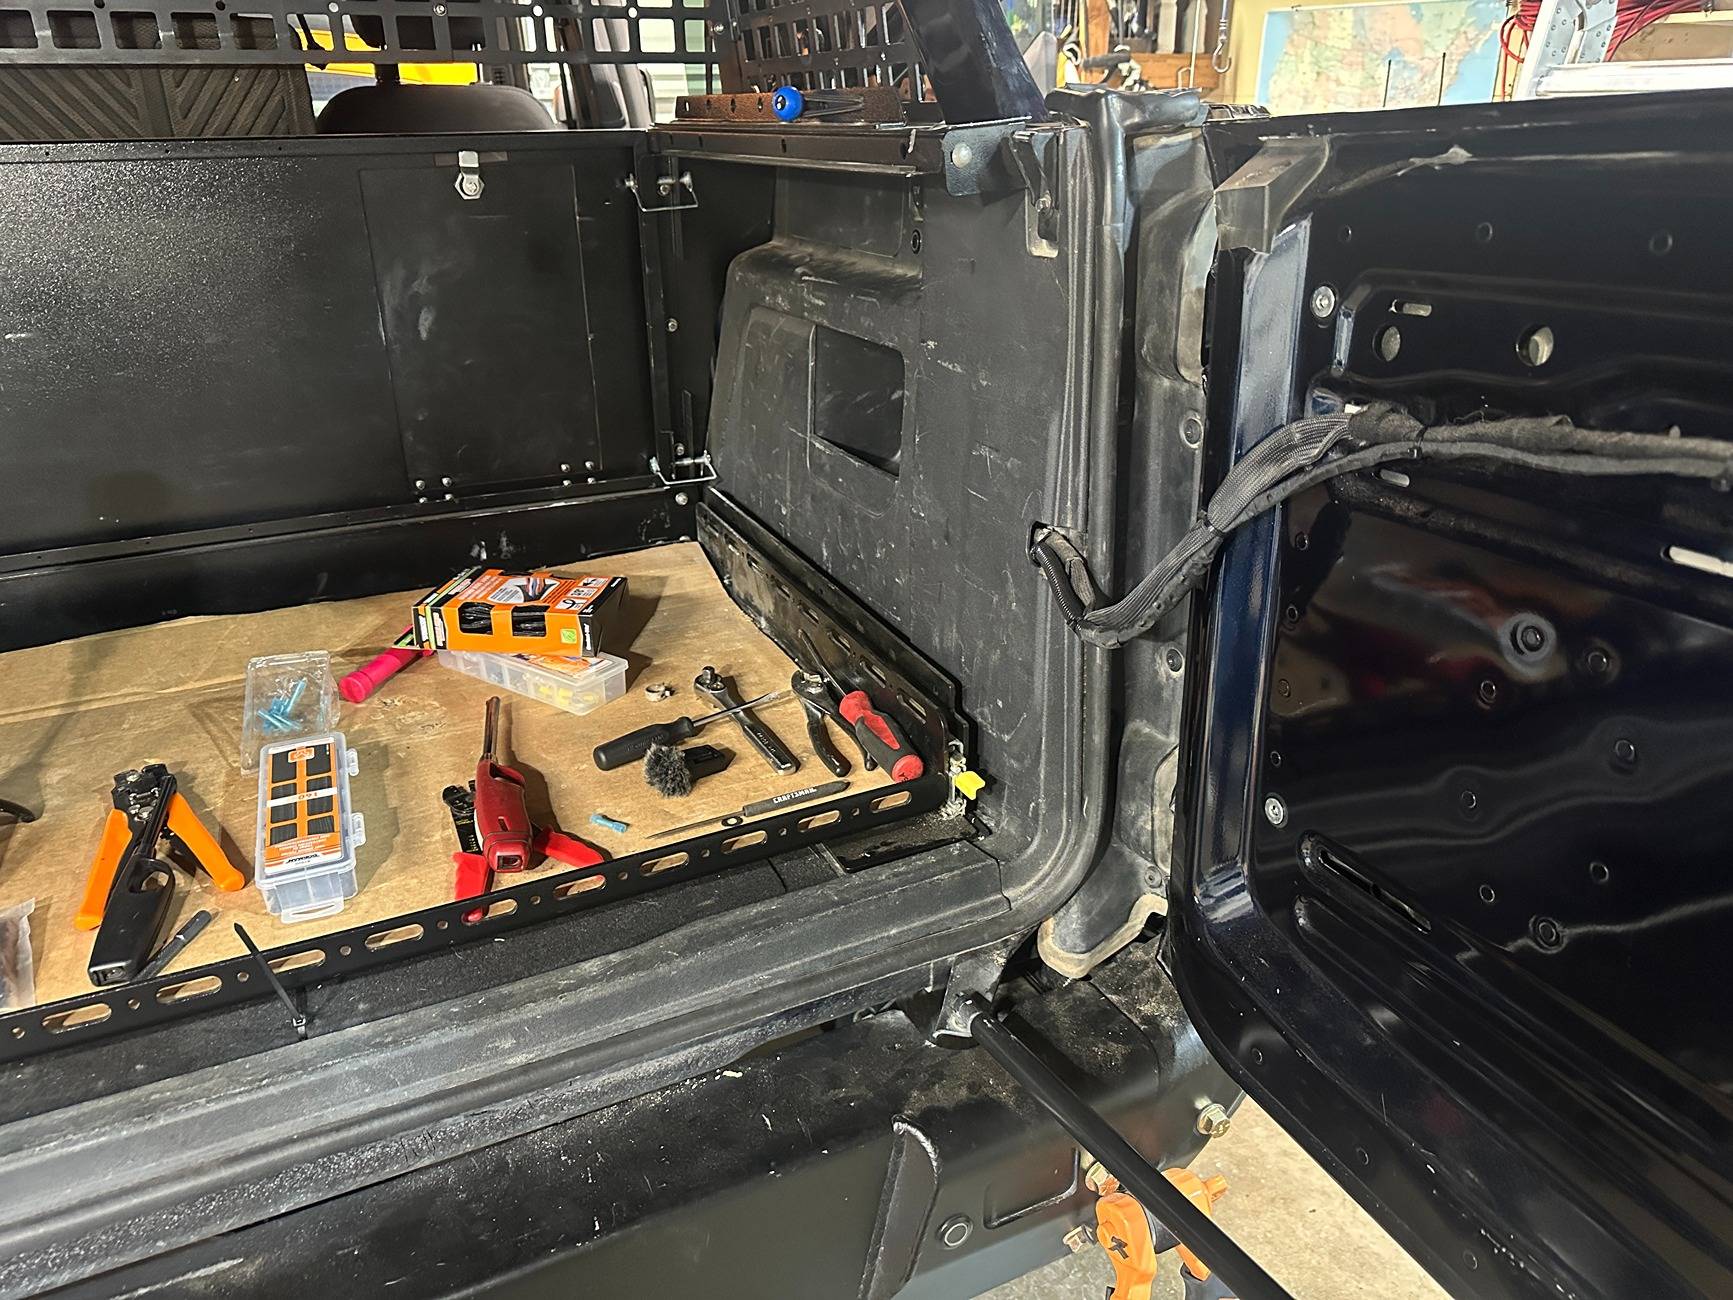
Now go into the tailgate side and remove the trim from the inside of the tailgate, if you have a tailgate table, you will have to remove that as well. You will also eventually be removing the trim piece between the tailgate and the taillight where the coordinates are. These all popped out for me with my hand or some gentle convincing with a plastic pry tool. The trim piece with the coordinates required a phillips head screwdriver as well.
Now there is also the lower trim that follows the rear trunk seal on the bottom that pops out as well. Remove this as well.
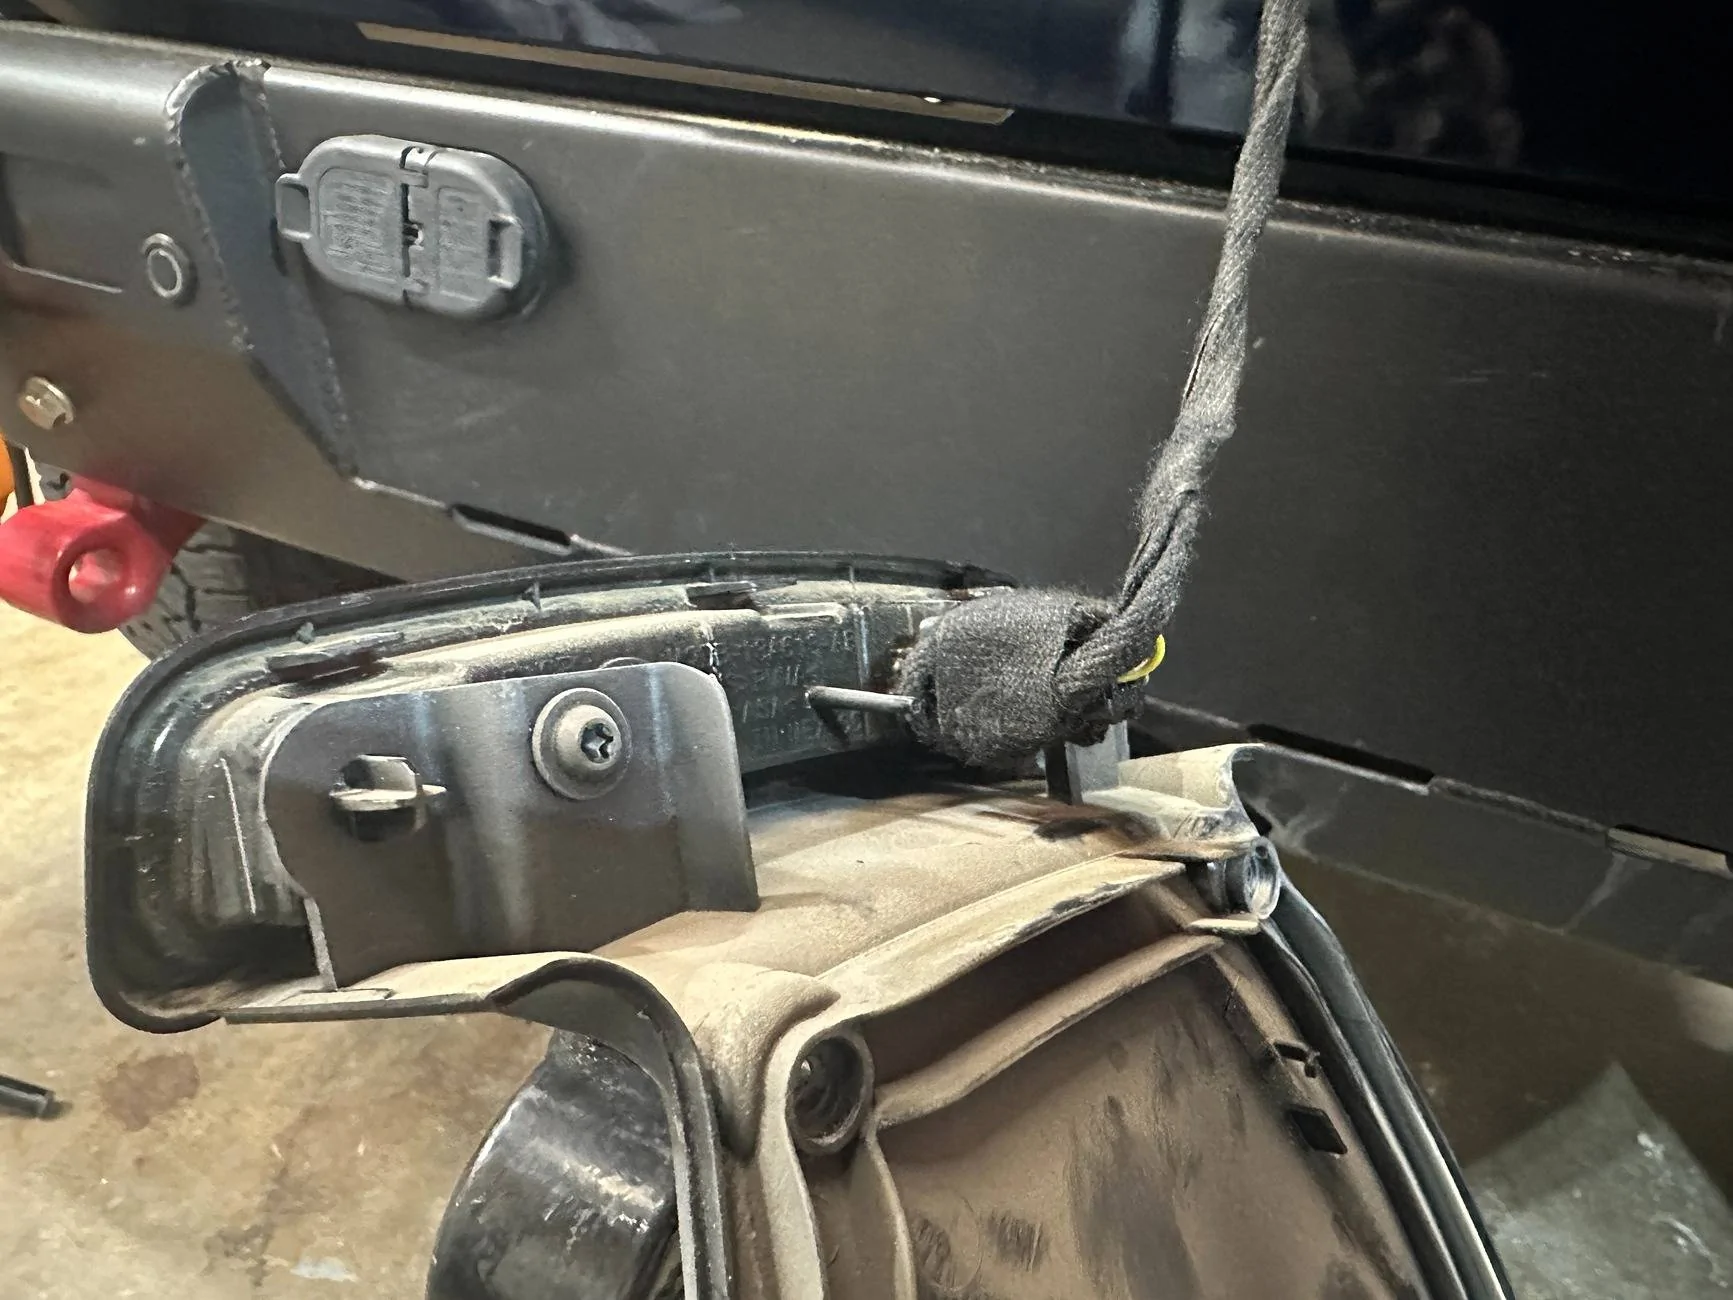
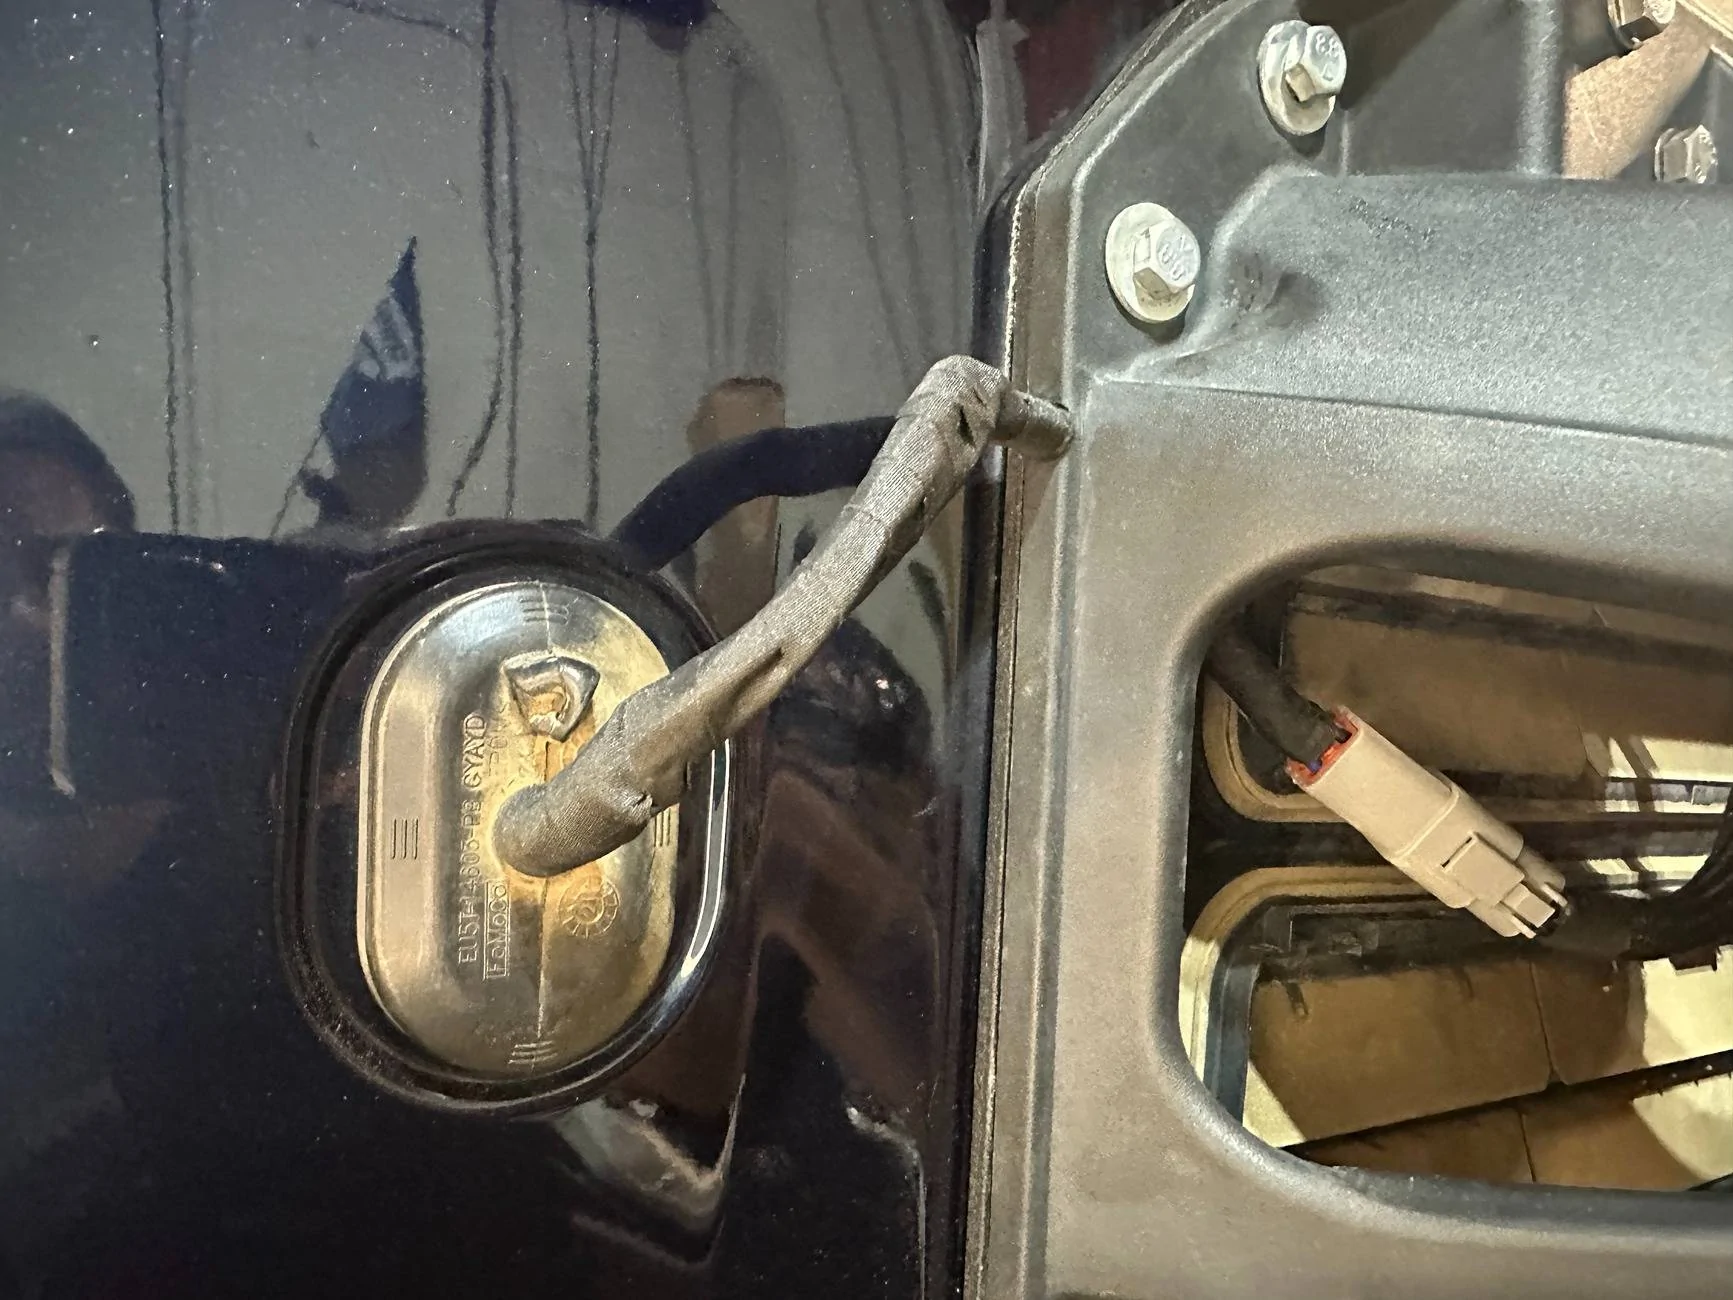
Now that our light assembly is installed and our trim panels removed. We will begin the wiring process. The included wiring harness plugs directly into the factory harness located behind the coordinates trim piece in the corner where the tailgate hinges are. Unplug the factory harness and plug the split end of the Hammerbuilt harness directly in.
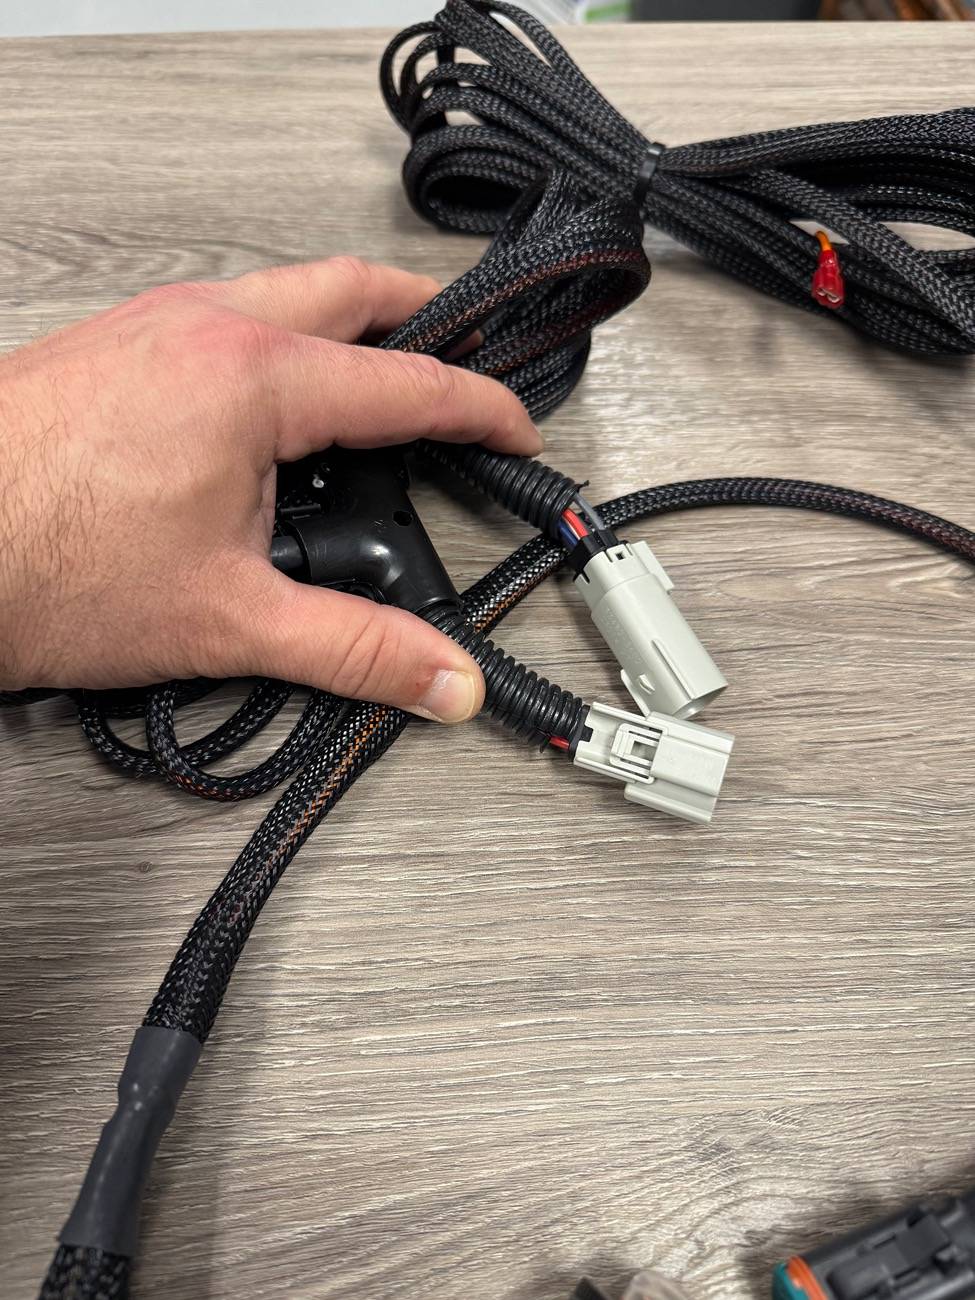
Now I did have some initial trouble trying to the fit the split end of the Hammerbuilt harness in here. It was sheathed in this thick, plastic piping that was not flexible. I removed the piping at the end and re-wrapped it with the factory style fabric electrical tape. It fit perfectly after this and I was able to push it back and out of the way. Some Bronco's like mine have the factory harness mounted in place on the lower connector and some are loose. Either way it works and just gently push it into the fender abyss. I did reach out to Hammerbuilt about the piping and they will make future harnesses with the fabric tape. I'll get more into it later but I ended up redoing almost the whole harness in that fabric tape. It's way sleeker, better looking and flexible. Plus its what the factory uses so it matches up better.
Now there are a few different ways to run your wiring harness after plugging into the factory harness:
1: Quick and dirty, just route the harness down, under the bronco and through the grommet above the heat shield going into cool box storage compartment in the trunk. While quick and simple, it can leave some big holes as pushing the connector through requires a bigger hole and now your wiring is in a smaller hole than the connector required. I also wanted a factory finish for the tailgate side of the wiring which you'll see in a bit which would also require a very small hole not big enough to push a connector through.
I elected for option 2: Cut my Hammerbuilt wiring in half giving myself a few feet on the tailgate side of the harness.
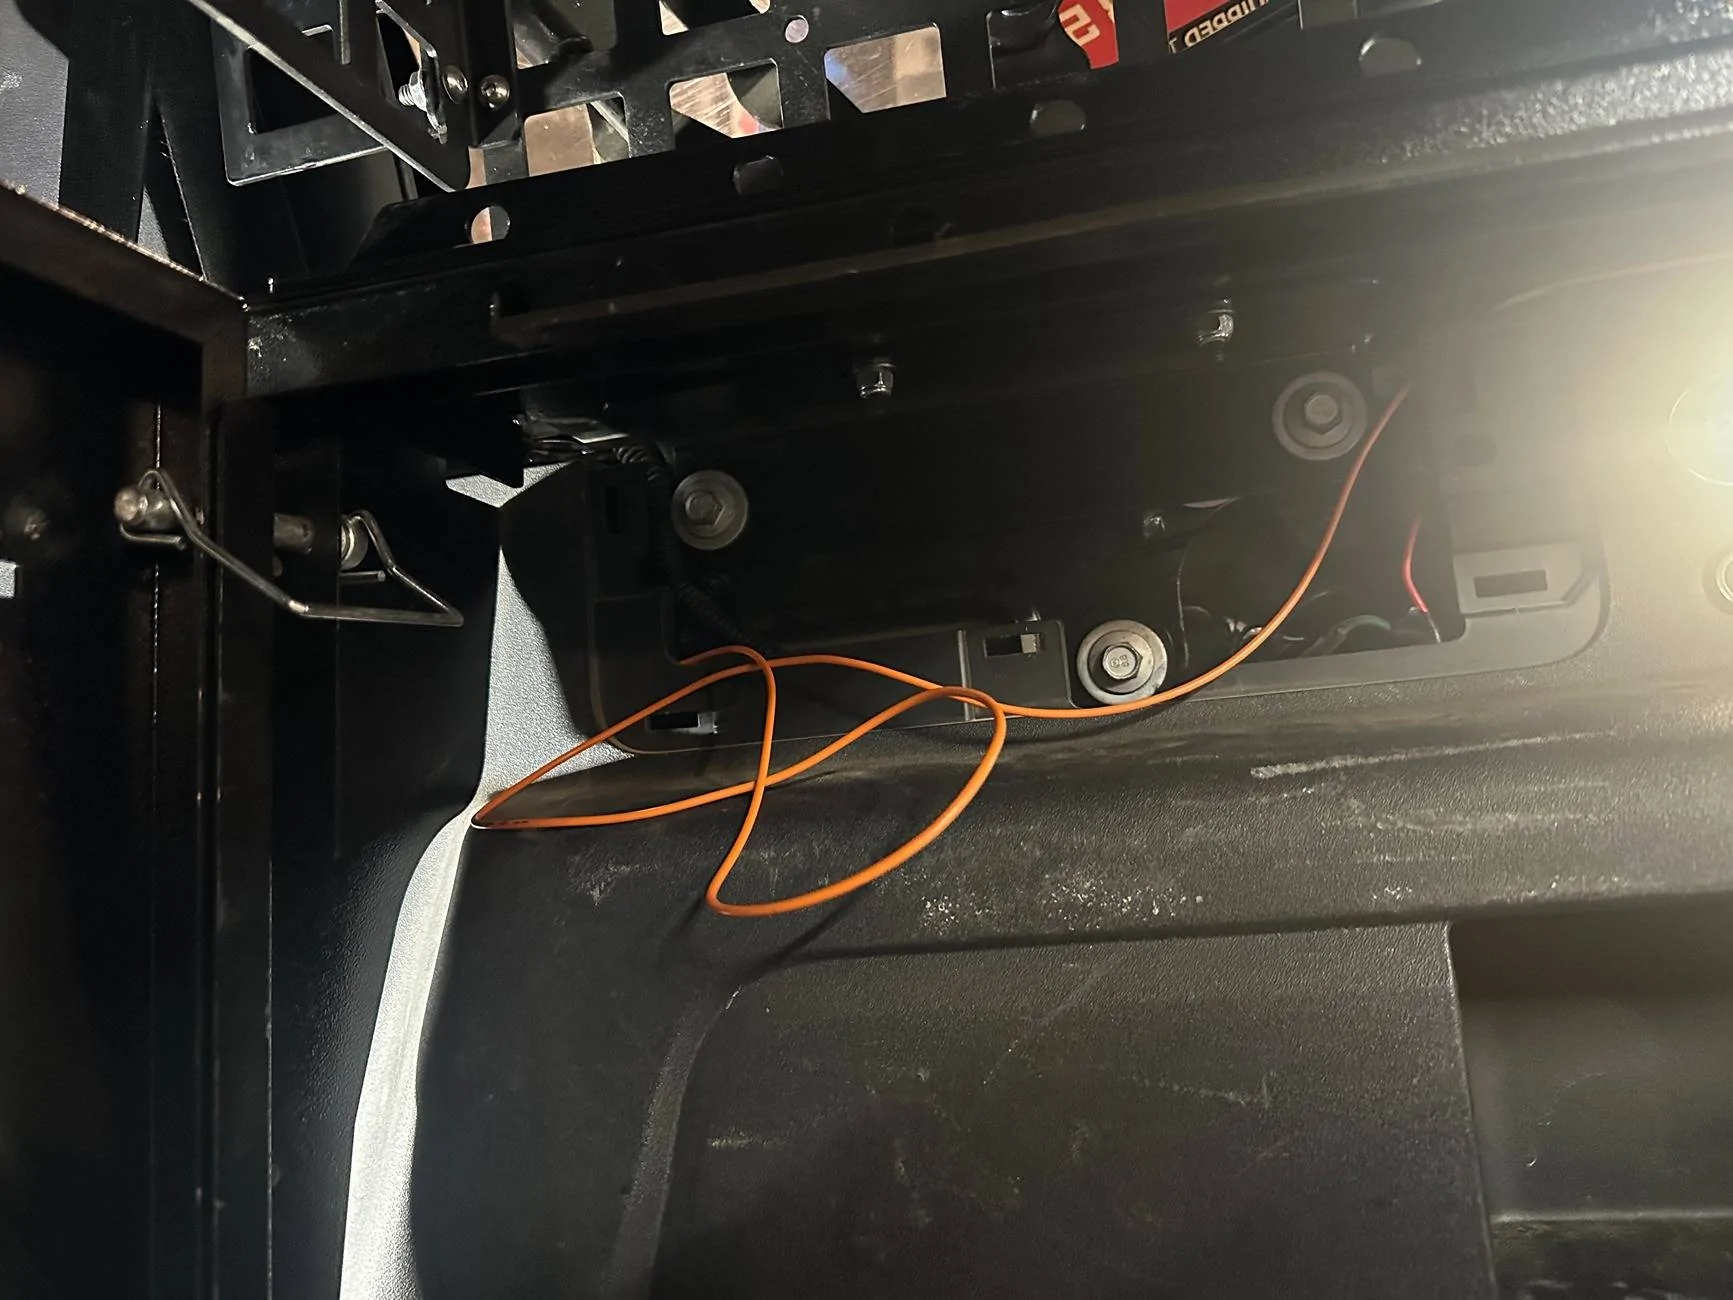
Now I fed the wires from the factory harness behind the trim down into the wiring harness running along the inside of my rear bumper. It then came straight back and underneath the heat shield straight into a tiny hole I made in the small grommet in the spare jack compartment.
I added some fabric electrical tape again and kept the plastic piping. This created a real nice seal with no worries (Hakuna Matata), especially as the heat shield provides additional protection. Plus the harness follows a factory harness behind the bumper as well.
Now I removed the plastic piping for the next section where I ran the wires in a body channel below the rear, lower trunk trim piece. The wires then went up the side and mocked up to where they would go behind the passenger side trim piece where the factory harness goes through the opening and out toward the tailgate.
This channel runs behind the seal and fits the wires perfectly (I later sheathed them after this picture with the tape). My cut will be placing the connections when I splice the harness back together directly behind the side trim and out of sight.
Now its time to move to the 3rd Brake light side of the Hammerbuilt harness and where I took the most time.
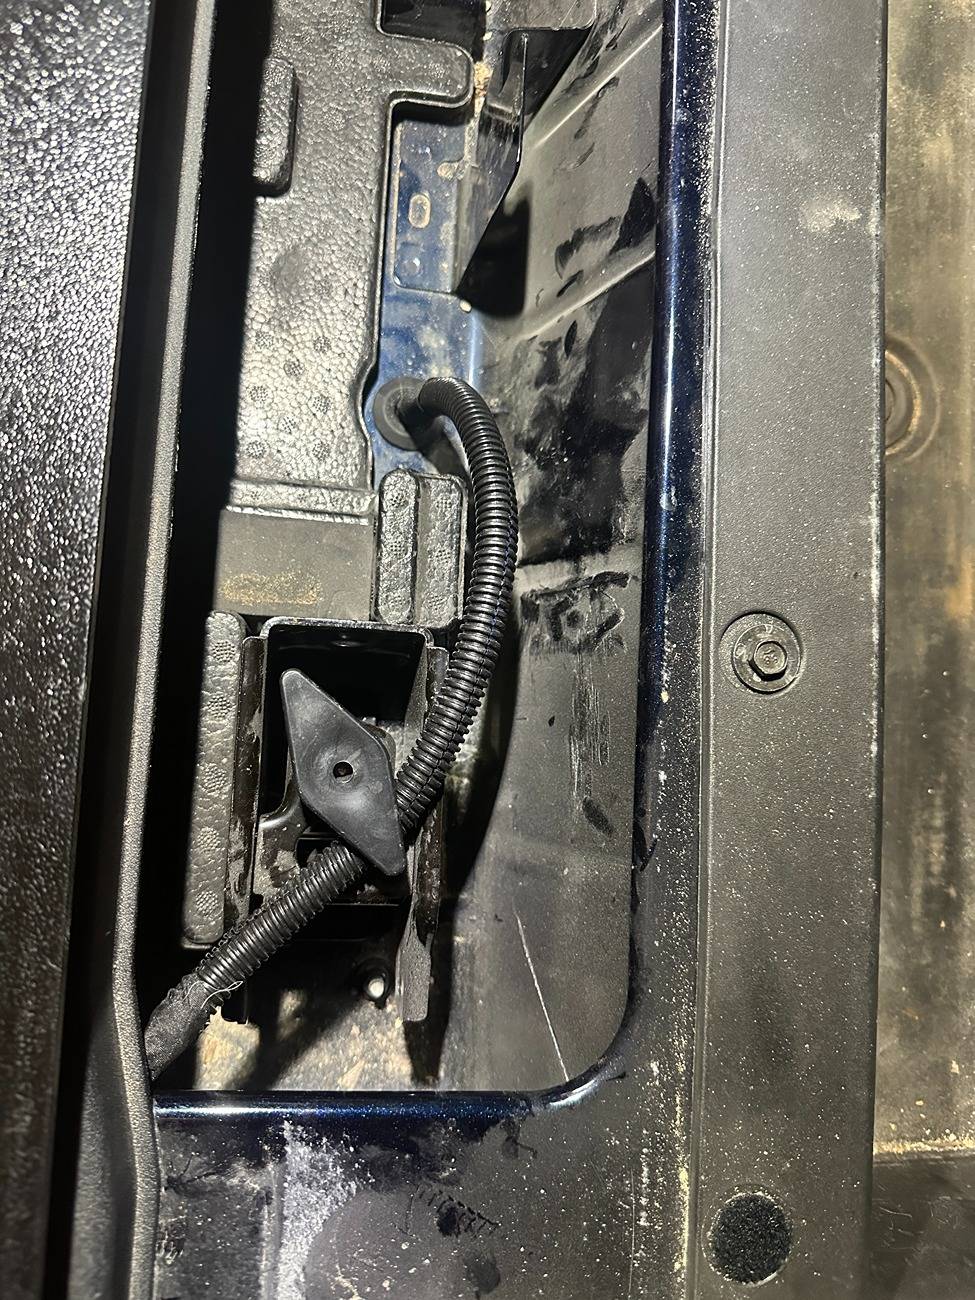
I begin by loosening up the spare tire carrier and filing the hole that the factory harness fit through so that it was enlarged enough to feed the Hammerbuilt harness through. I should offer that if you don't want to go this crazy, just push the harness through the dust vent behind the spare tire carrier and call it a day. I'm going for a factory look though and didn't want my vent to have an opening for OCD sake and a probably unwarranted concern that propping the vent open with a harness could allow too much dust into the interior.
After feeding the wires through and sheathing them. I sliced the nipple on the factory tailgate grommet and pushed the wires through the hole into the tailgate.
After all 5 wires were through, I sheathed them, wrapped fabric tape around the nipple, closing it off and wrapped all the wiring together as one leaving a factory look.
I then took my time, routing the wires along the factory wiring in the tailgate, sheathing them and tying them up as I went.
I routed them all the way to the end and then used watertight connectors and heat shrink wrap to reconnect them to their long lost better half.
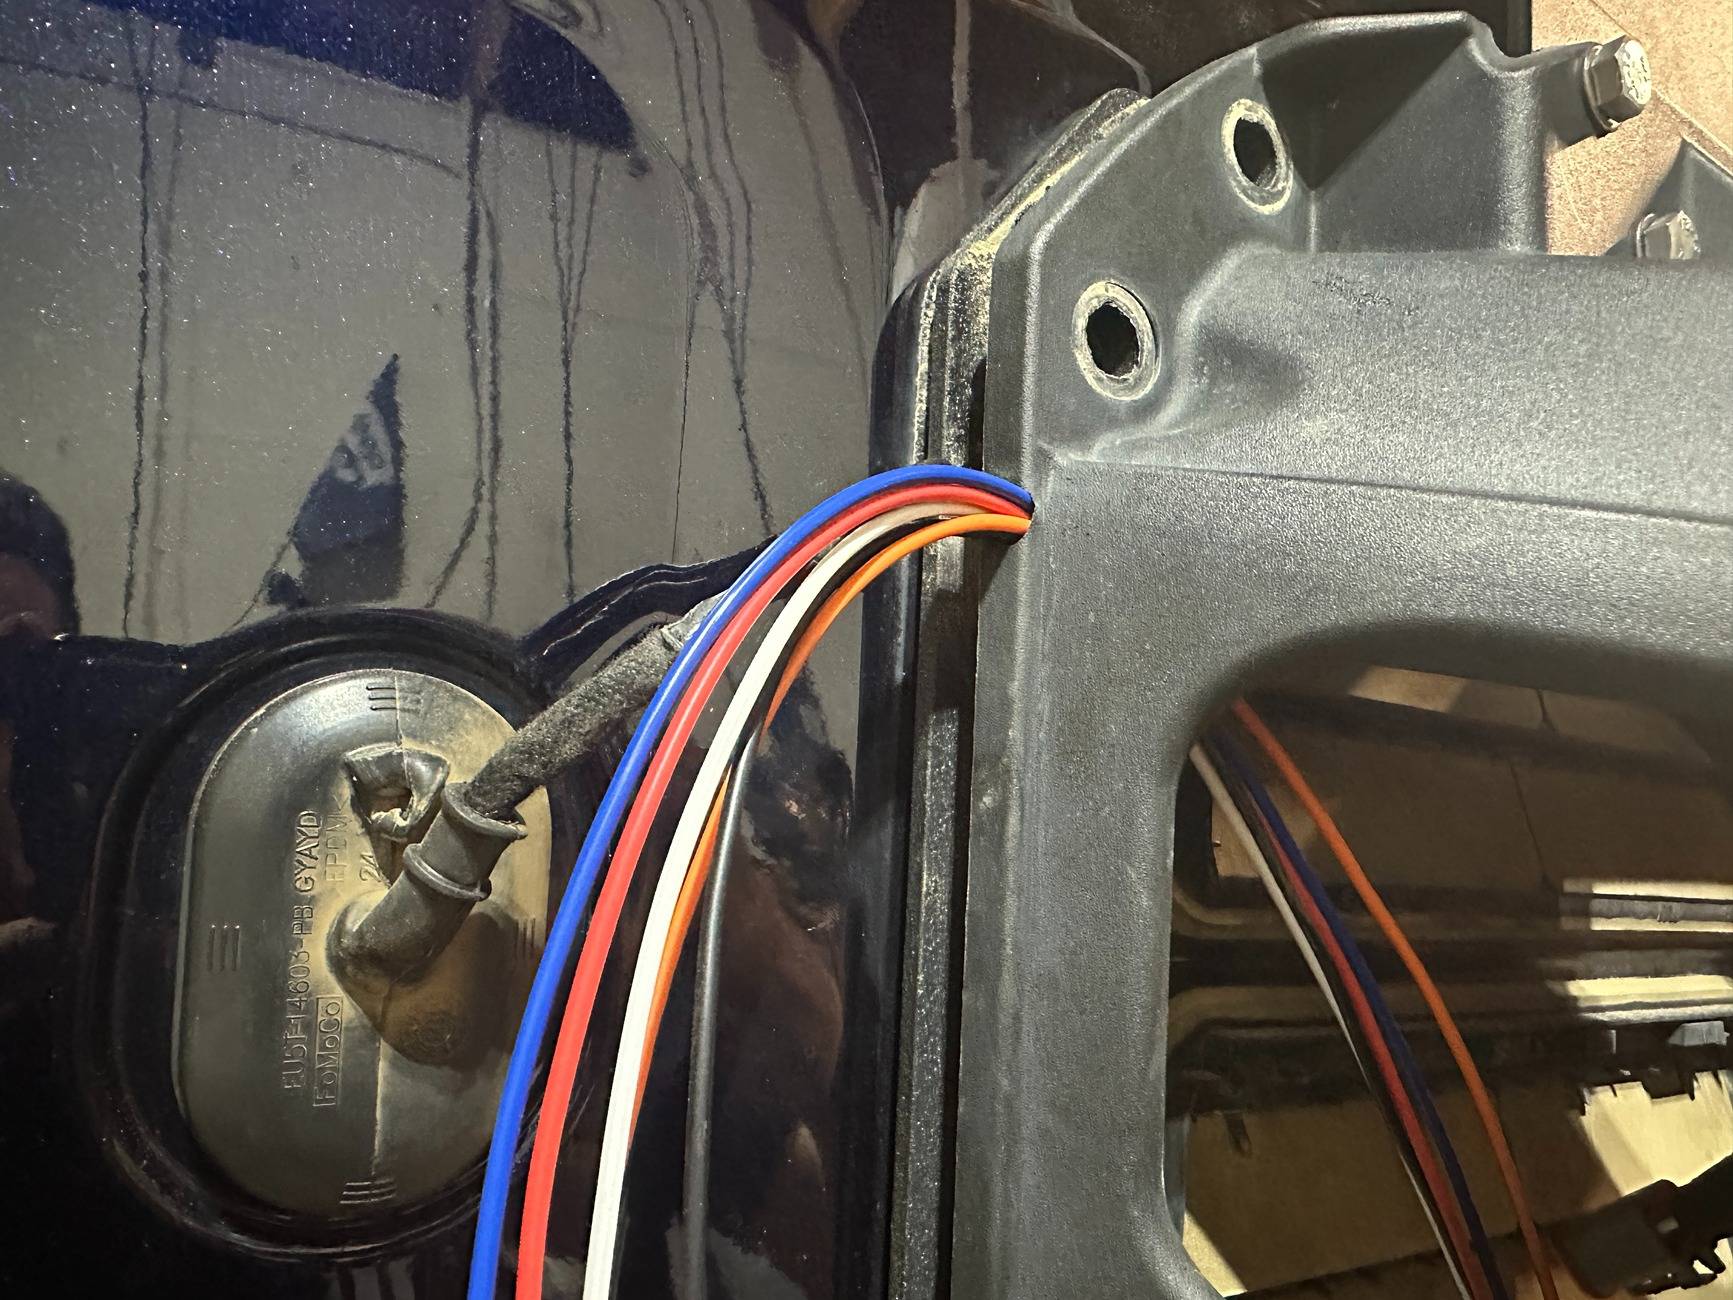
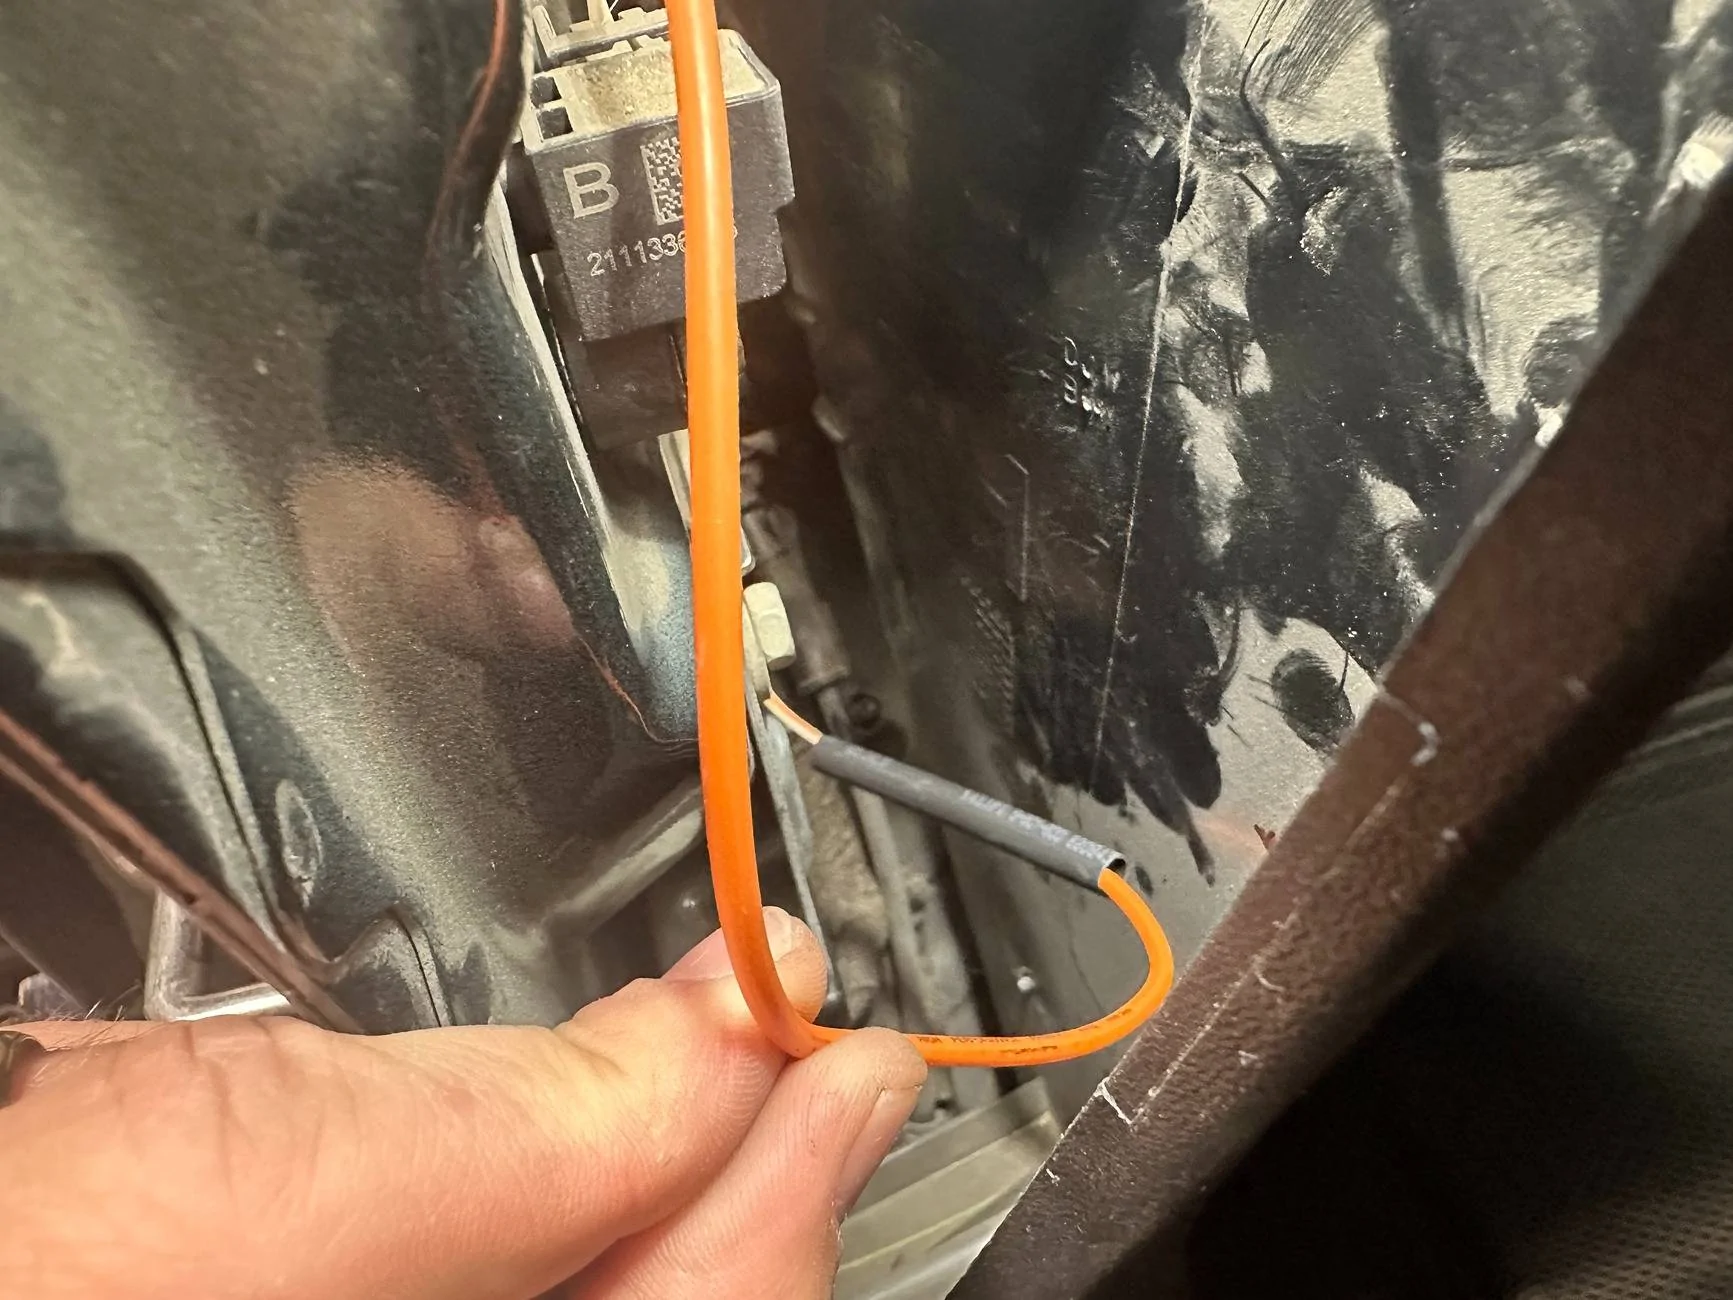
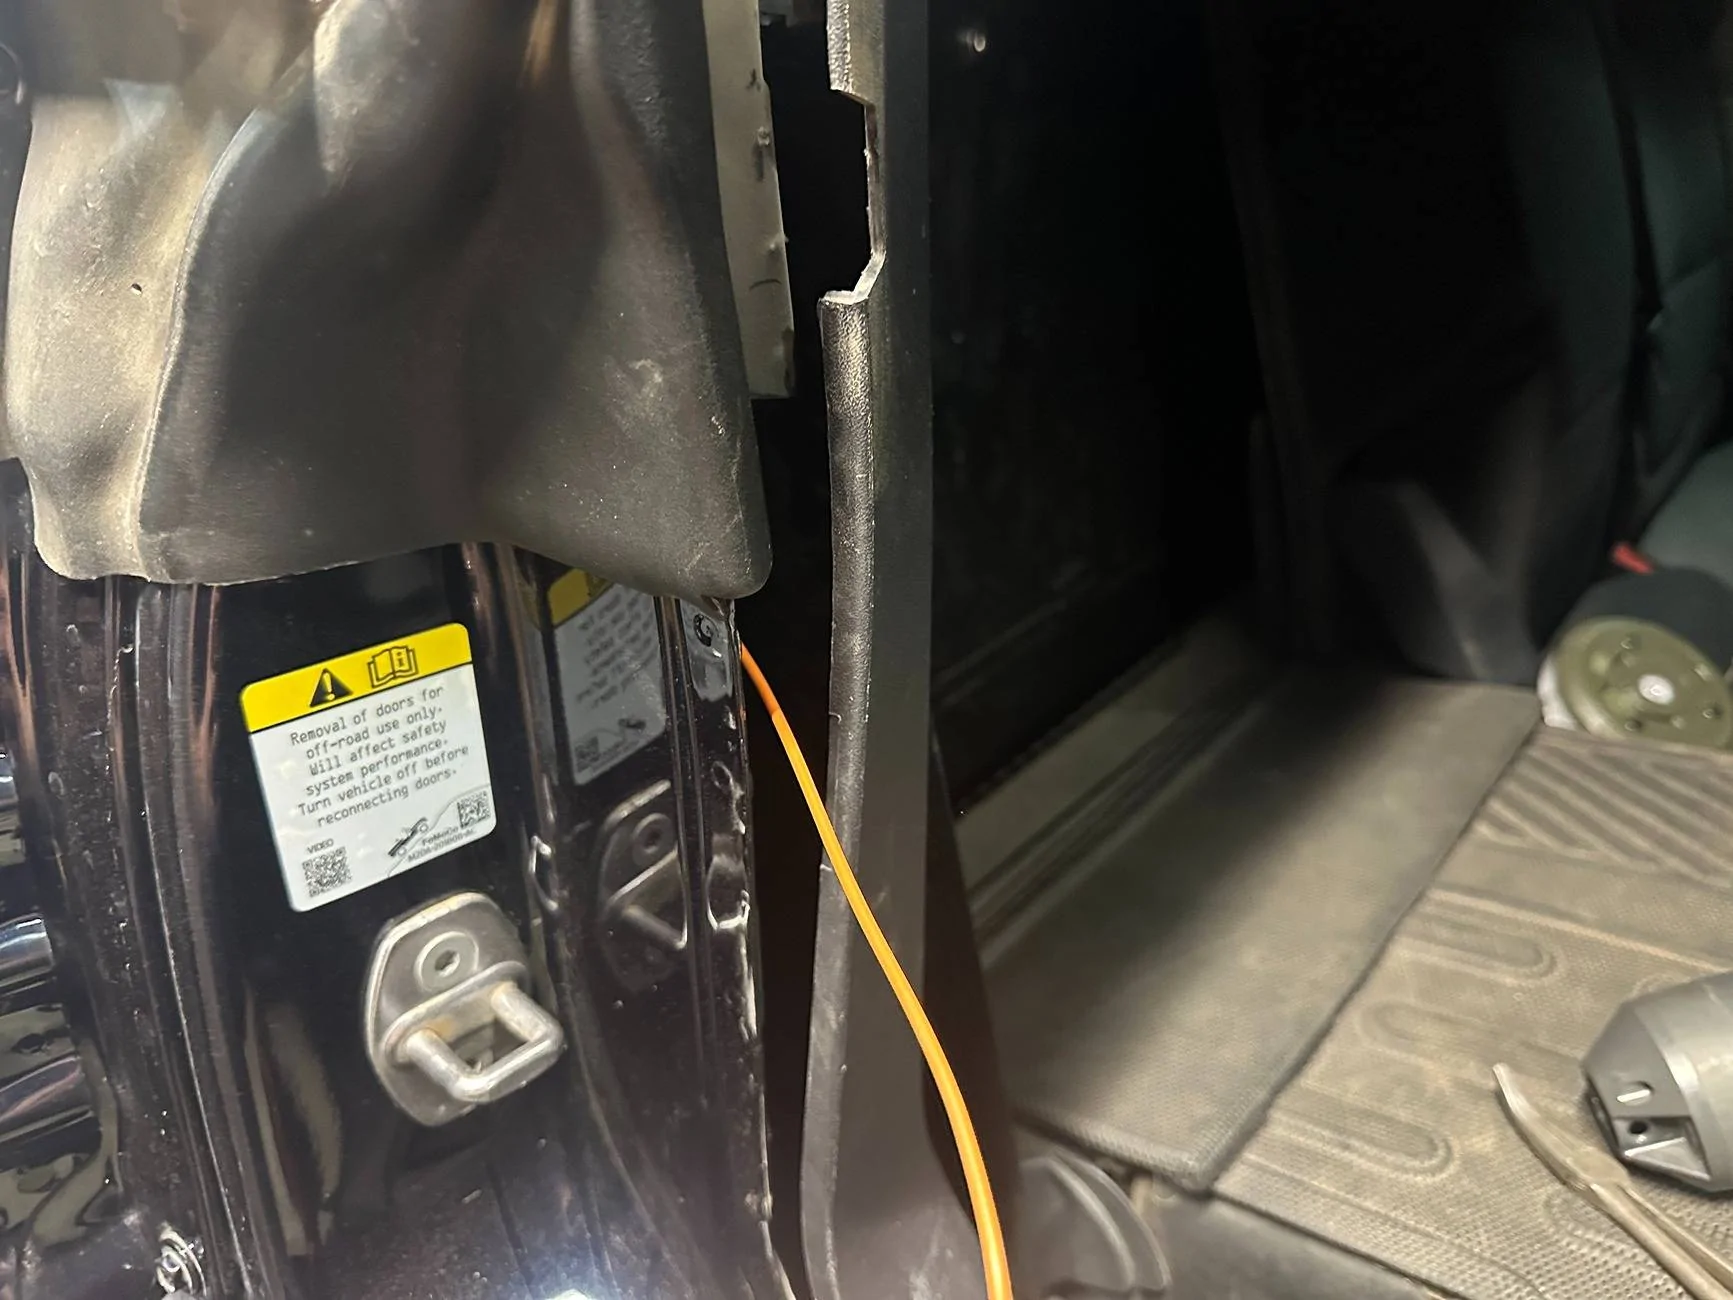
You'll notice the orange wiring: This is the chase light power that comes from the split end of the harness that we plugged into the factory wiring behind the trim. It is made long enough to go all the way to the cab if you don't have the aux switches. My harness (a prototype), was 8 inches too short with how I routed it through the tailgate grommet. I have the aux wiring thankfully so all I did was cut the slack off the orange chase light wire and used it to splice my 5 wires from the tailgate, lengthening them to where I need. (I told Hammerbuilt about this and it should be rectified for the production versions).
I connected the wires as stated and fed them behind the trim and out of sight after sheathing them. I then replaced the lower trim piece seen on the bottom left of the picture above.
The result looks almost factory, there are no bulges in the trim, everything fit where it should. He is as addtional photo of the final wiring from below the trunk as well in the jack storage area.
There is a cut-out from Ford perfect for my wiring to fit from the compartment to under the rear trim. Its like a match made in heaven.
Now the last thing to do is run the chase light wire from behind the coordinates trim panel to the aux switch wire. The aux wire in the rear is behind the passenger side rear trim panel. It is directly behind the rear seat in the four-door Bronco. I recommend removing the entire panel if you can. I did not have that luxury with my Diabolical setup so I fat fingered it.
To run the wire to this point is pretty easy. I tucked it up under the seal by the tailgate hinges which pushes it into the nether space behind the side trim piece. I then just kept stuffing/feeding until I made it forward to the aux cable and connected.
Now, after connecting to the aux. I connected the needed wires behind the glove box and then in the engine bay to allow for me to use Aux 5 for my chase light.
My aux wiring in the engine bay looks different as I got a disconnect installed so I didn't bother showing that part.
Now go through and clean anything up, test the lights and remount your spare. The light support should rest against the tailgate side and is adjustable heightwise to set where you want. Mine rests perfectly in place and makes a snug fit to prevent wobble.
I can't upload videos here well and its been raining hard but I am going to Death Valley next week. I will be updating this thread with a full youtube video of the install and a full show-down of all the light functions very soon. I'll add up updates, video/photos of reverse, chase and brake lights as soon as I get them. This light is not released yet but Tyson is working hard on getting it out as soon as possible.
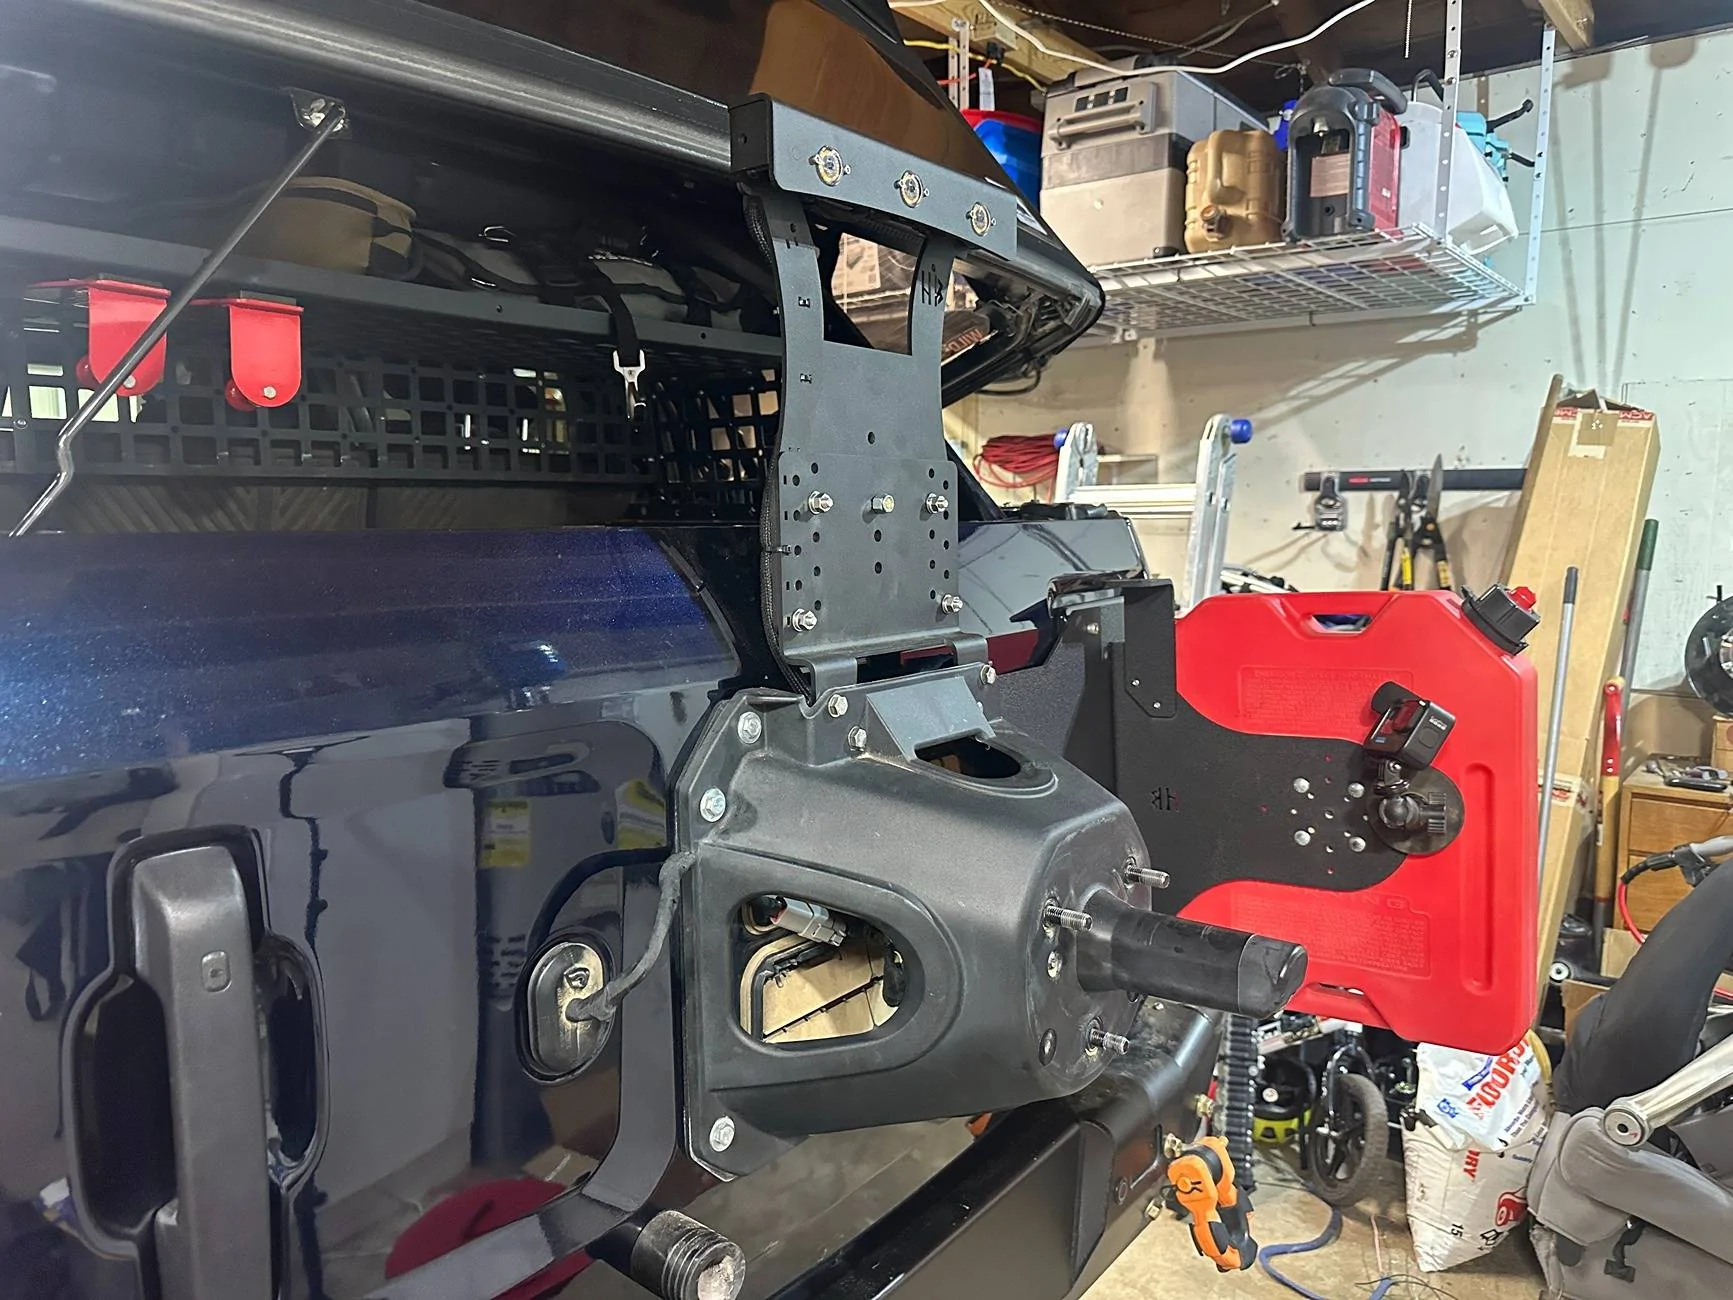
If you note the holes in the side in the picture below. They allow you to add additional accessories as you see fit. Corner lights, antenna mounts, whatever you want. It even includes slots for using zipties to tie up the harness which is a thoughtful touch.
This chase light covers a lot and leaves room for add-ons which is cool.
Tyson and Hammerbuilt were very receptive to my feedback on making the harness about 1 foot longer to allow for both the simple install and factory look install option. They will also be adding on the fabric sheathing for future wiring at least in the tailgate factory connection area for future batches (not the first batch).
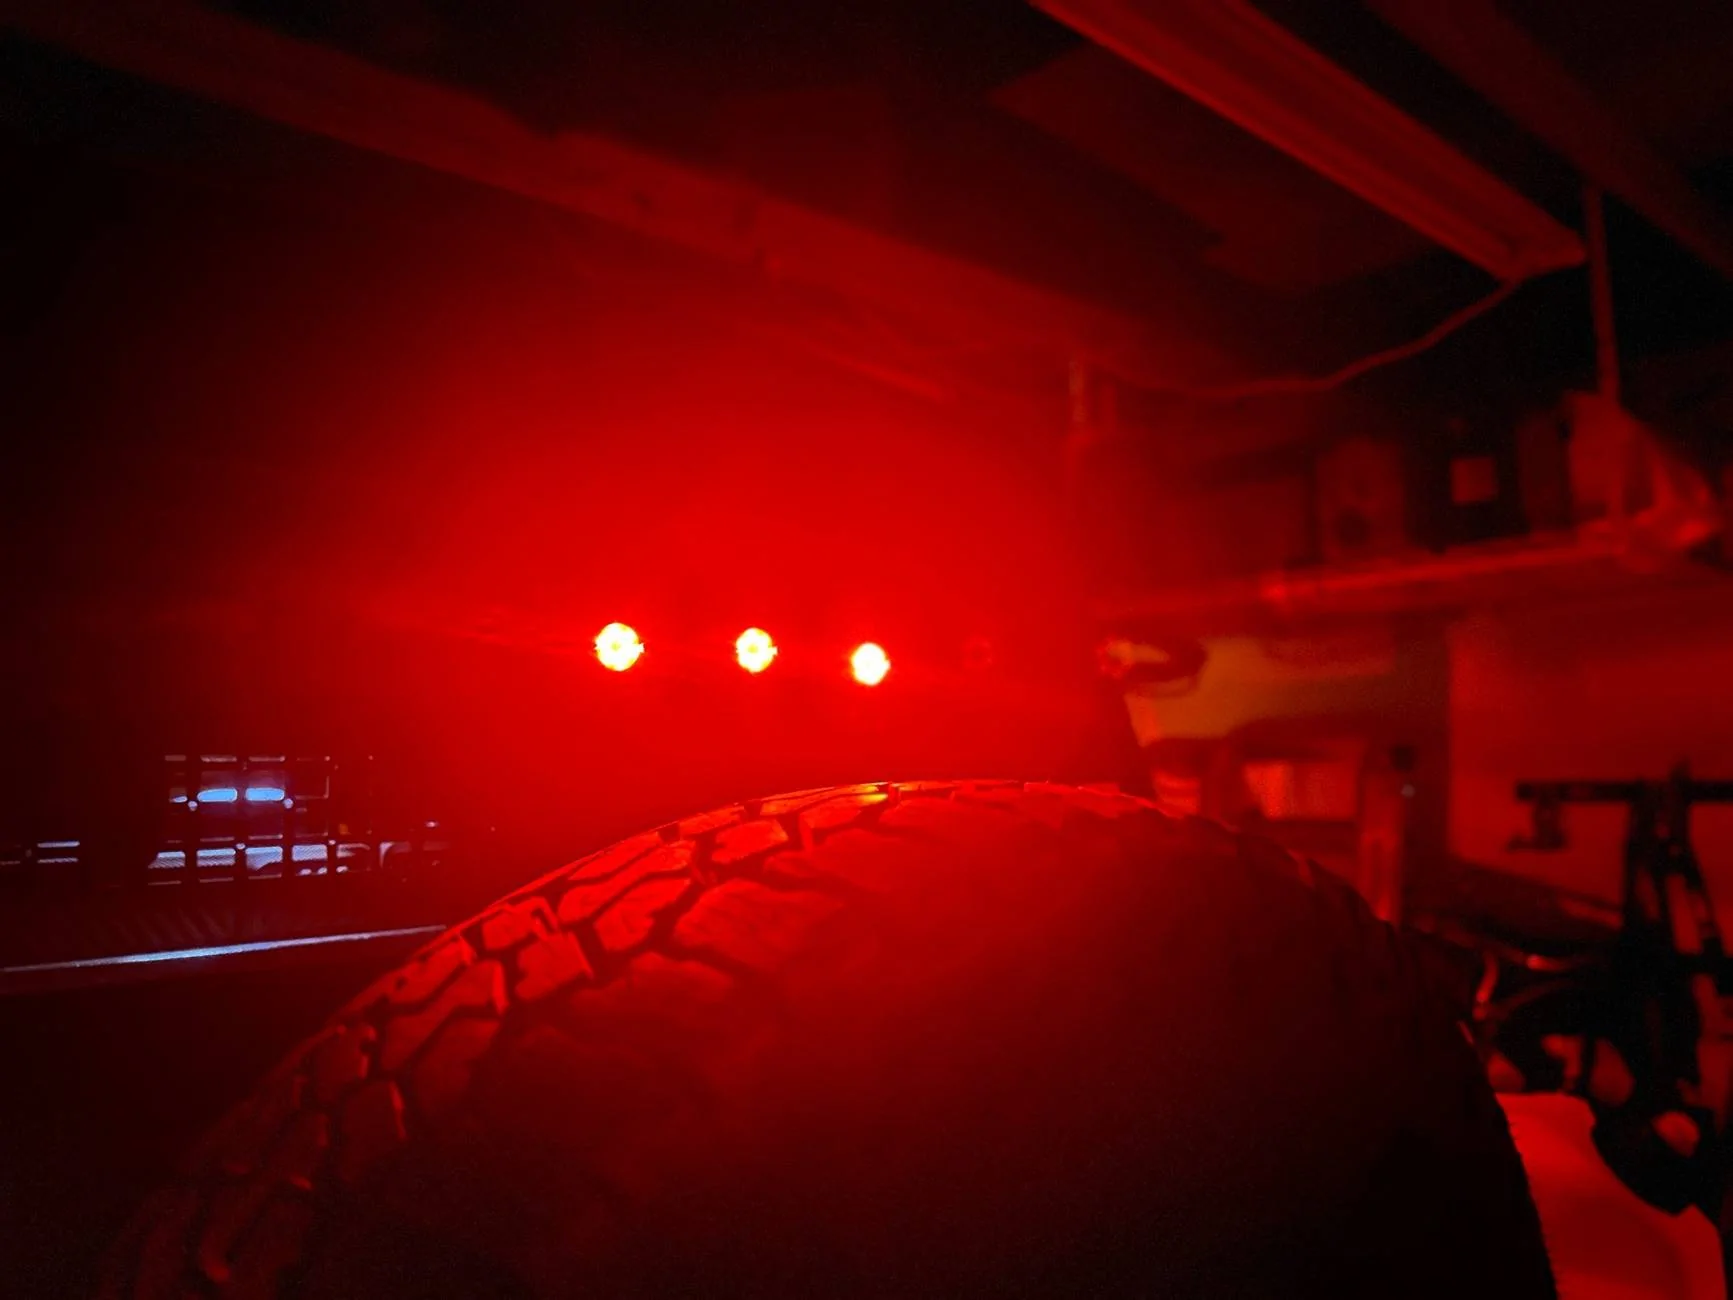
The lights are very bright though Feniex doesn't offer an exact lumen count. If you want immediate footage of it in use, Alex (@904.bronco) on IG has a reel of his being used. rest assured, I'll be putting this through its paces and reporting back on this thread.
I'm not telling you to buy it but I am saying its my favorite option thus far on the market. As far as pricing, that's not released yet. But I do know that usually all that American made freedom comes at an American made price. I am told between $600-$700 for the cost once it hits the market within I'm hoping a month or two...Tyson is still waiting on the harnesses to get made. They are each made by hand and wrapped so they want plenty made before they start selling the kits.
Unfortunately, there were not many options at the time. I did not want something over my spare after having experience on the same R2V run having to remove a bunch of spare mounted lights when changing a tire on the trail. It added a lot of time, tools and work having to remove 2 pod mounted chase lights and associated wiring mounted to the spare.
I also couldn't do the typical lightbar as it wouldn't look good in my opinion on the Bronco. Having something in the 3rd brake light area seemed perfect but nothing existed... yet.
In almost perfect timing, 3 different companies came out with a 3rd brake light/chase light option at similar times. Rad Designs, Turn Off-road, and Hammerbuilt.
Rad Designs is a nifty plug-n-play option that goes into the stock housing. It's 3D printed but does not strobe the chase lights or include reverse lights.
The Turn Off-Road option I initially really liked and even purchased but quickly decided to give to my neighbor for install in favor of the Hammerbuilt. The Turn Off-Road looks good but its very top-heavy, wobbles over washboards and bumps as it lacks support and also doesn't strobe its chase lights. The lights are also pretty cheap though you can opt to swap them for Baja Designs S2 Pros. The wiring on the Turn option requires cutting of your factory wiring harness as well which I wasn't excited about. Otherwise its a great option and can be modified to strobe if you are smart like that.
Finally, Hammerbuilt reached out as they heard I was looking at chase lights and asked if I wanted to try their latest product in the works (3rd Brake Light) and give feedback. I agreed but elected to maintain my own opinion on it. Thankfully, Tyson is and has always been super cool and awesome and so he agreed.
I received the new product and opened it up:

Now before we dive in I want to give a few specs: The product is entirely sourced, assembled, made in-house. The metal is American aluminum and powder-coated. The lights are Feniex lights which are an American light brand made in America and are the go-to for many 1st responder agencies for their lighting needs. Its a multi-purpose light that can be reconfigured to be several different colors or brightness levels. As-is, they are set to be running lights (dim), brake lights (bright), reverse lights (bright white), and chase lights (outer lights strobe amber while center light maintains 3rd brake light function). The light housing is assembled and then powdercoated which hides a lot of the assembly making it look like a single piece design.
The lights are easily accessible for replacement without removing the assembly.
The kit is very well put together and includes an adjustable section to set to your tire size. The assembly maintains the curvature of the tire for asthetics and tries not to be a in-your-face design. The attention to detail on the wiring is very impressive and is designed to be a mostly plug-n-play design with NO CUTTING of the factory harness. This will require more work on the install end to make things more seamless.
I ended up taking some extra time on the wiring and what I ended up with is a perfectly invisible wiring that can not be distinguished from the factory wiring.
The kit also includes an adjustable support that braces the kit from wobbling. I tested after install and its pretty freaking rigid in place.
Now for the install , give yourself several hours and take your time. Remove the OEM 3rd brake light and pull off the rear cover, accessing the OEM plug and unplug it from the 3rd brake light.
Assemble your Hammerbuilt assembly with your center support, support bracket and main light assembly in the configuration best for your needs/tire size.

Install it on the spare tire carrier in the stock location and zip tie the OEM harness that you disconnected out of the way and out of sight. The great thing about this kit is that you don't ruin your oem harness in case you ever go back.
Now go into the tailgate side and remove the trim from the inside of the tailgate, if you have a tailgate table, you will have to remove that as well. You will also eventually be removing the trim piece between the tailgate and the taillight where the coordinates are. These all popped out for me with my hand or some gentle convincing with a plastic pry tool. The trim piece with the coordinates required a phillips head screwdriver as well.

Now there is also the lower trim that follows the rear trunk seal on the bottom that pops out as well. Remove this as well.
Now that our light assembly is installed and our trim panels removed. We will begin the wiring process. The included wiring harness plugs directly into the factory harness located behind the coordinates trim piece in the corner where the tailgate hinges are. Unplug the factory harness and plug the split end of the Hammerbuilt harness directly in.


Now I did have some initial trouble trying to the fit the split end of the Hammerbuilt harness in here. It was sheathed in this thick, plastic piping that was not flexible. I removed the piping at the end and re-wrapped it with the factory style fabric electrical tape. It fit perfectly after this and I was able to push it back and out of the way. Some Bronco's like mine have the factory harness mounted in place on the lower connector and some are loose. Either way it works and just gently push it into the fender abyss. I did reach out to Hammerbuilt about the piping and they will make future harnesses with the fabric tape. I'll get more into it later but I ended up redoing almost the whole harness in that fabric tape. It's way sleeker, better looking and flexible. Plus its what the factory uses so it matches up better.
Now there are a few different ways to run your wiring harness after plugging into the factory harness:
1: Quick and dirty, just route the harness down, under the bronco and through the grommet above the heat shield going into cool box storage compartment in the trunk. While quick and simple, it can leave some big holes as pushing the connector through requires a bigger hole and now your wiring is in a smaller hole than the connector required. I also wanted a factory finish for the tailgate side of the wiring which you'll see in a bit which would also require a very small hole not big enough to push a connector through.
I elected for option 2: Cut my Hammerbuilt wiring in half giving myself a few feet on the tailgate side of the harness.

Now I fed the wires from the factory harness behind the trim down into the wiring harness running along the inside of my rear bumper. It then came straight back and underneath the heat shield straight into a tiny hole I made in the small grommet in the spare jack compartment.


I added some fabric electrical tape again and kept the plastic piping. This created a real nice seal with no worries (Hakuna Matata), especially as the heat shield provides additional protection. Plus the harness follows a factory harness behind the bumper as well.
Now I removed the plastic piping for the next section where I ran the wires in a body channel below the rear, lower trunk trim piece. The wires then went up the side and mocked up to where they would go behind the passenger side trim piece where the factory harness goes through the opening and out toward the tailgate.

This channel runs behind the seal and fits the wires perfectly (I later sheathed them after this picture with the tape). My cut will be placing the connections when I splice the harness back together directly behind the side trim and out of sight.
Now its time to move to the 3rd Brake light side of the Hammerbuilt harness and where I took the most time.
I begin by loosening up the spare tire carrier and filing the hole that the factory harness fit through so that it was enlarged enough to feed the Hammerbuilt harness through. I should offer that if you don't want to go this crazy, just push the harness through the dust vent behind the spare tire carrier and call it a day. I'm going for a factory look though and didn't want my vent to have an opening for OCD sake and a probably unwarranted concern that propping the vent open with a harness could allow too much dust into the interior.
After feeding the wires through and sheathing them. I sliced the nipple on the factory tailgate grommet and pushed the wires through the hole into the tailgate.

After all 5 wires were through, I sheathed them, wrapped fabric tape around the nipple, closing it off and wrapped all the wiring together as one leaving a factory look.
I then took my time, routing the wires along the factory wiring in the tailgate, sheathing them and tying them up as I went.

I routed them all the way to the end and then used watertight connectors and heat shrink wrap to reconnect them to their long lost better half.

You'll notice the orange wiring: This is the chase light power that comes from the split end of the harness that we plugged into the factory wiring behind the trim. It is made long enough to go all the way to the cab if you don't have the aux switches. My harness (a prototype), was 8 inches too short with how I routed it through the tailgate grommet. I have the aux wiring thankfully so all I did was cut the slack off the orange chase light wire and used it to splice my 5 wires from the tailgate, lengthening them to where I need. (I told Hammerbuilt about this and it should be rectified for the production versions).
I connected the wires as stated and fed them behind the trim and out of sight after sheathing them. I then replaced the lower trim piece seen on the bottom left of the picture above.
The result looks almost factory, there are no bulges in the trim, everything fit where it should. He is as addtional photo of the final wiring from below the trunk as well in the jack storage area.
There is a cut-out from Ford perfect for my wiring to fit from the compartment to under the rear trim. Its like a match made in heaven.
Now the last thing to do is run the chase light wire from behind the coordinates trim panel to the aux switch wire. The aux wire in the rear is behind the passenger side rear trim panel. It is directly behind the rear seat in the four-door Bronco. I recommend removing the entire panel if you can. I did not have that luxury with my Diabolical setup so I fat fingered it.
To run the wire to this point is pretty easy. I tucked it up under the seal by the tailgate hinges which pushes it into the nether space behind the side trim piece. I then just kept stuffing/feeding until I made it forward to the aux cable and connected.

Now, after connecting to the aux. I connected the needed wires behind the glove box and then in the engine bay to allow for me to use Aux 5 for my chase light.

My aux wiring in the engine bay looks different as I got a disconnect installed so I didn't bother showing that part.
Now go through and clean anything up, test the lights and remount your spare. The light support should rest against the tailgate side and is adjustable heightwise to set where you want. Mine rests perfectly in place and makes a snug fit to prevent wobble.
I can't upload videos here well and its been raining hard but I am going to Death Valley next week. I will be updating this thread with a full youtube video of the install and a full show-down of all the light functions very soon. I'll add up updates, video/photos of reverse, chase and brake lights as soon as I get them. This light is not released yet but Tyson is working hard on getting it out as soon as possible.
If you note the holes in the side in the picture below. They allow you to add additional accessories as you see fit. Corner lights, antenna mounts, whatever you want. It even includes slots for using zipties to tie up the harness which is a thoughtful touch.
This chase light covers a lot and leaves room for add-ons which is cool.
Tyson and Hammerbuilt were very receptive to my feedback on making the harness about 1 foot longer to allow for both the simple install and factory look install option. They will also be adding on the fabric sheathing for future wiring at least in the tailgate factory connection area for future batches (not the first batch).
The lights are very bright though Feniex doesn't offer an exact lumen count. If you want immediate footage of it in use, Alex (@904.bronco) on IG has a reel of his being used. rest assured, I'll be putting this through its paces and reporting back on this thread.
I'm not telling you to buy it but I am saying its my favorite option thus far on the market. As far as pricing, that's not released yet. But I do know that usually all that American made freedom comes at an American made price. I am told between $600-$700 for the cost once it hits the market within I'm hoping a month or two...Tyson is still waiting on the harnesses to get made. They are each made by hand and wrapped so they want plenty made before they start selling the kits.
Sponsored
Last edited:


 Seriously out of my wheelhouse!! What is your favorite plug and play?