- Joined
- Jan 25, 2022
- Threads
- 4
- Messages
- 77
- Reaction score
- 124
- Location
- Denver, CO
- Vehicle(s)
- 2022 Oxford White Bronco Wildtrack
- Your Bronco Model
- Wildtrak
- Thread starter
- #1
Finished installing the ARB Brushless Twin Compressor a couple weeks back, and after having to do a lot of research and digging to figure it all out (since there are differences with the brushless setup, particularly with the wiring) figured it might help some guys out to see how I did it.
Ordered the brushless twin and KR offroad bracket from @4x4TruckLEDs.com. Had an issue with the compressor as delivered (which was an ARB problem, not a 4x4TruckLEDs problem) and 4x4TruckLEDs were helpful in getting me connected with ARB to rectify the issue. So shout out to 4x4TruckLEDs for strong customer service.
I wound up going with the KR offroad bracket, ARB harness to an upfitter switch, and a remote mounted Apex Designs hose reel mounted on the back roll bar upright.
Parts I used:
Apex Designs CRS Mount from Fast Intentions: https://fastintentions.com/product/ford-bronco-apex-reel-mount/
ARB Brushless Twin Compressor Kit w/ KR Offroad Compressor Mount: https://www.4x4truckleds.com/kr-off...NigQWOpV7dFYE4ptBMseWpYEdFJuTUJH_uIcmpupqWuFU
Apex Designs 35' CRS: https://www.apexdesignsusa.com/products/compact-reel-system-crs?variant=46059077566764
Apex Designs CRS Banjo Fitting: https://www.apexdesignsusa.com/products/banjo-fitting-for-crs-1-4-npt-to-apex-3-8-braided-air-hose
Apex Designs Nylon Braided Air Line (25 ft): https://www.apexdesignsusa.com/products/3-8-od-braided-air-line-per-ft
Apex Designs 3/8" Braided Hose to 1/4" NPT Fitting: https://www.apexdesignsusa.com/products/crs-hose-end-fitting-3-8-id-to-1-4-npt-w-cover-nut
There's a couple of things I don't have pictures of, because they are extremely easy and the parts have their own solid directions - the fast intentions mount and the KR offroad bracket. If you copy this setup, just follow the included directions for these parts - they are very simple.
To start with the biggest challenge I had figuring out, wiring.
The kit includes a whole mess of wiring, which is great if you don't have upfitter switches in your rig. I had trouble figuring out exactly how to modify the harness to work with the upfitter setup because there are significant differences between the harness for the brushless vs. the older brushed compressors (there is a TON of info on the brushed compressor install, not so much on the new brushless), but was able to figure it out and it works perfect.
You can ditch the included plug-in fitting and pins, and the secondary harness. You can modify your harness for a clean look the way I did if you want it as OEM looking as possible (which I did).
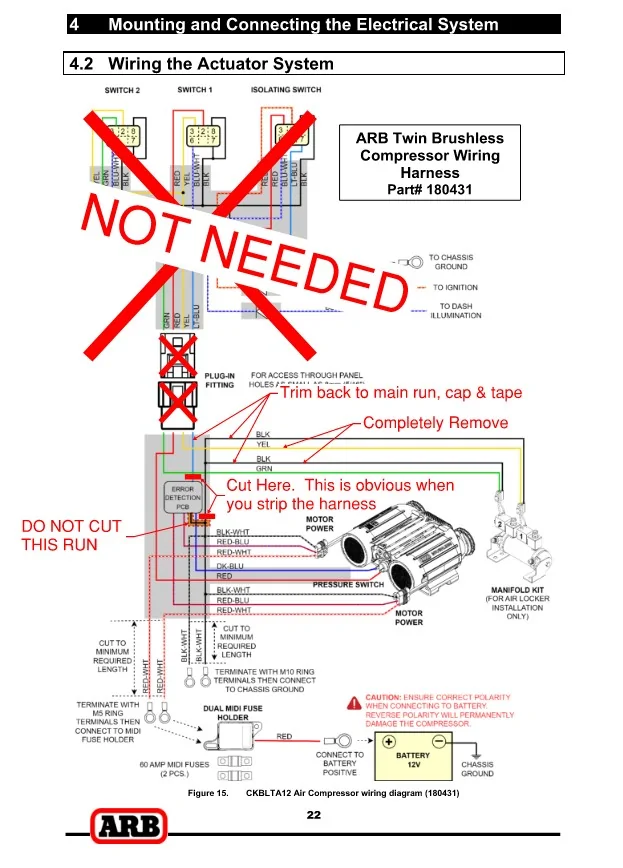
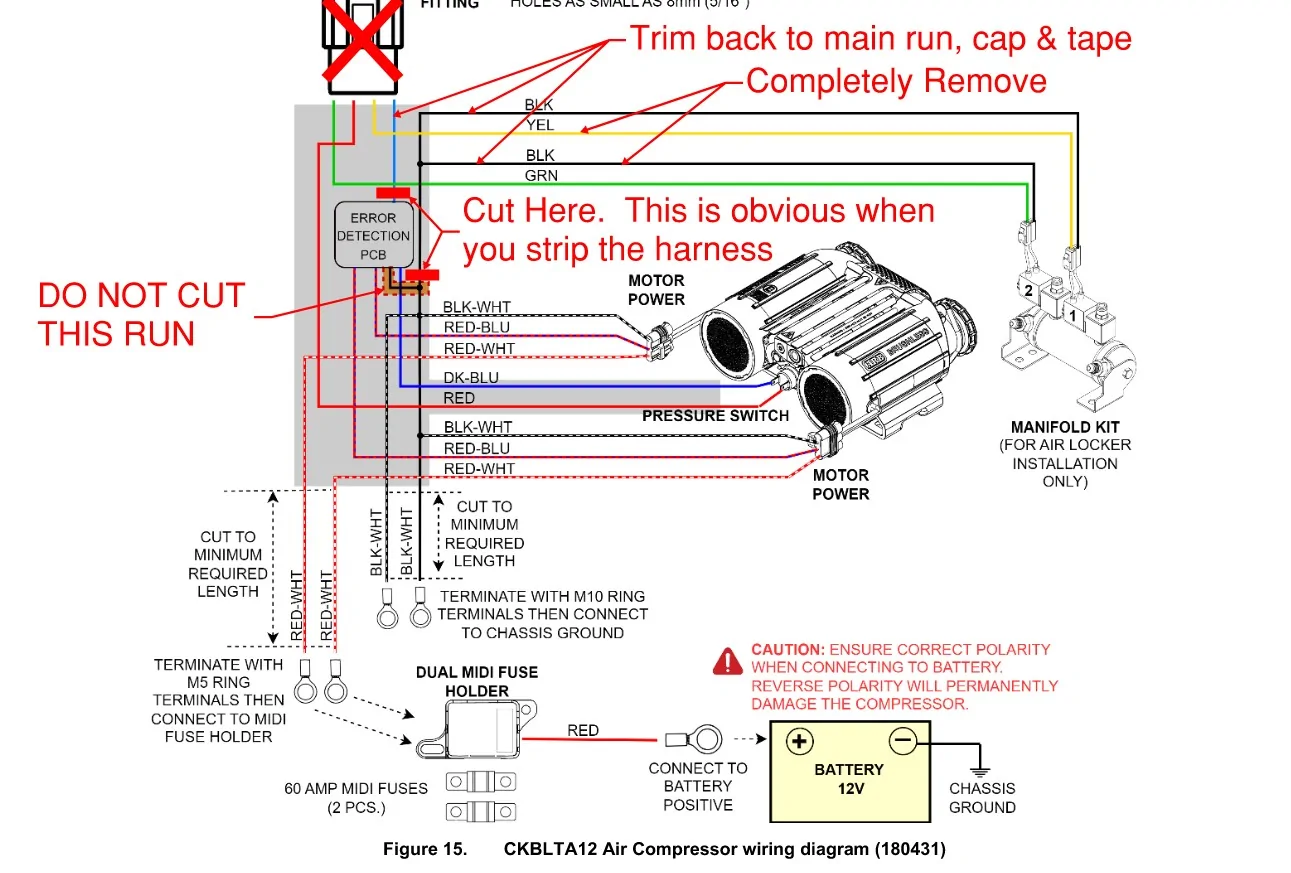
Wiring diagram (this is snipped from the ARB manual, with my notes)

Extra detail on what you actually need:

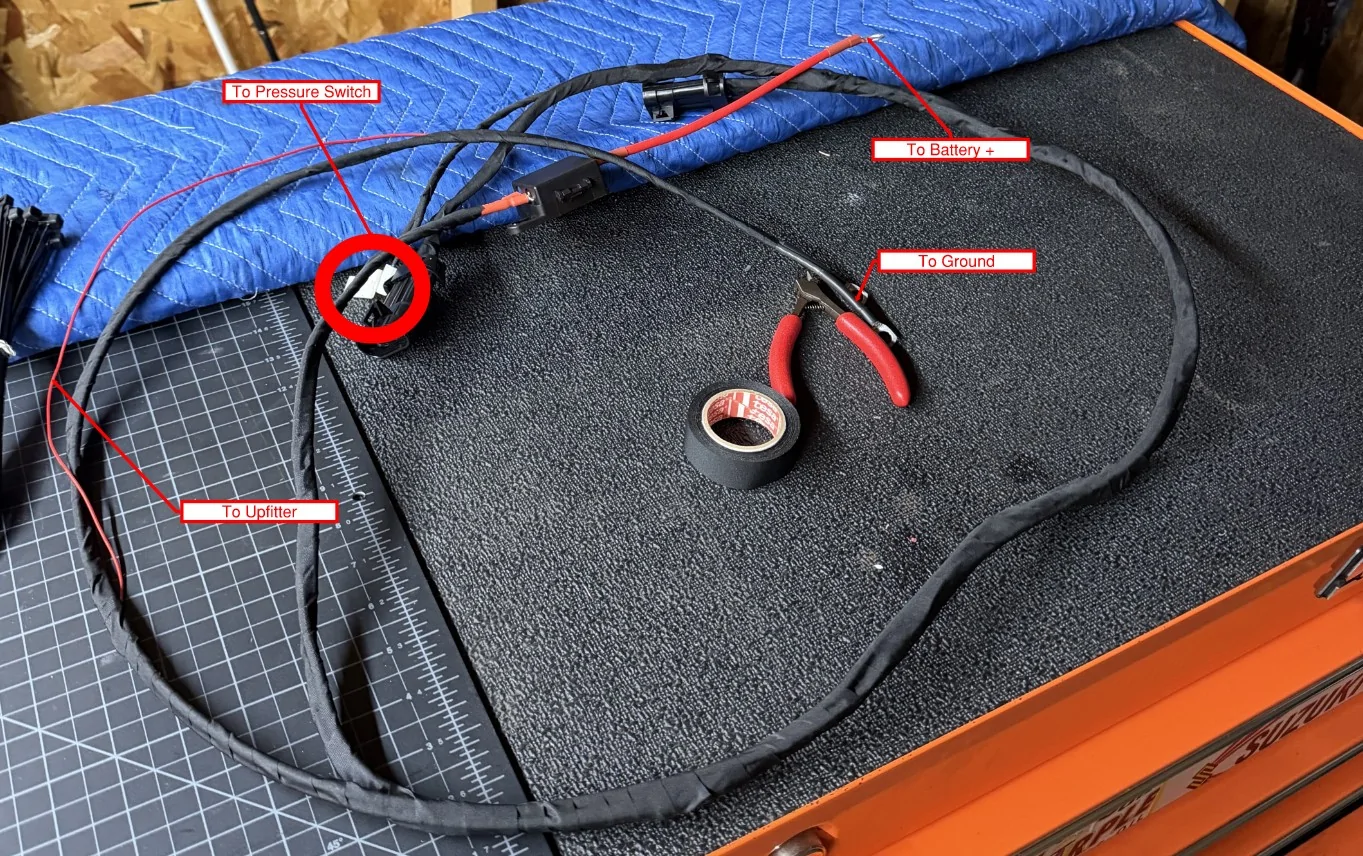
I fully stripped my harness and rewrapped with Tesa tape, after stripping out all the unnecessary stuff. You'll also want to lay this out and trim the ground and positive wires to length before you crimp on your terminals. Do all that and you're left with this:

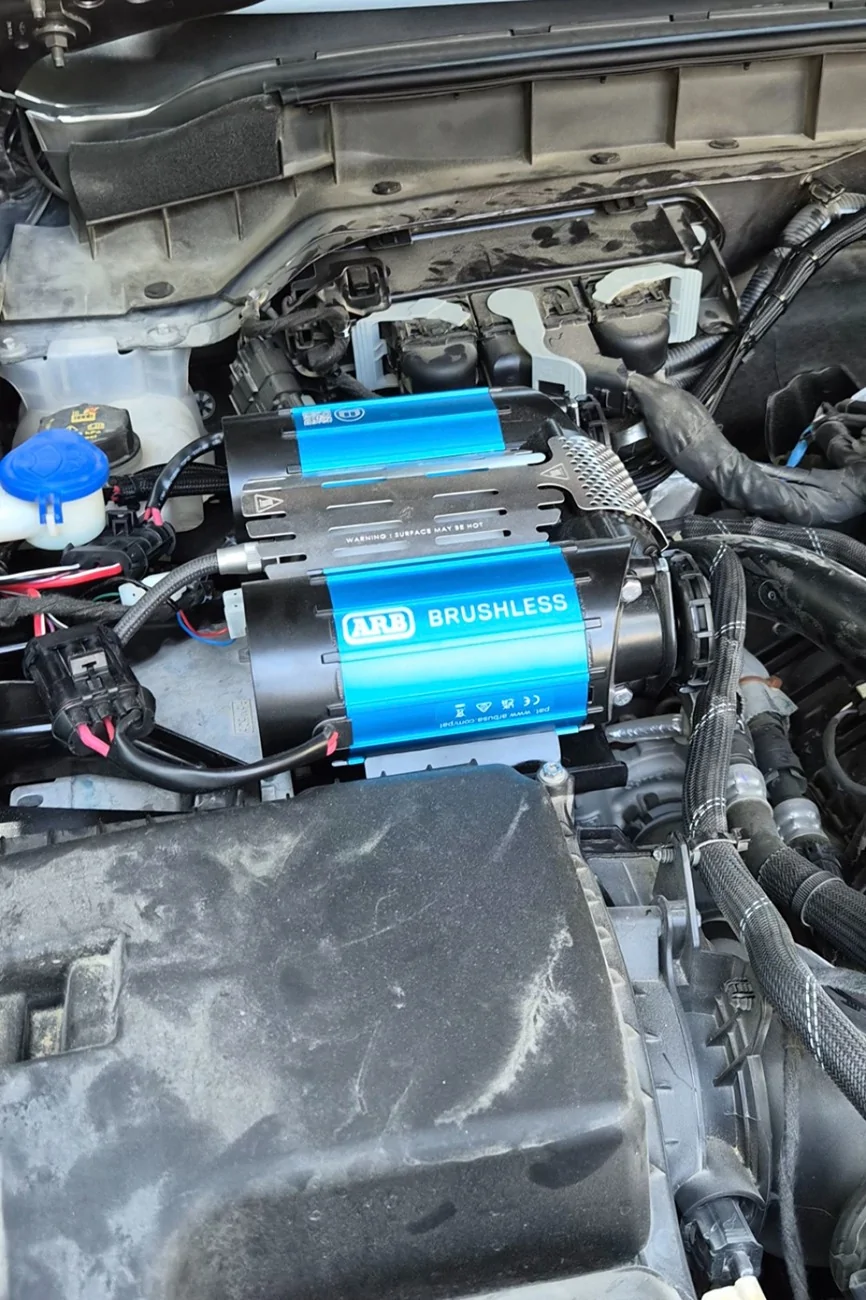
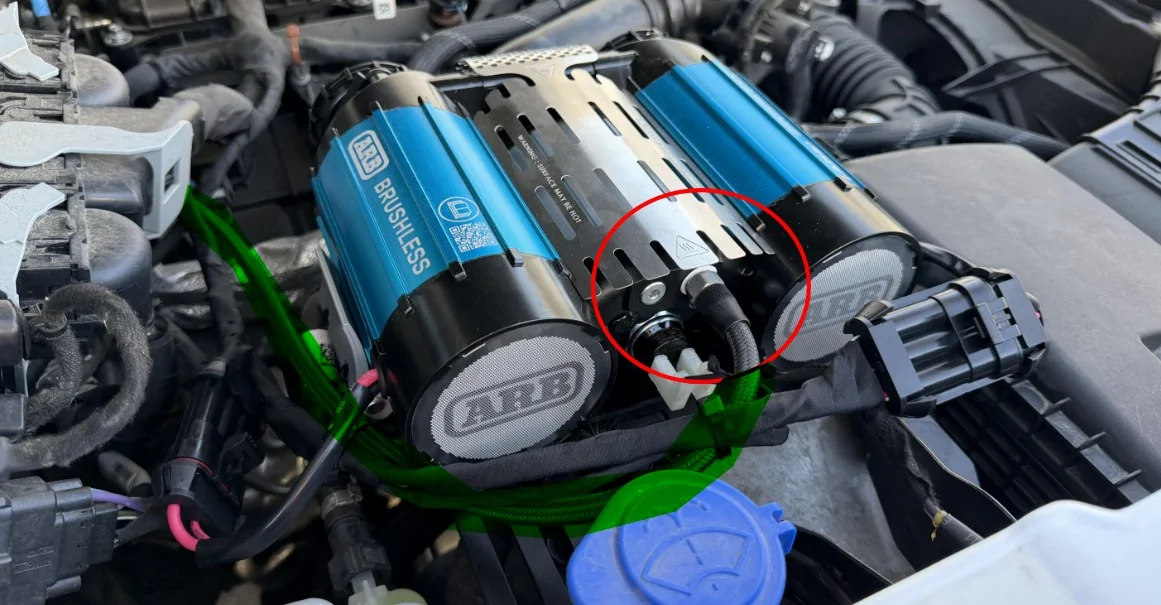
Once your bracket is installed, you can lay the harness in and make all the connections. One note - I installed my compressor 'backwards' from what is shown in the instructions, because it was easier to tuck the harness to the firewall and it keeps the hose connection a little further away from heat. Mount it my way if you want, or the standard way if you like that better; the compressor mounts to the ARB clamp either way.
Big connectors go to the compressor connectors obviously. The two small white connectors go to the pressure switch on the compressor housing. This is a simple closed contact switch, so polarity does not matter. Make sure you install the pressure switch- the compressor will not work without it.
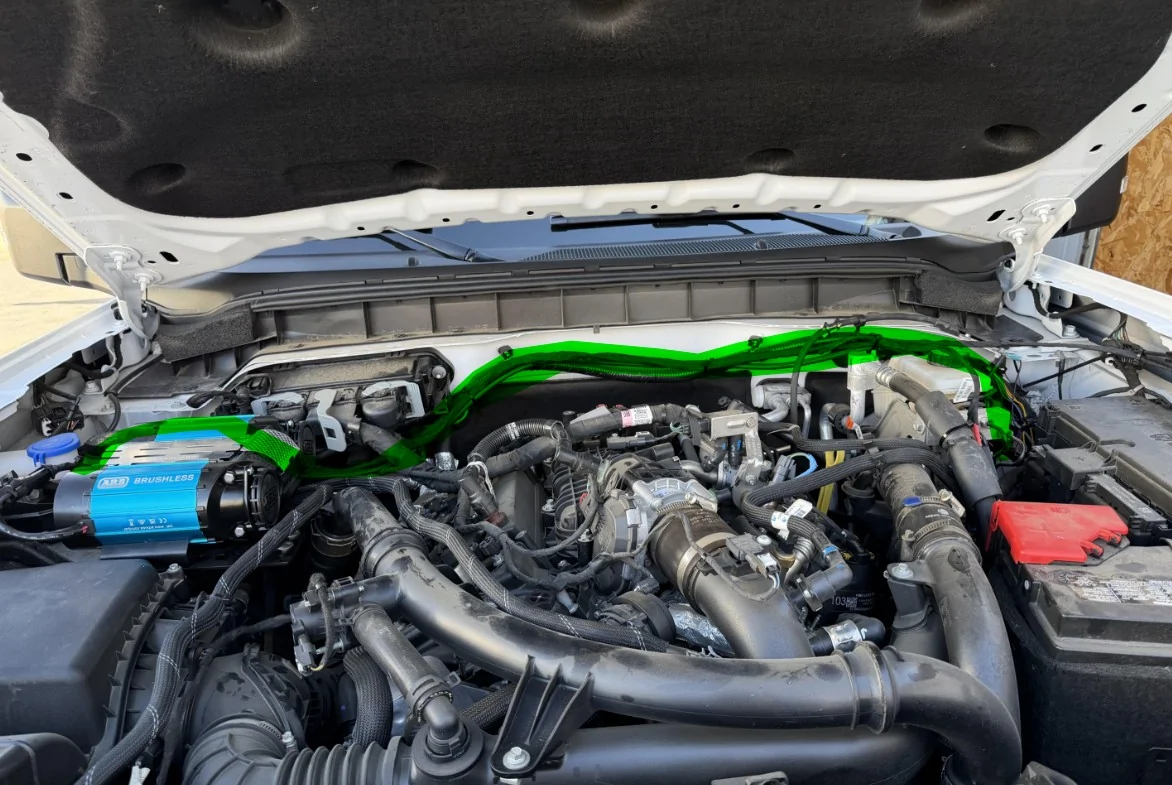
I chose to run the harness from the compressor along the firewall over to the connection points on the driver's side. The loose red wire can be connected to whatever upfitter switch you want to use; this is a trigger wire only, so any of the switches can provide enough current no problem. I chose upfitter 6.

Clean your grounds up better than I did.
Now, the fun part... Air.
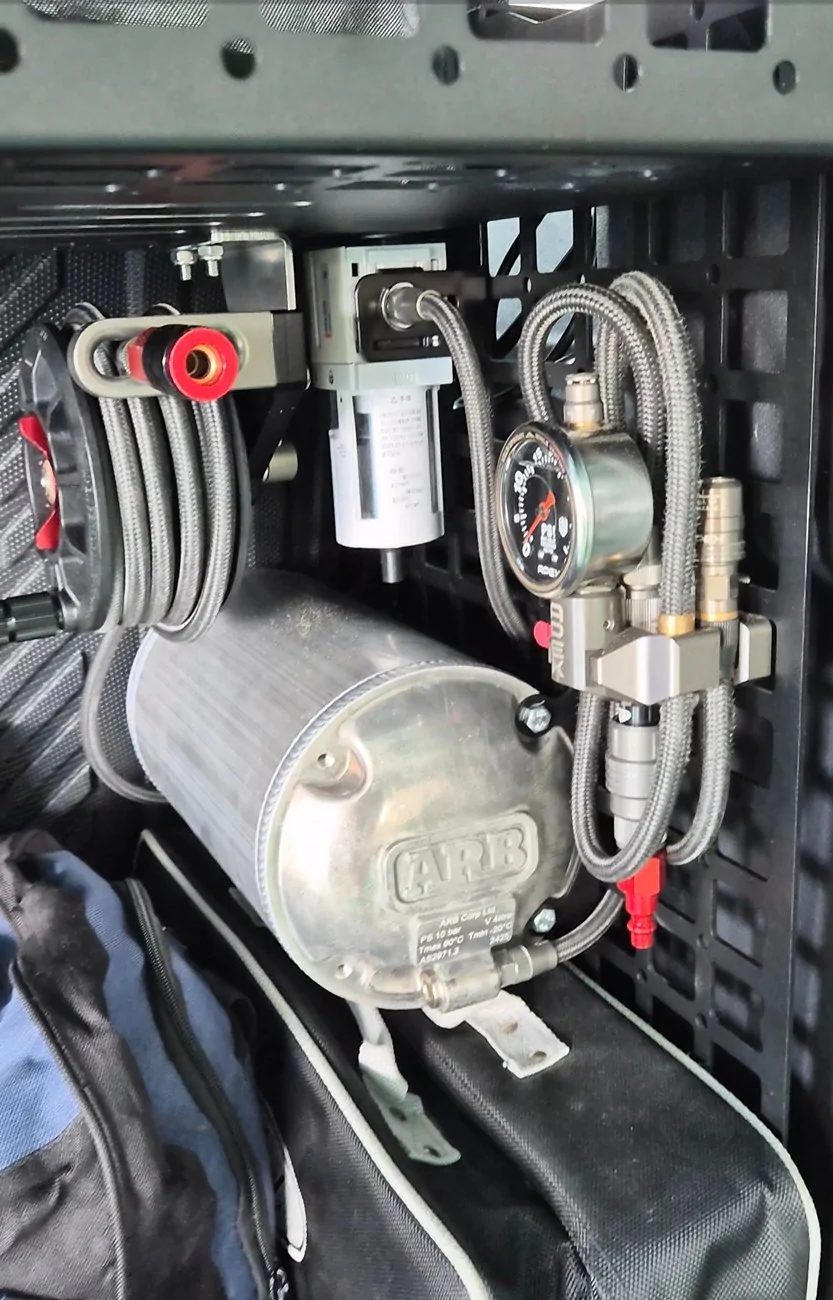
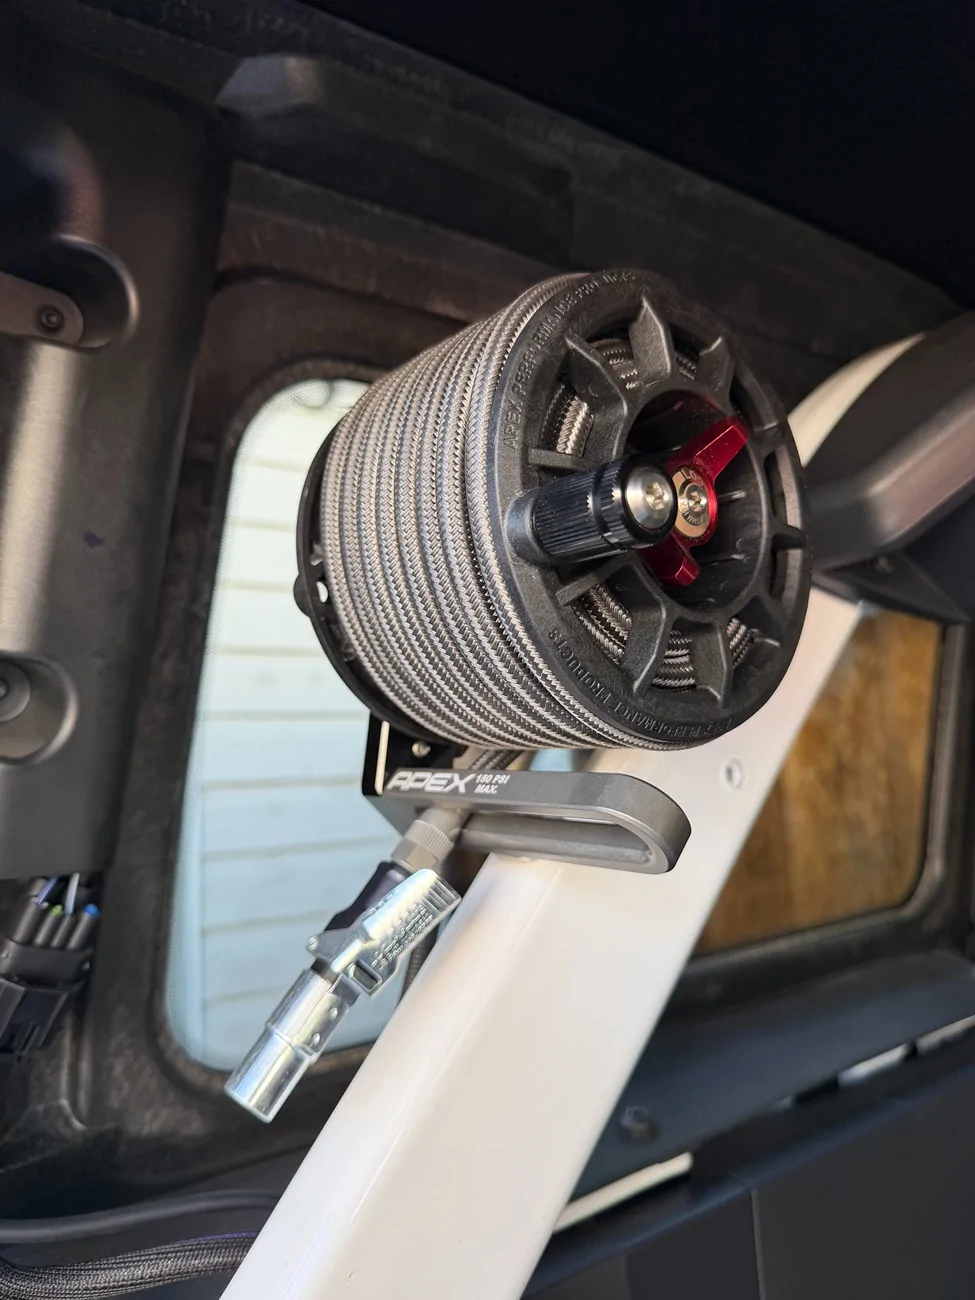
Install the Fast Intentions bracket on the driver's side roll bar. There are rivnuts in this location, it is extremely easy. Install the Apex Designs CRS onto the bracket. Again, extremely easy. Install your fitting of choice onto the 1/4" NPT fitting on the end of the CRS hose. I'm using a lock-n-flate chuck for now, as Apex's very slick push-on chuck was out of stock when I ordered my setup. I'll upgrade eventually.

You'll want to use the banjo fitting to connect the hose to the CRS, but don't do this yet- it is much easier to pull the hose without it connected to anything, and it's also much easier to pull from the rear toward the front than going the other way.
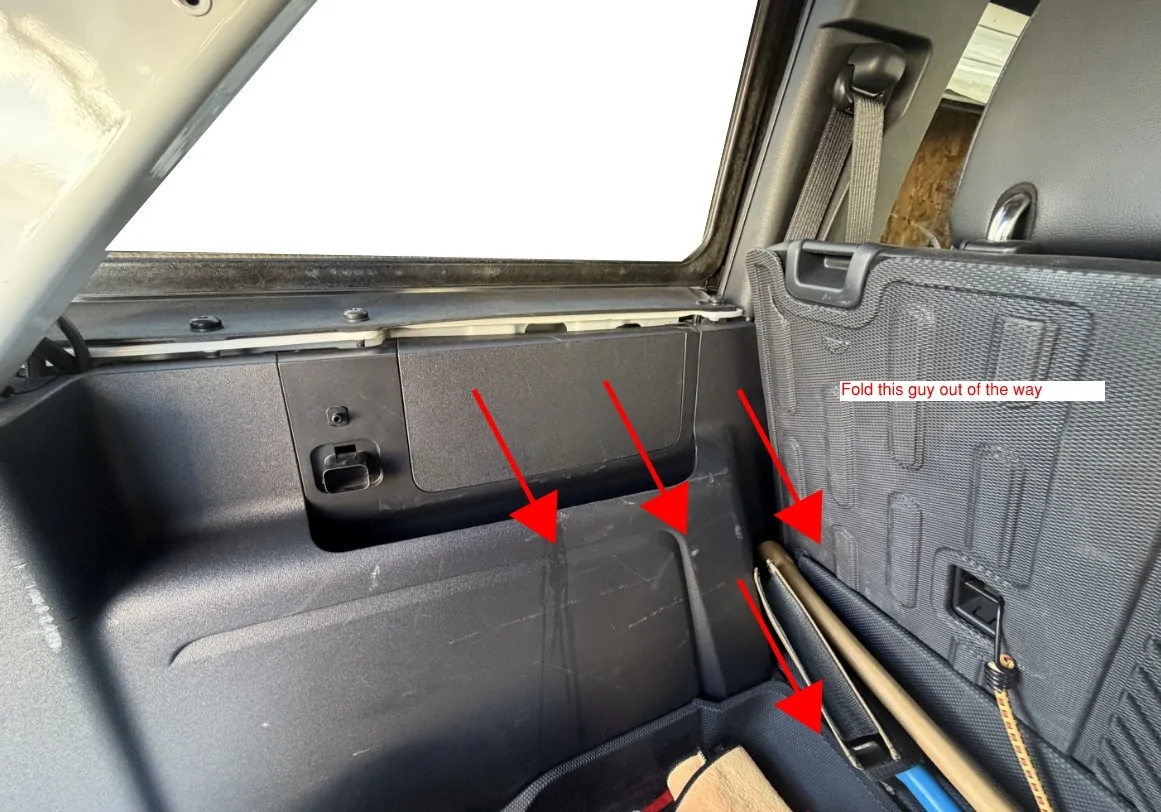
Starting from the rear, pop out the small rectangular filler panel from the cargo area trim. Tilt the driver's side back seat all the way forward, and pop off the front half of the cargo area side panel. You do not need to completely remove the panel to run the hose.

Pop off the driver's side rear door sill trim by pulling the center section straight up. The rear jamb trim comes off by pulling it toward the front of the Bronco. I didn't take pictures of this part. I may add later (sorry).
Run the hose behind the cargo area trim and toward the driver's side rear door jamb.

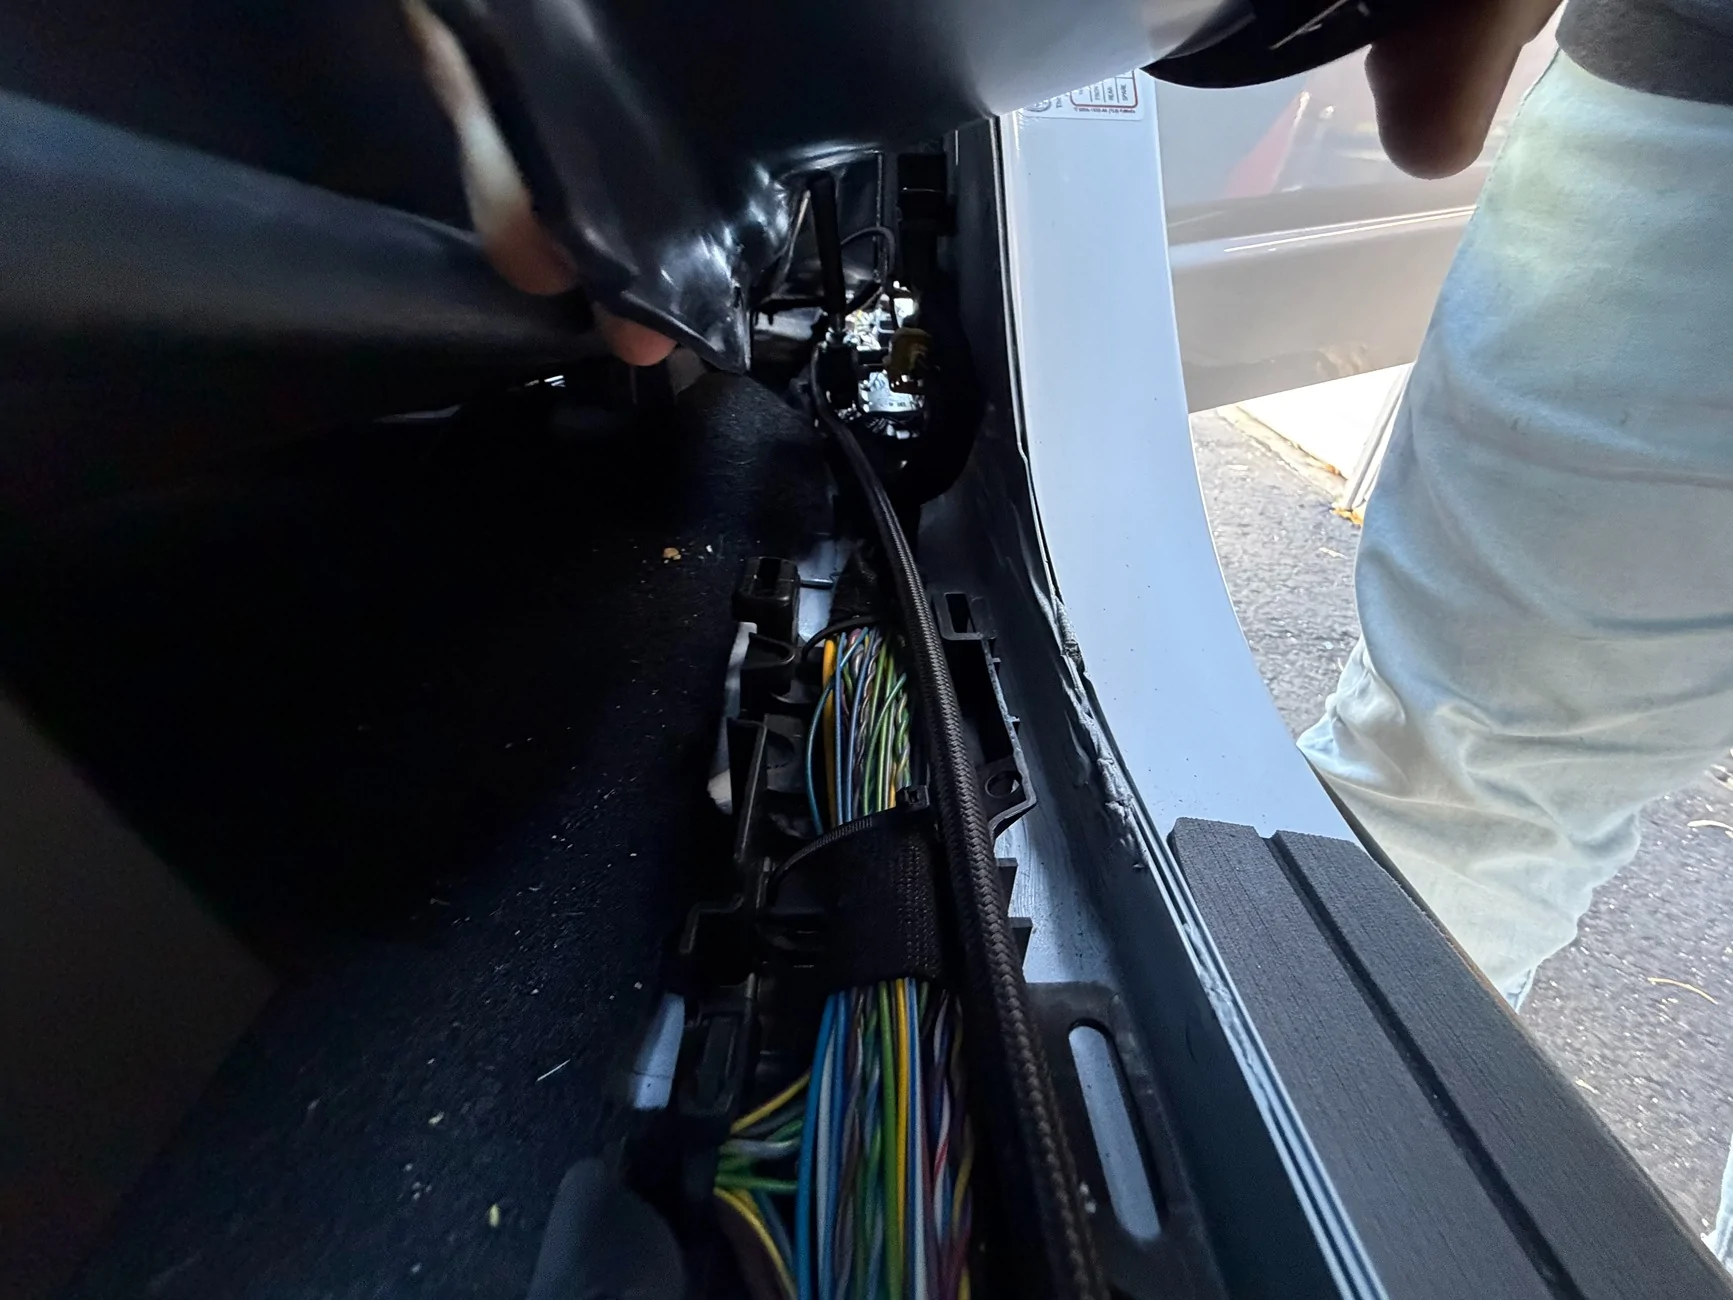
With the rear door sill trim out, you will see the wiring harness running through the sill. There is enough space in this channel to tuck the hose in neatly without preventing the trim from going back on.
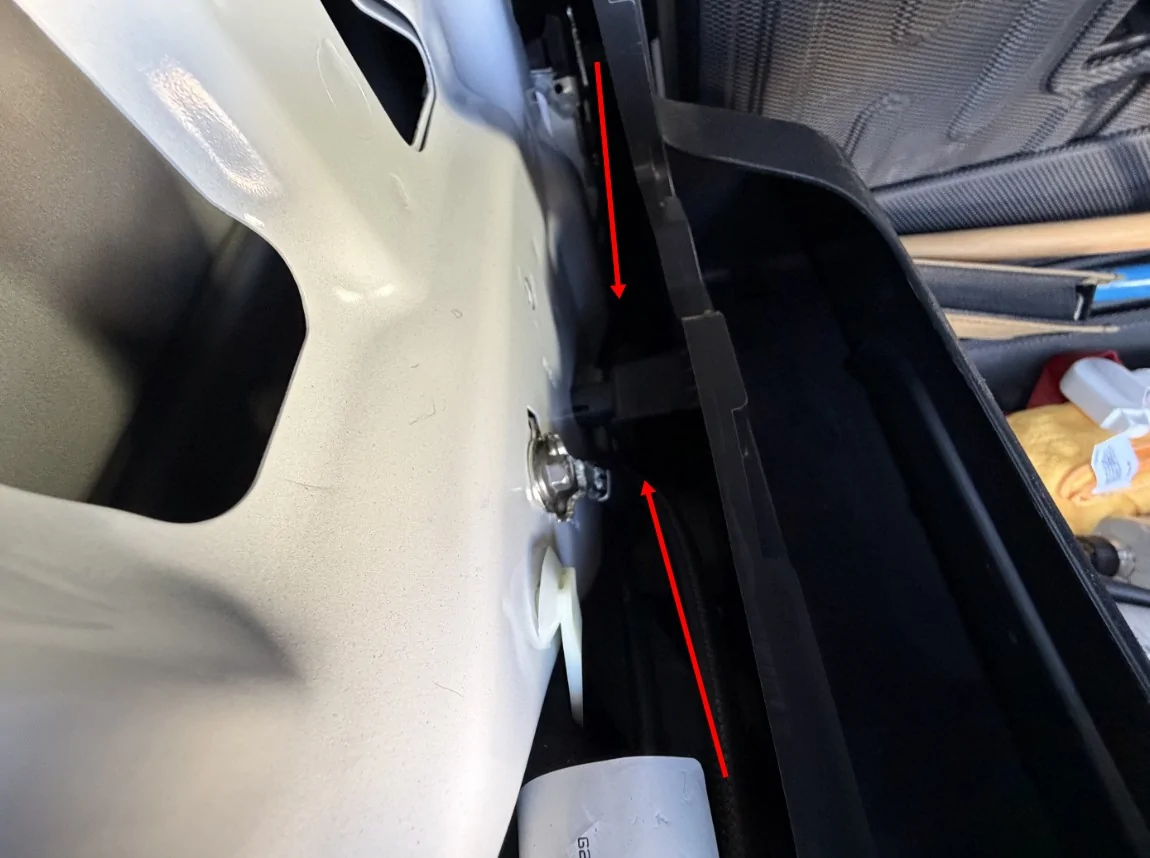
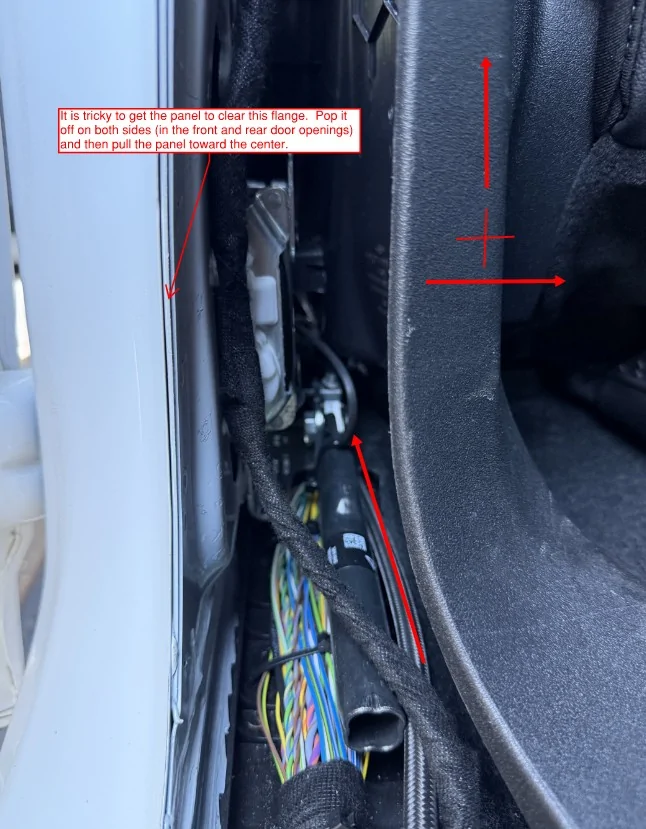
Next pull the B-pillar trim by pulling it toward the middle of the Bronco and slightly up, so you can see the channel running along the sill at the base of the B-pillar. This piece is a little finicky to get loose. If you have trouble, push the edges of the trim off of the B pillar flange before you pull the panel loose. Take your time and it will come off. Pop the driver door sill trim out by pulling straight up to expose the channel. With the B pillar loose (you do not need to fully remove it) run the hose through the channel.


Pop the middle a pillar trim out so you can pull the lower trim. This also does not need to come all the way out, but it needs to be loose so the lower trim can move.

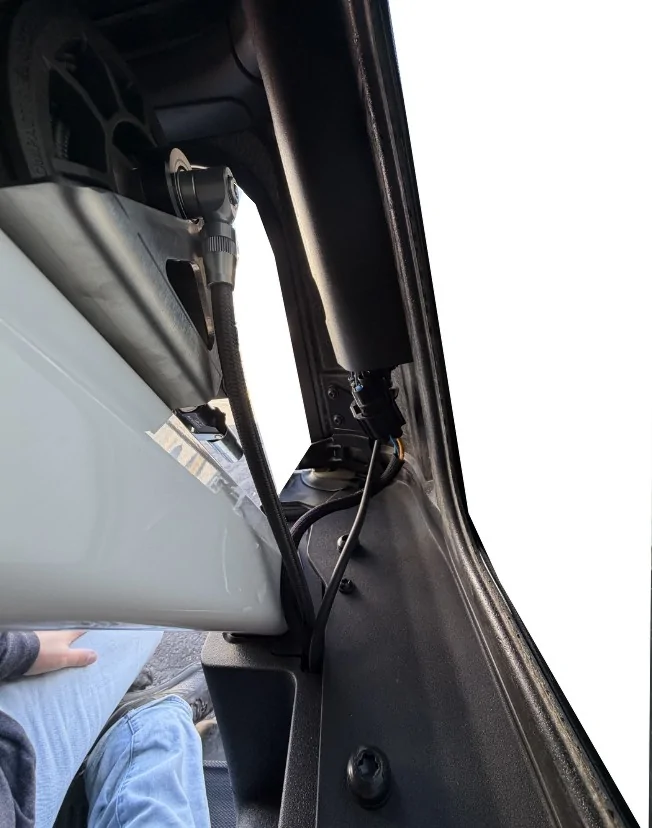
Pop the lower trim loose and pull it towards the trans tunnel. Just having it loose is enough. Run the hose underneath, and then up over the top of the speaker. It's hard to get pictures of this area, but it will make sense when you have it apart.

Once you have the hose in this area, you will want to pull the existing grommet from the firewall and cut a hole through it for the hose. It's tucked up behind the dash, and can be accessed through the footwell or from under the hood. it's just under the upfitter wire bundle on the other side. pull the hose through.

Once you have the hose in the engine bay, you can make the connection to the CRS using the Apex banjo fitting. Dress the hose into the existing opening (for the rear window washer fluid hose & harness) in the rear cargo trim panel, and you can snap the panel back into place.

Once this connection is made up, you can pull all the excess length out of the hose, deal with any twisting along the run, and pull all the excess through the firewall grommet into the engine bay. At this point you can re-install all the trim and you're done inside.
In the engine bay, dress the hose along the same path you took with the harness, and over to the compressor. Trim to length and install the Apex fitting (or whatever fitting you are using) into the compressor housing.


Now go do some wheelin'.
Very happy with the ARB twin brushless - it moves a huge amount of air and makes airing up all four 35" tires extremely fast, even doing them one at a time. Can't recommend it enough.
Also shout out to Apex Designs - their parts are incredibly well thought out down to the smallest detail, and are beautifully made from high end materials. They are spendy, but in my opinion more than worth it. And thanks again to 4x4TruckLEDs for great customer service.
Ordered the brushless twin and KR offroad bracket from @4x4TruckLEDs.com. Had an issue with the compressor as delivered (which was an ARB problem, not a 4x4TruckLEDs problem) and 4x4TruckLEDs were helpful in getting me connected with ARB to rectify the issue. So shout out to 4x4TruckLEDs for strong customer service.
I wound up going with the KR offroad bracket, ARB harness to an upfitter switch, and a remote mounted Apex Designs hose reel mounted on the back roll bar upright.
Parts I used:
Apex Designs CRS Mount from Fast Intentions: https://fastintentions.com/product/ford-bronco-apex-reel-mount/
ARB Brushless Twin Compressor Kit w/ KR Offroad Compressor Mount: https://www.4x4truckleds.com/kr-off...NigQWOpV7dFYE4ptBMseWpYEdFJuTUJH_uIcmpupqWuFU
Apex Designs 35' CRS: https://www.apexdesignsusa.com/products/compact-reel-system-crs?variant=46059077566764
Apex Designs CRS Banjo Fitting: https://www.apexdesignsusa.com/products/banjo-fitting-for-crs-1-4-npt-to-apex-3-8-braided-air-hose
Apex Designs Nylon Braided Air Line (25 ft): https://www.apexdesignsusa.com/products/3-8-od-braided-air-line-per-ft
Apex Designs 3/8" Braided Hose to 1/4" NPT Fitting: https://www.apexdesignsusa.com/products/crs-hose-end-fitting-3-8-id-to-1-4-npt-w-cover-nut
There's a couple of things I don't have pictures of, because they are extremely easy and the parts have their own solid directions - the fast intentions mount and the KR offroad bracket. If you copy this setup, just follow the included directions for these parts - they are very simple.
To start with the biggest challenge I had figuring out, wiring.
The kit includes a whole mess of wiring, which is great if you don't have upfitter switches in your rig. I had trouble figuring out exactly how to modify the harness to work with the upfitter setup because there are significant differences between the harness for the brushless vs. the older brushed compressors (there is a TON of info on the brushed compressor install, not so much on the new brushless), but was able to figure it out and it works perfect.
You can ditch the included plug-in fitting and pins, and the secondary harness. You can modify your harness for a clean look the way I did if you want it as OEM looking as possible (which I did).
Wiring diagram (this is snipped from the ARB manual, with my notes)
Extra detail on what you actually need:
I fully stripped my harness and rewrapped with Tesa tape, after stripping out all the unnecessary stuff. You'll also want to lay this out and trim the ground and positive wires to length before you crimp on your terminals. Do all that and you're left with this:
Once your bracket is installed, you can lay the harness in and make all the connections. One note - I installed my compressor 'backwards' from what is shown in the instructions, because it was easier to tuck the harness to the firewall and it keeps the hose connection a little further away from heat. Mount it my way if you want, or the standard way if you like that better; the compressor mounts to the ARB clamp either way.
Big connectors go to the compressor connectors obviously. The two small white connectors go to the pressure switch on the compressor housing. This is a simple closed contact switch, so polarity does not matter. Make sure you install the pressure switch- the compressor will not work without it.
I chose to run the harness from the compressor along the firewall over to the connection points on the driver's side. The loose red wire can be connected to whatever upfitter switch you want to use; this is a trigger wire only, so any of the switches can provide enough current no problem. I chose upfitter 6.
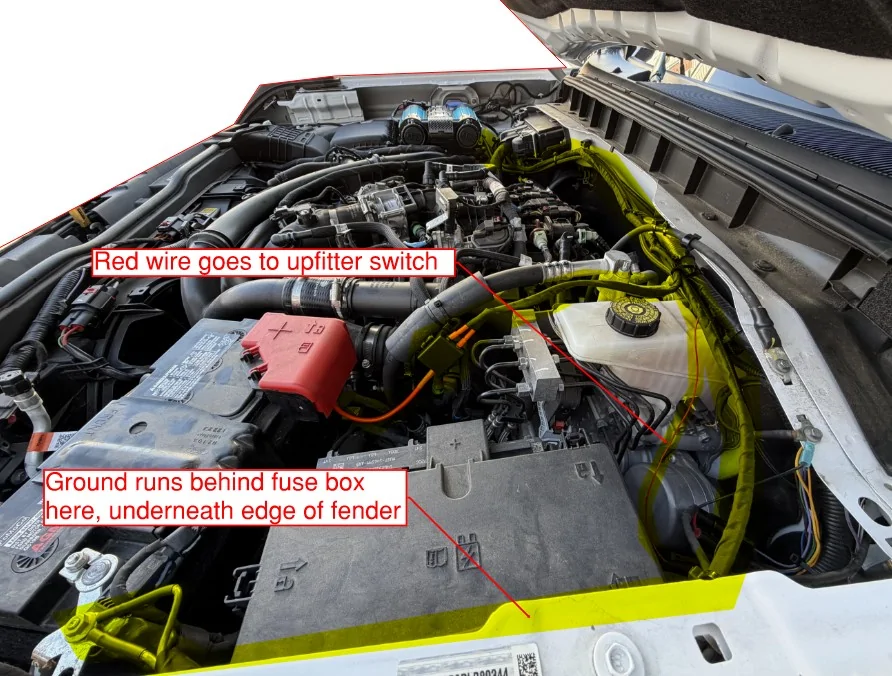
Clean your grounds up better than I did.
Now, the fun part... Air.
Install the Fast Intentions bracket on the driver's side roll bar. There are rivnuts in this location, it is extremely easy. Install the Apex Designs CRS onto the bracket. Again, extremely easy. Install your fitting of choice onto the 1/4" NPT fitting on the end of the CRS hose. I'm using a lock-n-flate chuck for now, as Apex's very slick push-on chuck was out of stock when I ordered my setup. I'll upgrade eventually.
You'll want to use the banjo fitting to connect the hose to the CRS, but don't do this yet- it is much easier to pull the hose without it connected to anything, and it's also much easier to pull from the rear toward the front than going the other way.
Starting from the rear, pop out the small rectangular filler panel from the cargo area trim. Tilt the driver's side back seat all the way forward, and pop off the front half of the cargo area side panel. You do not need to completely remove the panel to run the hose.
Pop off the driver's side rear door sill trim by pulling the center section straight up. The rear jamb trim comes off by pulling it toward the front of the Bronco. I didn't take pictures of this part. I may add later (sorry).
Run the hose behind the cargo area trim and toward the driver's side rear door jamb.
With the rear door sill trim out, you will see the wiring harness running through the sill. There is enough space in this channel to tuck the hose in neatly without preventing the trim from going back on.
Next pull the B-pillar trim by pulling it toward the middle of the Bronco and slightly up, so you can see the channel running along the sill at the base of the B-pillar. This piece is a little finicky to get loose. If you have trouble, push the edges of the trim off of the B pillar flange before you pull the panel loose. Take your time and it will come off. Pop the driver door sill trim out by pulling straight up to expose the channel. With the B pillar loose (you do not need to fully remove it) run the hose through the channel.
Pop the middle a pillar trim out so you can pull the lower trim. This also does not need to come all the way out, but it needs to be loose so the lower trim can move.
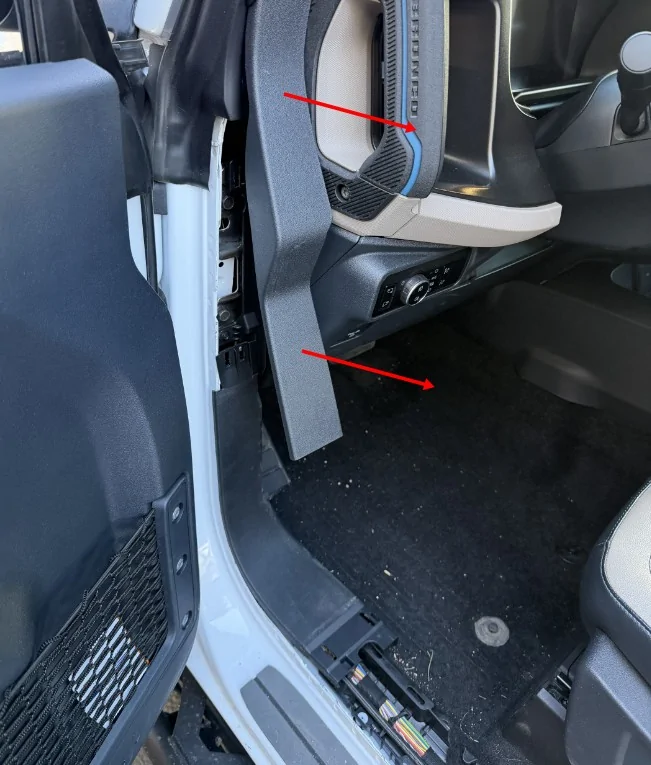
Pop the lower trim loose and pull it towards the trans tunnel. Just having it loose is enough. Run the hose underneath, and then up over the top of the speaker. It's hard to get pictures of this area, but it will make sense when you have it apart.
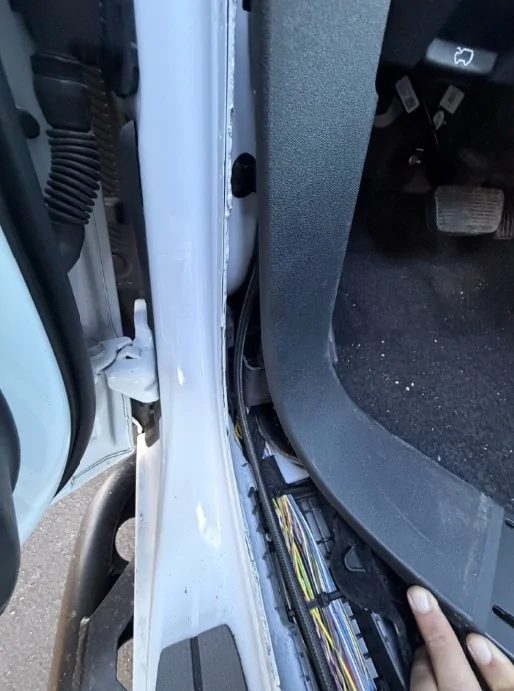
Once you have the hose in this area, you will want to pull the existing grommet from the firewall and cut a hole through it for the hose. It's tucked up behind the dash, and can be accessed through the footwell or from under the hood. it's just under the upfitter wire bundle on the other side. pull the hose through.

Once you have the hose in the engine bay, you can make the connection to the CRS using the Apex banjo fitting. Dress the hose into the existing opening (for the rear window washer fluid hose & harness) in the rear cargo trim panel, and you can snap the panel back into place.
Once this connection is made up, you can pull all the excess length out of the hose, deal with any twisting along the run, and pull all the excess through the firewall grommet into the engine bay. At this point you can re-install all the trim and you're done inside.
In the engine bay, dress the hose along the same path you took with the harness, and over to the compressor. Trim to length and install the Apex fitting (or whatever fitting you are using) into the compressor housing.
Now go do some wheelin'.
Very happy with the ARB twin brushless - it moves a huge amount of air and makes airing up all four 35" tires extremely fast, even doing them one at a time. Can't recommend it enough.
Also shout out to Apex Designs - their parts are incredibly well thought out down to the smallest detail, and are beautifully made from high end materials. They are spendy, but in my opinion more than worth it. And thanks again to 4x4TruckLEDs for great customer service.
Sponsored
Last edited:


")