

- Thread starter
- #1
Greetings all,
I come from the Ranger5G forums and love to do little maintenance write-ups to help people out and save a little money (maybe even convince you to buy some new tools you may or may not need ).
).
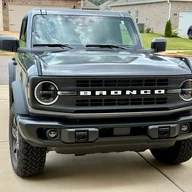
Today we will dive into a simple, but important maintenance task on your Bronco.
Ford recommends changing your cabin air filter every 20,000 miles and your engine air filter element every 30,000 miles. I usually change the filters on all of my vehicles once a year in the spring after pollen season ; it may be a little overkill but being overkill on your maintenance can help prolong the life of your vehicle right? I always use OEM parts but ymmv and as long as you are using a quality equivalent no harm, no foul.
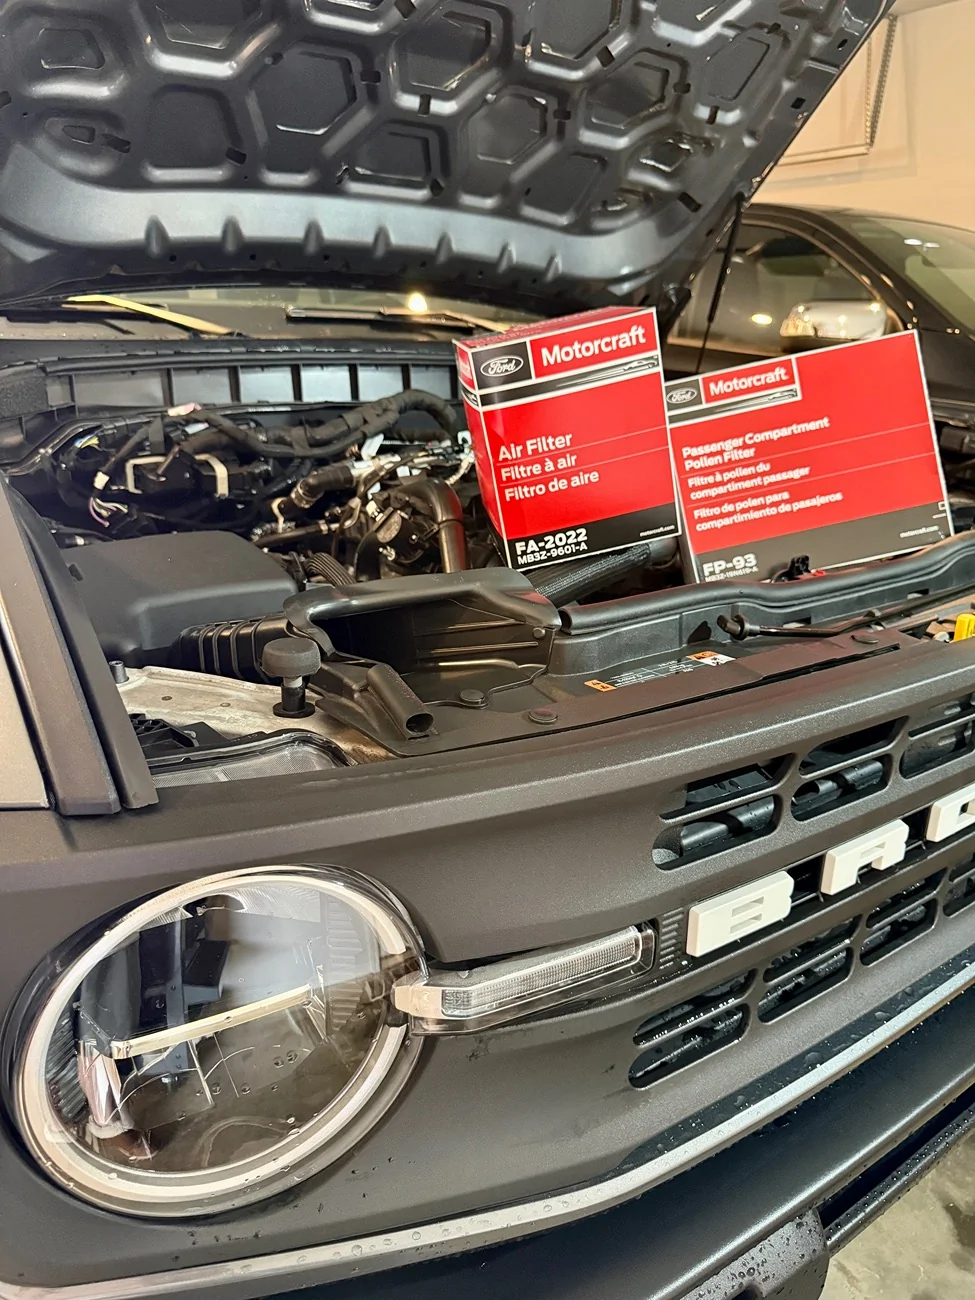
Parts Needed :
- Motorcraft FA-2022 (MB3Z-9601-A) Engine Air Element
- Motorcraft FP-93 (MB3Z-19N619-A) Cabin Air Filter
Optional Replacement Parts Needed :
- W721933S450B Screws (4x needed to hold down engine air box assembly)
- W714040S300 Clip (1x needed to hold down engine intake tube assembly)
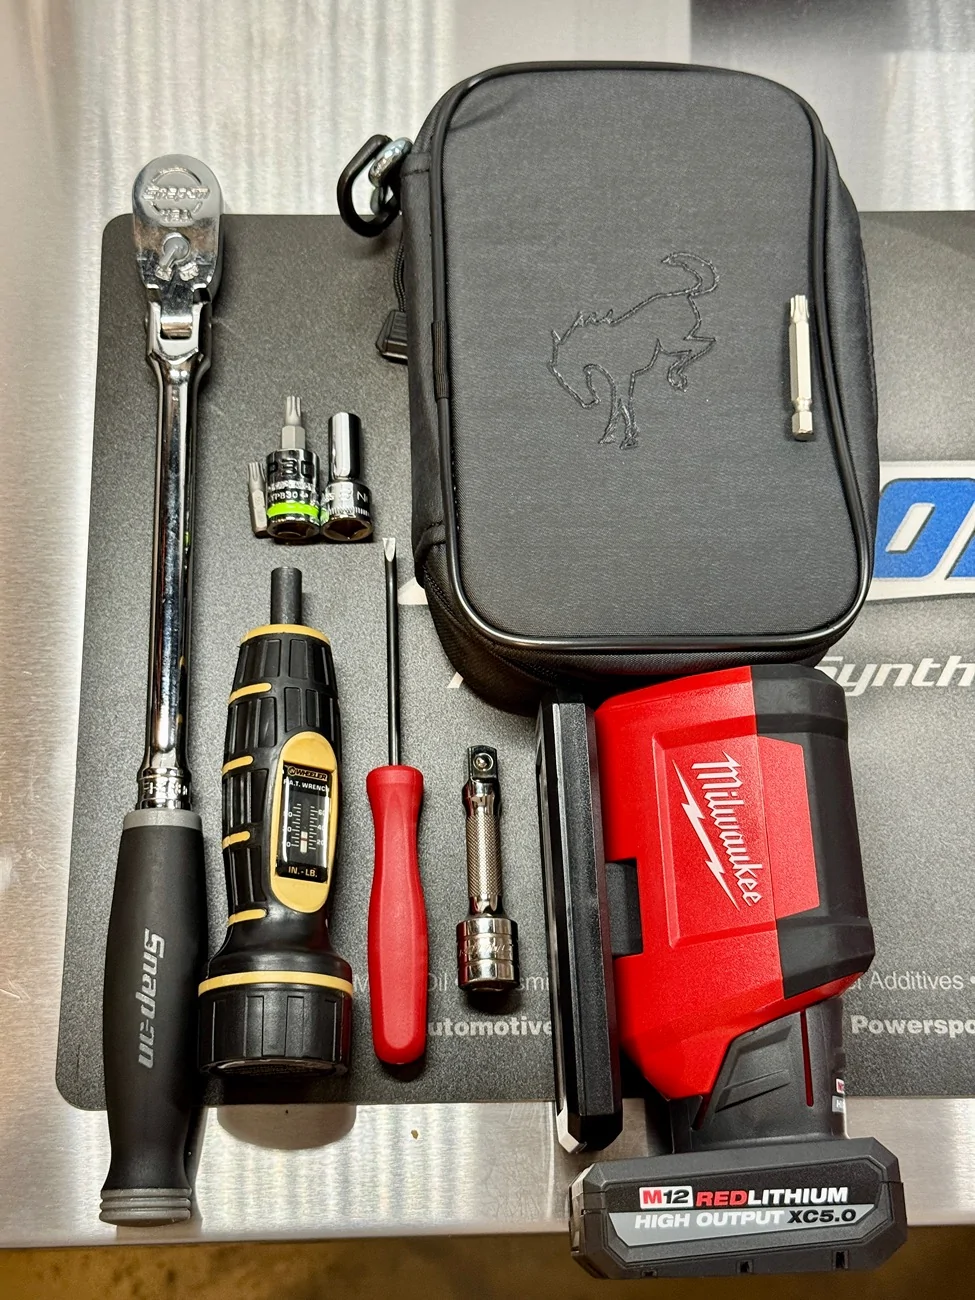
Tools Needed :
- 1/4" or 3/8" ratchet
- 1" - 3" extension
- IP30 Star Plus Bit Socket (GripEdge STPB30) *or* 8mm socket for the 4x air box screws
- Torque Screwdriver (in-lbs) (*optional*)
- IP30 Star Plus Bit or if you have your little Bronco tool pack for removing the top you will find an IP30 bit in there!
- Small slotted screwdriver or mini pry bar (I am using Tekton P/N LRD82100 in my pictures)
- Light
- Microfiber Towel for cleaning

***2.3L ECOBOOST ENGINE AIR FILTER ELEMENT INSTRUCTIONS***
STEP ONE :
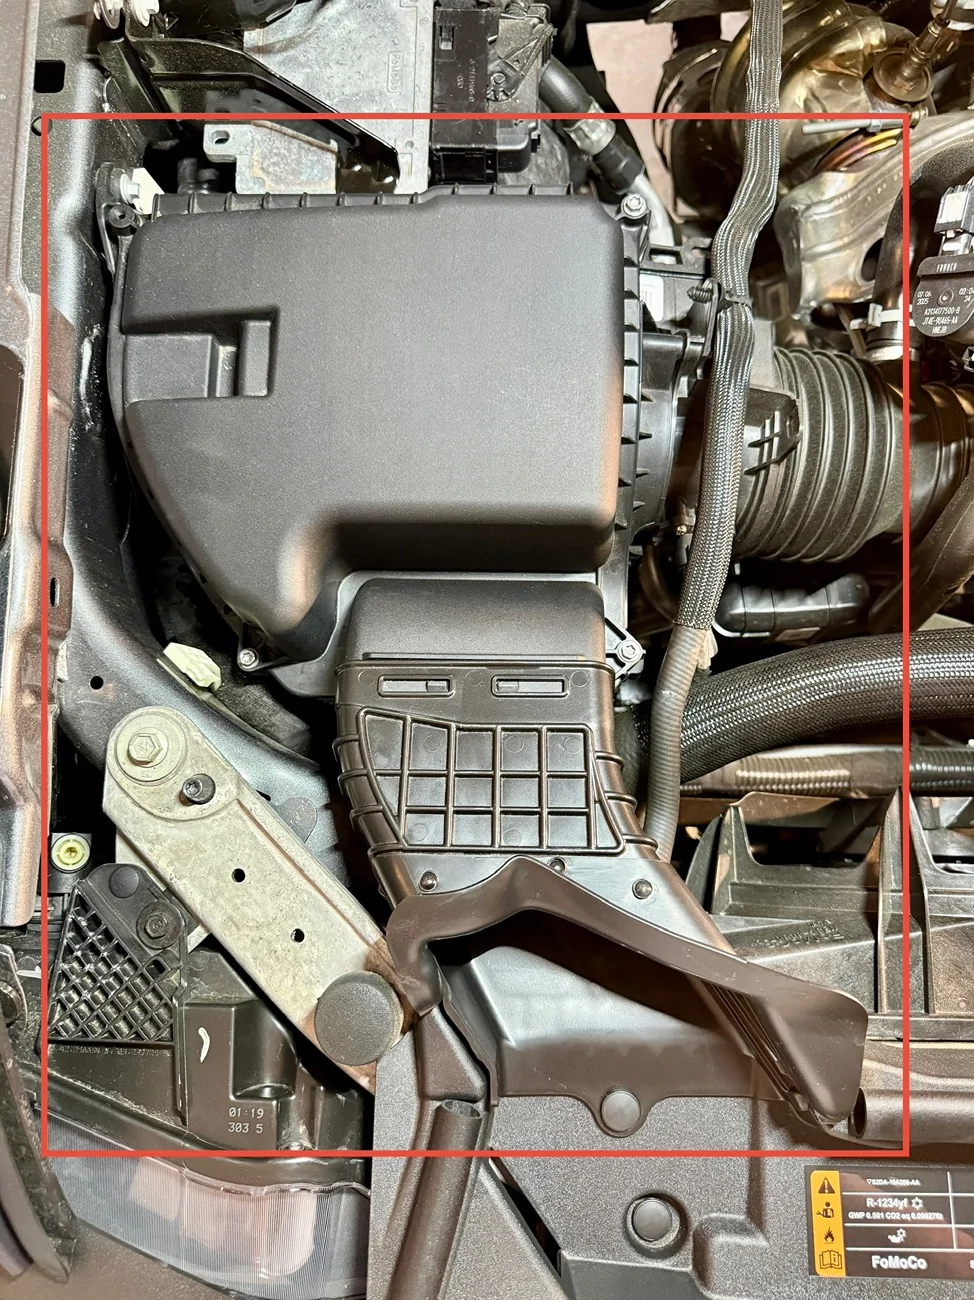
Open and support hood and locate the Air Filter assembly on the passenger front side (or front left) of the engine bay.

STEP TWO :
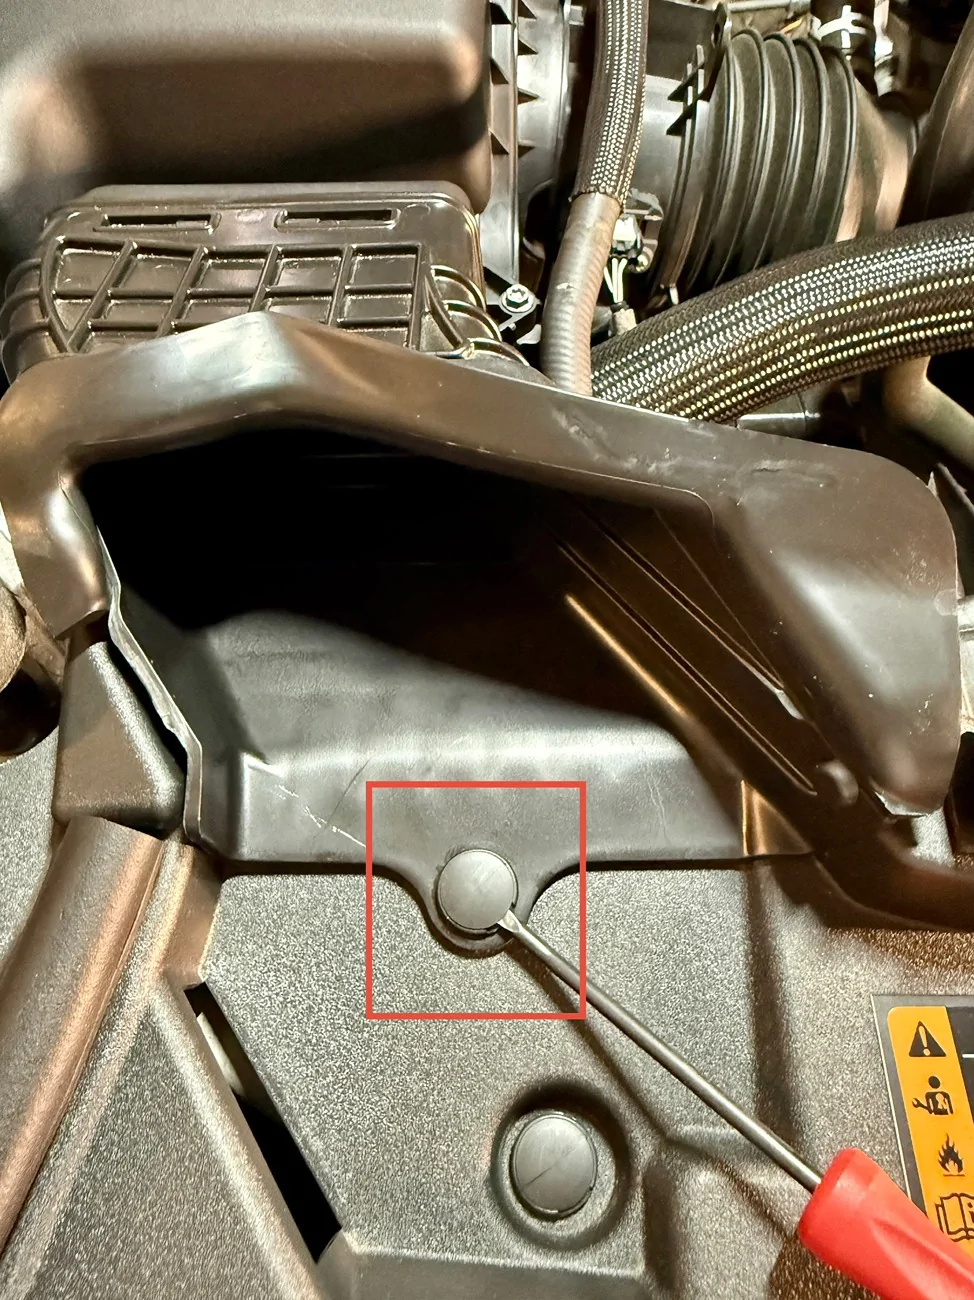
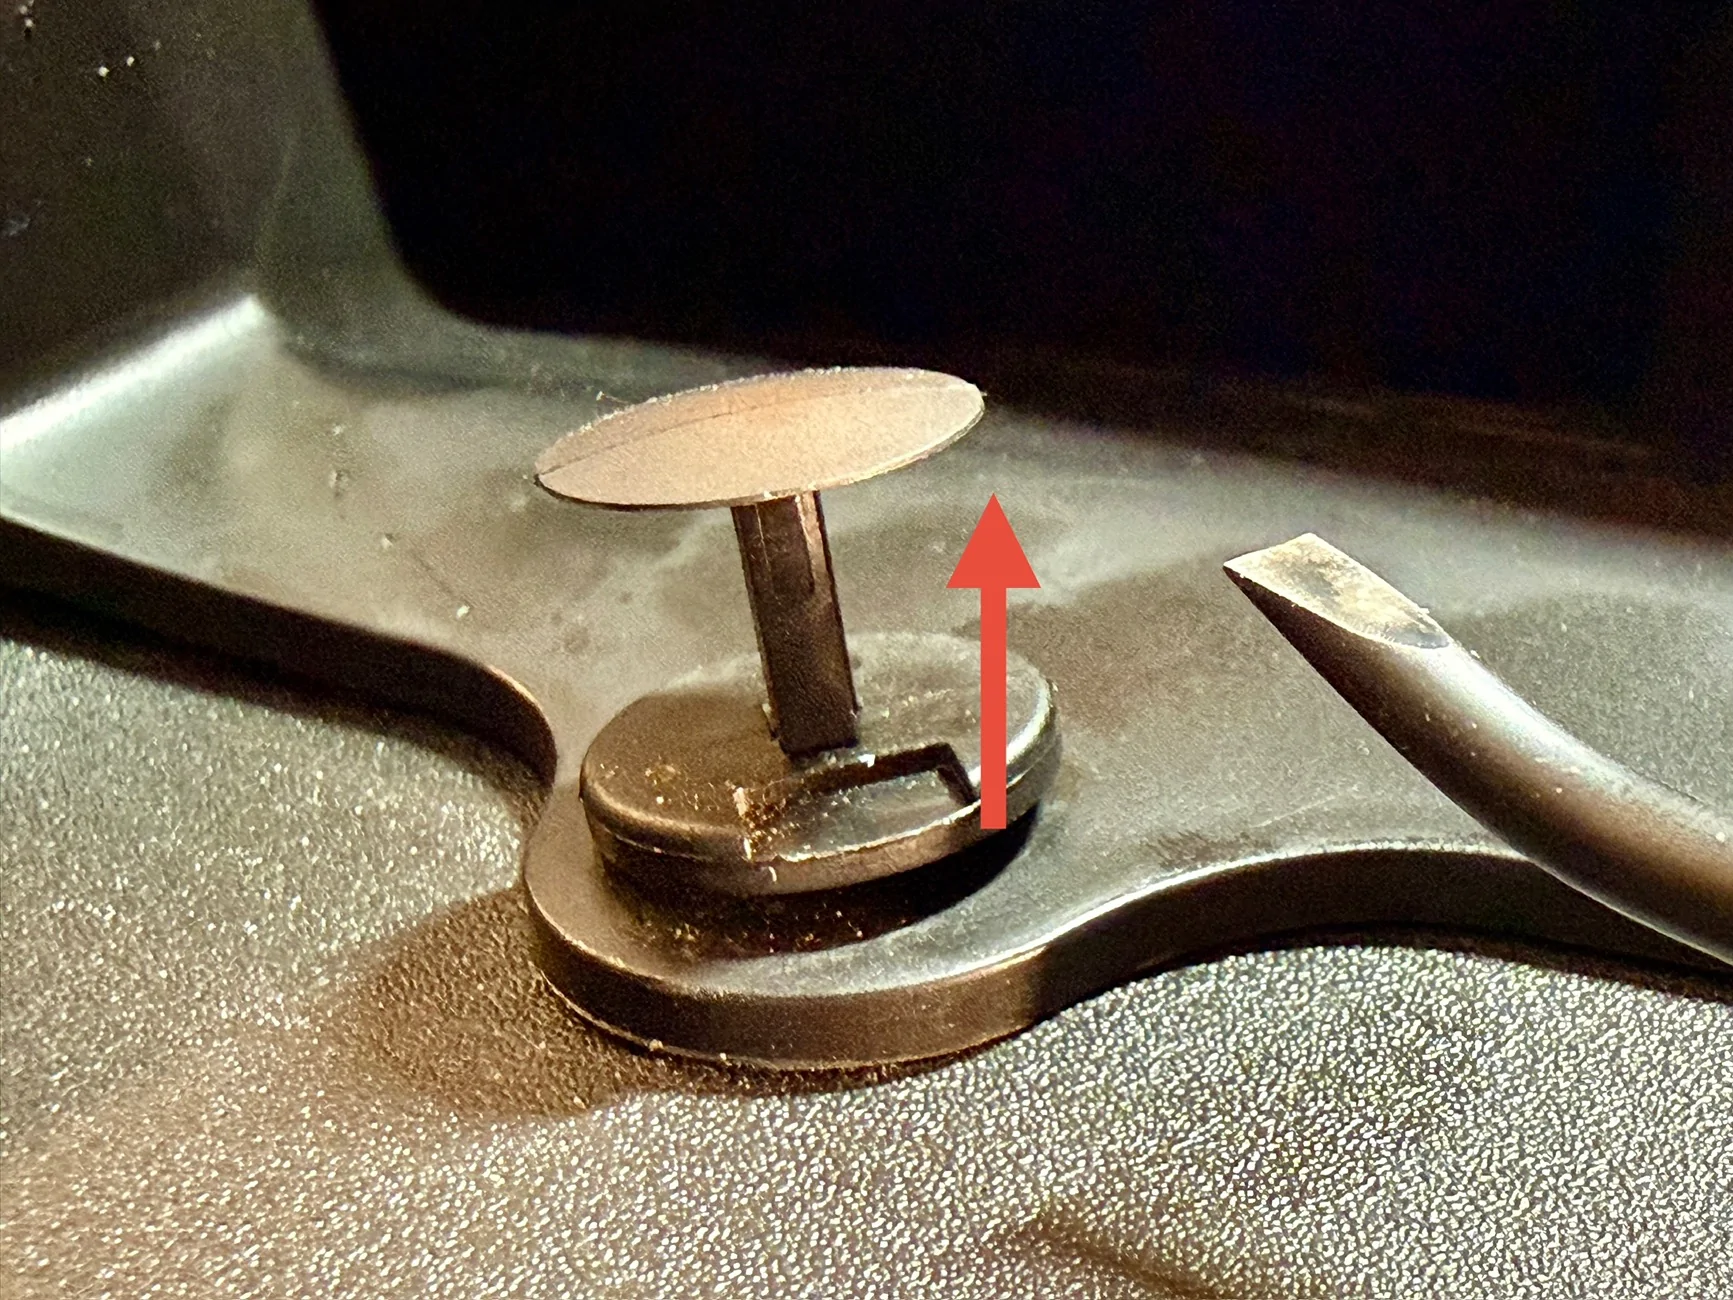
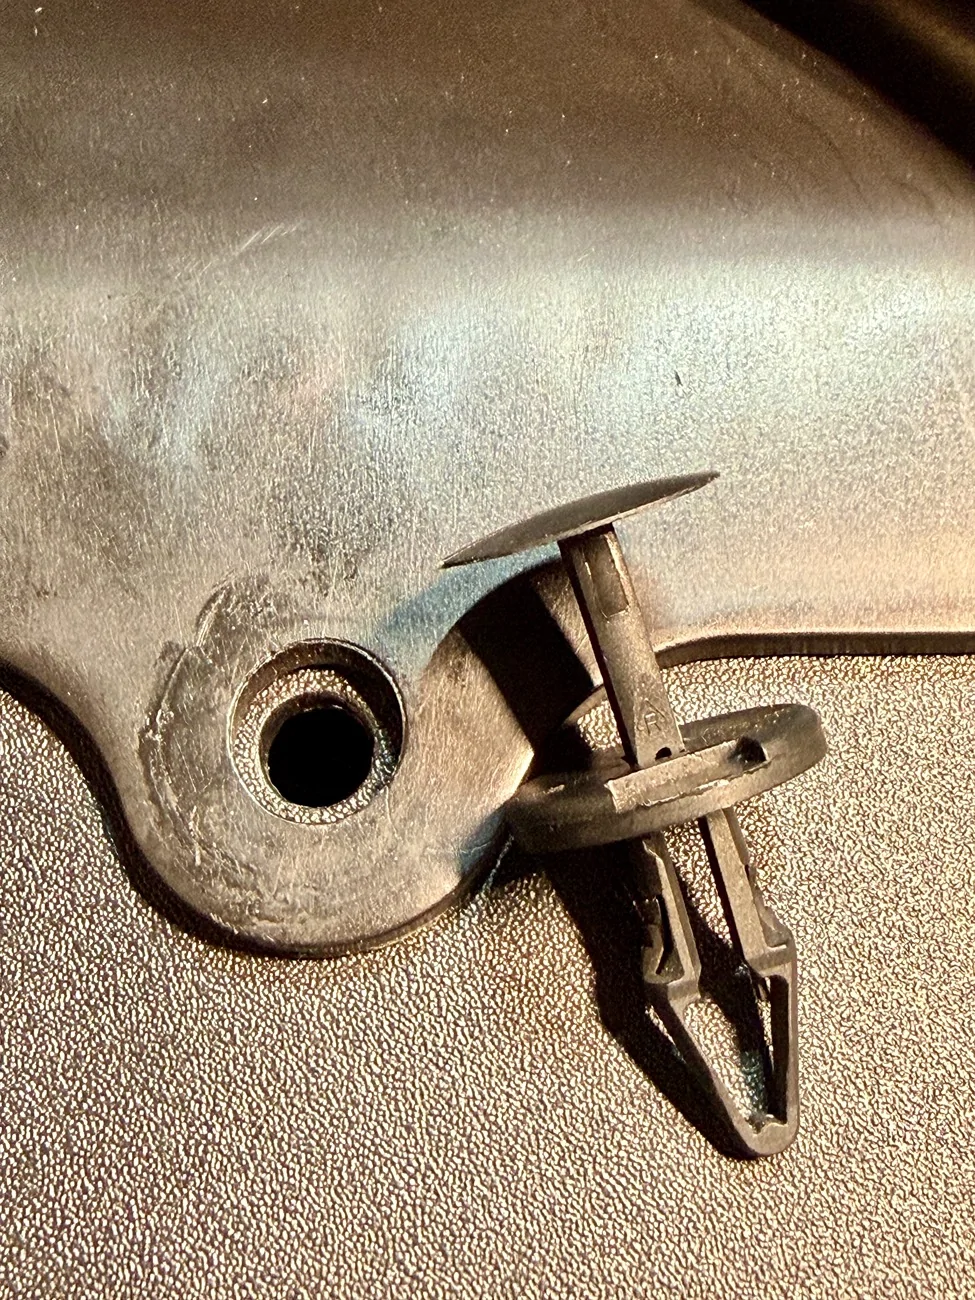
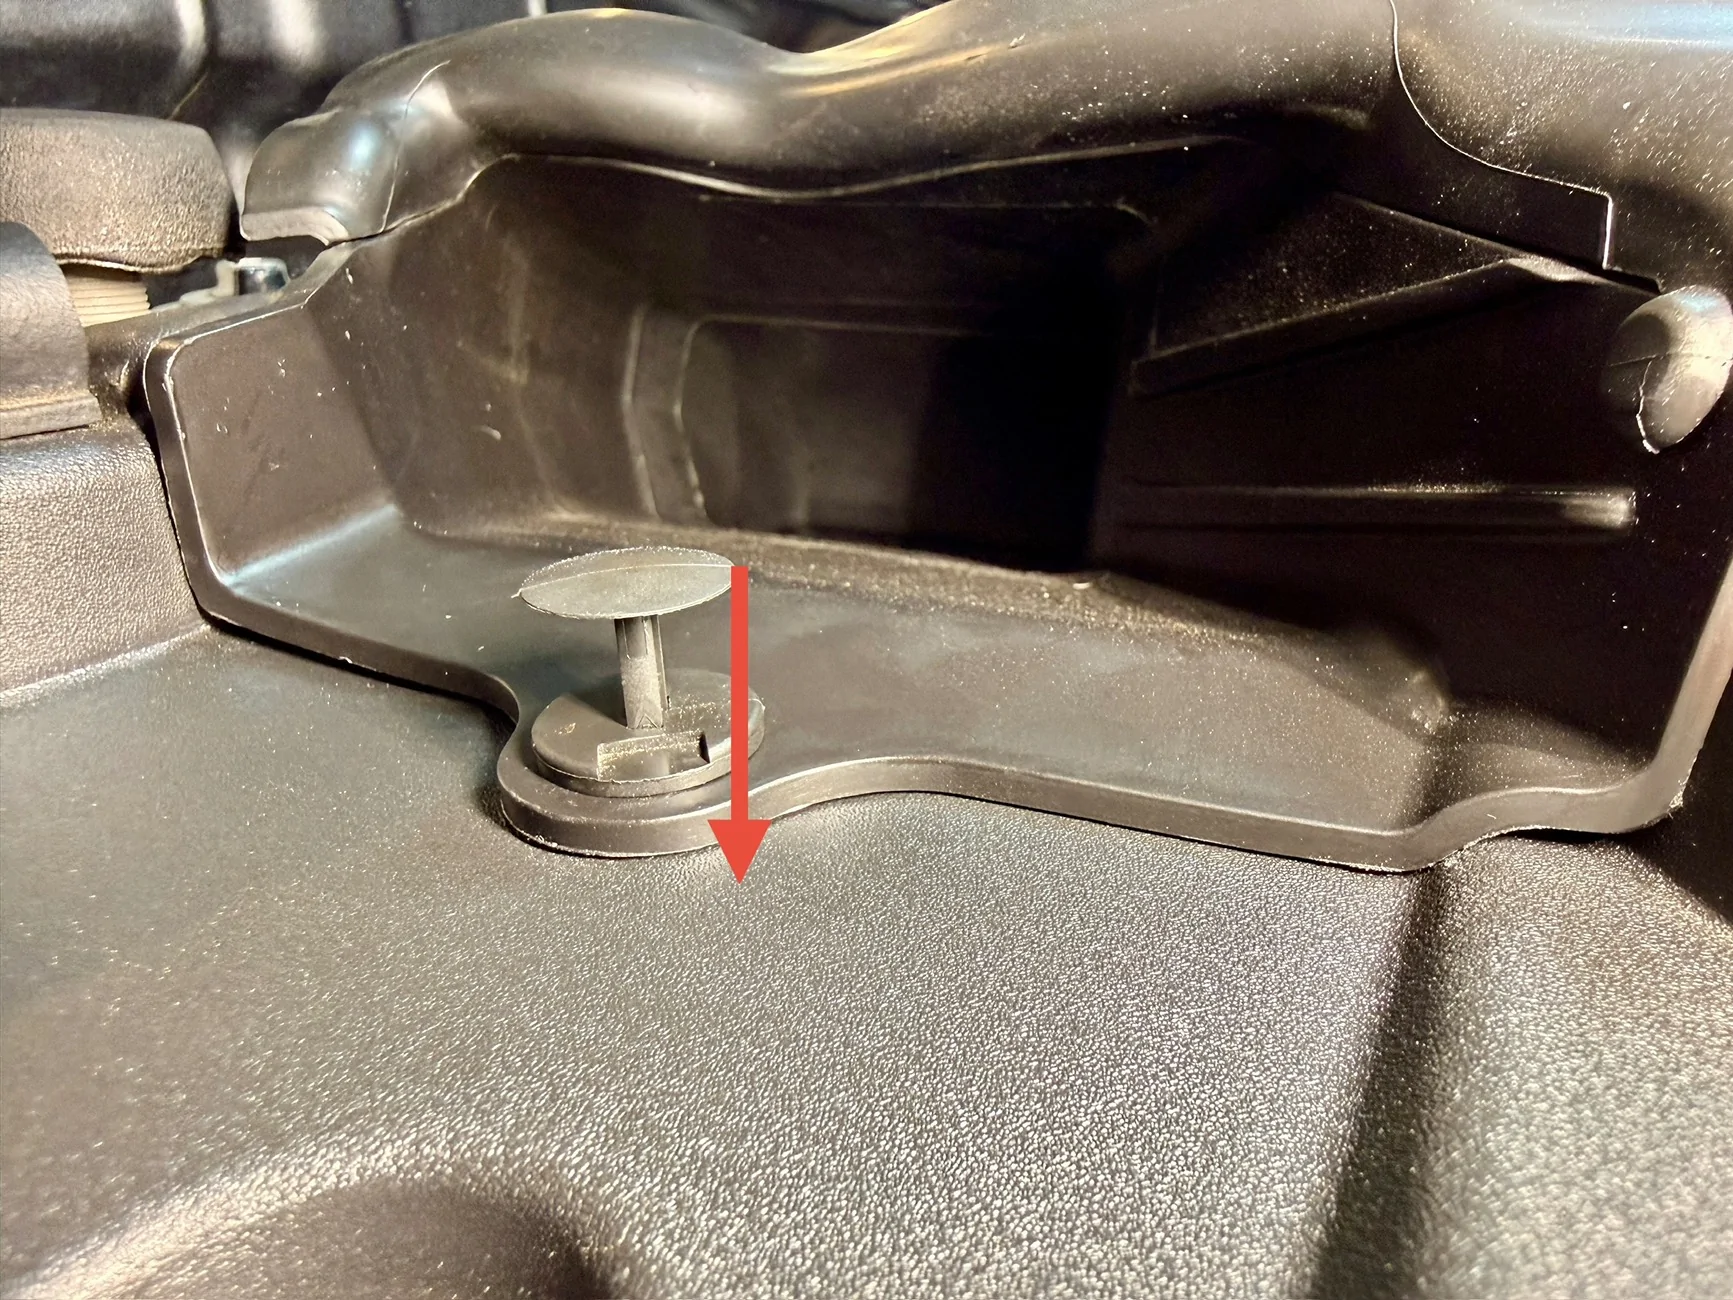
Locate intake tube plastic trim clip and remove by lightly prying upward with a small pocket prybar or slotted screwdriver. The trim clip comes apart in two pieces for full removal. If you damage or break the clip you can purchase a replacement.

STEP THREE :
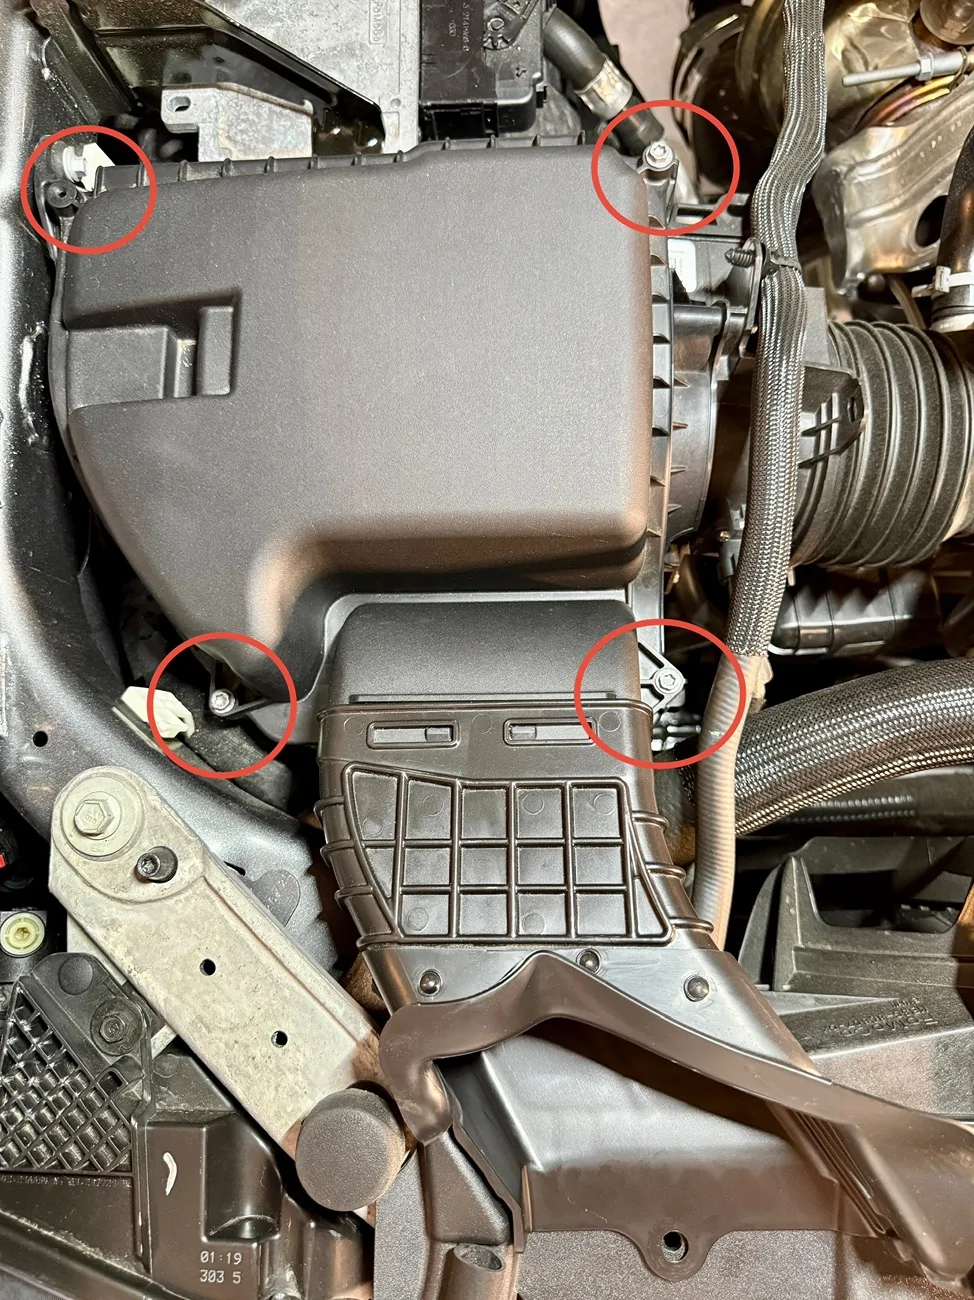
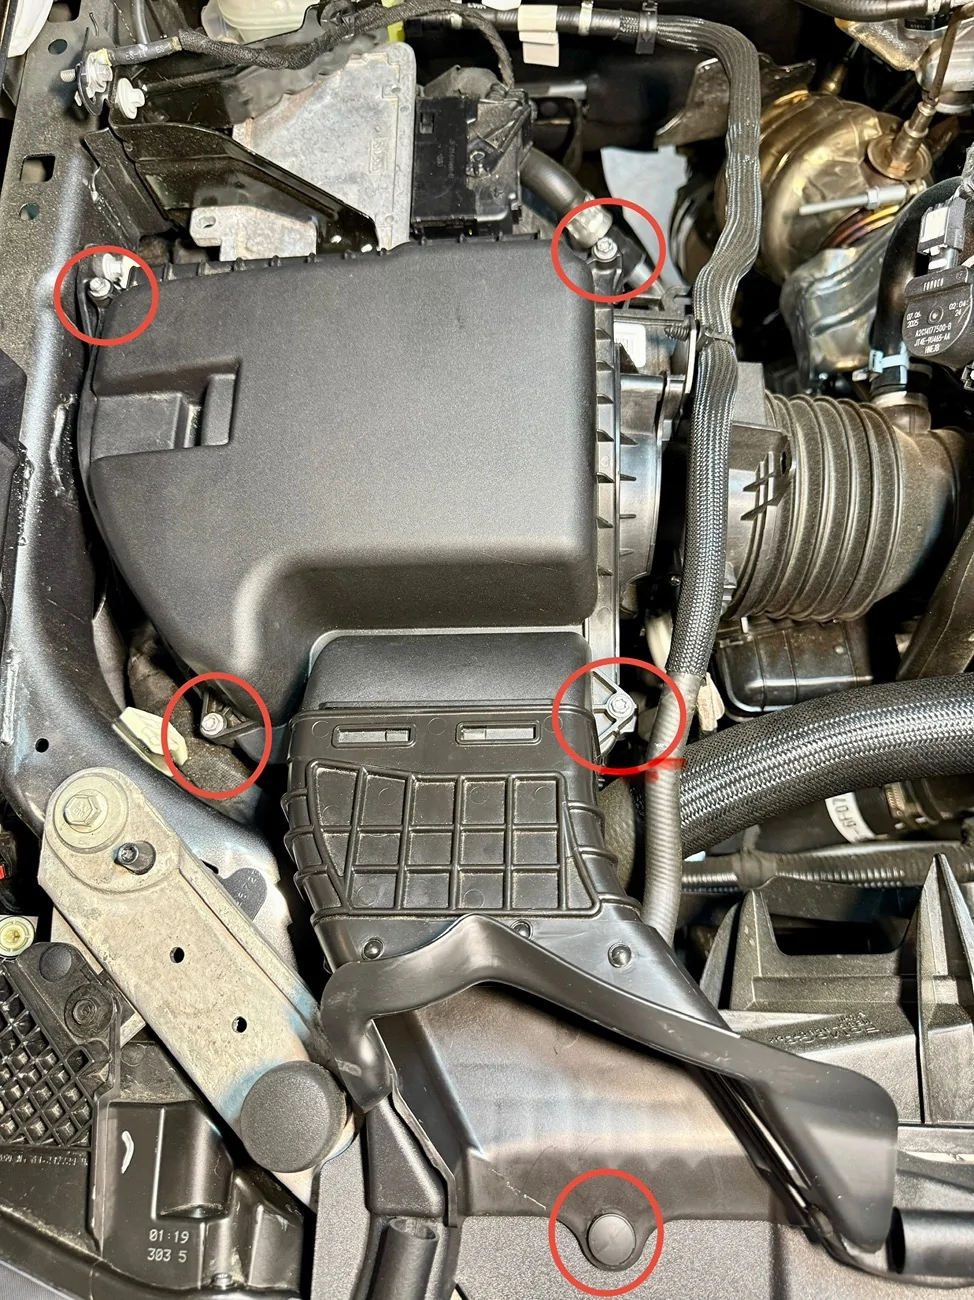
Locate the 4x air box screws and loosen them. The air box screws are somewhat captivated by the plastic threads in the air box lid so you do not have to remove them completely ; when you see a good portion of the screw's shank they are loose enough!
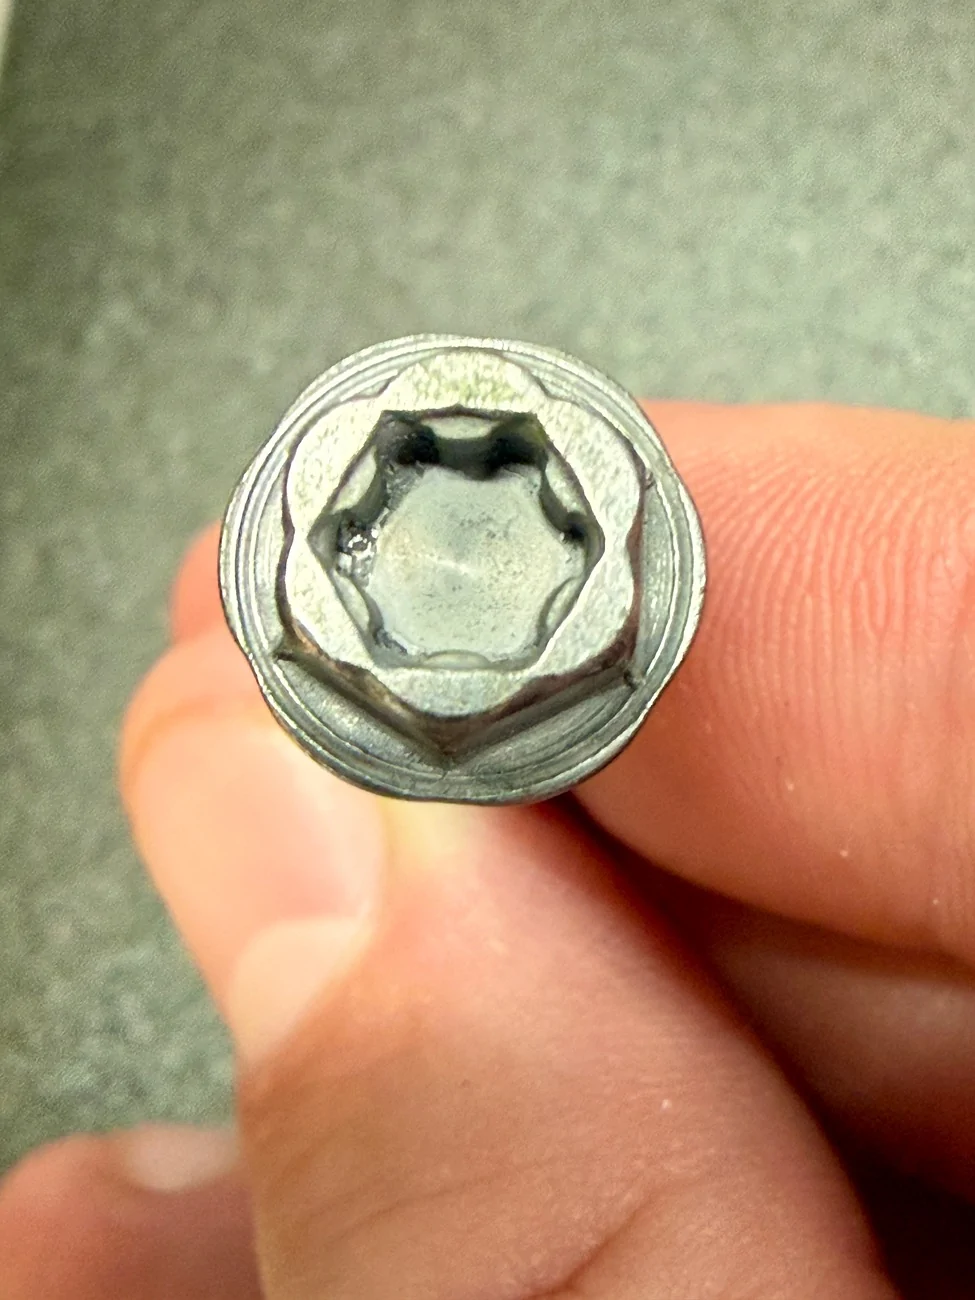
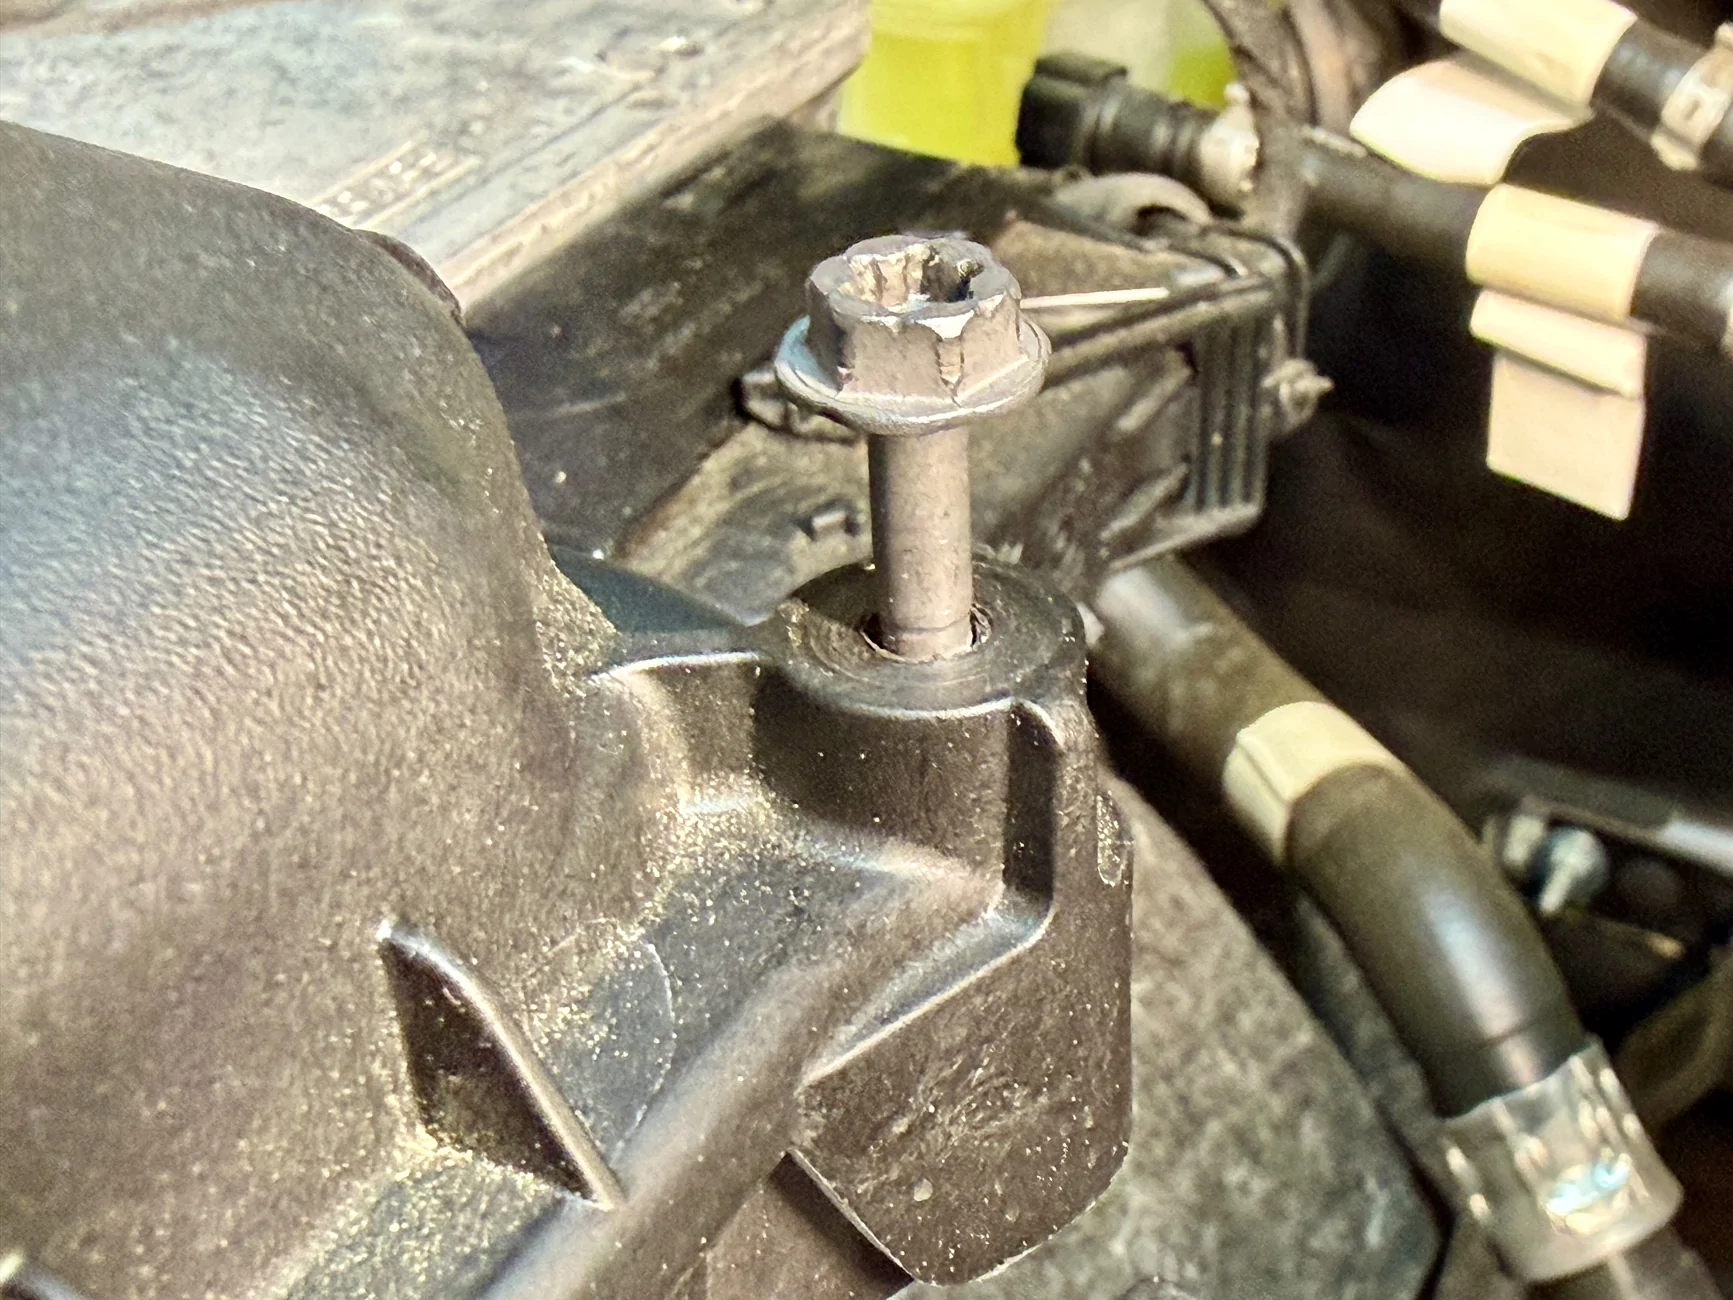
This job was easy for me because somehow I only had 3 screws...I guess the dealer lost it or something upon delivery...
***NOTE*** these screw heads require an IP30 TORX PLUS bit or 8mm socket to remove. If you use a regular T30 Torx bit you can easily strip the screws like the dealer did to one of mine.
If the screws become damaged or stripped out you can also purchase a replacement.
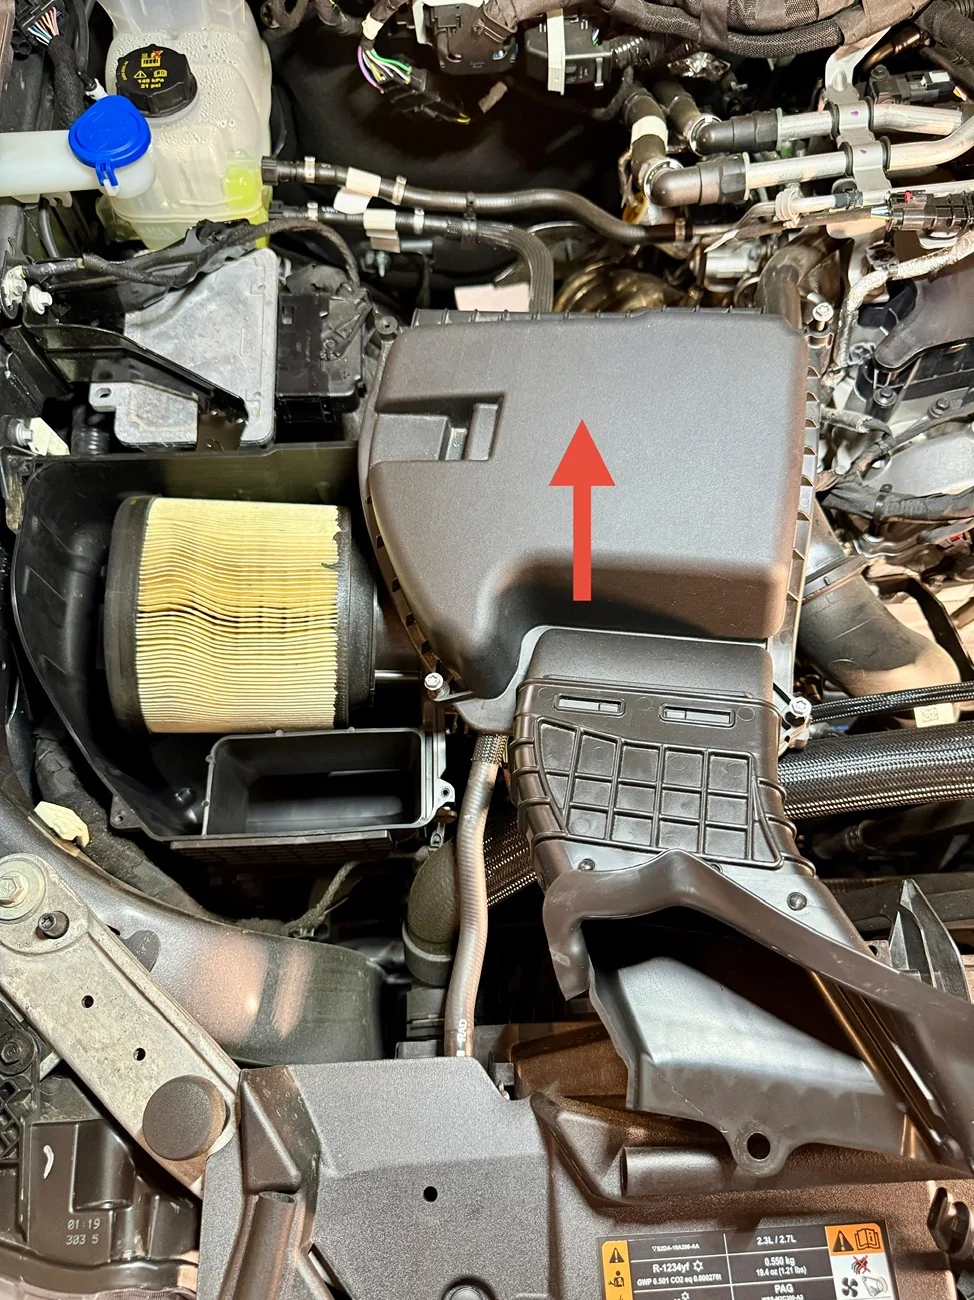
Carefully pull straight up on the airbox lid / intake tube to remove and expose the engine air filter element. If you would like to clean it you can ; it's just plastic!
STEP FOUR :
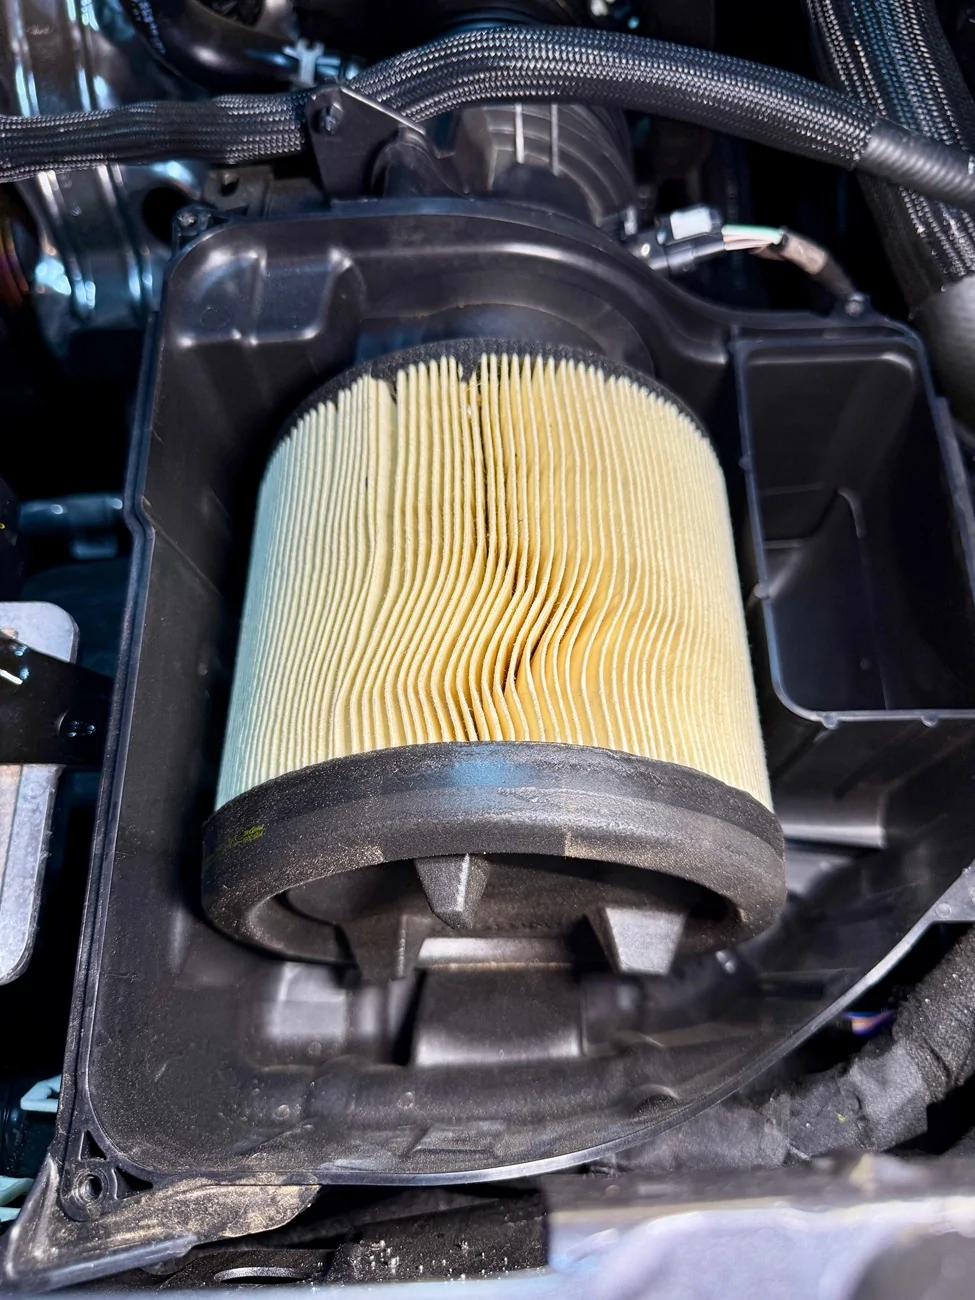
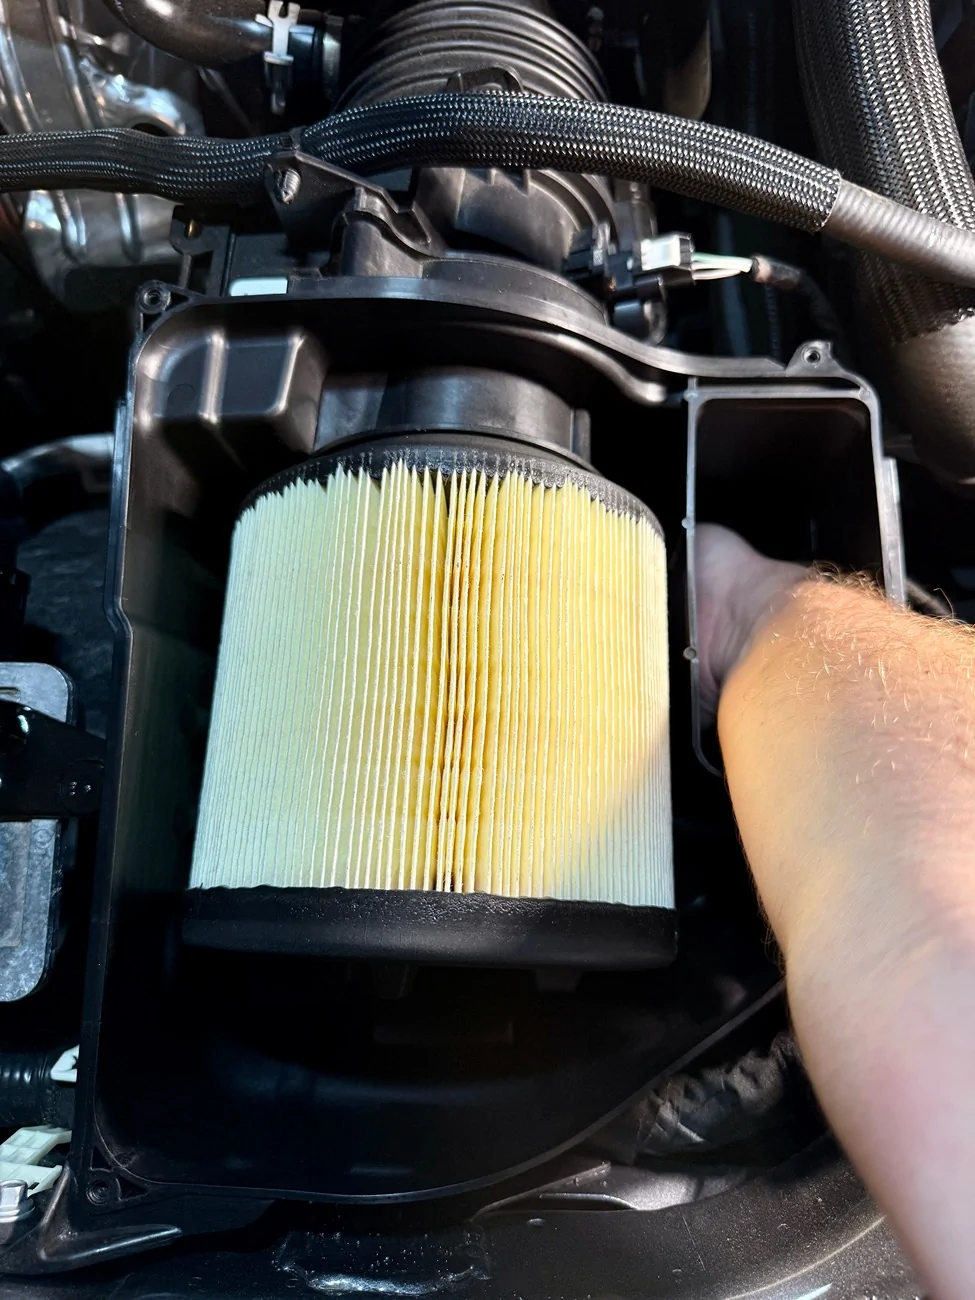
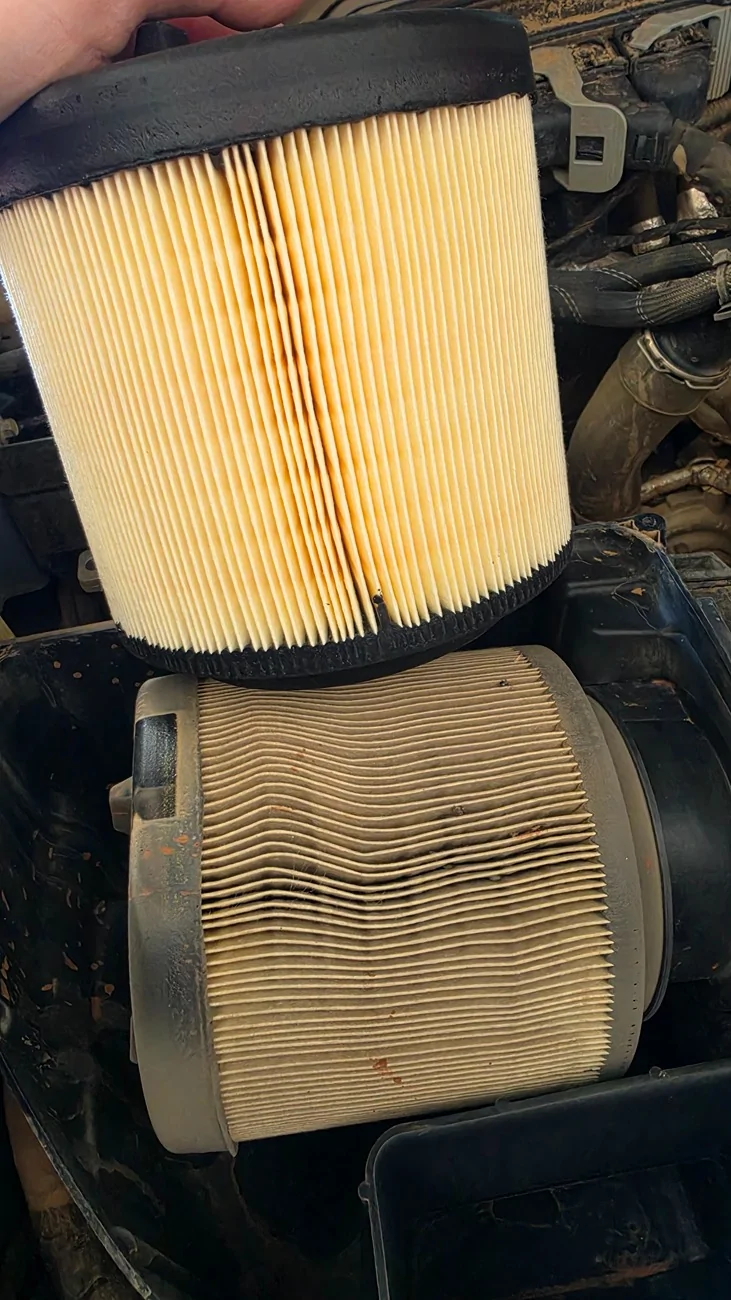
Remove old engine air filter element. The easiest way to do it is stand by the passenger front fender facing the filter and use two hands to pull up on the filter. There is a slightly raised tab the edge of the filter at the bottom of the air box that the filter kind of anchors with. When this is broken by pulling up on the filter it is easy to pull the filter towards you to completely remove it.
With the filter removed now you can deep clean the inside of the air box / remove large debris if desired.
STEP FIVE :
Reverse steps in Step Four and replace the engine air filter element with your new one.
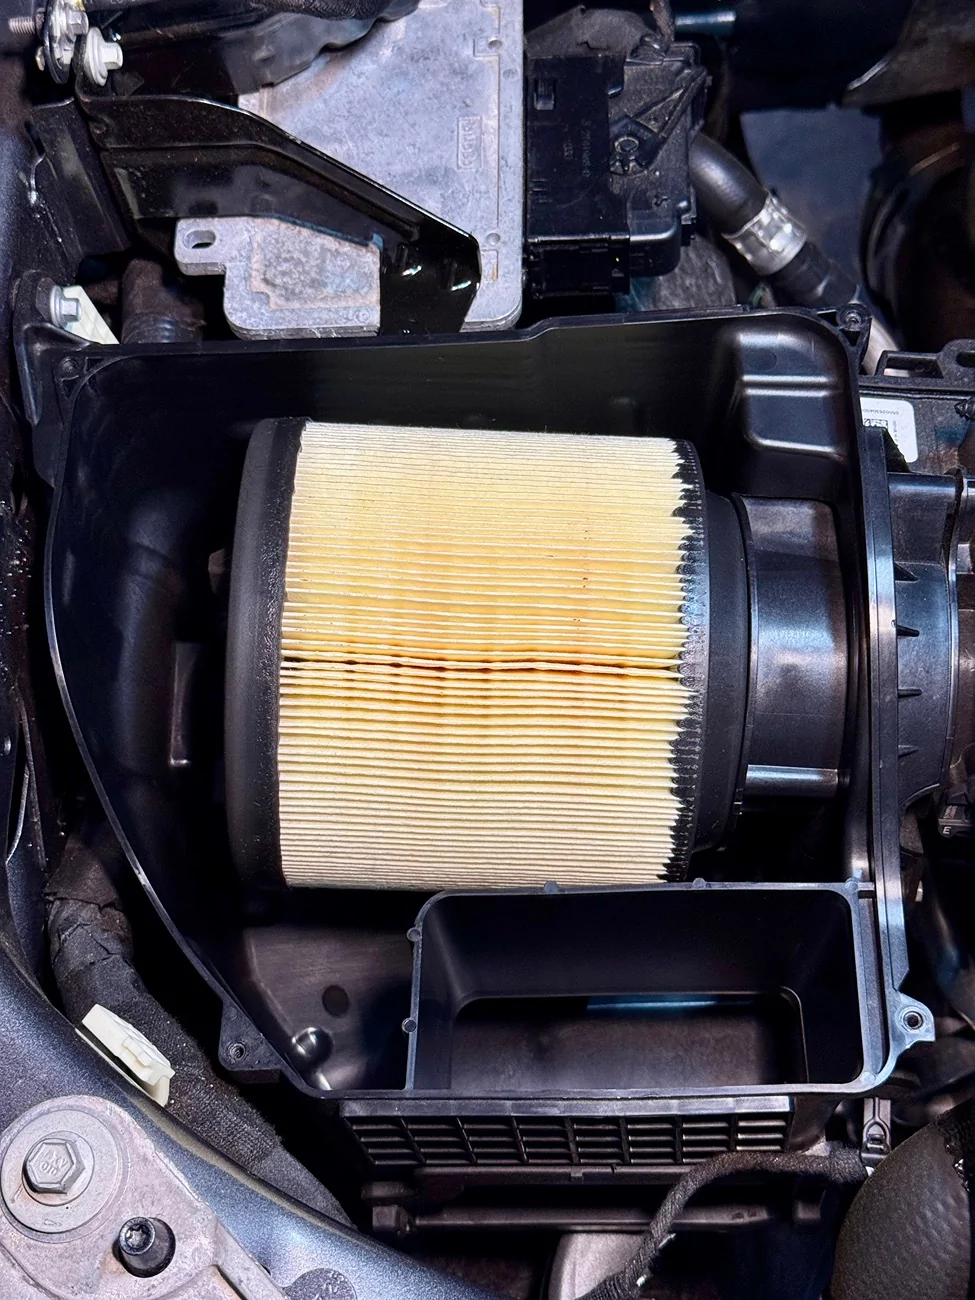
It can be a little bit tricky to get it right but I use the FordMoCo stamp on the filter facing the bottom of the airbox for alignment with the hold tab. I attach the engine side part first and then push down on the end of the filter facing the fender last to "lock" it in place. If you want to ensure you lined the filter up properly you can use your right hand to reach down the filter tube box area on the top right and feel underneath the filter to make sure there is not a gap.
The filter will be slightly angled up and should not wiggle around and you will know it is properly attached.
STEP SIX :
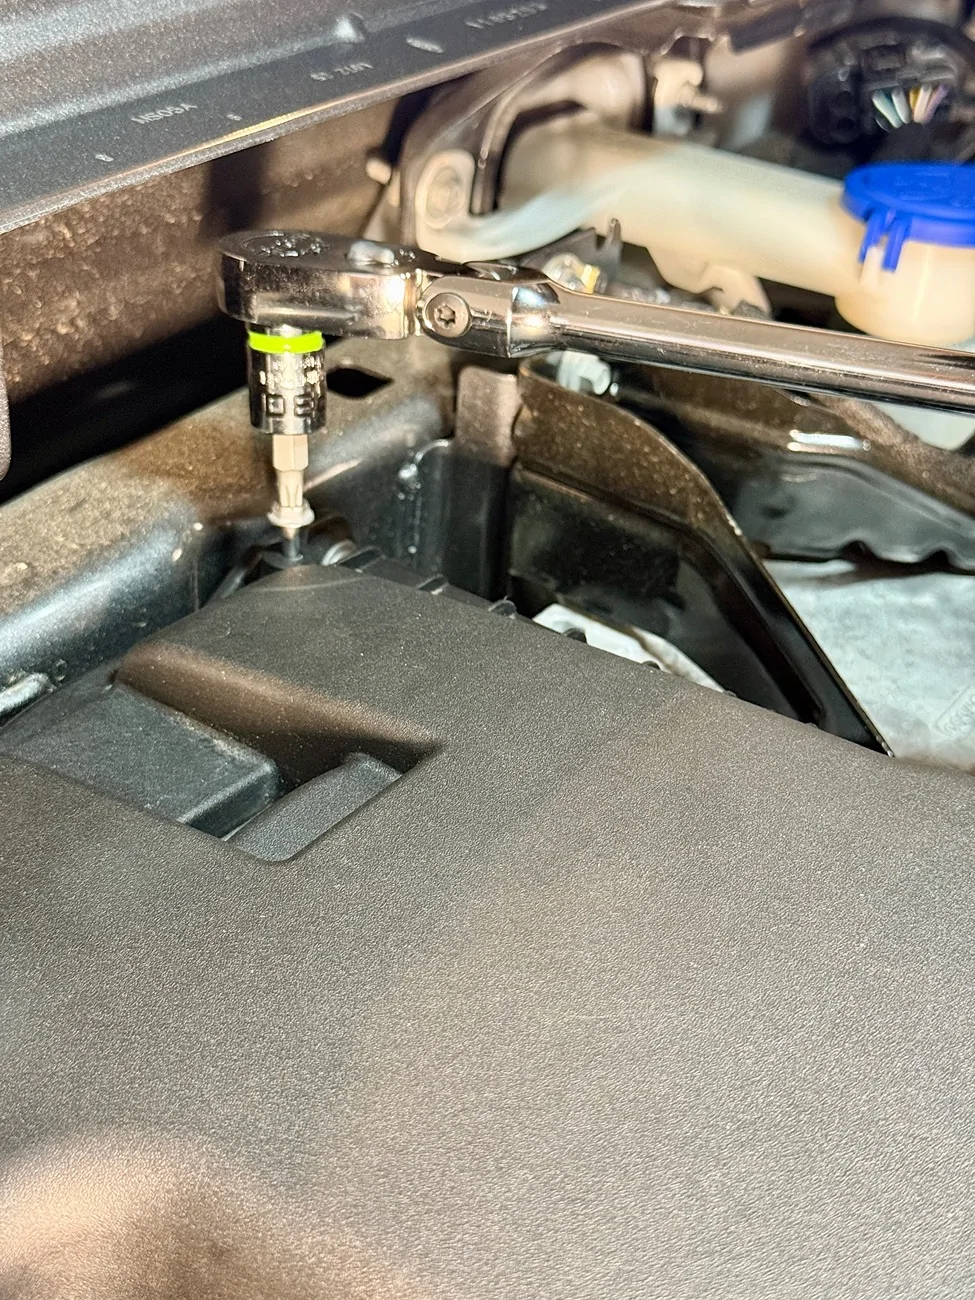
Replace the air box lid / attached intake tube over the engine air filter element and give slight downward pressure to guide it in place. At this point you can begin to hand tighten the 4x air box lid screws. Use your tool of choice to snug the screws down. If you are using a ratchet you will probably have to remove the extension and use just the Torx Plus bit socket on the top left screw due to fender clearance.
The torque specifications for the 4x air box lid screws are 2.8 Nm / 2.07 ft.lb / 24.84 in.lb. I am an engineer in the aerospace/defense sector so I usually torque all fasteners to spec ; you do not have to though...I doubt these being snug will fly off on you...
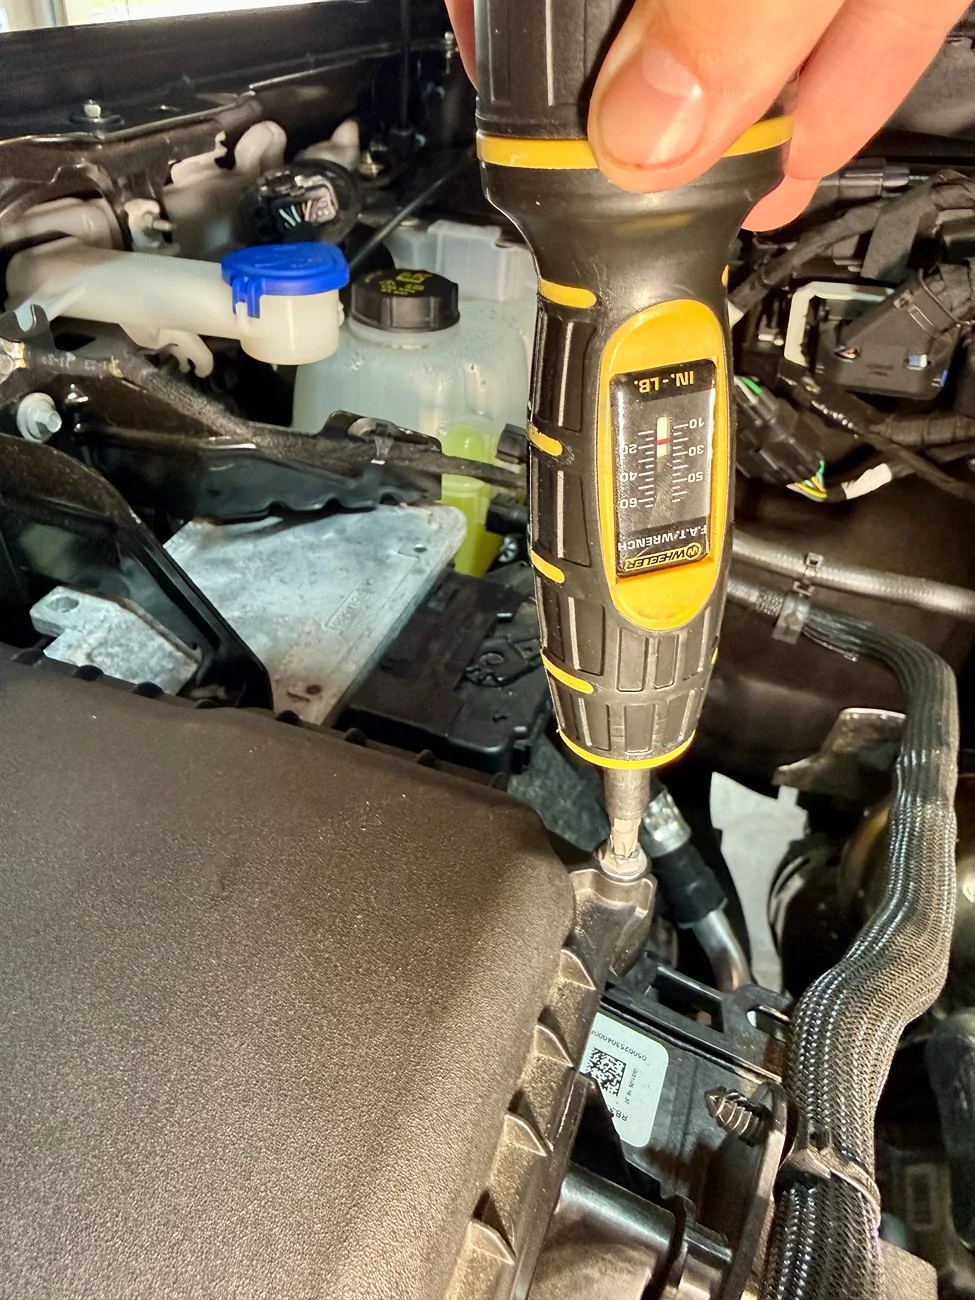
If you would like to torque you can set your torque screwdriver if you have one to 23 or 24 in.lbs. I maybe got a quarter of a turn from hand snug before the torque screwdriver clicked so it does not take much. I did not torque the top left screw because of clearance ; if you are using an inch-lb torque wrench then you will be fine and not experience any clearance issues.
STEP SEVEN :
Reverse steps in Step Two to reattach the intake tube plastic trim clip. Push the bottom of the clip into the hole first and then push the top of the clip down to lock it in place. Rotate the slot you used your pry bar or slotted screwdriver to the right to make it more convenient for you the next time you remove it.
**Quality Check** - Ensure you have tightened 4x screws and 1x trim clips. Ensure all tools are removed from engine bay prior to closing the hood.
That's it! Grab a cold one and enjoy a job well done!

***BONUS*** - If you would like to remove your MAF (Mass Air Flow Sensor) and clean it, it requires the removal of 2x T20 screws (P/N W714386S300). Since there are a few hoses around it, a tool like a GripEdge T20 Star T-Handle (PST20) works nicely.
***BIG BEND TRIM CABIN AIR FILTER INSTRUCTIONS***
STEP ONE :
Locate and open your glove box on the passenger side of your Bronco. Remove contents of glove box if desired. This is your reminder to sort through your glovebox and remove anything that is not needed including your tag paperwork from 5+ years ago..
STEP TWO :
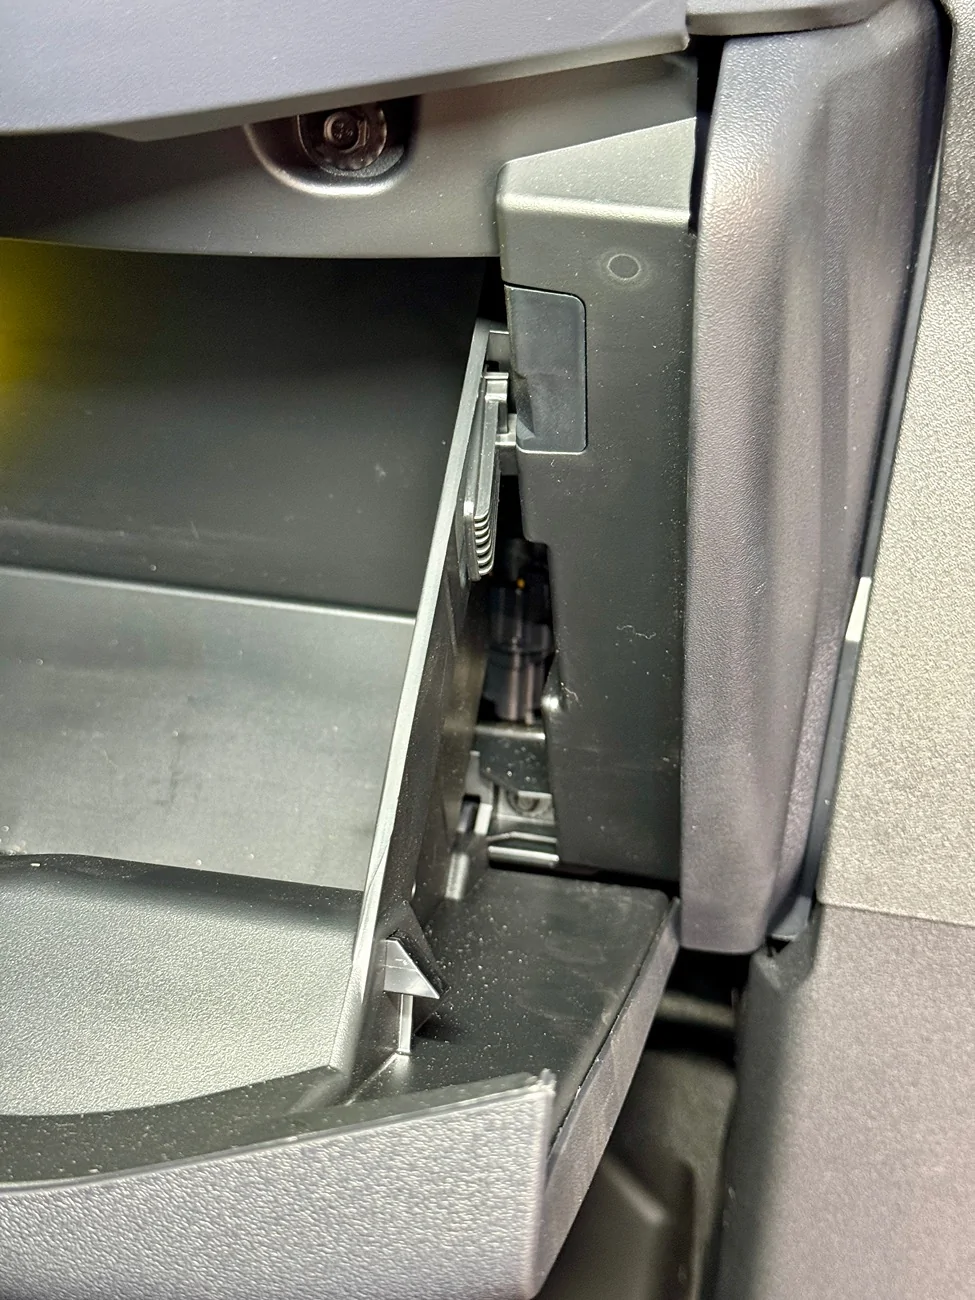
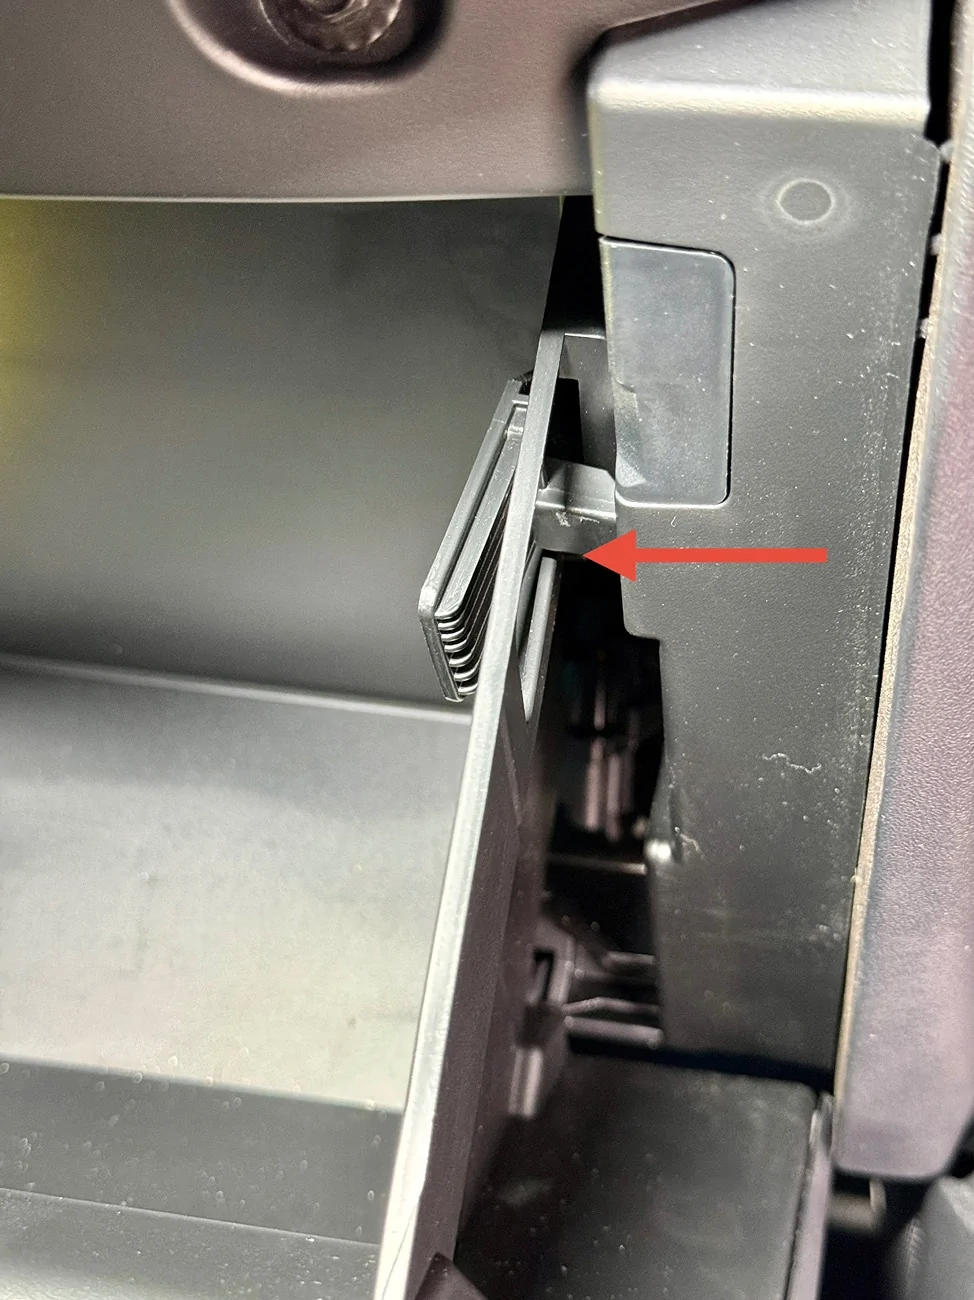
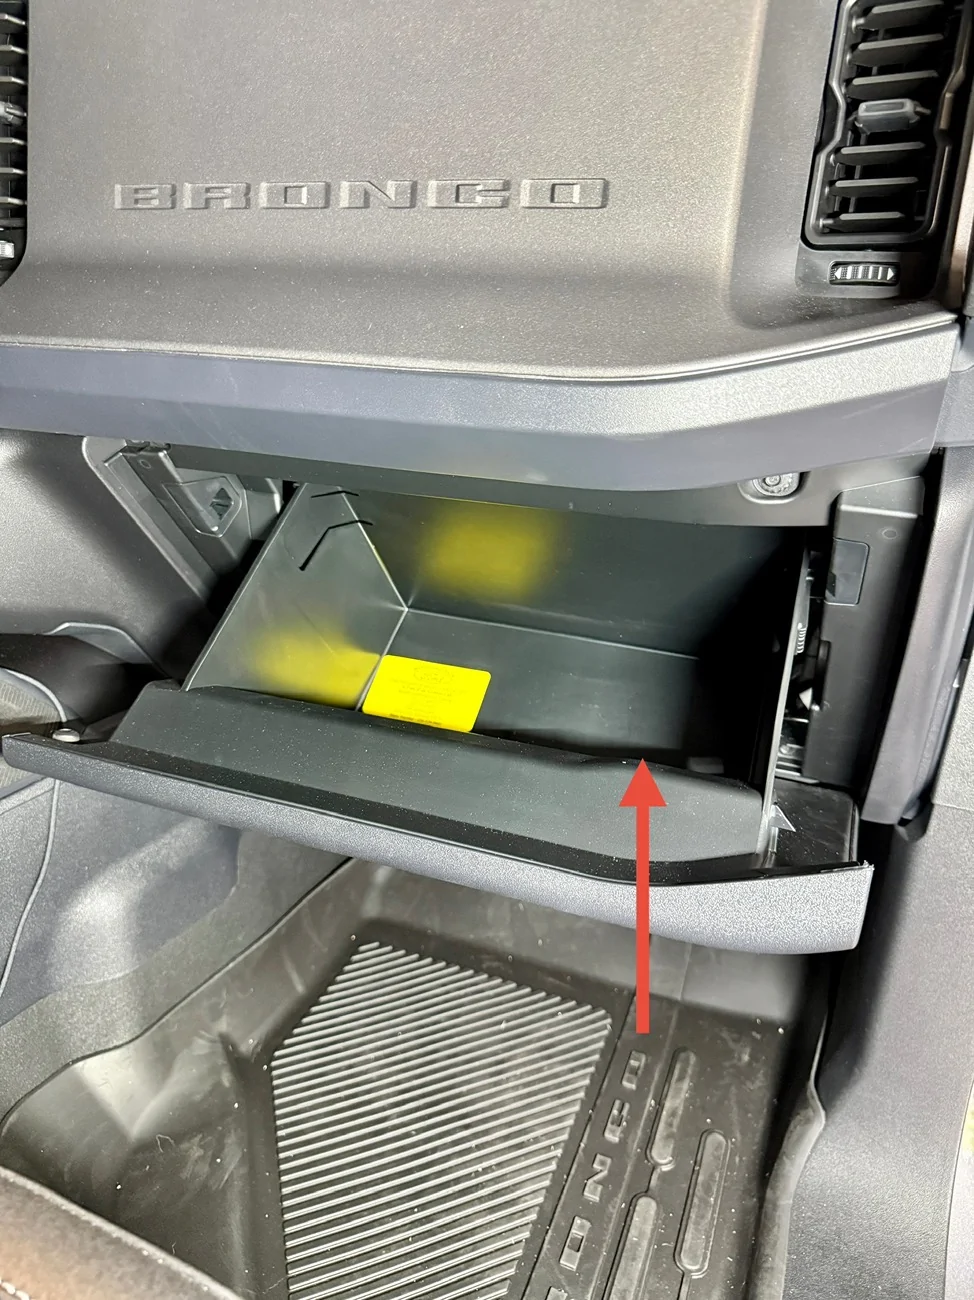
Push tabs on both sides of glove box inwards to unlatch them. The glovebox is now free with no tension and will lower all the way to the floorboard. I always hold on to my glovebox to ease it down so nothing breaks. Now is also a great time to ensure no loose paper, napkins, FOD, etc has gotten behind the glovebox and could potentially be sucked up by the blower motor.
On the Big Bend trim I do not think there are any dampers or glovebox assist systems equipped like I have on my Ford Ranger Lariat or maybe higher trims of Broncos. Usually that is an additional step to unlatch those and then lower your glovebox.
STEP THREE :
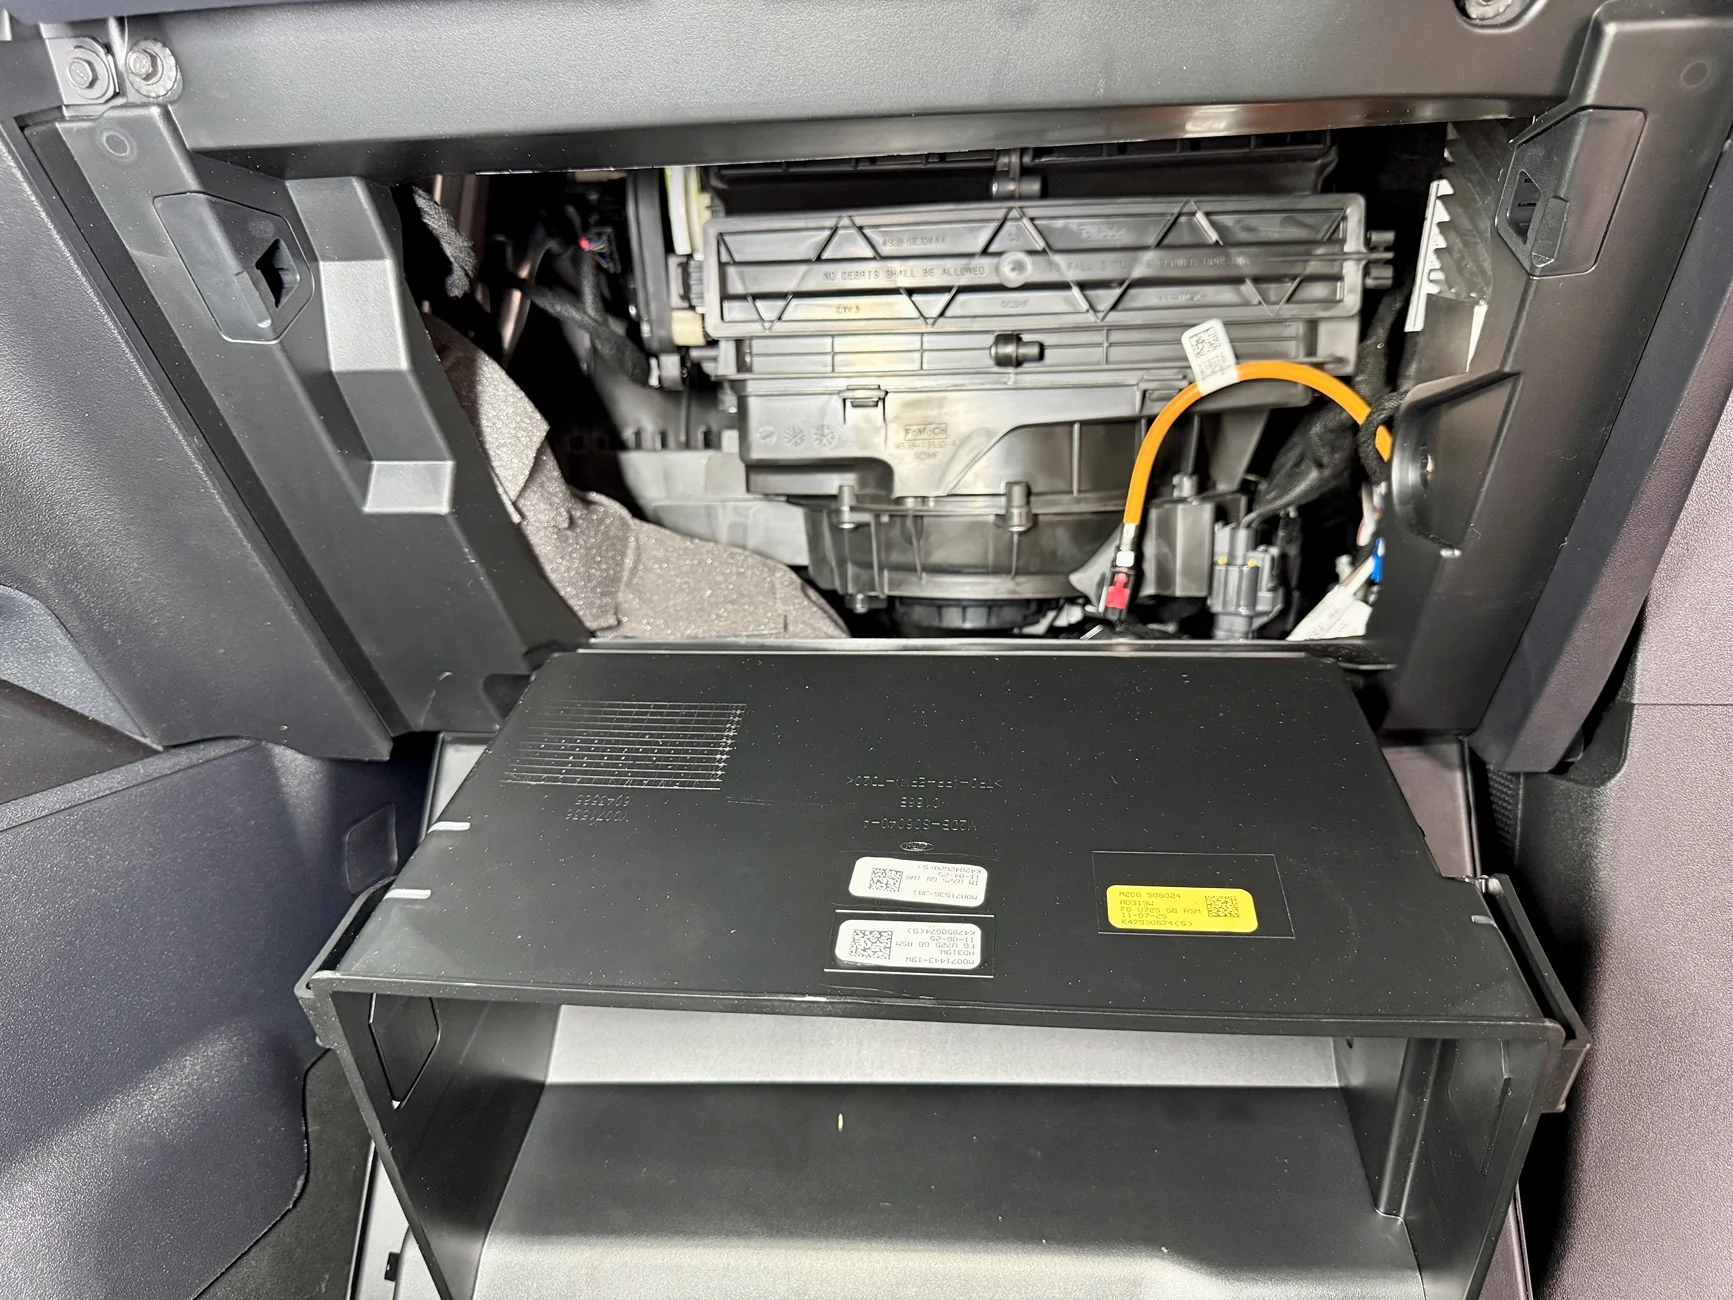
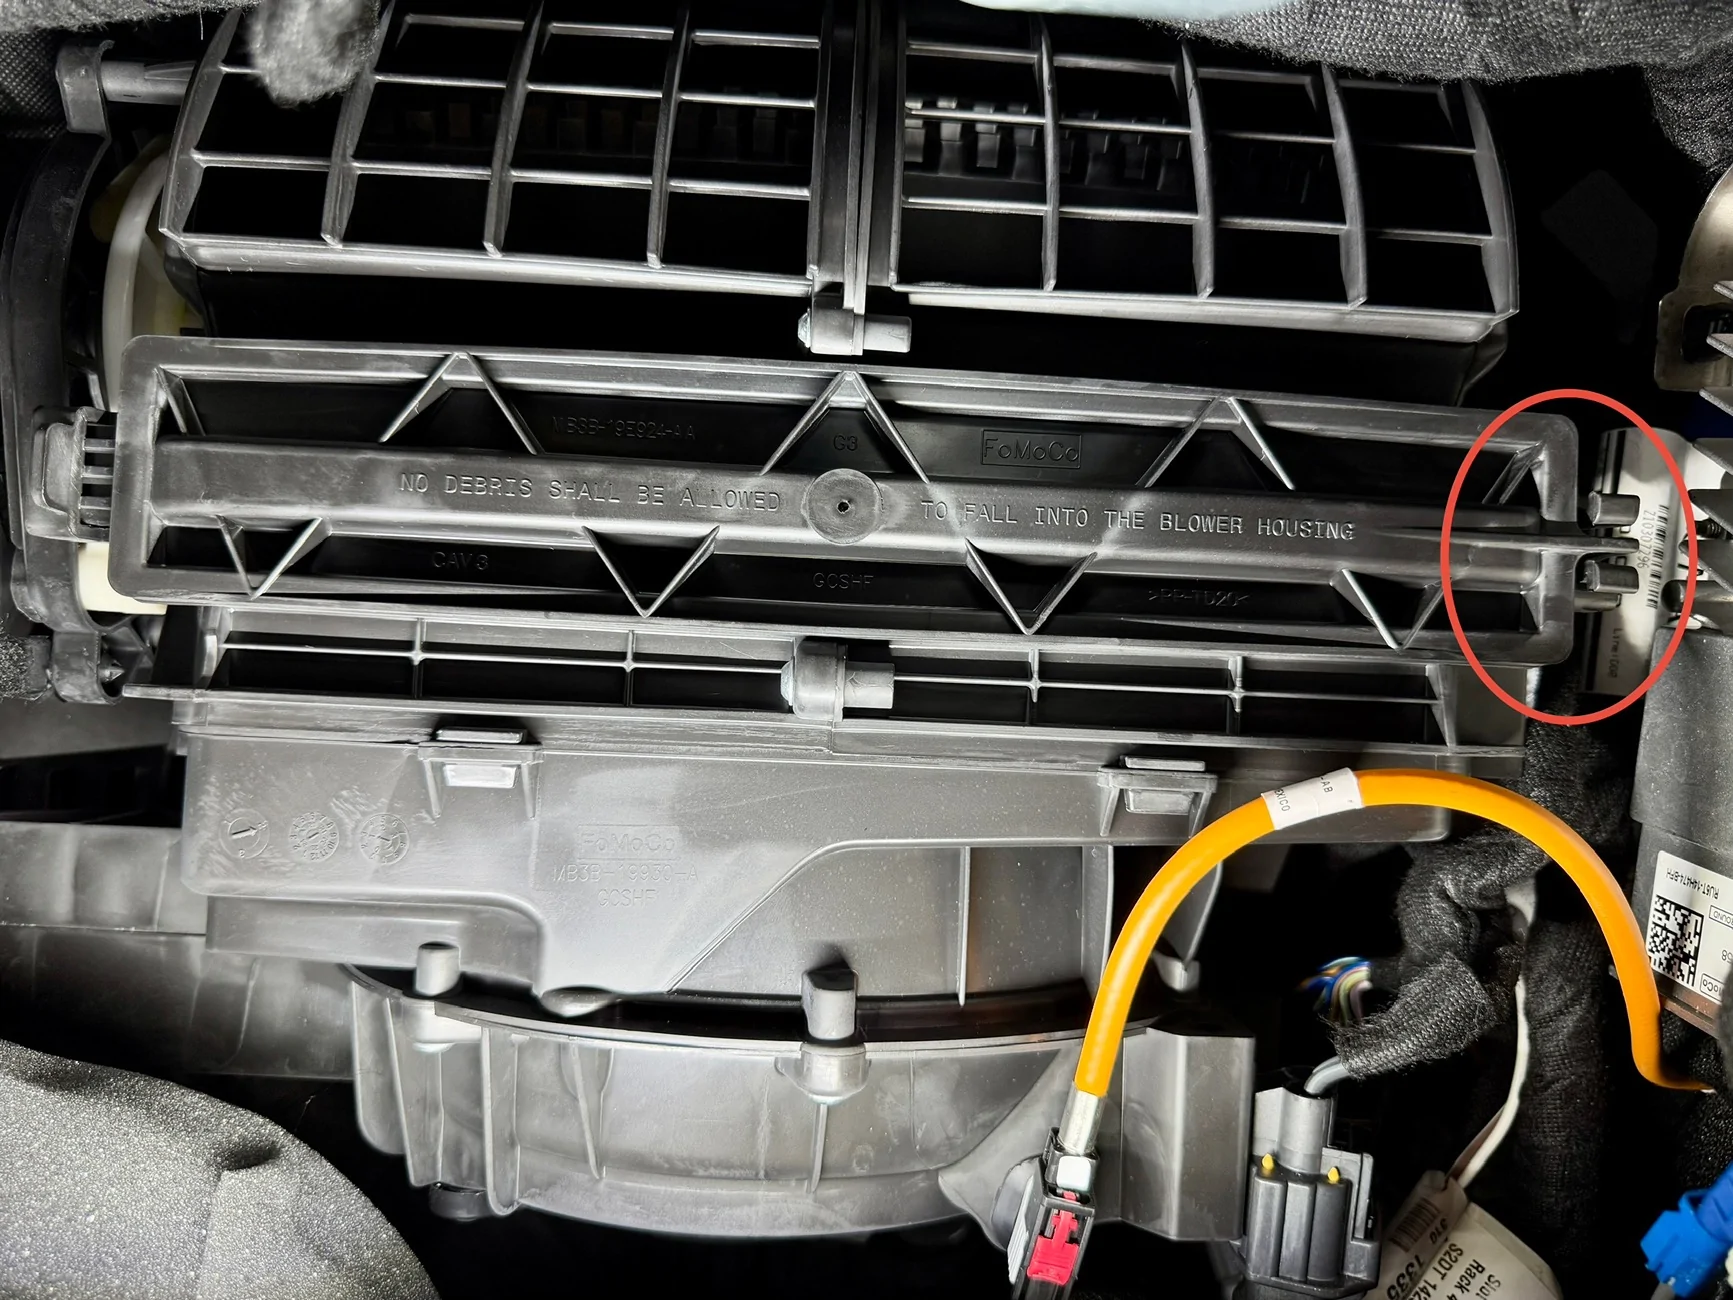
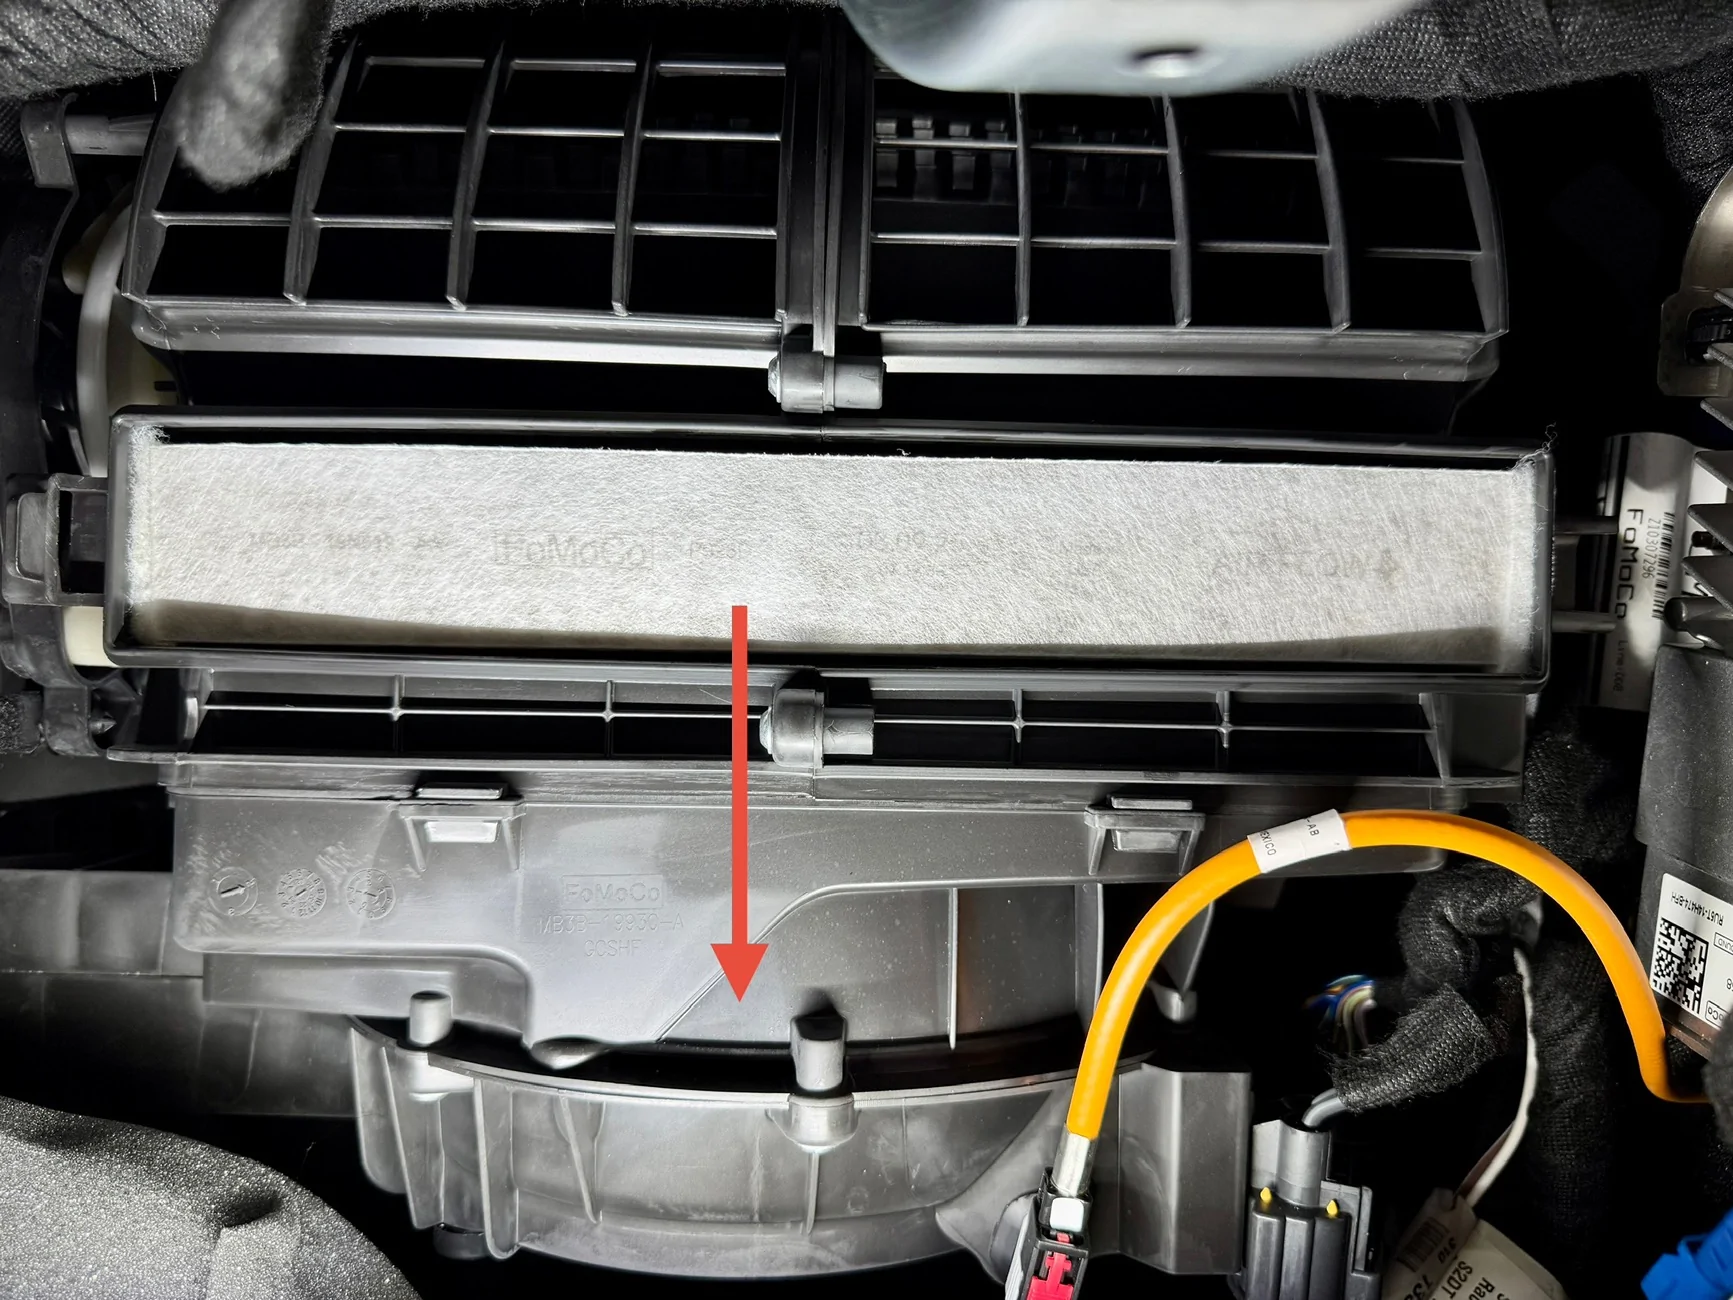
Locate the Cabin Air Filter Dust Cover located directly behind the glovebox and remove it by pinching the tabs on the right and pulling it towards you. The tab on the left of the dust cover is stationary and is just the pivot point. Pull the dust cover to the right to remove it from the pivot point. If it is filthy you can always take it inside and wash it down in the sink since it is all plastic and easily removable.
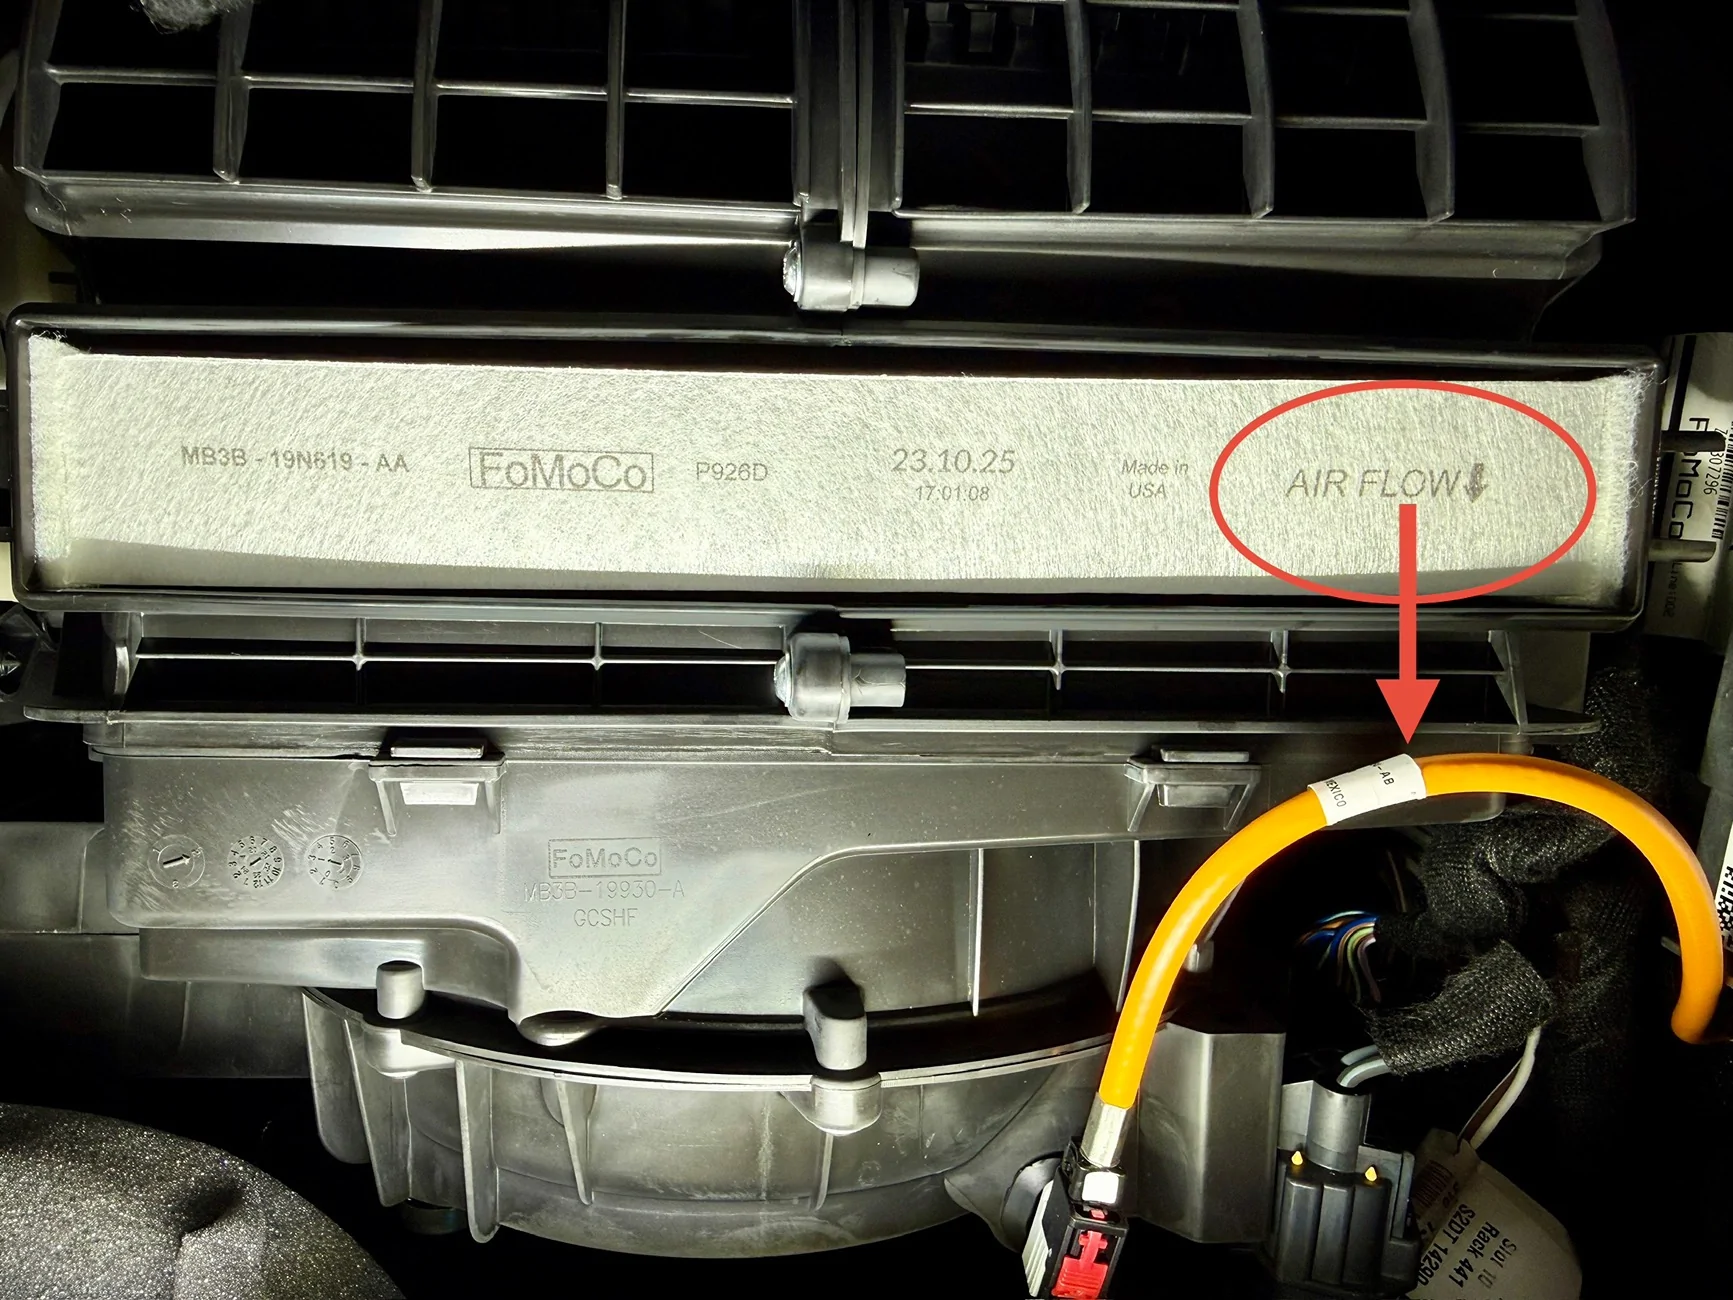
Pull the old cabin air filter out of the housing towards you and take note of the air flow direction arrow on the right side of the filter. *The air flow direction arrow should always face DOWN towards your blower assembly or the floor.*
I was genuinely shocked how dirty the Cabin Air filter was...Our 2025 Bronco was a dealer demo with a 11/25 build date and only 4000 miles on it on the date of this write-up...Now you see why I change filters once a year regardless of miles...
STEP FOUR :
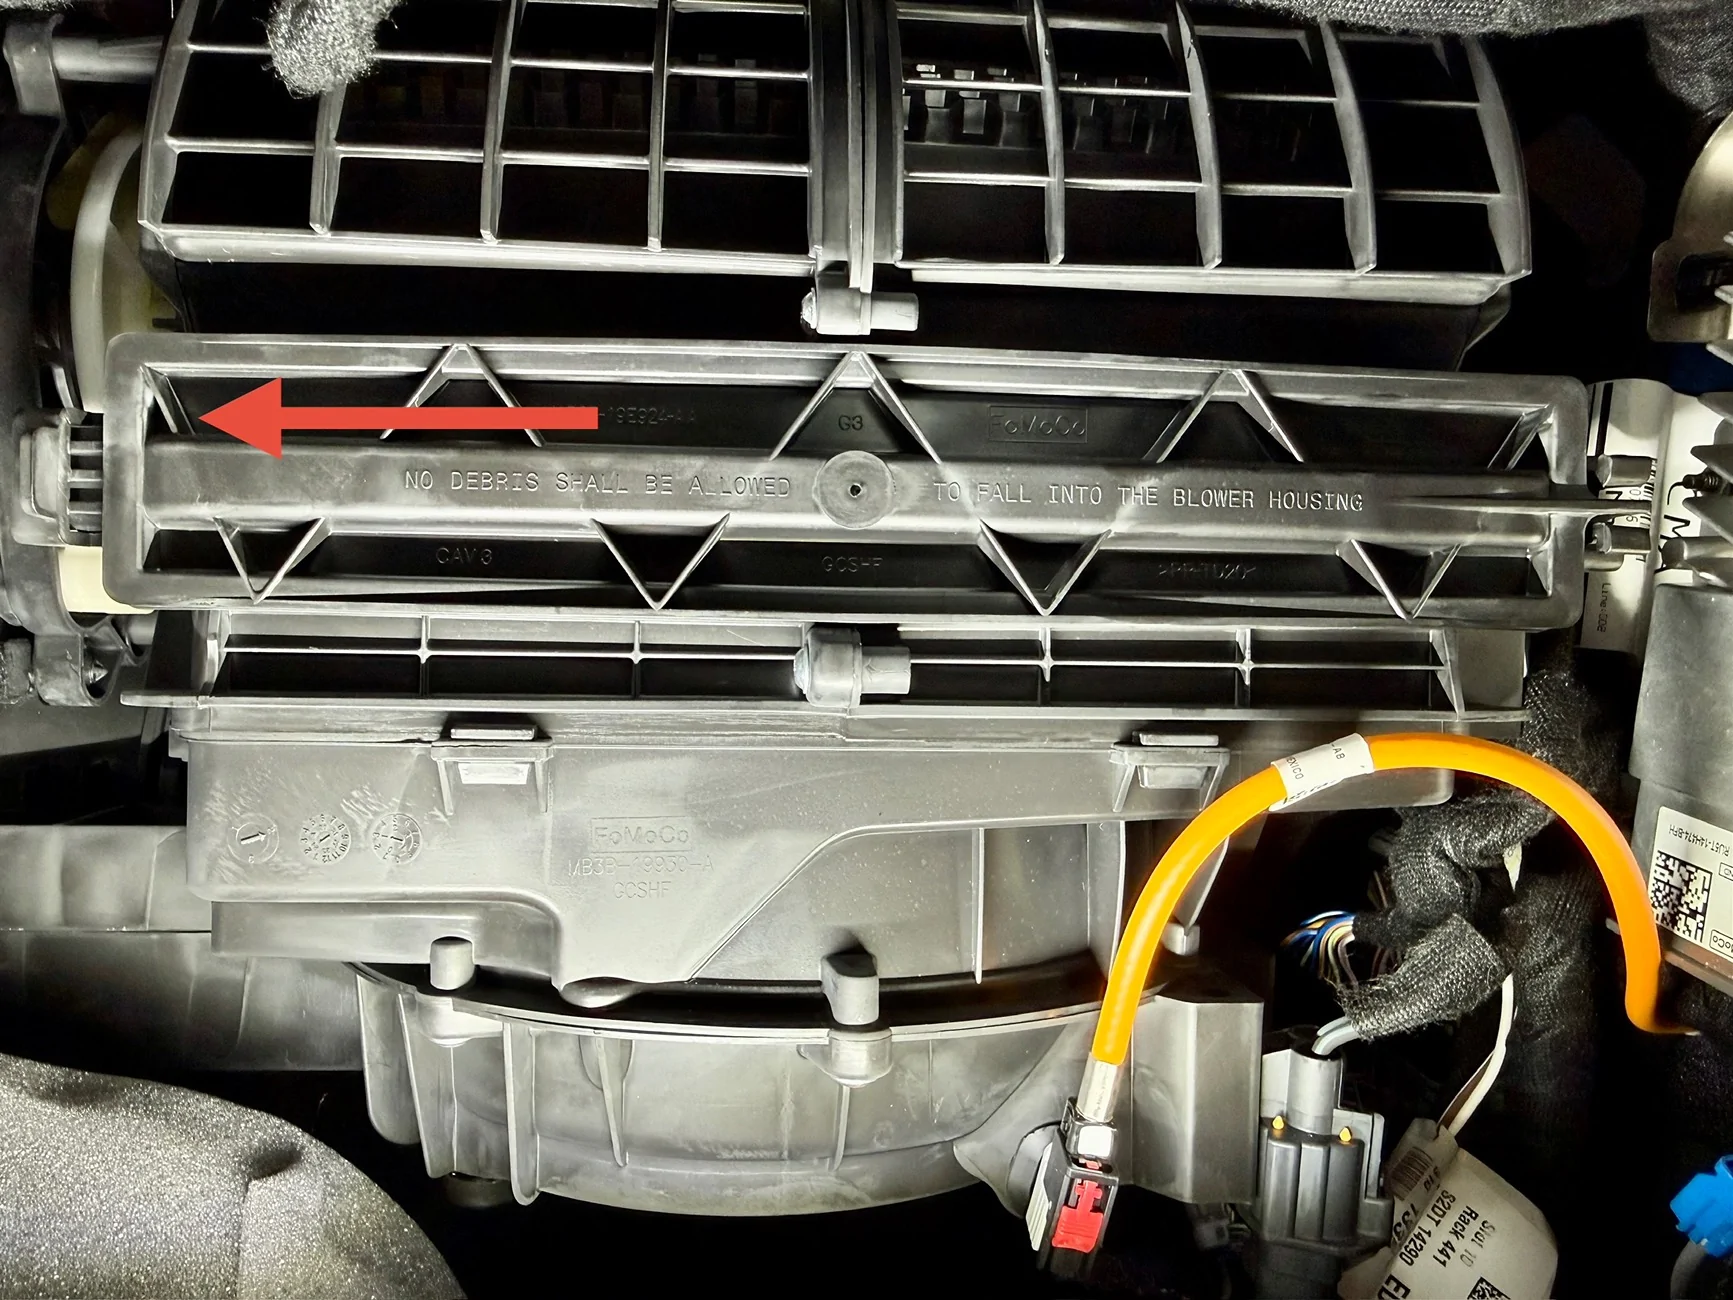
Reverse the steps in Step Three and insert your new Cabin Air filter into the slot with the airflow direction arrow facing down.
To reattach the dust cover insert the left side into the pivot point first and then push down on the right side of the dust cover to engage/secure the clip.
STEP FIVE :
Lift your glovebox up in place and the tabs on the sides of the glovebox should engage to hold it back in its original position. Don't forget to put any missing contents back into the glove box!
That's it! Grab a cold one and enjoy a job well done!
Hope this little tutorial helps someone out and saves you a little money in the long run! This is entry level maintenance that can save you quite a bit of money over the lifetime of your Bronco! Do not follow me for financial advice though ; I take the money I "saved" and buy more tools...

I come from the Ranger5G forums and love to do little maintenance write-ups to help people out and save a little money (maybe even convince you to buy some new tools you may or may not need
).Today we will dive into a simple, but important maintenance task on your Bronco.
Ford recommends changing your cabin air filter every 20,000 miles and your engine air filter element every 30,000 miles. I usually change the filters on all of my vehicles once a year in the spring after pollen season ; it may be a little overkill but being overkill on your maintenance can help prolong the life of your vehicle right? I always use OEM parts but ymmv and as long as you are using a quality equivalent no harm, no foul.
Parts Needed :
- Motorcraft FA-2022 (MB3Z-9601-A) Engine Air Element
- Motorcraft FP-93 (MB3Z-19N619-A) Cabin Air Filter
Optional Replacement Parts Needed :
- W721933S450B Screws (4x needed to hold down engine air box assembly)
- W714040S300 Clip (1x needed to hold down engine intake tube assembly)
Tools Needed :
- 1/4" or 3/8" ratchet
- 1" - 3" extension
- IP30 Star Plus Bit Socket (GripEdge STPB30) *or* 8mm socket for the 4x air box screws
- Torque Screwdriver (in-lbs) (*optional*)
- IP30 Star Plus Bit or if you have your little Bronco tool pack for removing the top you will find an IP30 bit in there!
- Small slotted screwdriver or mini pry bar (I am using Tekton P/N LRD82100 in my pictures)
- Light
- Microfiber Towel for cleaning
***2.3L ECOBOOST ENGINE AIR FILTER ELEMENT INSTRUCTIONS***
STEP ONE :
Open and support hood and locate the Air Filter assembly on the passenger front side (or front left) of the engine bay.
STEP TWO :
Locate intake tube plastic trim clip and remove by lightly prying upward with a small pocket prybar or slotted screwdriver. The trim clip comes apart in two pieces for full removal. If you damage or break the clip you can purchase a replacement.
STEP THREE :
Locate the 4x air box screws and loosen them. The air box screws are somewhat captivated by the plastic threads in the air box lid so you do not have to remove them completely ; when you see a good portion of the screw's shank they are loose enough!
This job was easy for me because somehow I only had 3 screws...I guess the dealer lost it or something upon delivery...
***NOTE*** these screw heads require an IP30 TORX PLUS bit or 8mm socket to remove. If you use a regular T30 Torx bit you can easily strip the screws like the dealer did to one of mine.
If the screws become damaged or stripped out you can also purchase a replacement.
Carefully pull straight up on the airbox lid / intake tube to remove and expose the engine air filter element. If you would like to clean it you can ; it's just plastic!
STEP FOUR :
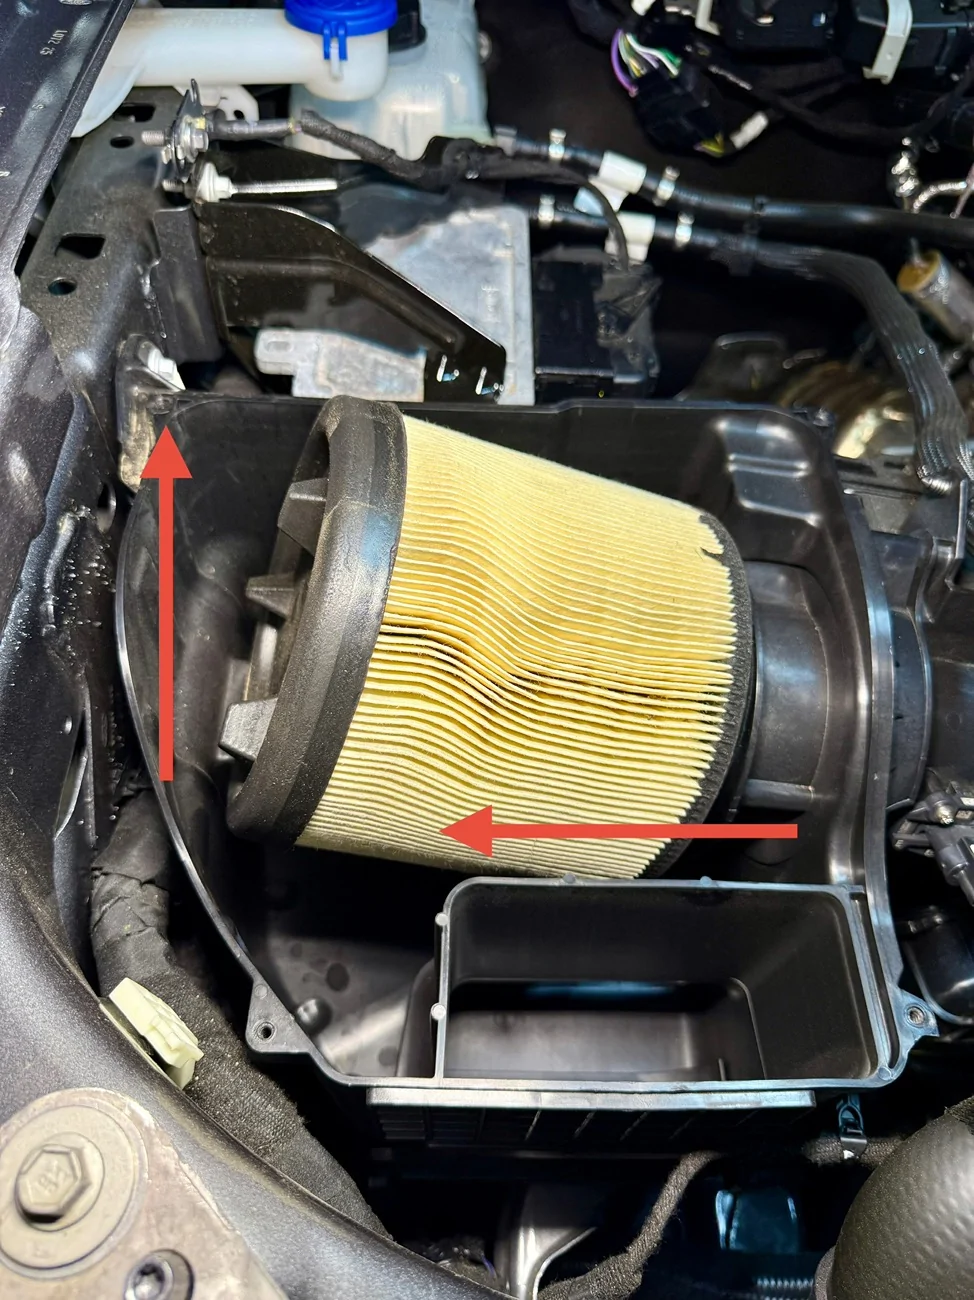
Remove old engine air filter element. The easiest way to do it is stand by the passenger front fender facing the filter and use two hands to pull up on the filter. There is a slightly raised tab the edge of the filter at the bottom of the air box that the filter kind of anchors with. When this is broken by pulling up on the filter it is easy to pull the filter towards you to completely remove it.
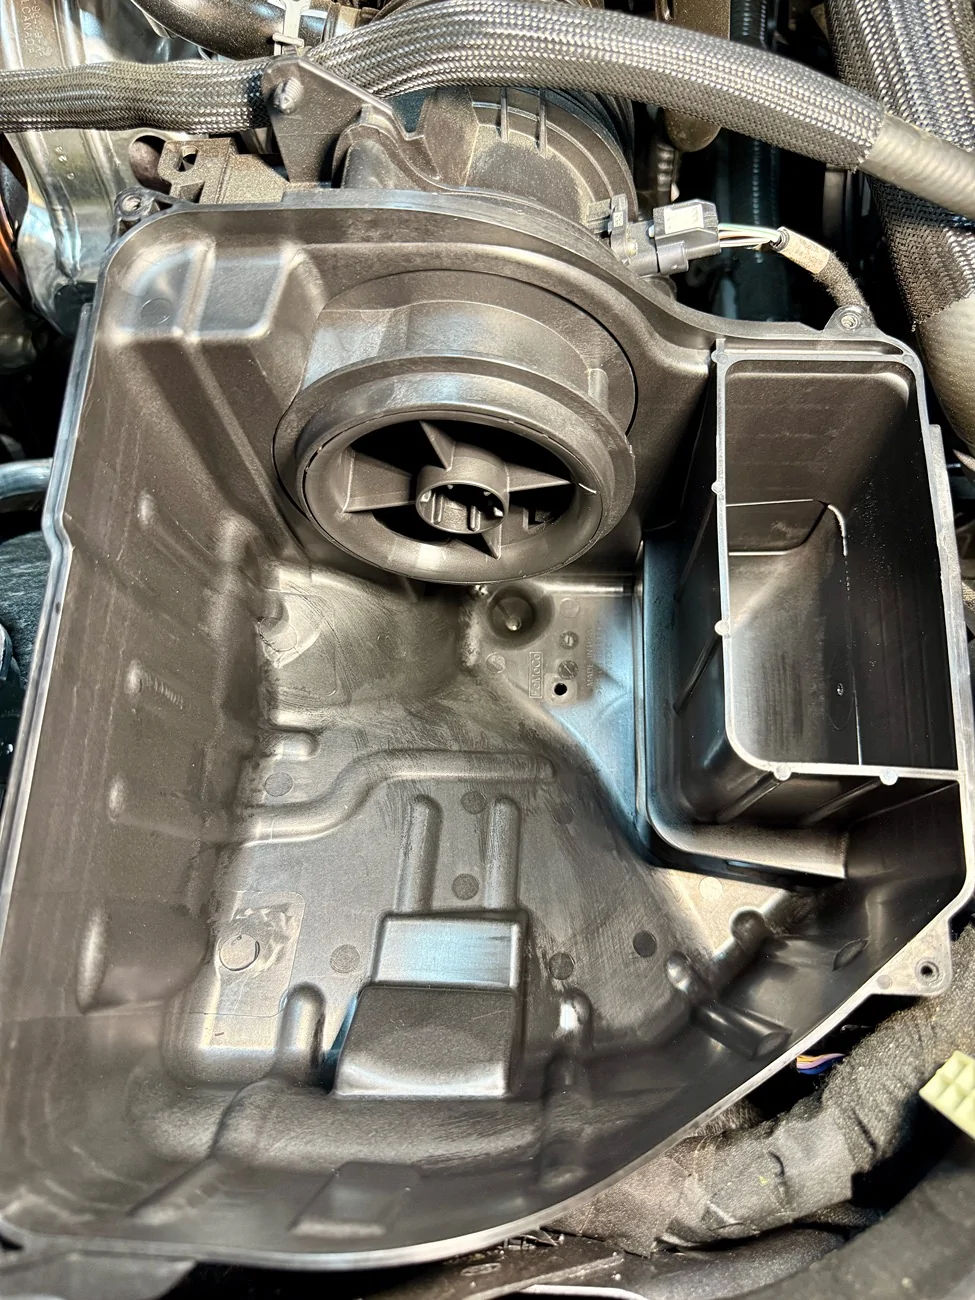
With the filter removed now you can deep clean the inside of the air box / remove large debris if desired.
STEP FIVE :
Reverse steps in Step Four and replace the engine air filter element with your new one.
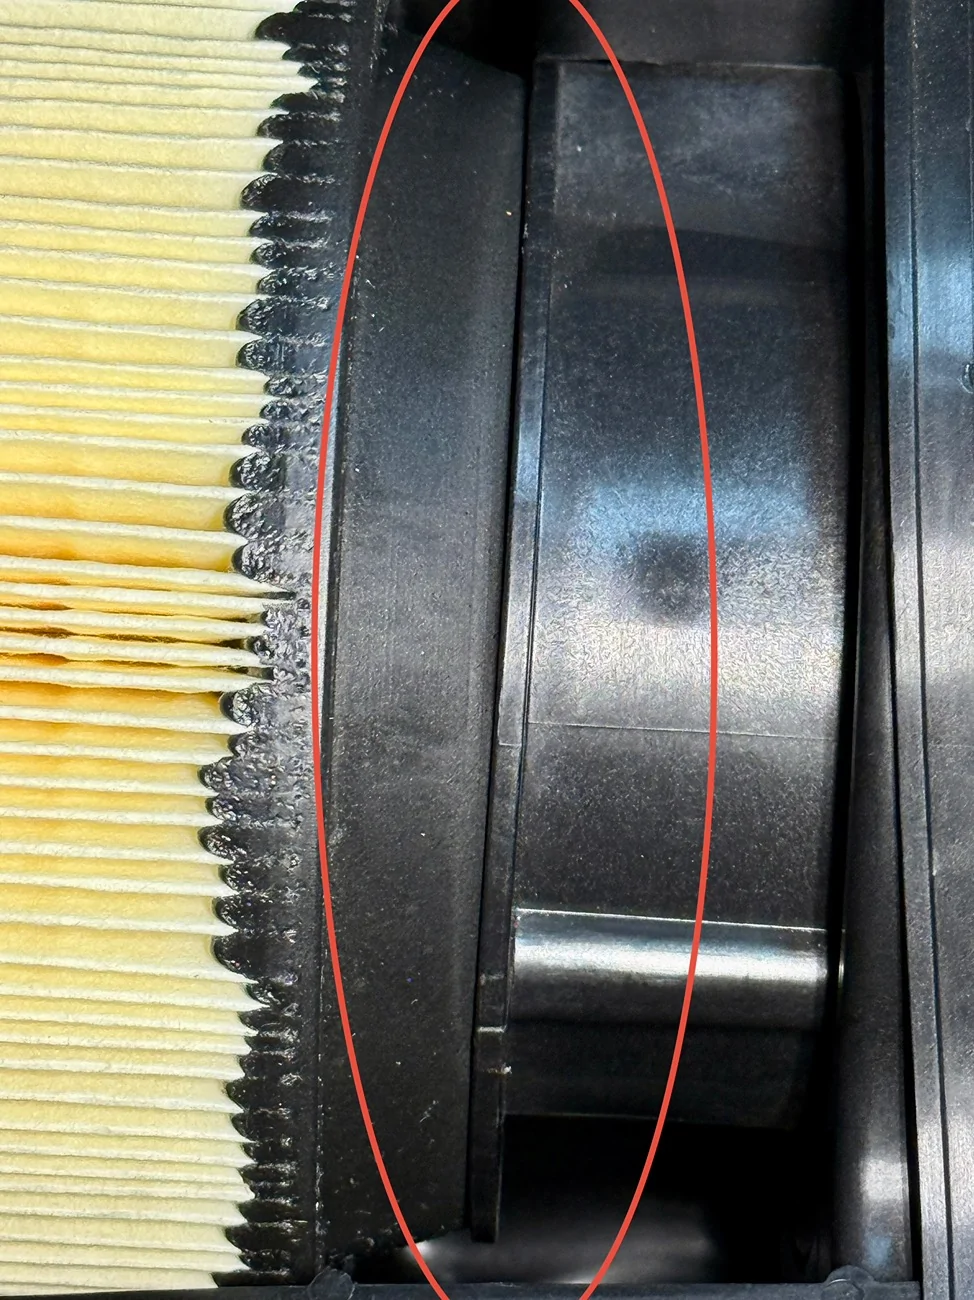
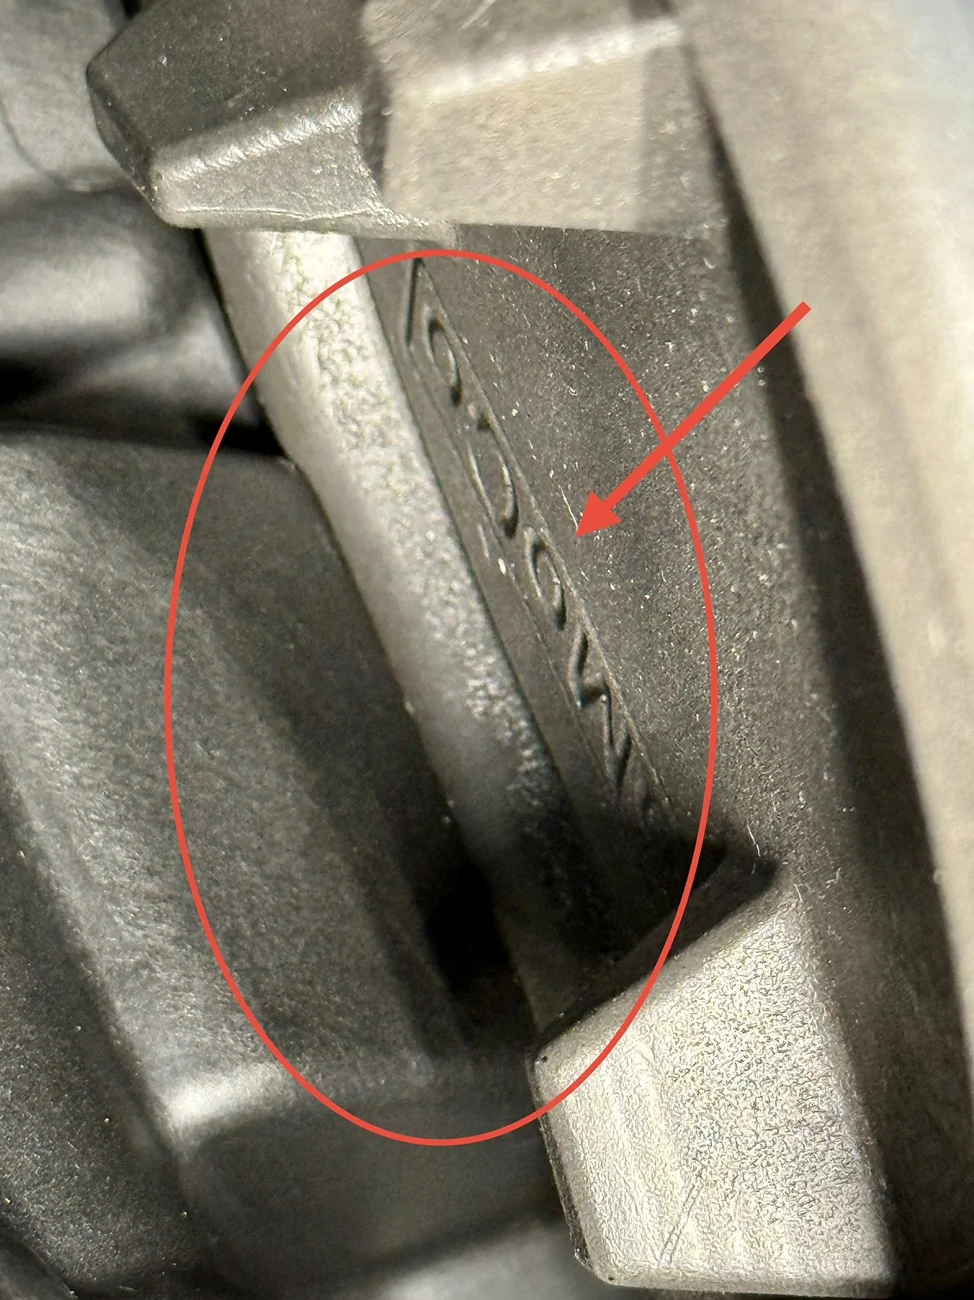
It can be a little bit tricky to get it right but I use the FordMoCo stamp on the filter facing the bottom of the airbox for alignment with the hold tab. I attach the engine side part first and then push down on the end of the filter facing the fender last to "lock" it in place. If you want to ensure you lined the filter up properly you can use your right hand to reach down the filter tube box area on the top right and feel underneath the filter to make sure there is not a gap.
The filter will be slightly angled up and should not wiggle around and you will know it is properly attached.
STEP SIX :
Replace the air box lid / attached intake tube over the engine air filter element and give slight downward pressure to guide it in place. At this point you can begin to hand tighten the 4x air box lid screws. Use your tool of choice to snug the screws down. If you are using a ratchet you will probably have to remove the extension and use just the Torx Plus bit socket on the top left screw due to fender clearance.
The torque specifications for the 4x air box lid screws are 2.8 Nm / 2.07 ft.lb / 24.84 in.lb. I am an engineer in the aerospace/defense sector so I usually torque all fasteners to spec ; you do not have to though...I doubt these being snug will fly off on you...
If you would like to torque you can set your torque screwdriver if you have one to 23 or 24 in.lbs. I maybe got a quarter of a turn from hand snug before the torque screwdriver clicked so it does not take much. I did not torque the top left screw because of clearance ; if you are using an inch-lb torque wrench then you will be fine and not experience any clearance issues.
STEP SEVEN :
Reverse steps in Step Two to reattach the intake tube plastic trim clip. Push the bottom of the clip into the hole first and then push the top of the clip down to lock it in place. Rotate the slot you used your pry bar or slotted screwdriver to the right to make it more convenient for you the next time you remove it.
**Quality Check** - Ensure you have tightened 4x screws and 1x trim clips. Ensure all tools are removed from engine bay prior to closing the hood.
That's it! Grab a cold one and enjoy a job well done!
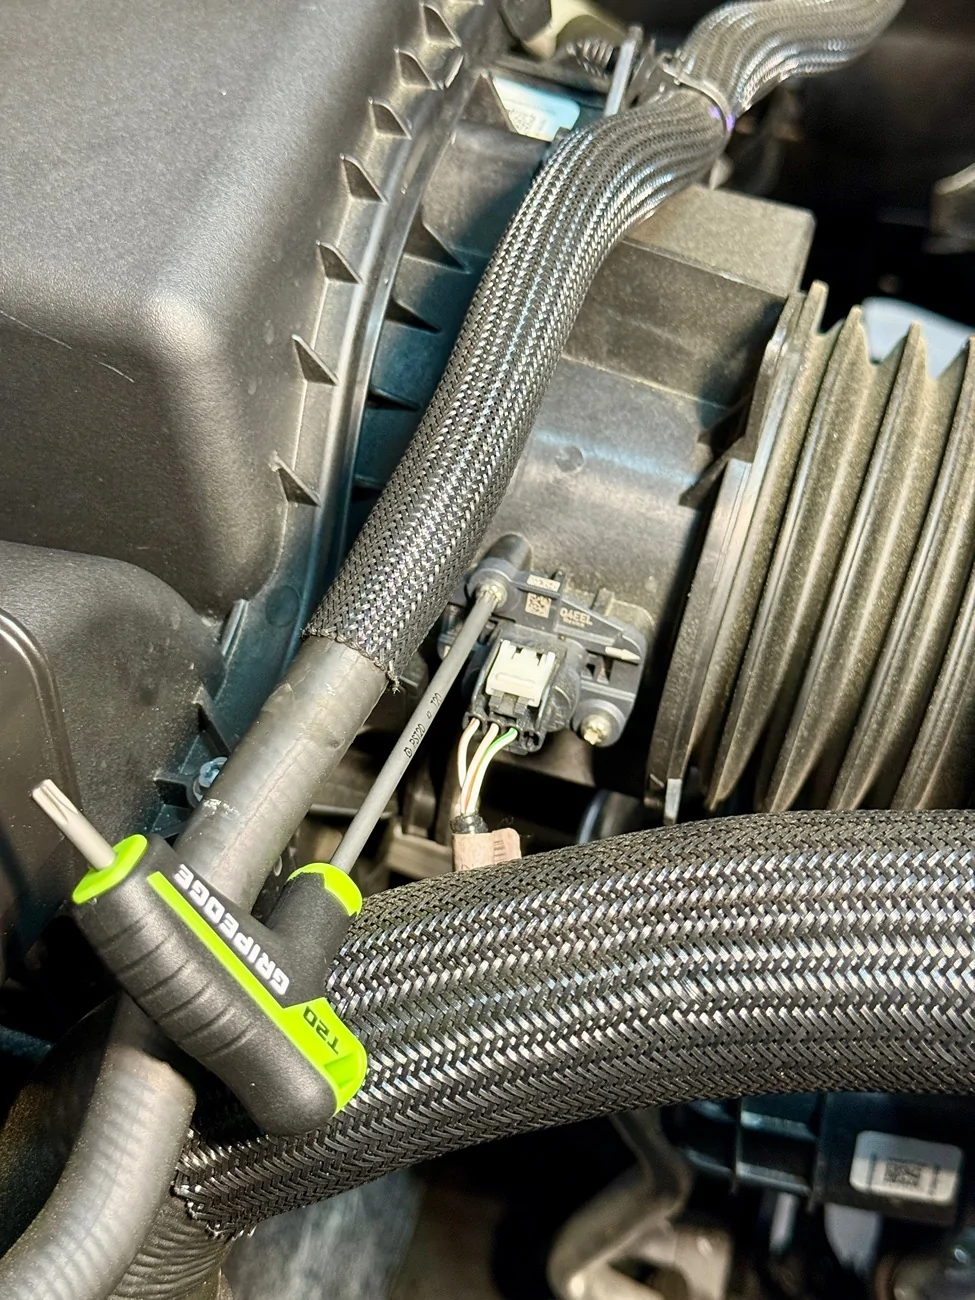
***BONUS*** - If you would like to remove your MAF (Mass Air Flow Sensor) and clean it, it requires the removal of 2x T20 screws (P/N W714386S300). Since there are a few hoses around it, a tool like a GripEdge T20 Star T-Handle (PST20) works nicely.
***BIG BEND TRIM CABIN AIR FILTER INSTRUCTIONS***
STEP ONE :
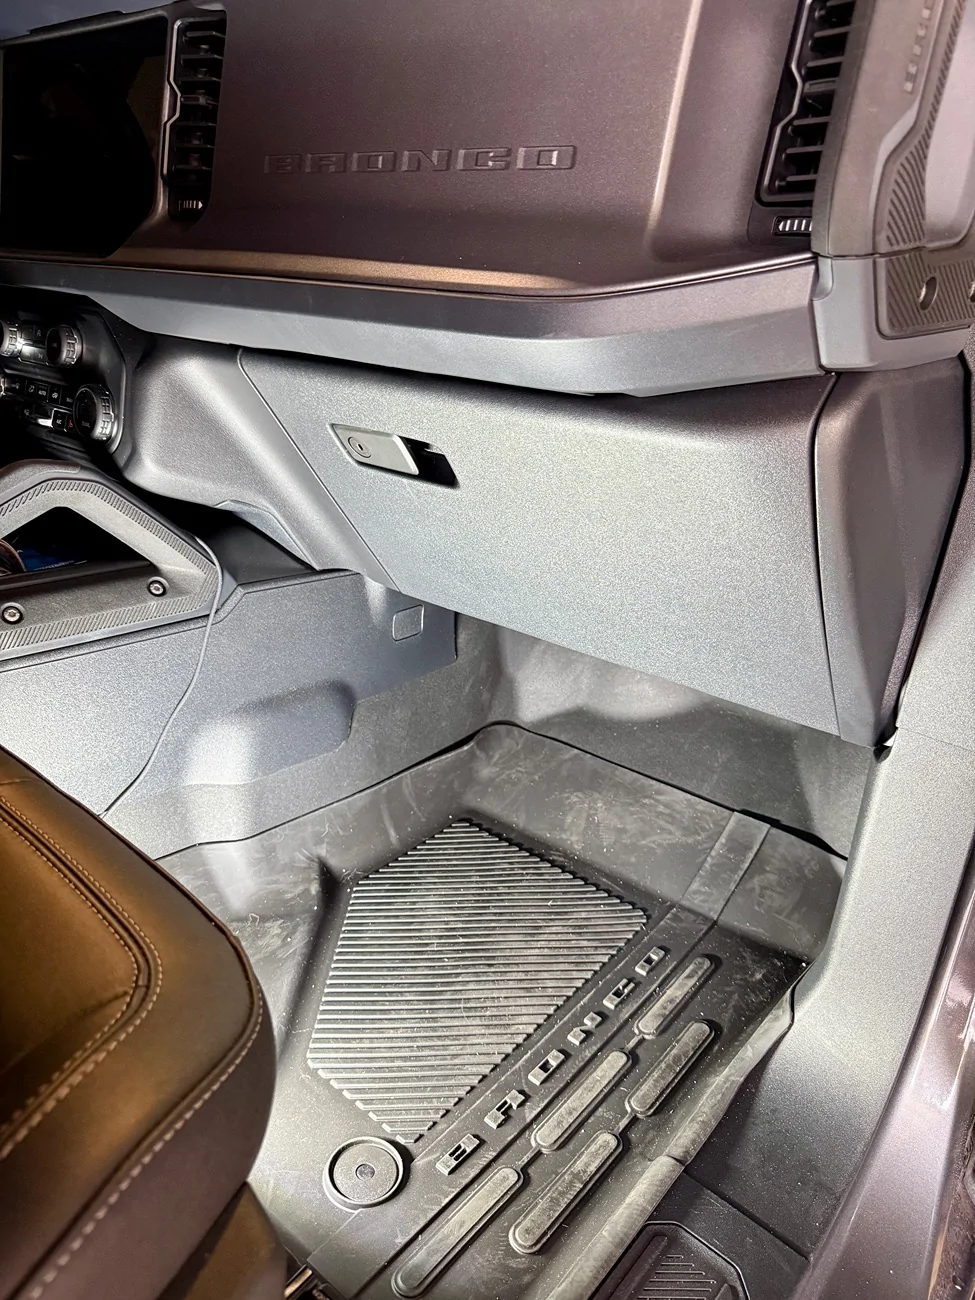
Locate and open your glove box on the passenger side of your Bronco. Remove contents of glove box if desired. This is your reminder to sort through your glovebox and remove anything that is not needed including your tag paperwork from 5+ years ago..
STEP TWO :
Push tabs on both sides of glove box inwards to unlatch them. The glovebox is now free with no tension and will lower all the way to the floorboard. I always hold on to my glovebox to ease it down so nothing breaks. Now is also a great time to ensure no loose paper, napkins, FOD, etc has gotten behind the glovebox and could potentially be sucked up by the blower motor.
On the Big Bend trim I do not think there are any dampers or glovebox assist systems equipped like I have on my Ford Ranger Lariat or maybe higher trims of Broncos. Usually that is an additional step to unlatch those and then lower your glovebox.
STEP THREE :
Locate the Cabin Air Filter Dust Cover located directly behind the glovebox and remove it by pinching the tabs on the right and pulling it towards you. The tab on the left of the dust cover is stationary and is just the pivot point. Pull the dust cover to the right to remove it from the pivot point. If it is filthy you can always take it inside and wash it down in the sink since it is all plastic and easily removable.
Pull the old cabin air filter out of the housing towards you and take note of the air flow direction arrow on the right side of the filter. *The air flow direction arrow should always face DOWN towards your blower assembly or the floor.*
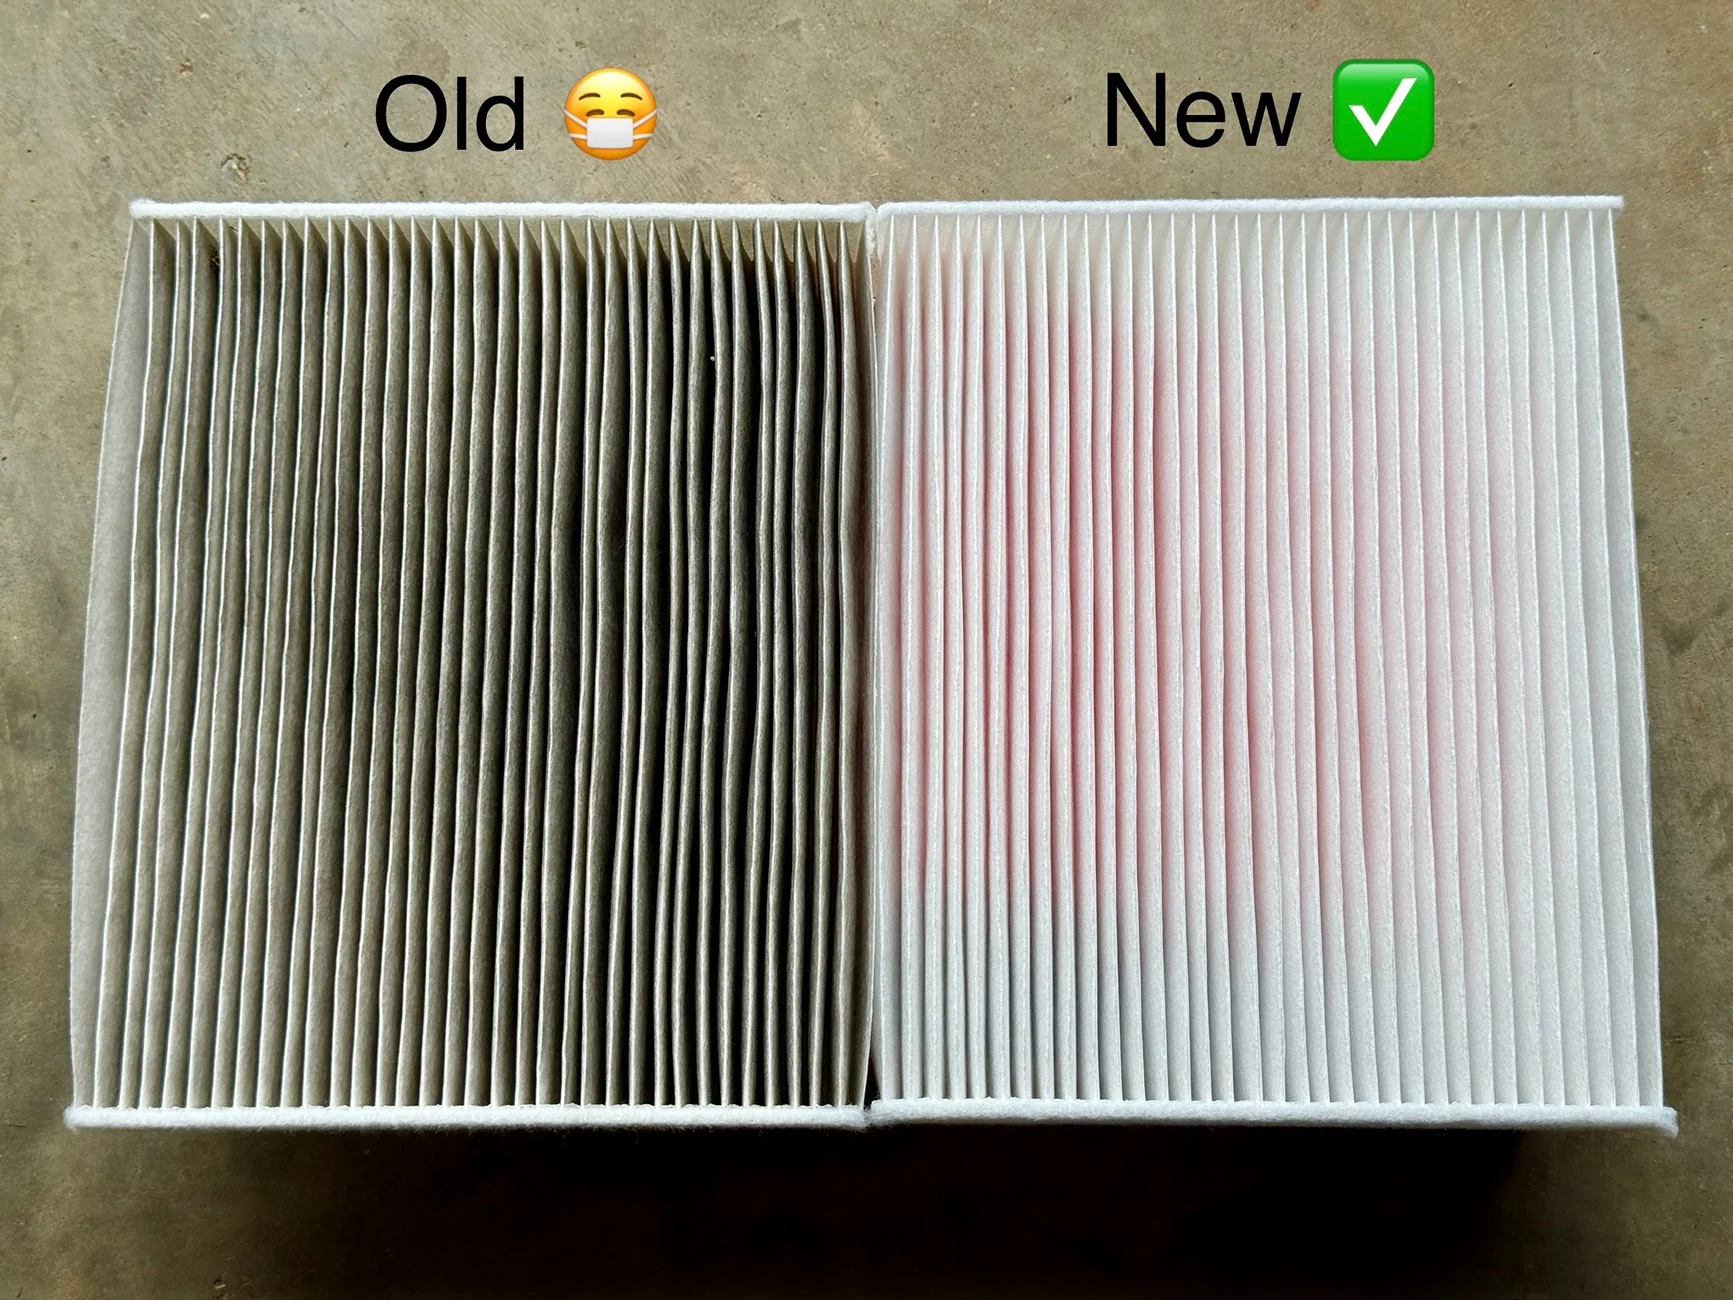
I was genuinely shocked how dirty the Cabin Air filter was...Our 2025 Bronco was a dealer demo with a 11/25 build date and only 4000 miles on it on the date of this write-up...Now you see why I change filters once a year regardless of miles...
STEP FOUR :
Reverse the steps in Step Three and insert your new Cabin Air filter into the slot with the airflow direction arrow facing down.
To reattach the dust cover insert the left side into the pivot point first and then push down on the right side of the dust cover to engage/secure the clip.
STEP FIVE :
Lift your glovebox up in place and the tabs on the sides of the glovebox should engage to hold it back in its original position. Don't forget to put any missing contents back into the glove box!
That's it! Grab a cold one and enjoy a job well done!
Hope this little tutorial helps someone out and saves you a little money in the long run! This is entry level maintenance that can save you quite a bit of money over the lifetime of your Bronco! Do not follow me for financial advice though ; I take the money I "saved" and buy more tools...
Sponsored
Last edited:












 Great detail and explanation with supporting visual evidence. The advice by