- Joined
- Sep 17, 2020
- Threads
- 49
- Messages
- 298
- Reaction score
- 731
- Location
- San Marcos
- Vehicle(s)
- Bronco
- Your Bronco Model
- Undecided
- Thread starter
- #1
Whether winning races or blazing trails, every off-road enthusiast’s needs are unique when building an off-road LED lighting package. Baja Designs created “Lighting Zones” to help identify the right off-road lights, with the right lens pattern, in the right location for optimal performance. It’s not about having the brightest lights; it’s about using the right lights strategically for the right application. A well-designed lighting setup enhances safety and drivability in the dark, offering drivers a competitive advantage. To achieve this, it’s essential to understand the correct light placement, power, and pattern for each zone. From overlanding to racing at high speeds through the desert, we have the perfect lights to illuminate every zone you need.
Lens Pattern: Wide Cornering
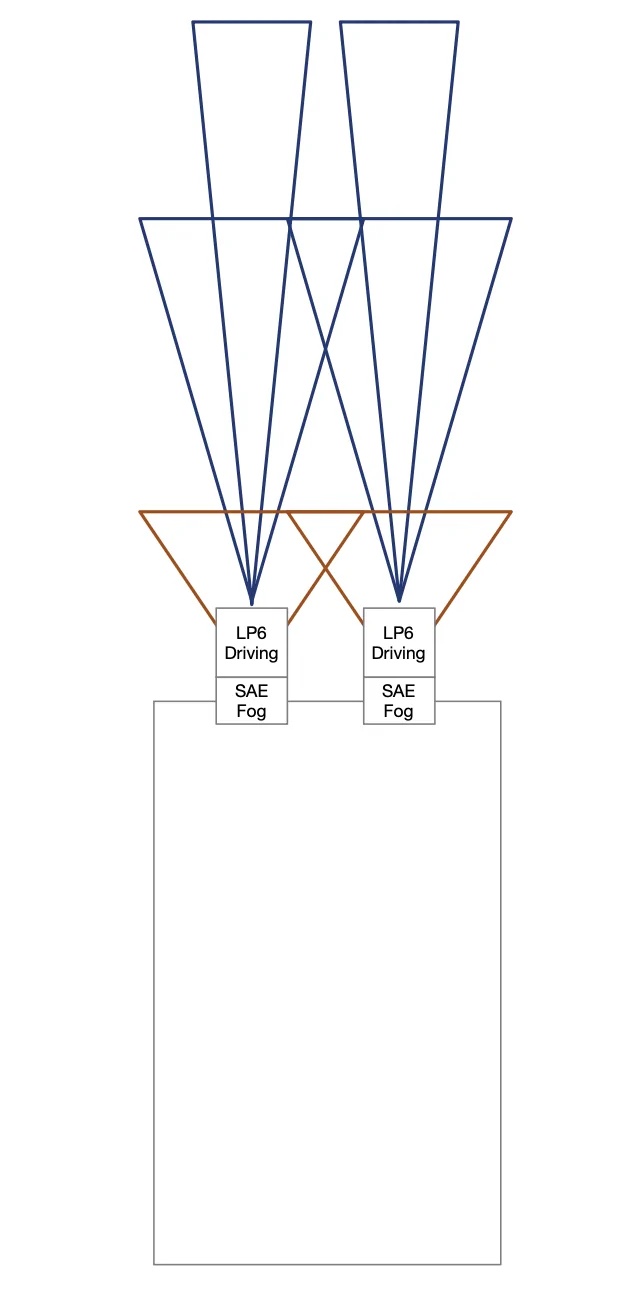
Lighting Zone 1 | Dust/Fog Lights
The foundation of our Lighting Zone System lies in Lighting Zone 1, strategically designed to illuminate close-range distances effectively. The expansive cornering pattern ensures optimal visibility by providing light that extends around corners or curves, providing illumination in the peripheral areas of a vehicle's path. Zone 1 LED fog lights penetrate through obstacles like dust, fog, and other particles commonly encountered in challenging weather conditions, such as snow or rain, as well as in dusty off-road trail environments. These Zone 1 LED lights disperse light horizontally, offering enhanced safety illumination for nearby areas. Placement, Power, and Pattern
- Lower power is ideal for Zone 1 – a little goes a long way
- Minimum vertical spread – primary focus to illuminate immediate surroundings horizontally
- Baja Amber or Factory Amber lens color reduces glare and minimizes reflection
Zone 1 lighting is strategically positioned directly in front of your vehicle, mounted low on the bumper. This low placement of LED fog lights eliminates any glare that could reflect toward you. It’s important to avoid mounting or aiming the LED fog lights in Zone 1 too high. In contrast to mid-field or long-distance LED lights, dust and fog lights in Zone 1 don’t require extremely high power— a modest amount of illumination goes a long way. Zone 1 lighting is specifically designed to identify objects in dusty and foggy conditions, making lower-powered lights the ideal choice. The lighting pattern in Zone 1 should prioritize a minimal vertical field. Meaning that the primary focus of the light is to illuminate the immediate surroundings horizontally, especially the ground or lower areas in front of the vehicle. Additionally, the use of Baja or Factory amber fog lights contributes to reducing glare and minimizing reflections.
We offer a wide range of Zone 1 lights in various colors, designs, and for different applications. Below, you’ll find some of our most popular Zone 1 lighting products. Each LED light undergoes rigorous testing to ensure top performance. Whether you’re looking for off-road illumination, upgrading your daily drive with LED fog lights, or enhancing your work or farm truck, Baja Designs has an exceptional selection of fog lights to meet your needs.
Lens Pattern: Wide Cornering
Lighting Zone 2 | Cornering
Welcome to the Cornering Zone, where lighting extends to your peripheral view, preventing tunnel vision. Lighting in zone 2 illuminates potential obstacles or wildlife entering the trail, enhancing your ability to assess terrain while navigating turns. Cornering lights are crucial for driving confidently at higher speeds.
Placement, Power, Pattern
- Mount Zone 2 lighting on the outside of the bumper or mounted off the A-pillar angled outward.
- Brighter relative to your Zone 1 lights, but not overpowering your Zone 3 or primary driving lights.
Zone 2 lights are commonly mounted on the vehicle’s exterior bumpers or affixed to the A-Pillars. The A-pillars of a vehicle are the vertical supports or pillars on either side of the front windshield, forming the sides of the windshield frame. It is advised to avoid a wide-pattern lighting setup on the A-Pillar, unless the lights are angled outward, as this could lead to perceived glare from the hood.
Zone 2 focuses on illuminating the peripheral areas of your lighting zone, making the Wide/Cornering lens pattern the ideal choice. This lens offers the maximum horizontal spread. A lighting system with a significant horizontal spread is designed to cast light over a wide area from left to right, providing ample coverage horizontally. It helps to create a broader field of vision, contributing to safer navigation in various driving conditions. Thus, seamlessly blending Zones 1 and 3 for comprehensive coverage.
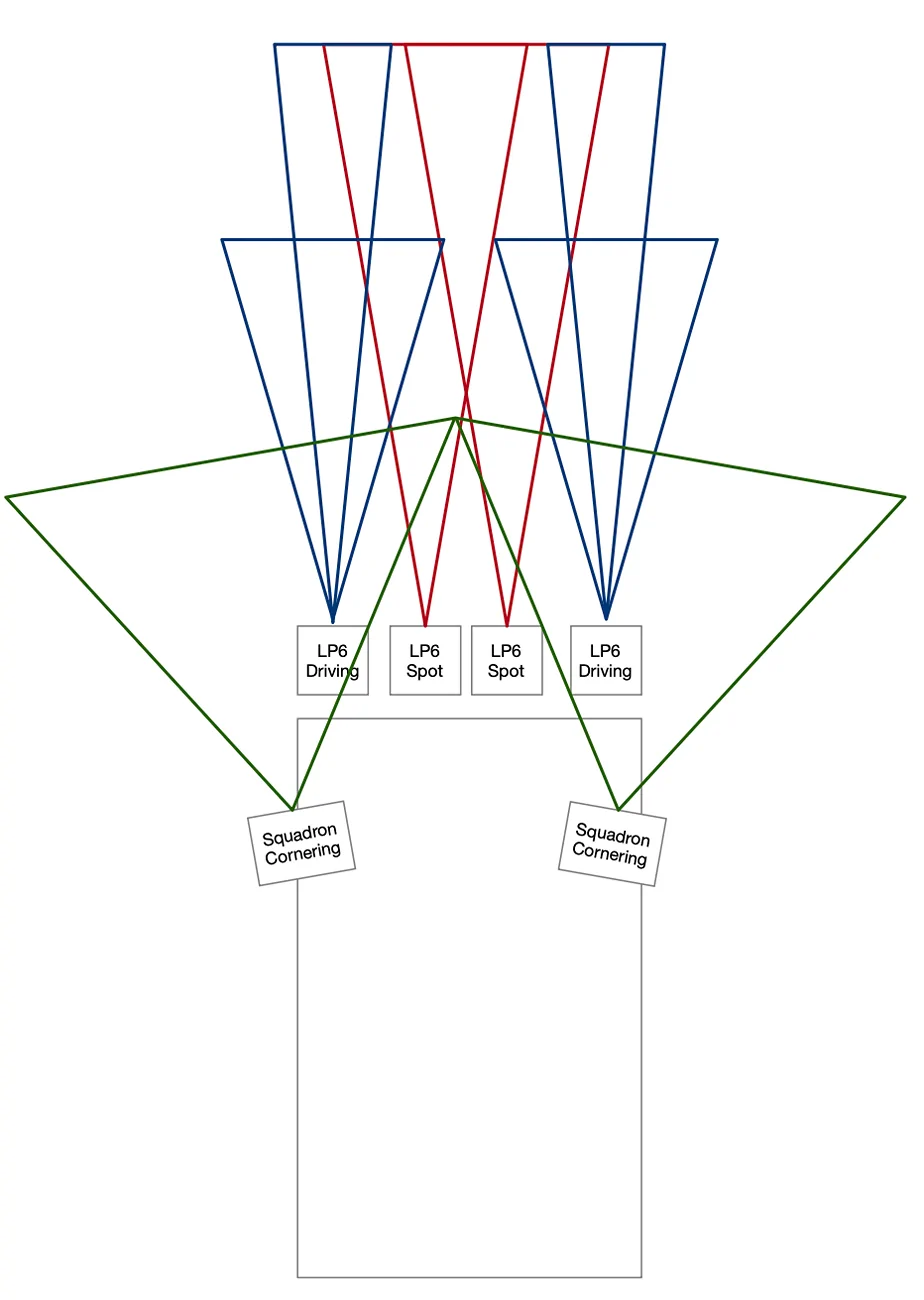
Lens Pattern: Driving Combo
Lighting Zone 3 | Driving Combo
The driving combo serves as the central zone around which you’ll shape your entire lighting setup. Acting as a foundation for a well-balanced lighting package. This holds particularly true in the realm of high-performance off-road lighting.
Placement, Power, Pattern
Zone 2 focuses on illuminating the peripheral areas of your lighting zone, making the Wide/Cornering lens pattern the ideal choice. This lens offers the maximum horizontal spread. A lighting system with a significant horizontal spread is designed to cast light over a wide area from left to right, providing ample coverage horizontally. It helps to create a broader field of vision, contributing to safer navigation in various driving conditions. Thus, seamlessly blending Zones 1 and 3 for comprehensive coverage.
Lens Pattern: Driving Combo
Lighting Zone 3 | Driving Combo
The driving combo serves as the central zone around which you’ll shape your entire lighting setup. Acting as a foundation for a well-balanced lighting package. This holds particularly true in the realm of high-performance off-road lighting.
Placement, Power, Pattern
- Zone 3 can have as much light as you want, but be sure to balance relative to other lighting zones.
- Lighting in Zone 3 should be significantly brighter than in Zones 1 and 2.
- The driving combo pattern is recommended for Zone 3 as it combines wide and spot elements in one lens.
Zone 3 lights are usually positioned at the vehicle’s center, either on the bumper or within the grille. As a general guideline, we recommend that 80% of your lighting package remain below the hood line for optimal performance.
In Zone 3, feel free to incorporate ample lighting, but it’s crucial to maintain a balance relative to your other zones. While Zone 3 should be notably brighter than Zone 1 and Zone 2, exercise caution to ensure that the intensity of your Zone 3 lights doesn’t overpower your spotlight beams.
We highly recommend our Driving/Combo pattern for Zone 3, as it seamlessly combines a wide and spot element within a single lens, making it the ideal choice.
Lens Pattern: Spot
Lighting Zone 4 | Spot Lights
Enhance your off-road speed and safety with Zone 4 lighting, the specialized LED spotlight in our innovative Lighting Zone System. This zone marks the transition to long-distance lights, moving beyond near- and mid-field illumination. Zone 4 becomes crucial for night driving, providing the ability to assess terrain and spot obstacles promptly for improved reaction times.
Placement, Power, Pattern
- Placement of Zone 4 lighting is recommended to be mounted higher on the vehicle – a-pillar or on the roofline.
- Zone 4 lighting should be brighter than Zone 3 lighting.
Zone 4 lighting embodies a thoughtful blend of three essential elements for dependable off-road illumination. Unlike Zone 1, Zone 2, and Zone 3, which are positioned lower on the front of your vehicle, Zone 4 is mounted higher—either on the A-pillar or the roofline. This elevated placement minimizes glare from particulates, fog, and dust. Zone 4 LED spotlights should only be used when absolutely necessary to conserve power and prevent vision fatigue. The power of Zone 4 is determined by the output of your Zone 3 lighting, making it brighter than Zone 3. For optimal performance, we recommend the spot pattern lens for Zone 4, providing a tight beam with reduced glare.
Explore our Zone 4 LED spot LED off-road lights and elevate your driving experience with our premium selection of high-quality, high-performance LED spot lights. Mix and match to customize your lighting setup with options like LED bar spot lights, LP9 driving combos, and other designs crucial for your off-road adventures. Your ideal lighting awaits!
Lens Pattern: Spot
The Zone 5 Racer Edition Spotlight is designed for off-road enthusiasts navigating at high speeds or requiring extended visibility. Zone 5 lights feature a tighter pattern than our traditional spots. We recommend ensuring a well-balanced lighting package before adding Zone 5 lights to avoid spotlight separations due to this tighter pattern.
Placement, Power, Pattern
- A well-balanced lighting package is recommended before adding Zone 5 lighting.
- The placement of Zone 5 lighting will benefit from being higher on the vehicle to achieve maximum distance.
- Use of Racer Spots only when absolutely necessary to avoid glare from dust/fog.
- Perfect for search and rescue lights as well as other applications that require a powerful, tightly focused beam of light.
Lights in Zone 5 benefit from being placed higher up on your vehicle. The tighter overall beam from these lights helps to negate what would otherwise be a concern of glare coming back into the cab. Avoid mounting Zone 5 lights too low as to not block their overall distance throw caused by rocks and brush close to the vehicle. Try to use these top-mounted lights only when absolutely necessary, to avoid glare from dust and fog, excess power consumption, and eye fatigue.
Coordinate Zone 5 lighting with your setup in zones 3 and 4. Ensure that Zone 5 lighting is at least as powerful, if not more, to prevent it from being overshadowed. These lights are particularly effective for search and rescue operations and other activities that demand a potent, tightly focused spotlight.
We only offer a spot pattern lens in Zone 5 lights, as they feature many components that are designed for use in distance-specific applications. Using a wider lens would be counterproductive to the goal of throwing light thousands of feet down the road.
Rock light
Lighting Zone 6 | Rock Light
This is the Rock Light Zone, where lights are designed to illuminate wheel wells and the undercarriage. Ideal for navigating tight situations, these lights provide visibility under and around the bottom of the vehicle.
Placement, Power, Pattern
- Typically, one rock light per vehicle corner or wheel well to achieve the best results.
- Understand your vehicle’s suspension so as to mount lights where they will come into contact with moving parts.
Zone 6 lights are user-dependent, with optimal placement usually being one per vehicle corner, inside the wheel well, or on the bumpers. These versatile lights can also be mounted inside vehicle roll-cages or on tailgate panels. However, it’s crucial to understand your vehicle’s suspension to avoid mounting them where the lights might come into contact with moving parts.
Zone 6 lighting provides brightness without being overpowering, making it suitable for various situations such as navigating technical terrain, at camp, or during trail repairs under your vehicle.
For most applications, one light per corner is enough. Yet, dedicated rock crawlers might opt to increase this count according to their specific needs.
Lens Pattern: Work/Scene
Lighting Zone 7 | Cargo
This is the Cargo Lighting Zone, designed for illuminating the general work area around your vehicle, especially during planned or unplanned stops off-road. Cargo lighting is essential for any build.
Placement, Power, Pattern
- Work/Scene pattern is a perfect round and smooth light that illuminates your workspace evenly.
Zone 7 light placement should typically be on the roofline, aimed downward for best projection. However, the mounting of the cargo lights is a user preference.
Zone 7 lights' power will depend on your needs as a driver. Campers might find one lower-powered scene light per side adequate, whereas pit crews may want the absolute brightest light when working on a race vehicle, just pulling into the pits.
The Zone 7 Work/Scene pattern offers a flawlessly round and smooth light, providing even illumination to your workspaces.
Lens Pattern: Wide Cornering Lens Pattern: Work/Scene
Zone 8 | Backup/Reverse
This is the Reverse or Dust Light Zone. Visibility is crucial when driving at night, and being seen is just as important as seeing. Whether you’re off-roading in the dark or pulling out of your driveway, people can only react to what they can see. Utilizing a dust light can effectively mitigate risks in low-visibility situations.
Placement, Power, Pattern
- Reverse lights are mounted under or inside the rear bumper
- Dust lights are mounted higher, such as on the roof line, to avoid being obstructed.
- Baja Amber or Factory Amber lens color is recommended for dust light applications.
Zone 8 for reverse or dust lights involves two distinct locations, yet both share a common direction—facing rearward. Reverse lights are commonly mounted under or inside the rear bumpers, while dust lights are positioned higher up on the vehicle, such as the roof line. This elevation helps prevent obstruction as the vehicle angle changes and aims to maximize visibility by keeping the lights high above the dust.
The power of Zone 8 is entirely at the user’s discretion. While some vehicles may benefit from a less powerful reverse light, others may choose the most potent and visually striking dust light available.
The pattern of these lights depends on the application. Reverse lights benefit from the Work/Scene pattern, offering a round and smooth distribution of light. A Wide/Cornering lens can be used when closer to the ground, or to gain a bit of distance while maintaining a wide spread of light. For dust lights, optimal placement is higher, such as on the rooftop, to illuminate as far above the dust as possible.
Why is uService important?
With Baja Designs UService Technology, your light doesn’t have to remain the same forever. Most of our lighting offers the ability to change pattern and lens color in a matter of minutes. This gives you the freedom to completely personalize your setup without compromising your lights, and without having to buy more.
Whether you're making your first purchase or adding more lights to your build, we hope this guide helps point you in the right direction. For any questions or to place an order, reach out to brahianh@bajadesigns. Forum specials for members.
Best,
Sponsored
Last edited: