Sponsored
OP
OP
swamp2

swamp2

Raptor
Well-Known Member
Joined
Dec 19, 2022
Threads
156
Messages
4,040
Reaction score
4,188
Location
San Diego
Vehicle(s)
911 Carrera S / 4Runner TRD Pro
Your Bronco Model
Raptor
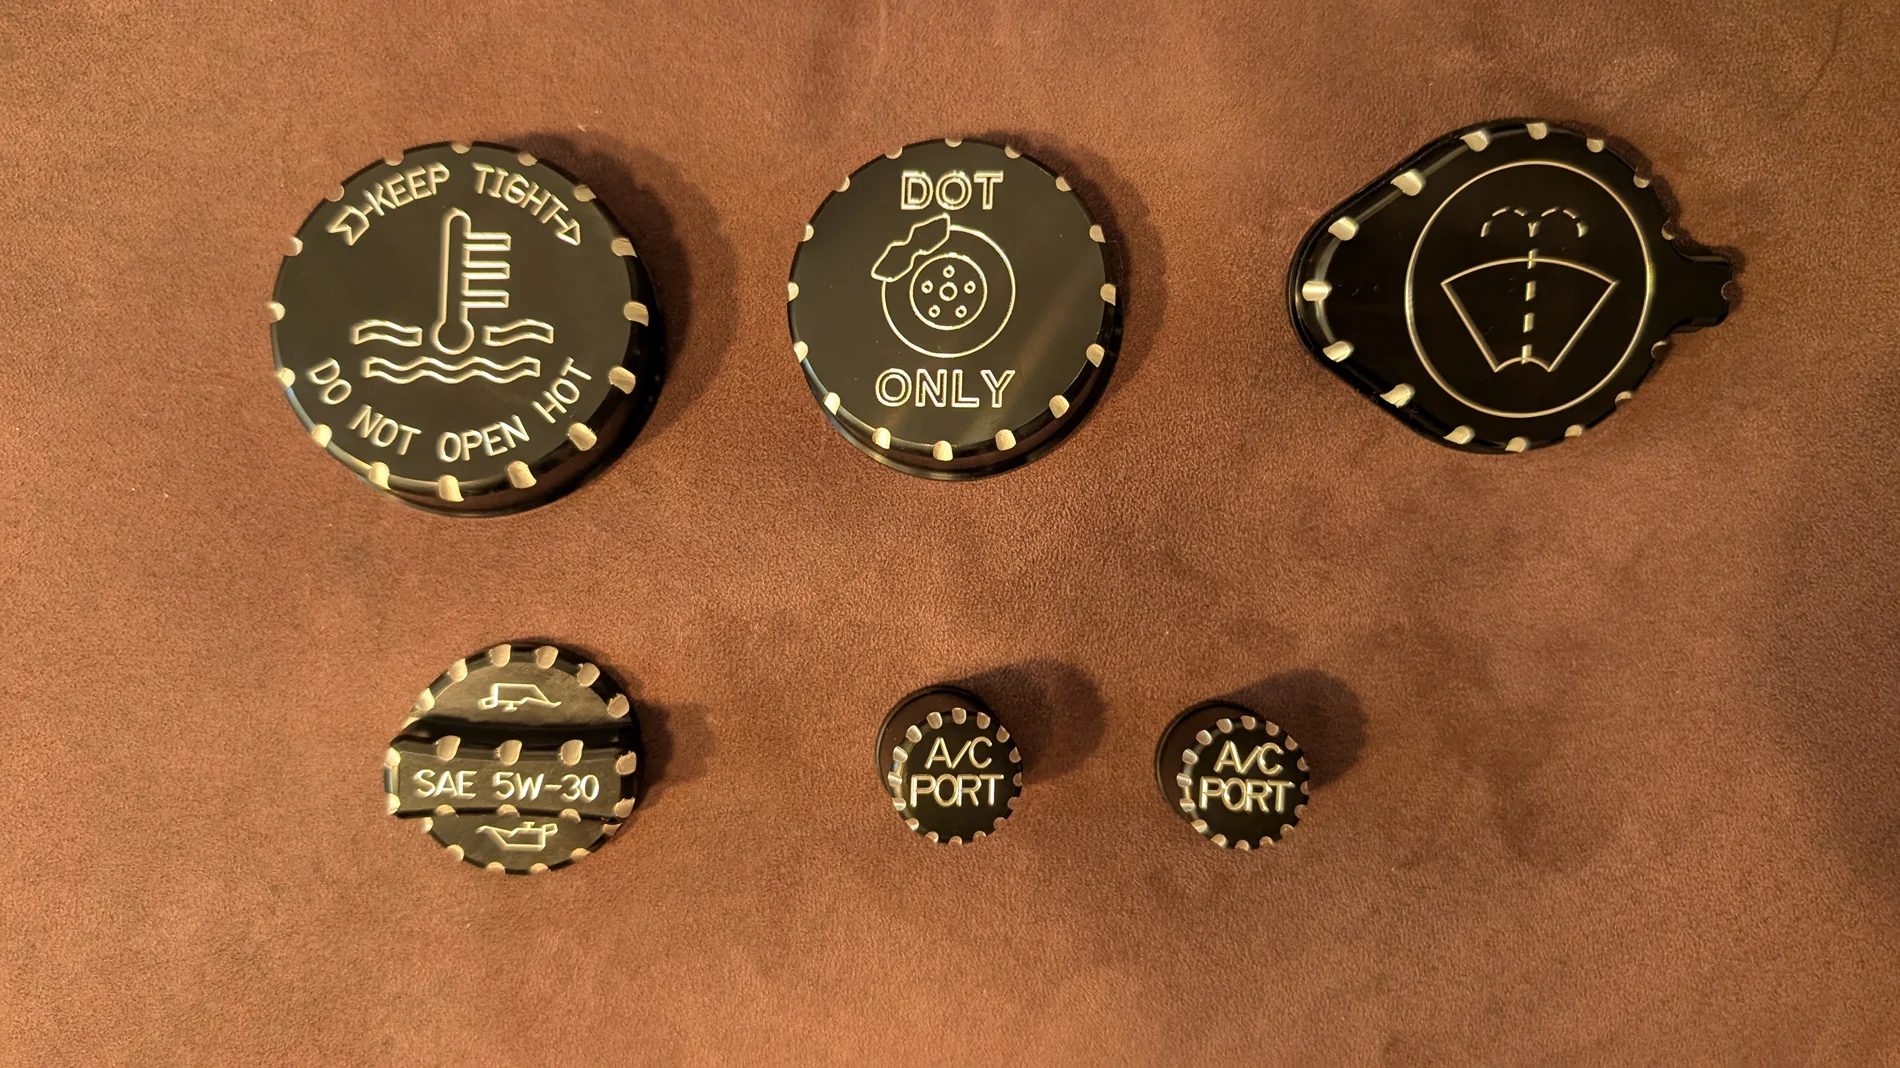
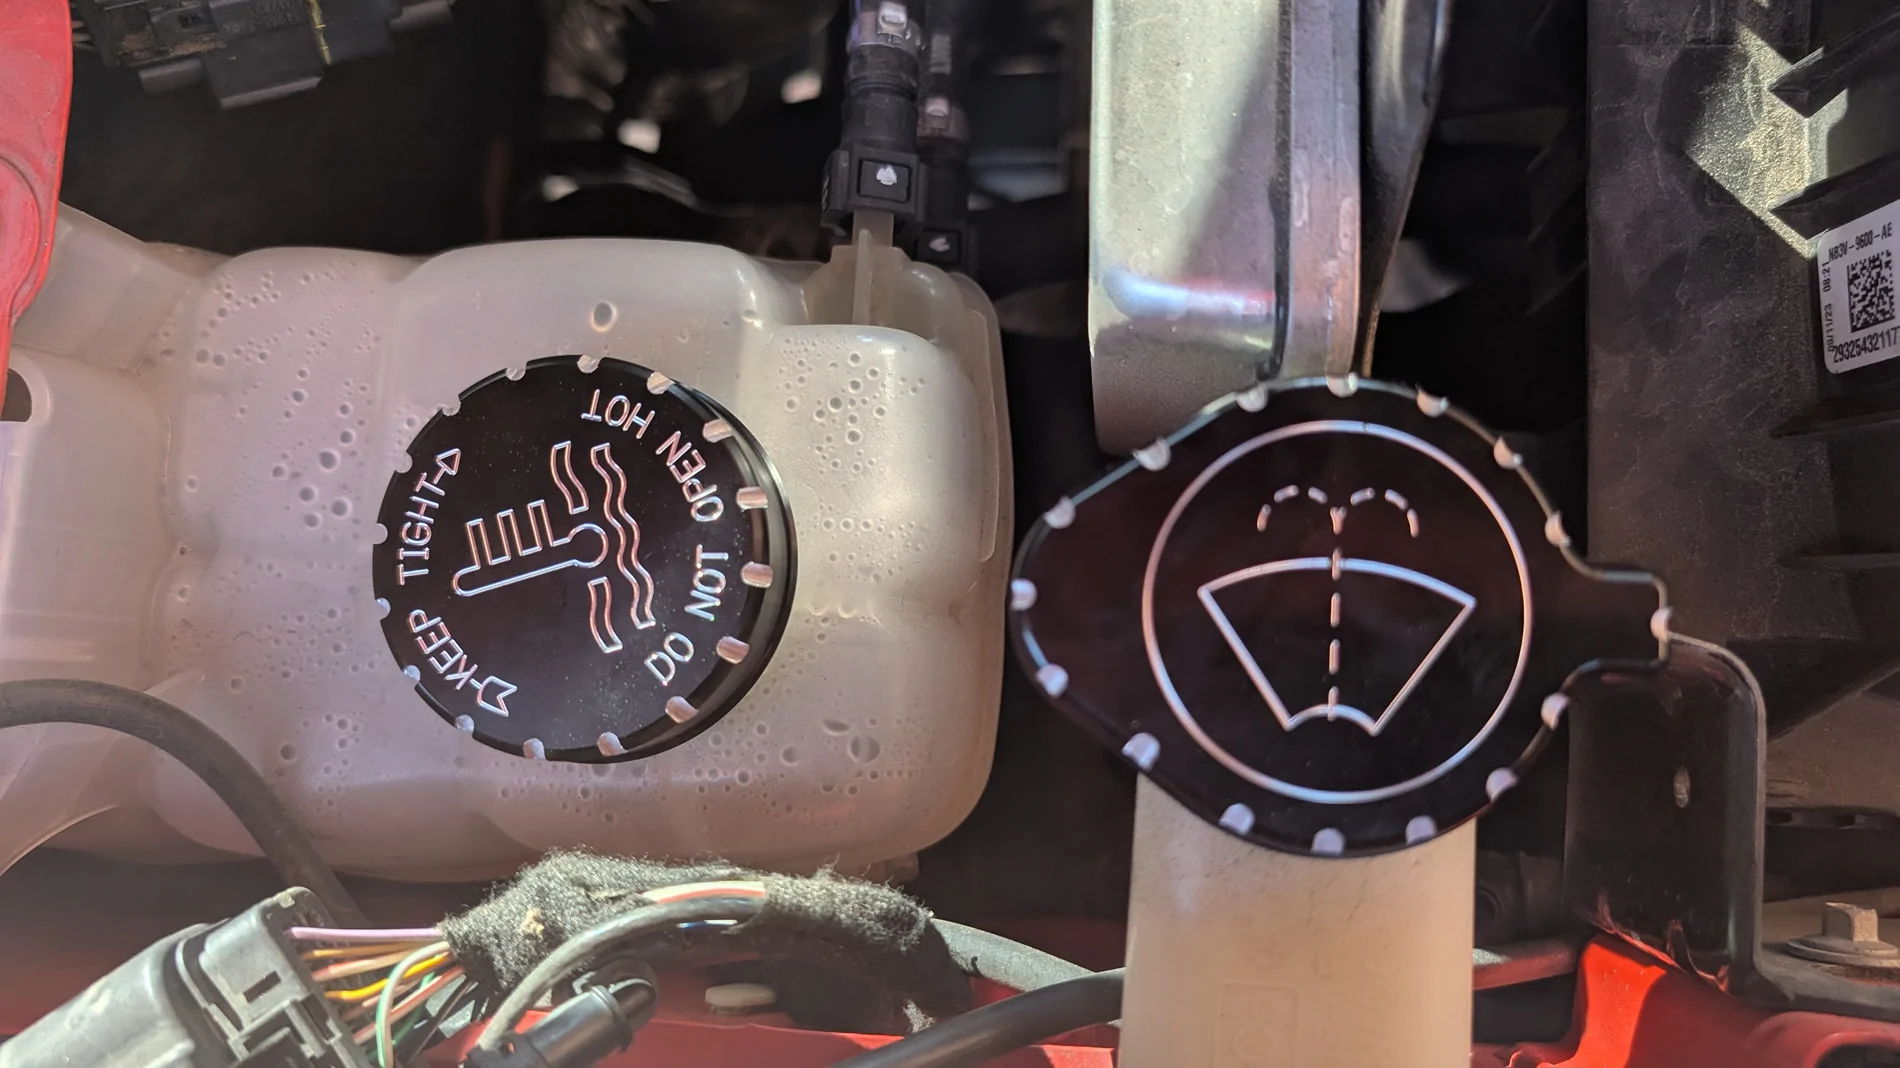
UPR Products Billet Underhood Cap Kit:

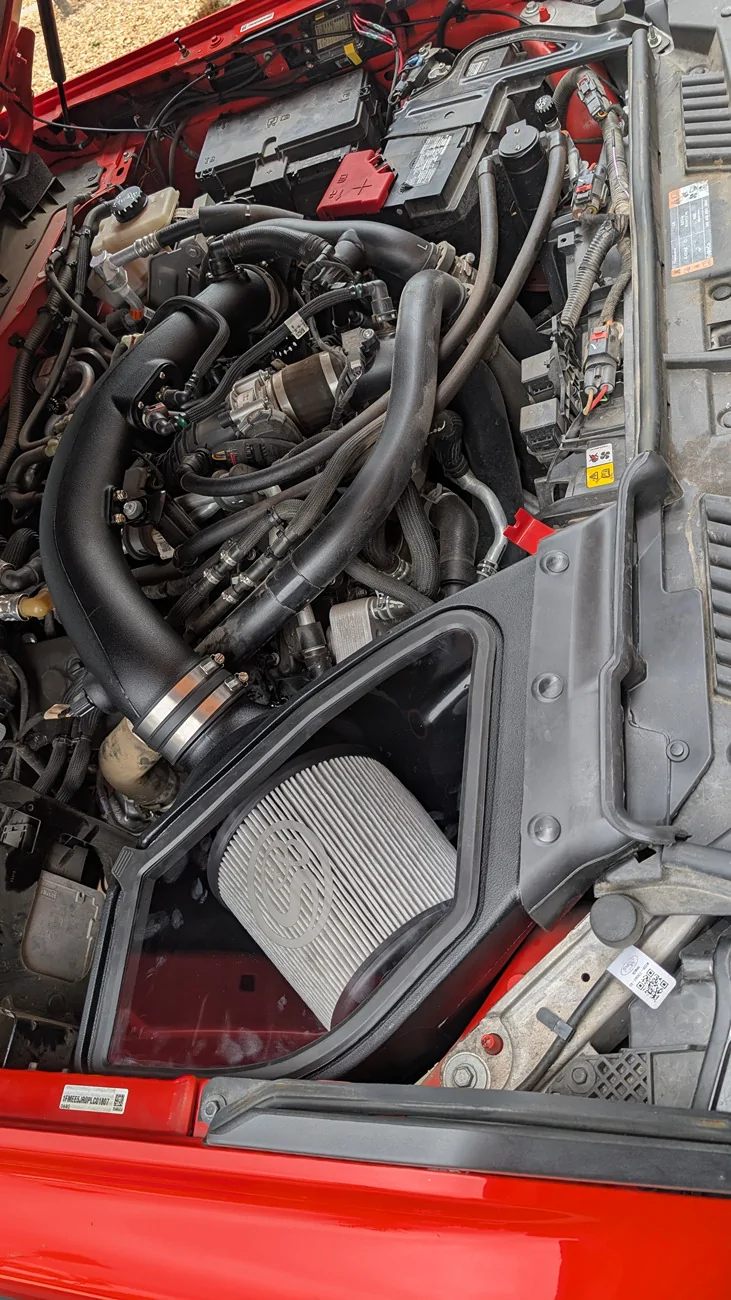
Just a quick/easy engine bay cosmetic "jewelry mod".

PXL_20250902_222507495.jpg


Comes in silver or black. Nicely machined, especially black with machining after anodizing. Was initially put off by the fact that these are just press fit caps over the factory caps. However, after realizing how much design and engineering (threads, seals, etc.) went into the factory caps, I realized this design makes a lot of sense and gets the price down to a pretty reasonable level.

The caps fit very tight and I used plastic soft jaws on my bench vice to install many of the caps. The press fits are tight but appropriate.

PXL_20250902_223555008.jpg
Sponsored


Umichigan1

Black Diamond
Well-Known Member
Joined
Sep 13, 2022
Threads
7
Messages
361
Reaction score
321
Location
Michigan
Vehicle(s)
2022 2-Door Bronco
Your Bronco Model
Black Diamond
Clubs
 
Interestingly, the factory drivers mirror is flat, whereas the passenger side is convex, just not enough convex like the Sumas are (both sides quite convex).

I think someone here said the mirrors used to be available in plain (no tint) but they are not anymore.
  1. It took quite a lot of force to dislodge factory mirrors. Felt like something was going to break.
As a former mirror designer for OEMs... mirrors and their function is very heavily federally regulated and must meet a very comprehensive and strict set of guidelines. Two primary criteria come into play. One, field of view from the driver's perspective. All of the eyepoint angles are measured and verified in government tests. The flatness that you noticed is also federally regulated. As is the convexity of the RH mirror (along with the text on the mirror which is specified by standards). Two, tinted mirrors are also carefully tested. There are levels of reflectivity that must be met (this includes "brightness"). Every surface that touches the reflected light affects the mirror's performance and is therefore measured. There are a ton of other performance measurements that must be done. I'm only calling out what I think are the top two.
 
OP
OP
swamp2

swamp2

Raptor
Well-Known Member
Joined
Dec 19, 2022
Threads
156
Messages
4,040
Reaction score
4,188
Location
San Diego
Vehicle(s)
911 Carrera S / 4Runner TRD Pro
Your Bronco Model
Raptor
As a former mirror designer for OEMs... mirrors and their function is very heavily federally regulated and must meet a very comprehensive and strict set of guidelines. Two primary criteria come into play. One, field of view from the driver's perspective. All of the eyepoint angles are measured and verified in government tests. The flatness that you noticed is also federally regulated. As is the convexity of the RH mirror (along with the text on the mirror which is specified by standards). Two, tinted mirrors are also carefully tested. There are levels of reflectivity that must be met (this includes "brightness"). Every surface that touches the reflected light affects the mirror's performance and is therefore measured. There are a ton of other performance measurements that must be done. I'm only calling out what I think are the top two.
Any idea why these aftermarket mirrors are so completely superior to the factory ones in terms of blind spot elimination? I mean, I get it, their shape/curvature are different, simple. More specifically, why are these regulations producing mirrors that do not perform the essential function of blind spot elimination?

Most vehicles factory mirrors, with enough willingness to run them rotated outward far enough, can meet this goal. They just can't in the (4D) Bronco (Raptor).
 

Umichigan1

Black Diamond
Well-Known Member
Joined
Sep 13, 2022
Threads
7
Messages
361
Reaction score
321
Location
Michigan
Vehicle(s)
2022 2-Door Bronco
Your Bronco Model
Black Diamond
Clubs
 
Interestingly, the factory drivers mirror is flat, whereas the passenger side is convex, just not enough convex like the Sumas are (both sides quite convex).

I think someone here said the mirrors used to be available in plain (no tint) but they are not anymore.
  1. It took quite a lot of force to dislodge factory mirrors. Felt like something was going to break.
As a former mirror designer for OEMs... mirrors and their function is very heavily federally regulated and must meet a very comprehensive and strict set of guidelines. Two primary criteria come into play. One, field of view from the driver's perspective. All of the eyepoint angles are measured and verified in government tests. The flatness that you noticed is also federally regulated. As is the convexity of the RH mirror (along with the text on the mirror which is specified by standards). Two, tinted mirrors are also carefully tested. There are levels of reflectivity that must be met (this includes "brightness"). Every surface that touches the reflected light affects the mirror's performance and is therefore measured. There are a ton of other performance measurements that must be done. I'm only calling out what I think are the top two.
Any idea why these aftermarket mirrors are so completely superior to the factory ones in terms of blind spot elimination? I mean, I get it, their shape/curvature are different, simple. More specifically, why are these regulations producing mirrors that do not perform the essential function of blind spot elimination?

Most vehicles factory mirrors, with enough willingness to run them rotated outward far enough, can meet this goal. They just can't in the (4D) Bronco (Raptor).
Essentially, the regulations require the LH mirror to be flat so that it provides a clean, unadulterated view. The aftermarket mirrors would not pass federal testing, which is required of all OEM mirrors. However, some OEM mirrors contain blind spot extensions (I think the Mustang has these, along the lower edge). These mirrors must still pass Federal regulations for field of view (FOV is a complex definition all by itself). OEMs are not allowed to create "better" (possibly a subjective evaluation) mirrors if they do not pass regulation, just like bumpers and BIW structures must pass impact regulations. Without the certification the vehicle could not be sold or licensed. Without getting too deep into the weeds, mirror manufacturers are always trying to discover new ways to improve visibility for the driver but some of the basic items are outside of their control (never let the politicians try to do engineering).
 
OP
OP
swamp2

swamp2

Raptor
Well-Known Member
Joined
Dec 19, 2022
Threads
156
Messages
4,040
Reaction score
4,188
Location
San Diego
Vehicle(s)
911 Carrera S / 4Runner TRD Pro
Your Bronco Model
Raptor

Sponsored
OP
OP
swamp2

swamp2

Raptor
Well-Known Member
Joined
Dec 19, 2022
Threads
156
Messages
4,040
Reaction score
4,188
Location
San Diego
Vehicle(s)
911 Carrera S / 4Runner TRD Pro
Your Bronco Model
Raptor
Glove Box Light (switched) and Fuel-It Bluetooth Ethanol Sensor:

I installed this switch and light a long time ago but seriously procrastinated on the wiring... I used the EtOH sensor project to wire them both simultaneously and they actually share a single 1 A fused circuit. I added this marine, inline, AG fuse holder after the fuse tap on unused/switched slot #35 since the Micro 2 fuse minimum is a relatively large 5 A.

PXL_20250915_160934192.webp


I largely followed this post but my wiring, running a fuse tap from the driver's side interior fuse box, is way easier than all of the disassembly needed to get into the A-pillar. I was able to get a wire over by only opening the hinged cover above the pedals and partially opening the trim piece above the front/lower/center storage tray. Wires are kept away from the moving glove box itself via adhesive backed zip tie bases above/behind the upper trim of the glove box. Definitely got to find a better color temperature bulb...

EtOH Sensor:

Will properly support tuning and will allow some comparison with my innovative and unmatched accuracy fuel mixing app ( https://www.octanecalc.com/ ). When I'm driving in Mexico, I'll be able to run my 91/93 and E50 tunes from ZFG and will get real time EtOH content via Bluetooth on my phone. So cool. This is the Fuel-It kit I used. The Fuel-It folks were very helpful in determining which kit to fit the Raptor. It's quite difficult to fit one in the "normal" spot underhood by the HPFP, so this one is just in front of the fuel tank. The quick connects help make sure one gets robust o-ring sealing in a critical delivery system.

PXL_20250915_170934313.webp


I'm definitely keen for some suggestions on securing this new heavier assembly. These SAE J2044 connections (Quick Connects) along with the large unsupported runs of fuel tubing vibrate a lot even in the stock configuration and at idle. I expect it would survive as is during hard wheeling but especially with fuel near exhaust, better safe than sorry. The sensor and the u shaped tubing, highlighted below, is about 3"-4" from the noted sheet metal screw. Unfortunately, there are no mounting holes on the sensor itself.

PXL_20250915_170934313~2.webp


I have thought about:
  1. Safety wire. Not so gentle on the aluminum 180° tube adapters.
  2. 3D Print. Lots of scanning and design work and my printer is down.
  3. Custom, thin, stainless sheet bracket. Seems like the best option so far.
There must be something I'm missing that is simple, cheap, fast and effective.

EDIT: Finally fabbed up a mounting bracket. See a couple posts down.

The wiring harness just went over part of the fuel tank, over the frame, up through the rear wiring grommet and into the rear passenger floor/door sill wiring tray.

EDIT: Got misled by an overconfident AI (surprise, surprise) as to color coding for supply vs. vent lines so I had the sensor on a vent line. Picture below is corrected. The correct line is the one with the elbow and closer to vehicle center line.

Ford Bronco Swamps Code Orange Bronco Raptor Build PXL_20250916_155236038
 
Last edited:

Bschurr

Raptor
Well-Known Member
Joined
Jan 28, 2021
Threads
28
Messages
1,808
Reaction score
4,160
Location
NY
Vehicle(s)
2023 Braptor / 2023 Heritage LE / 2016 JKU
Your Bronco Model
Raptor
Clubs
 
Glove Box Light (switched) and Fuel-It Bluetooth Ethanol Sensor:

I installed this switch and light a long time ago but seriously procrastinated on the wiring... I used the EtOH sensor project to wire them both simultaneously and they actually share a single 1 A fused circuit. I added this marine, inline, AG fuse holder after the fuse tap on unused/switched slot #35 since the Micro 2 fuse minimum is a relatively large 5 A.

PXL_20250915_160934192.webp


I largely followed this post but my wiring, running a fuse tap from the driver's side interior fuse box, is way easier than all of the disassembly needed to get into the A-pillar. I was able to get a wire over by only opening the hinged cover above the pedals and partially opening the trim piece above the front/lower/center storage tray. Wires are kept away from the moving glove box itself via adhesive backed zip tie bases above/behind the upper trim of the glove box. Definitely got to find a better color temperature bulb...

EtOH Sensor:

Will properly support tuning and will allow some comparison with my innovative and unmatched accuracy fuel mixing app ( https://www.octanecalc.com/ ). When I'm driving in Mexico, I'll be able to run my 91/93 and E50 tunes from ZFG and will get real time EtOH content via Bluetooth on my phone. So cool. This is the Fuel-It kit I used. The Fuel-It folks were very helpful in determining which kit to fit the Raptor. It's quite difficult to fit one in the "normal" spot underhood by the HPFP, so this one is just in front of the fuel tank. The quick connects help make sure one gets robust o-ring sealing in a critical delivery system.

PXL_20250915_170934313.webp


I'm definitely keen for some suggestions on securing this new heavier assembly. These SAE J2044 connections (Quick Connects) along with the large unsupported runs of fuel tubing vibrate a lot even in the stock configuration and at idle. I expect it would survive as is during hard wheeling but especially with fuel near exhaust, better safe than sorry. The sensor and the u shaped tubing, highlighted below, is about 3"-4" from the noted sheet metal screw. Unfortunately, there are no mounting holes on the sensor itself.

PXL_20250915_170934313~2.webp


I have thought about:
  1. Safety wire. Not so gentle on the aluminum 180° tube adapters.
  2. 3D Print. Lots of scanning and design work and my printer is down.
  3. Custom, thin, stainless sheet bracket. Seems like the best option so far.
There must be something I'm missing that is simple, cheap, fast and effective.

The wiring harness just went over part of the fuel tank, over the frame, up through the rear wiring grommet and into the rear passenger floor/door sill wiring tray.
Very cool (as always).

Since you don’t have the equipment to scan and print a custom part for securing the assembly, have you thought about using a 2 part foam (or expanding spray foam) solution to keep it both isolated & protected? (just spit-ballin’)
 
OP
OP
swamp2

swamp2

Raptor
Well-Known Member
Joined
Dec 19, 2022
Threads
156
Messages
4,040
Reaction score
4,188
Location
San Diego
Vehicle(s)
911 Carrera S / 4Runner TRD Pro
Your Bronco Model
Raptor
Very cool (as always).

Since you don’t have the equipment to scan and print a custom part for securing the assembly, have you thought about using a 2 part foam (or expanding spray foam) solution to keep it both isolated & protected? (just spit-ballin’)
Not bad. I would be concerned about long term maintainability and flammability though 🔥🫠.

EDIT: I do have a great 3D scanner and a nice printer, but the printer is down now, probably permanently. I'm thinking about moving from resin to filament...
 
Last edited:
OP
OP
swamp2

swamp2

Raptor
Well-Known Member
Joined
Dec 19, 2022
Threads
156
Messages
4,040
Reaction score
4,188
Location
San Diego
Vehicle(s)
911 Carrera S / 4Runner TRD Pro
Your Bronco Model
Raptor
S&B Intake:

Of course only for those trips to Mexico and Utah...

PXL_20250926_215112347.webp


ZFG claims this is really needed when tuning aggressively and can uncork like 30 hp. That's surprising as it seems like OEMs haven't left much on the table in that regard for some time, but I guess when tuned, it's another scenario.

Install fairly straight forward but a few minor "nits":
  1. The plastic "rivets" that connect the silicone intake shroud to the Air box are unlike any push/quick connects I've ever used. They interlock with identical pieces from the top and bottom.
  2. Missing one of the push in fasteners for the silicone intake shroud.
  3. Fitment at the main tube crossing over the engine at the vibration reduction mount seems misaligned (i.e. system just won't align properly here)
  4. Resulting fitment of the front silicone intake shroud will not fit low enough so the shroud is flush with the plastic trim in that spot.
S&B has been fantastic about answering a couple support calls and helping to resolve.

Intake noise is more and more better. I'm not going to bother dynoing...
 
OP
OP
swamp2

swamp2

Raptor
Well-Known Member
Joined
Dec 19, 2022
Threads
156
Messages
4,040
Reaction score
4,188
Location
San Diego
Vehicle(s)
911 Carrera S / 4Runner TRD Pro
Your Bronco Model
Raptor
Adams Driveshaft - 1350

The 1350 is the heavier duty model.

After needing a 4th factory driveshaft over 44k miles and despite being under warranty, I threw in the towel and upgraded. Nice double cardan style and beefy.

Ford Bronco Swamps Code Orange Bronco Raptor Build PXL_20251030_225918428


Had some back and forth with and got the wrong front yoke, but Adams were on it and got the correct one out quickly. Specs: Front (T-case) yoke 1 3/8" x 32 tooth (NOT 34), rear (diff) 1 3/8" x 28 tooth. Length face to face is 51”. John at Adams was super helpful and fast!

PXL_20251127_003009352.webp
PXL_20251127_002950004.webp


You will need a few special tools/materials including:
  • 1/2 impact wrench (or VERY long breaker bar)
  • Multiple 1/2 extensions (to get impact through frame hoop and on front TC yoke nut)
  • 3 jaw gear puller or yoke puller (i got a free rental from O'Reily)
  • 12 point, 12mm closed end wrench for front yoke bolts. These are actually a "triple square" head (not a triple square socket) but you cannot fit a socket and ratchet on them due to space constraints. I ended up guessing the torque (via comparison with a bench set up) with a breaker bar on the closed end wrench. Not ideal but zero stripping. Big bonus for who ever figures out how to actually properly torque these bolts.
  • 1 1/4" impact socket for front and rear yoke nuts (I believe a 32 mm will fit, but it's actually a true imperial size, which I found very odd).
  • Socket swivels
  • RTV gasket making sealer
  • Loctite 243 Medium Strength (online Jeep instructions note red Loctite but that's a firm no-go for me).
Other details:
  • 160 ft lb on the FRONT Tcase yoke nut only. And its not sensitive/critical, within 10% or even 20% will be fine.
  • Rear diff yoke pinion nut torque sets the pinion bearing preload against the (already crushed) crush sleeve. It's a little bit tricky as you torque just until all wobble in the pinion/yoke assembly goes away. It is A LOT of torque, like 300-400 ft lb. Way more than the front nut. If you under OR over do it you can trash your pinion bearings or even ring and pinion.
  • As noted in the online Jeep instructions - DO NOT OVER TORQUE the rear U-bolt nuts. 1/4 turn past flattening the lock washers.
Jeep instructions (very close to Bronco/Bronco Raptor).

I'm confident this thing will go 100s of thousands of miles even with my aggressive tune.
 
Last edited:

Sponsored
OP
OP
swamp2

swamp2

Raptor
Well-Known Member
Joined
Dec 19, 2022
Threads
156
Messages
4,040
Reaction score
4,188
Location
San Diego
Vehicle(s)
911 Carrera S / 4Runner TRD Pro
Your Bronco Model
Raptor
Comms, Comms, Comms:

Yaesu RTM-150RASP Radio (stealth mount), Browning BR-180S Dual Band UHF/VHF Antenna, Rugged Radios Bronco NMO Mount.


A long post and journey, full of mistakes, hopefully helpful to others.

Well after purchasing and stealth installing a nice Midland MXT575 GMRS Radio, I realized the EXO Baja Mitad run will use a "business radio band". This is VHF not UHF nor GMRS (a subset of UHF). These bands are not even permitted with a ham license in the US, which I will pursue soon (I was able to get within a couple of questions of passing that test with no studying).

So to get the chosen EXO frequency, I needed to have a MARS/CAP unlocked VHF radio (removing a small resistor basically turns a US limited radio into a global radio, sold in other markets). Out of the box this radio can LISTEN (Rx) but not talk (Tx) on the chosen EXO frequency of 151.625 MHz. Despite it being perfectly safe and with proper etiquette, using a dual band radios UHF capability on GMRS frequencies WITHOUT the radio being "type certified" for such, is against FCC regulations. Regardless, I also wanted UHF (GMRS & FRS) capability in my radio. It's my understanding that despite bring against the rules, using a high quality dual band radio such as this on GMRS & FRS (to communicate with other mobile GMRS or handhelds on FRS (Family Radio Service)) is roughly akin to breaking a speed limit law. The aforementioned mod does also unlock both Tx and Rx on GMRS (and FRS).

I also didn't want a Chinesium radio, many of which are known to pollute lots of harmonics into other bands (which in part likely drove the FCCs type certification rule...).

Last but certainly not least, I also wanted to maintain a stealth install with a detachable head unit and/or mic, with the radio under the front/center storage tray (or above the glove box).

Hence, I arrived at the Yaesu RTM-150RASP radio (designed and manufactured in Japan). I also was ignorant as to dual band VHF&UHF antennas, so I bought one of each of those from Rugged Radios along with their NMO cable and very nice Bronco NMO style mount. Don't bother with a custom length cable as you have to cut off the radio end to get the cable through a firewall seal and then recrimp yourself. You'll end up at about 7'-8'. Here she is:

Ford Bronco Swamps Code Orange Bronco Raptor Build PXL_20251228_193206396

Ford Bronco Swamps Code Orange Bronco Raptor Build PXL_20251228_193241550
Ford Bronco Swamps Code Orange Bronco Raptor Build PXL_20251228_193215907

Ford Bronco Swamps Code Orange Bronco Raptor Build PXL_20251229_004251794


The finishing touches are:
  • Magnetic Mic mount. Use the old duct tape on a wrench to get it bolted on without a ton more trim removal. M4 stainless button heads with nylock nuts and washers (of course)
  • ProClip vent mount
  • AMPS Short Reach Adapter, 20mm Ball & Socket System, Legacy 2.0 × 1, also M4 stainless hardware
  • 67 Designs Series 55 20mm Track Ball
  • PENGLIN RJ45 Shielded Panel Mount Coupler (front left side of trim panel in storage area)
Getting this radio stealth mounted was way more work than I thought it would be. It required:
  1. Removing the radio head unit plastic mounting "hood" from the main body. Just takes a few tiny Phillips screws and a covers to do so. This permits the (precious) needed forward travel of the radio in its mount to actually remove it.
  2. Modify the steel radio mounting bracket to accommodate actual slide/lock install and physical radio removal. About 2/3 rds to 3/4 ths of the right side short horizontal slide rail of the mounting bracket needs to be removed (angle grinder with metal cutting disc). This permits sliding the radio as far forward as possible in this tight space and then tilting it toward the driver's side to wriggle it out of it's mount. Unfortunately, this also makes the mounting a bit too loose or potentially rattle-y for my liking. To fix that I slightly bent the left vertical sheet metal for a closer/tighter fit with the radio body slot. Then 3M VHB double sided tape some 3/8" neoprene foam rubber strips/pads on the mount base. These compress between the radio body and bracket. Perhaps somewhat more "hacky" than I would have liked, but still results in a very robust/secure mount. Mine was so secure that I had to coax the locking/release lever into the locked position. Should have taken more pictures...
  3. Space the radio off of the floor of the area below the front/center storage tray. Use two nylon spacers, 1/4 ID, 5/8" OD, 3/8" tall. Then trim this tab and slot to gain a lower mounting height. It's non functional stuff, just far easier assembly. I removed it with a side cutting wire cutter.
    Ford Bronco Swamps Code Orange Bronco Raptor Build PXL_20251217_010556034
    Finally longer screes are needed. 1/4" x 1" long hex head stainlesss sheet metal screws match the existing holes/threads in the truck and the factory fasteners perfectly. Here are the fasteners and nylon spacers shown with the prior drilled Midland mounting bracket.
    Ford Bronco Swamps Code Orange Bronco Raptor Build PXL_20251217_014647436
    To mark the mounting plate for the two 9/32" holes: Cut the heads off of the largest wood or sheet metal screws that will slip fit into the two mounting holes. Lower the radio attached to its bracket. Shoot for a very small clearance between the radio fan and trans cable routing bracket. Rotate (yaw) the radio with its nose slightly toward passenger side (about 3°-5°). This position ensures you can actually mount and dismount the radio in this tight space.
    Ford Bronco Swamps Code Orange Bronco Raptor Build PXL_20251227_211958104
    Rap the radio and wiggle it around to scratch drill locations on to the bottom of the mounting bracket. Yes, unfortunately, one of the holes will be right in one of the curved stiffening contours of the bracket making it harder to get your drill&hole accurately placed.
  4. Modify the underside of the center console trim piece to fit on top of the radio. Use a Dremel to cut off the front left and front right "brackets" that hold the tray into the large console trim piece. Sand them roughly flat with a Dremel and replace the Torx plus fasteners with an added stainless fender washer. There was plenty of remaining thread length/bite and plenty of strength to support the plastic tray.
    Ford Bronco Swamps Code Orange Bronco Raptor Build PXL_20251228_012434176~2
Whew!!
 
OP
OP
swamp2

swamp2

Raptor
Well-Known Member
Joined
Dec 19, 2022
Threads
156
Messages
4,040
Reaction score
4,188
Location
San Diego
Vehicle(s)
911 Carrera S / 4Runner TRD Pro
Your Bronco Model
Raptor
Lighting: Baja Designs and SPV:

I've only wheeled a few times and night out in the desert. I'd been toying with bumper pocket lights for a while since the factory Rigids are utter weak sauce. What pushed me over the top was the requirement for "aftermarket" lights for the upcoming 500 mile EXO Baja Raptor Mitad trip.

I tried to hit all of the zones and included some yellow for fog/dust. I also got the yellow covers for the big lights.

Doing this job right, with good materials and everything thoughtfully laid out was way more work than I imagined...

Ford Bronco Swamps Code Orange Bronco Raptor Build PXL_20260104_001840765~2
Ford Bronco Swamps Code Orange Bronco Raptor Build PXL_20260104_001822319(1)


Install tips/notes:
  1. 2 Baja Designs LP6, 2 BD Squadron Pro Driving/Combo, 2 BD Squadron Pro Driving/Combo Amber, 2 BD Squadron Pro Spot. The beam patterns on these don't matter that they are "upside down". This is just fastest install with the SPV brackets. Choose your spacers washers carefully to minimize the small obstructing overlap between lights and bumper. It might take a couple test fits. Do it right and practically no light ends up being blocked.
  2. Removing the factory fogs is a PITA, this YT vid helped.
  3. SPV bumper pocket brackets, SPV LP6 bumper brackets, SPV wiring "adapters" to reuse the factory Raptor fog and upfitter switches & wiring (link). For the Raptor, these let you just throw away 2 sets of the BD harnesses that come with 2 sets of the pocket lights. Thus, ZERO cable routing for these 2 sets of lights. That's a big time and space saver. BD lock out harness for LP6s, shortened, placed a new junction and repinned final light connectors for proper length harness sections. Finally, used the SPV headlight connector tap/interrupt to get power to the LP6 backlights. This powers the very low power/lumen amber LP6 backlights whenever the factory parking/marker lights are on. Link.
  4. Full custom stainless steel security bolt kit (selling these as well). Uses center pin "security Torx" heads. No one is gonna steal my lights! Link.
    Ford Bronco Swamps Code Orange Bronco Raptor Build PXL_20251210_215856876~2
  5. I mounted the relays for the BD lockout harness (prevents highs and lows being simultaneously powered) on the small shelf near drivers side firewall using a factory ground location and drilled for the 2nd relay. Added some zip ties to keep the relays together and support the factory heat shrink tubing. Not quite done looming everything here...
    Ford Bronco Swamps Code Orange Bronco Raptor Build PXL_20260104_011906756
  6. Both the LP6 and single Squadron harness run from drivers firewall area, along far upper drivers fender, behind wheel liner and just behind top of the bumper. The connector between the lock out harness and tap for the LP6 backlights meets up front and center behind trim at front edge of underhood area. No coiling up extra wire even for this single conductor run, everything trimmed to proper length and properly sealed/reterminated.
  7. Pulled DC power from my EOS SAPS for the LP6s.
  8. All 3M/Molex heat shrink crimp terminals/splices with adhesive, heatshrink with adhesive and self sealing silicone tape where heatshrink wasnt feasible (new LP6 split junction, etc.). Plenty of zip ties to keep everything tidy and tight.
It's hard to capture in photos but each bumper pocket set is about equivalent to good aftermarket high beams. The LP6s on the other hand are like commercial jet landing lights. They just throw both so far and so wide.

I'm anxiously awaiting when someone repeatedly flashes their highs at me when only my properly/responsibly set factory low beams are on...
 
OP
OP
swamp2

swamp2

Raptor
Well-Known Member
Joined
Dec 19, 2022
Threads
156
Messages
4,040
Reaction score
4,188
Location
San Diego
Vehicle(s)
911 Carrera S / 4Runner TRD Pro
Your Bronco Model
Raptor
Back Covers for Bumper Pocket Lights:

I wasn't thrilled at all with the exposure to rocks, muddy water, etc. to my wiring, connectors and cooling fins of my Baja Designs Squadron Pros in my bumper pockets. The factory lights, due in part to their complex and perhaps somewhat delicate adjustment mechanism had very nice molded plastic covers that kept most debris out. It certainly wasn't water proof or even entirely mud proof, but compared to without the covers the exposure difference was huge.

No covers just after install:

Ford Bronco Swamps Code Orange Bronco Raptor Build PXL_20251220_230644597


This just isn't the stuff one wants fully exposed in the wheel wells on their off roader.

So I custom fabricated these covers, entirely reusing factory mounting points.

Ford Bronco Swamps Code Orange Bronco Raptor Build PXL_20260120_001106485


They are made from very tough, fabric reinforced 3/32" thick neoprene sheets. Neoprene offers a great combination of toughness, resistance to common automotive chemicals and UV resistance. They are reinforced with stainless steel grommets.

I used a bumper bolt, factory light mounting point, fender liner attachment point and a frame hole already present with an aluminum rivnut installed. Found a perfect one with no drilling required!

Ford Bronco Swamps Code Orange Bronco Raptor Build PXL_20260120_010233369


Of course all attachment point use stainless washers and stainless button socket head hardware. These even improve cosmetics from the front making it look like the lights have bezels.

Ford Bronco Swamps Code Orange Bronco Raptor Build PXL_20260120_010933542


Happy to provide a detailed parts list if anyone is interested. The rubber itself was quite pricey even from McMaster. Not to mention the grommets, grommet setting tools and some punches.

Lastly, despite warnings from others here on another thread, I have absolutely zero concerns about this cutting off airflow and causing the lights to get too hot.
 
Last edited:

SierraBronco

Wildtrak
Well-Known Member
Joined
Mar 27, 2024
Threads
40
Messages
5,108
Reaction score
13,743
Location
USA
Vehicle(s)
2022 Wildtrak, 2024 Wildtrak, 2024 Wildtrak
Your Bronco Model
Wildtrak
Back Covers for Bumper Pocket Lights:

I wasn't thrilled at all with the exposure to rocks, muddy water, etc. to my wiring, connectors and cooling fins of my Baja Designs Squadron Pros in my bumper pockets. The factory lights, due in part to their complex and perhaps somewhat delicate adjustment mechanism had very nice molded plastic covers that kept most debris out. It certainly wasn't water proof or even entirely mud proof, but compared to without the covers the exposure difference was huge.

No covers just after install:

PXL_20251220_230644597.webp


This just isn't the stuff one wants fully exposed in the wheel wells on their off roader.

So I custom fabricated these covers, entirely reusing factory mounting points.

PXL_20260120_001106485.webp


They are made from very tough, fabric reinforced 3/32" thick neoprene sheets. Neoprene offers a great combination of toughness, resistance to common automotive chemicals and UV resistance. They are reinforced with stainless steel grommets.

I used a bumper bolt, factory light mounting point, fender liner attachment point and a frame hole already present with an aluminum rivnut installed. Found a perfect one with no drilling required!

PXL_20260120_010233369.webp


Of course all attachment point use stainless washers and stainless button socket head hardware. These even improve cosmetics from the front making it look like the lights have bezels.

PXL_20260120_010933542.webp


Happy to provide a detailed parts list if anyone is interested. The rubber itself was quite pricey even from McMaster. Not to mention the grommets, grommet setting tools and some punches.

Lastly, despite warnings from others here on another thread, I have absolutely zero concerns about this cutting off airflow and causing the lights to get too hot.
Shit you can put them behind a grill and next to the condenser and they won’t overheat. They’ll get hot and kill your AC but won’t stop working. I think you’ll be fine
 
OP
OP
swamp2

swamp2

Raptor
Well-Known Member
Joined
Dec 19, 2022
Threads
156
Messages
4,040
Reaction score
4,188
Location
San Diego
Vehicle(s)
911 Carrera S / 4Runner TRD Pro
Your Bronco Model
Raptor
Installed NGK Spark Plugs:

Due to both being aggressively tuned and what I think is a bit of a rough idle, I upgraded to NGK Ruthenium HX LTR7BHX plugs, gapped at 0.028". I think they were around 0.030" or a bit more from the box.

Ford Bronco Swamps Code Orange Bronco Raptor Build NGK-Ruthenium-HX-1024x853_1024x1024


Don't try to pry off any (likely only one) grey Christmas tree nuts that hold the wire harness to the coil pack studs. The black (round) ones pry/lift off, but the gray one(s) need to be spun off, which in turn requires clipping the zip tie from it first.

That, and the severe distortion/bending of the fuel pump noise insulator required to remove it were the only tips/tricks worth sharing.
Sponsored


Top