- First Name
- Ethan
- Joined
- Apr 10, 2022
- Threads
- 1
- Messages
- 11
- Reaction score
- 59
- Location
- New Hampshire
- Vehicle(s)
- 4runner
- Your Bronco Model
- Badlands
- Thread starter
- #1
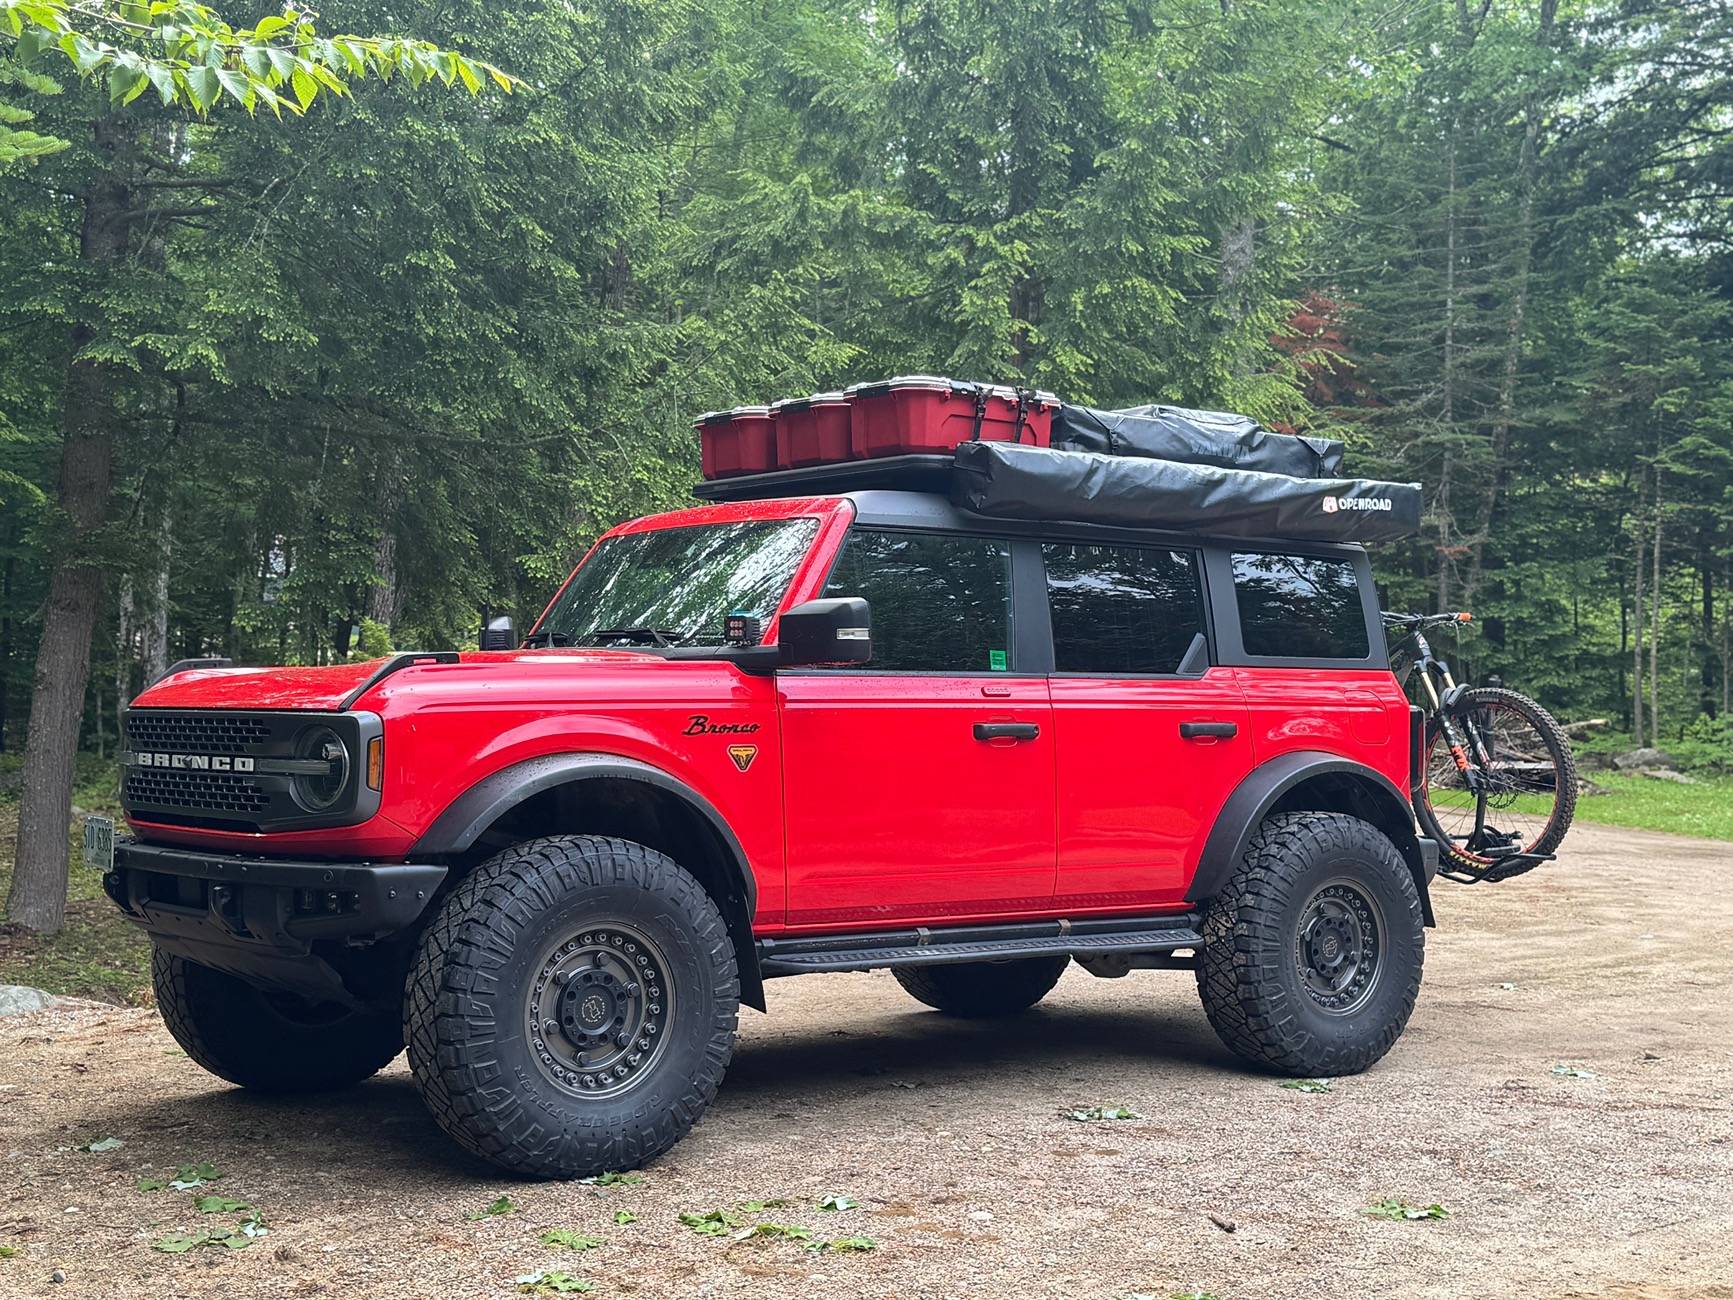
I finally wrapped up the little details on my weekend camping/mountain bike race rig so I thought I’d share my build. The Bronco is usually 3rd in line for money; skis and bikes take precedent in this family. But, I like all the “overland” stuff and being a decent carpenter and mechanic I went to work building with a budget. Are there better options out there: Definitely. Does this work “good enough” for me: Sure does. I’m not out shooting an episode of or XO or TSTN.

2022 Badlands (non-sas) purchased Oct 22
2.3M 7MT
Ford Performance Tune
B and M shifter
Catch can
IAG bolt on steps
Zone 3.5” lift on factory suspension
37/12.50r17 Nitto Ridge Grappler
Rhino wheels1:7x9.5 +6 offset
Yakima bike rack and Kuat swing out. (After a lot of internet searching the Kuat swing out has the widest swing so it allows the bike to be close to the spare tire but swing wide enough to clear the side of the Bronco. Also it opens to 120* which allows the tailgate to swing wide open.
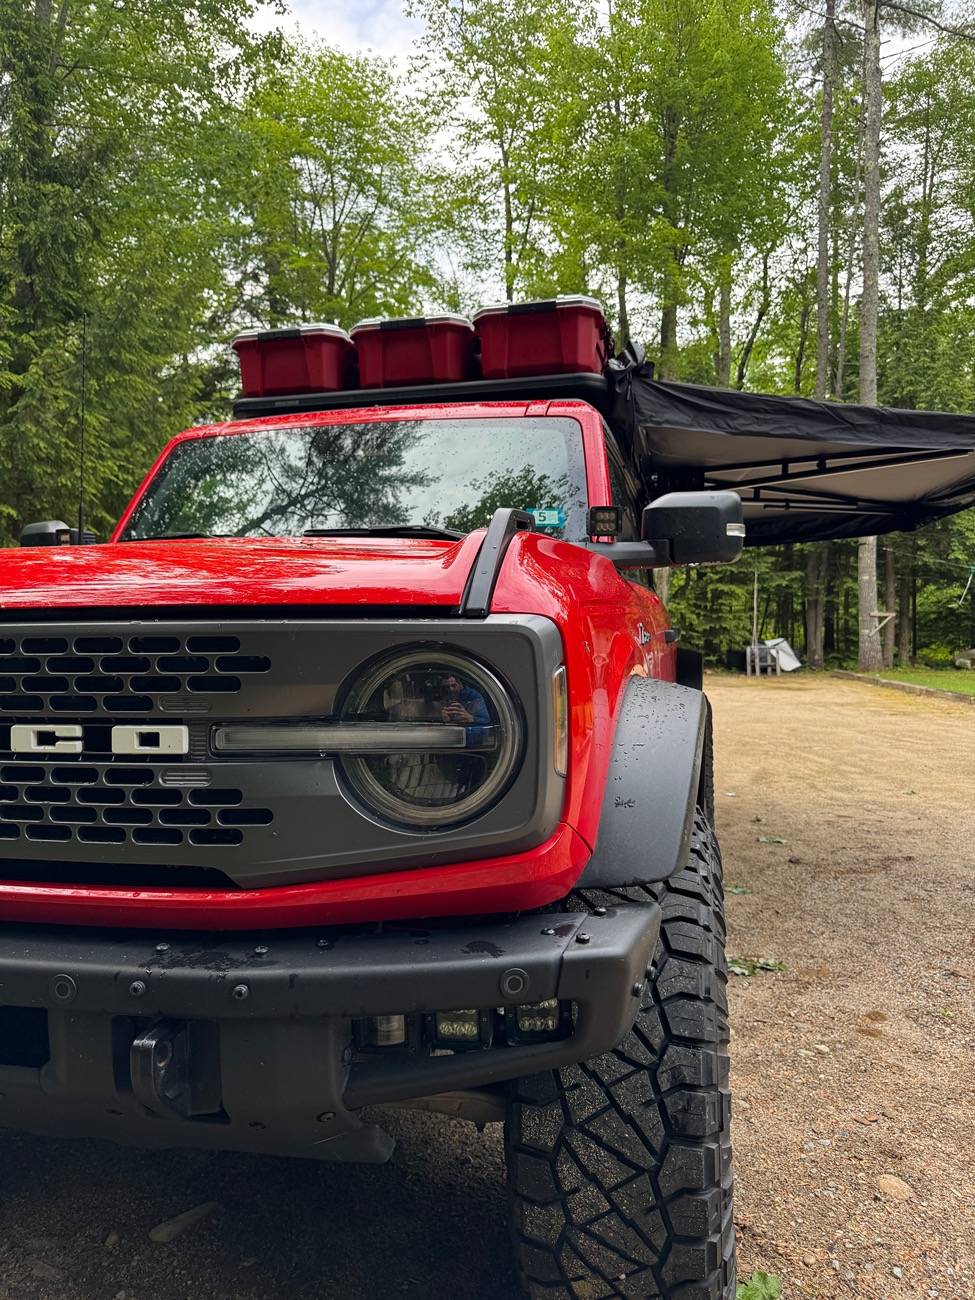
Rough Country lighting in the modular bumper and ditch lights. I’m not racing Baja at night. They are plenty bright enough for cruising back roads

On the roof:
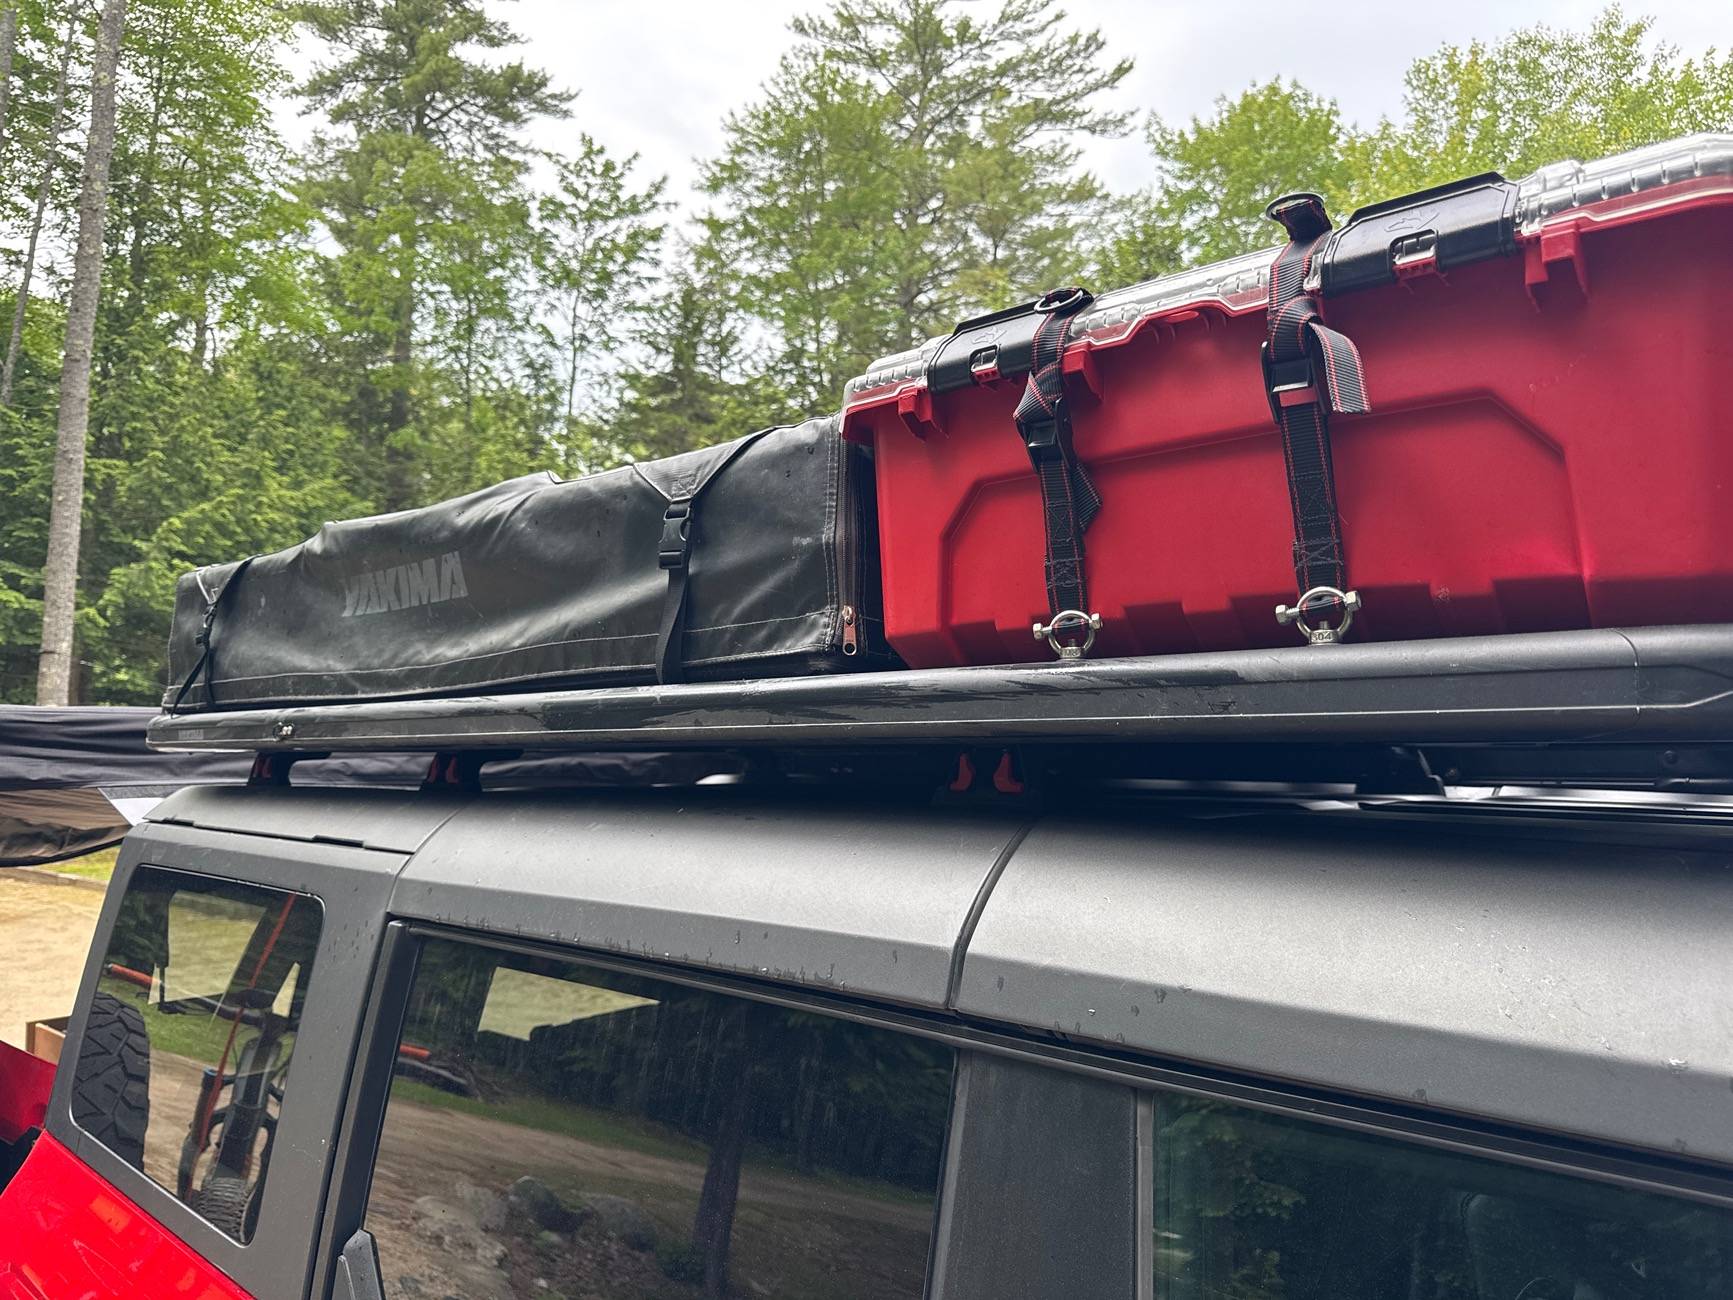
At the time I bought the Bronco there weren’t many options for roof platforms and what was available was too narrow for what I wanted. So I bought a Yakima 54”x84” platform and used 3 sets of Rhino rack feet. I went with the Yakima platform vs the Rhino because the load bars were perpendicular to the vehicle vs parallel. I felt it makes it easier to walk up there and mount the stuff I already had up there. I used the Rhino feet since they had the shortest stack height. I worked up the nut to drill the roof and figure out I could mount the feet around the most structurally parts of the roof. The most forward foot mounts right over the latch for the mid roof section and the rear feet land right where the factory rack feet sit. I now have a factory rack I may cut up and use the forward part as a4th mount
Mounted to the platform is a Yakima RTT and an OpenRoad 270* awning.
Next I needed storage on the platform and after looking at all the “overland” stuff I was not going to pay the overland tax. I went down to Home Depot with a tape measure and found the Husky bins fit the space I had left perfectly. I liked the quick on and off some of the premium storage bins but all that was out of the budget. I knew straps were going to be my only option so I grabbed some $8 straps, M8 t slot hooks and the sewing machine and got to work creating quick mounts for my bins. The rings give some leverage to pull down on and the just tie off the tails. I cut the straps to length and bar tacked with nylon thread in the sewing machine. The ends are secured through the hooks with some 1/4” threaded rod and nuts staked on them. You just push the loose strap though and pull the bolt out and everything is free.
The Kitchen:
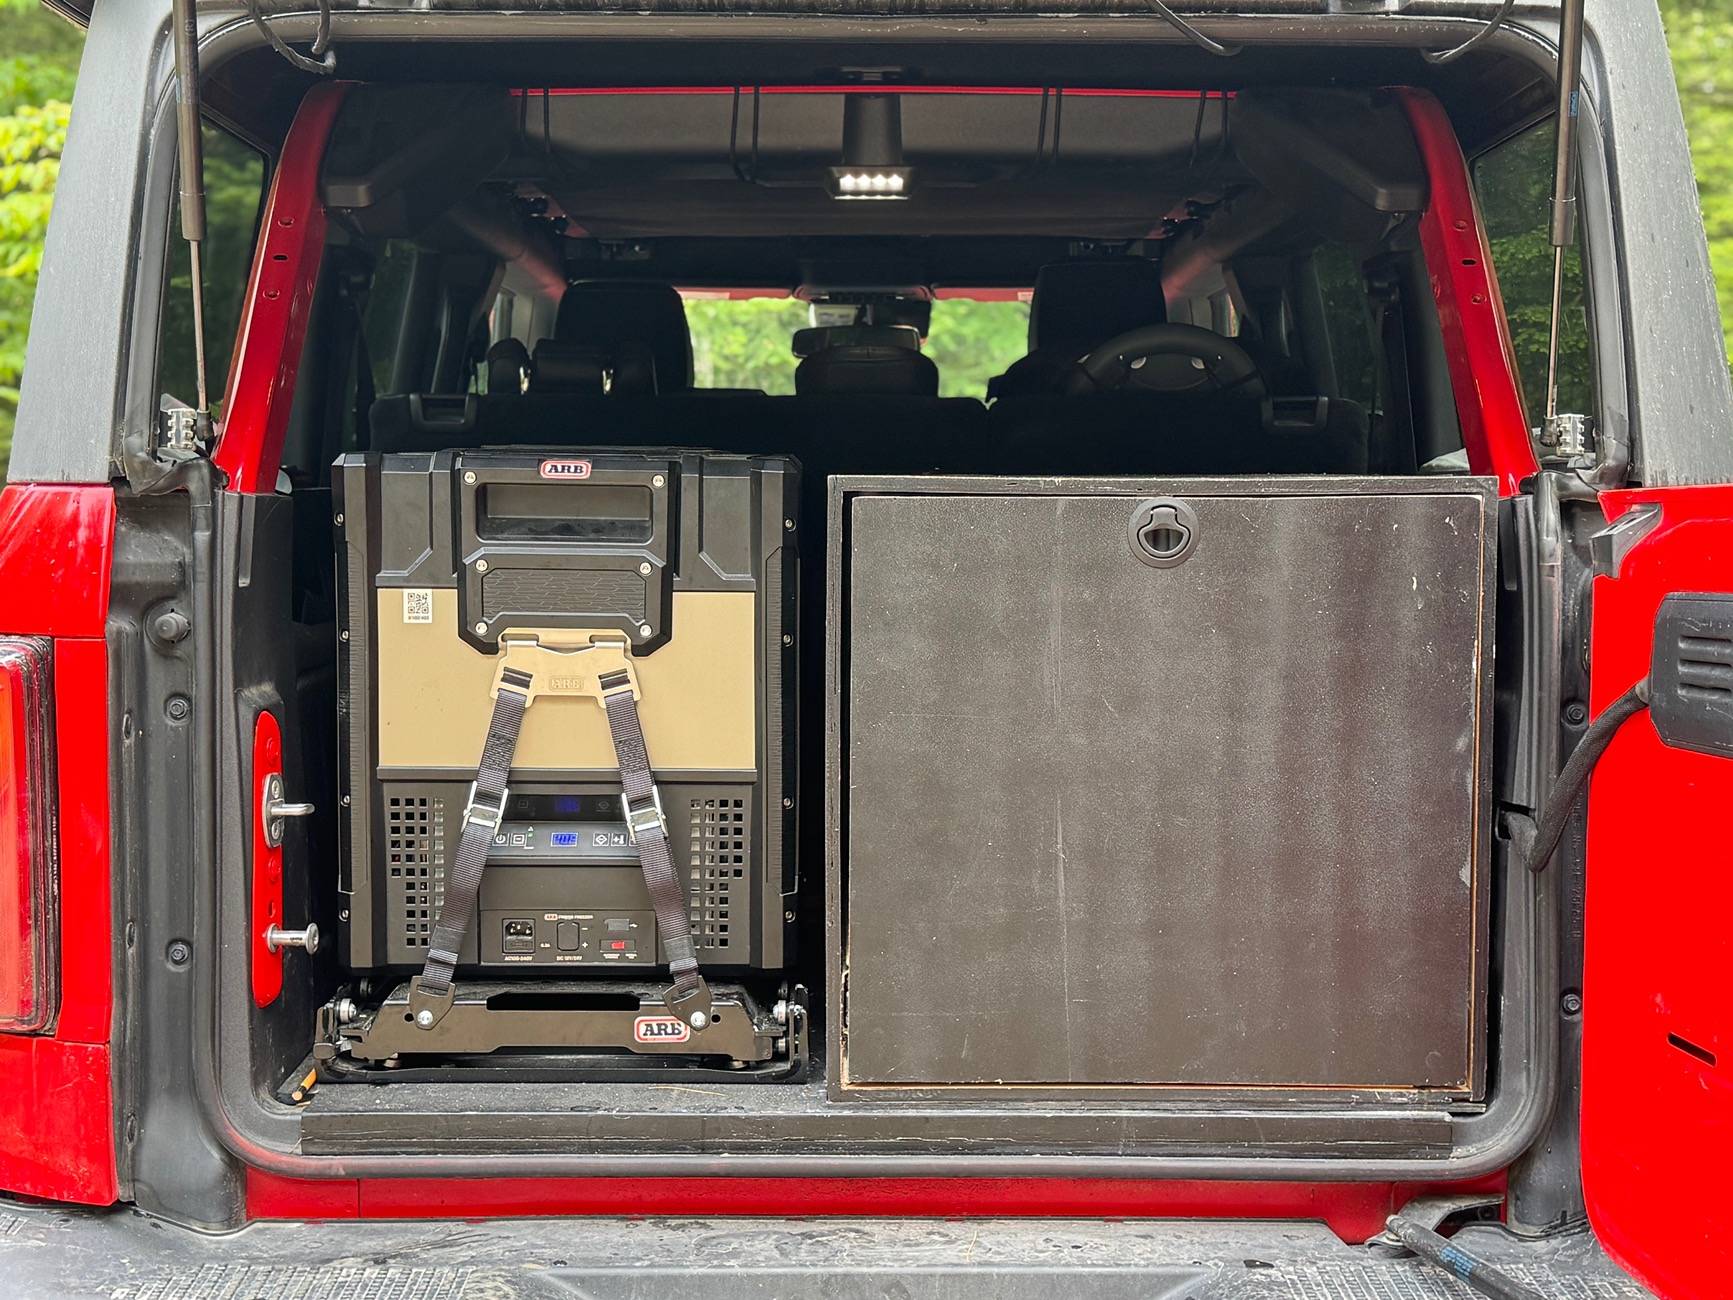
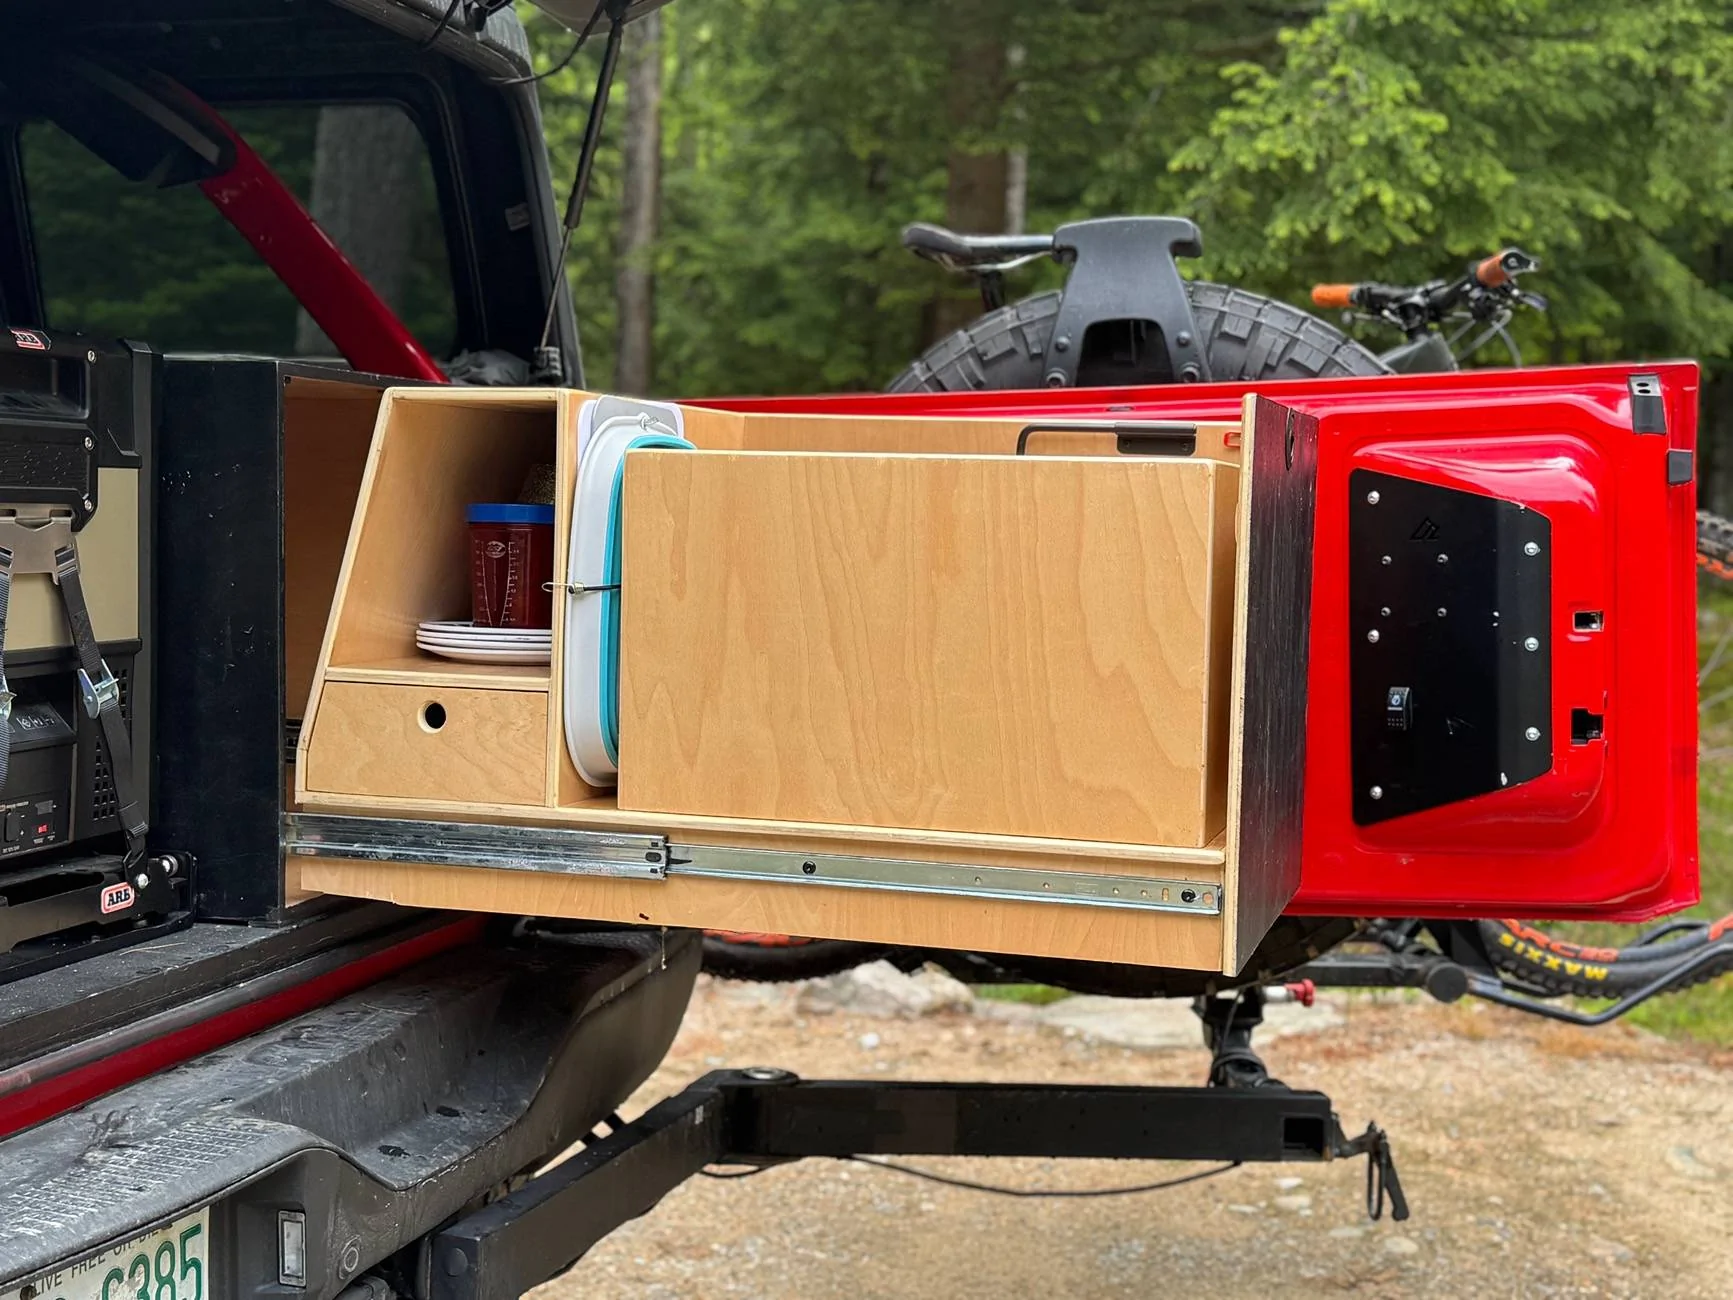
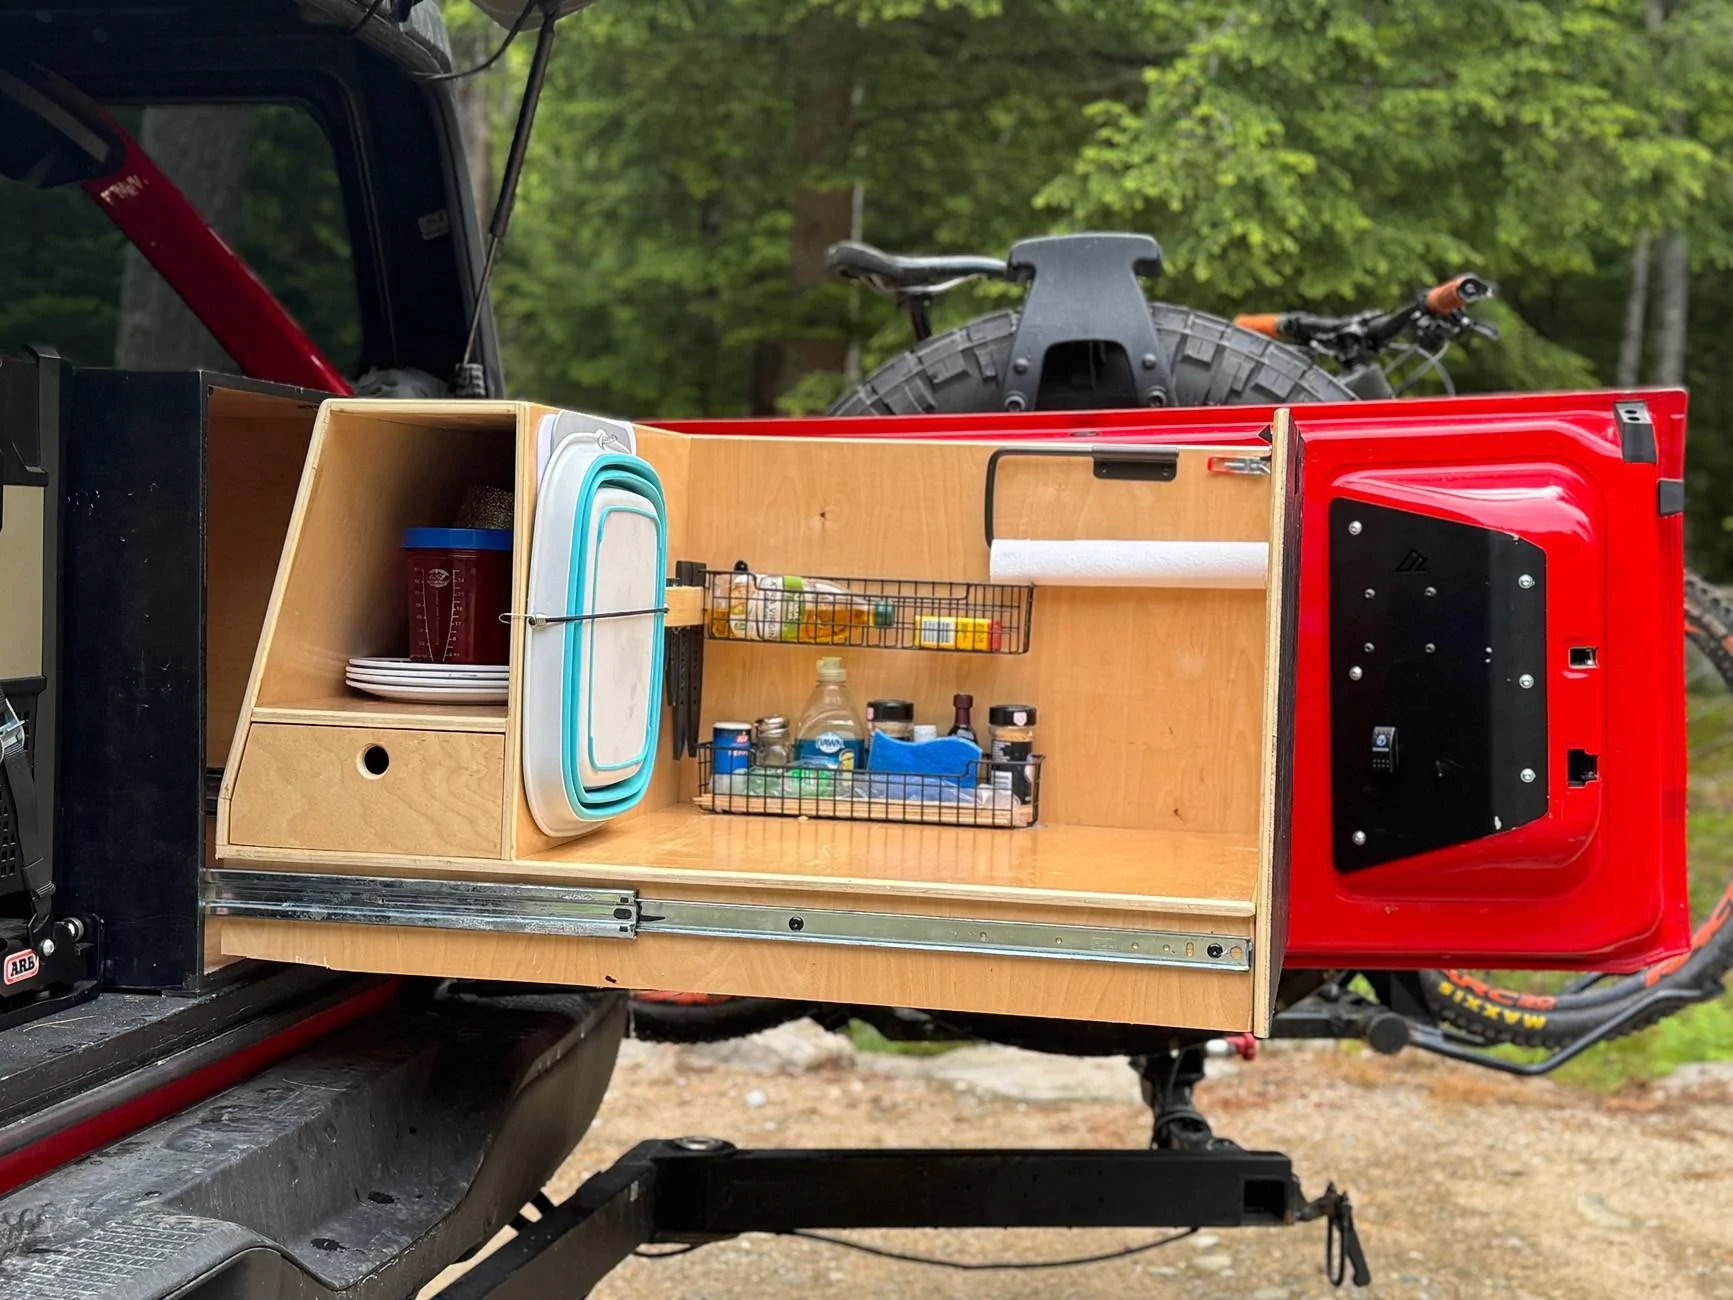
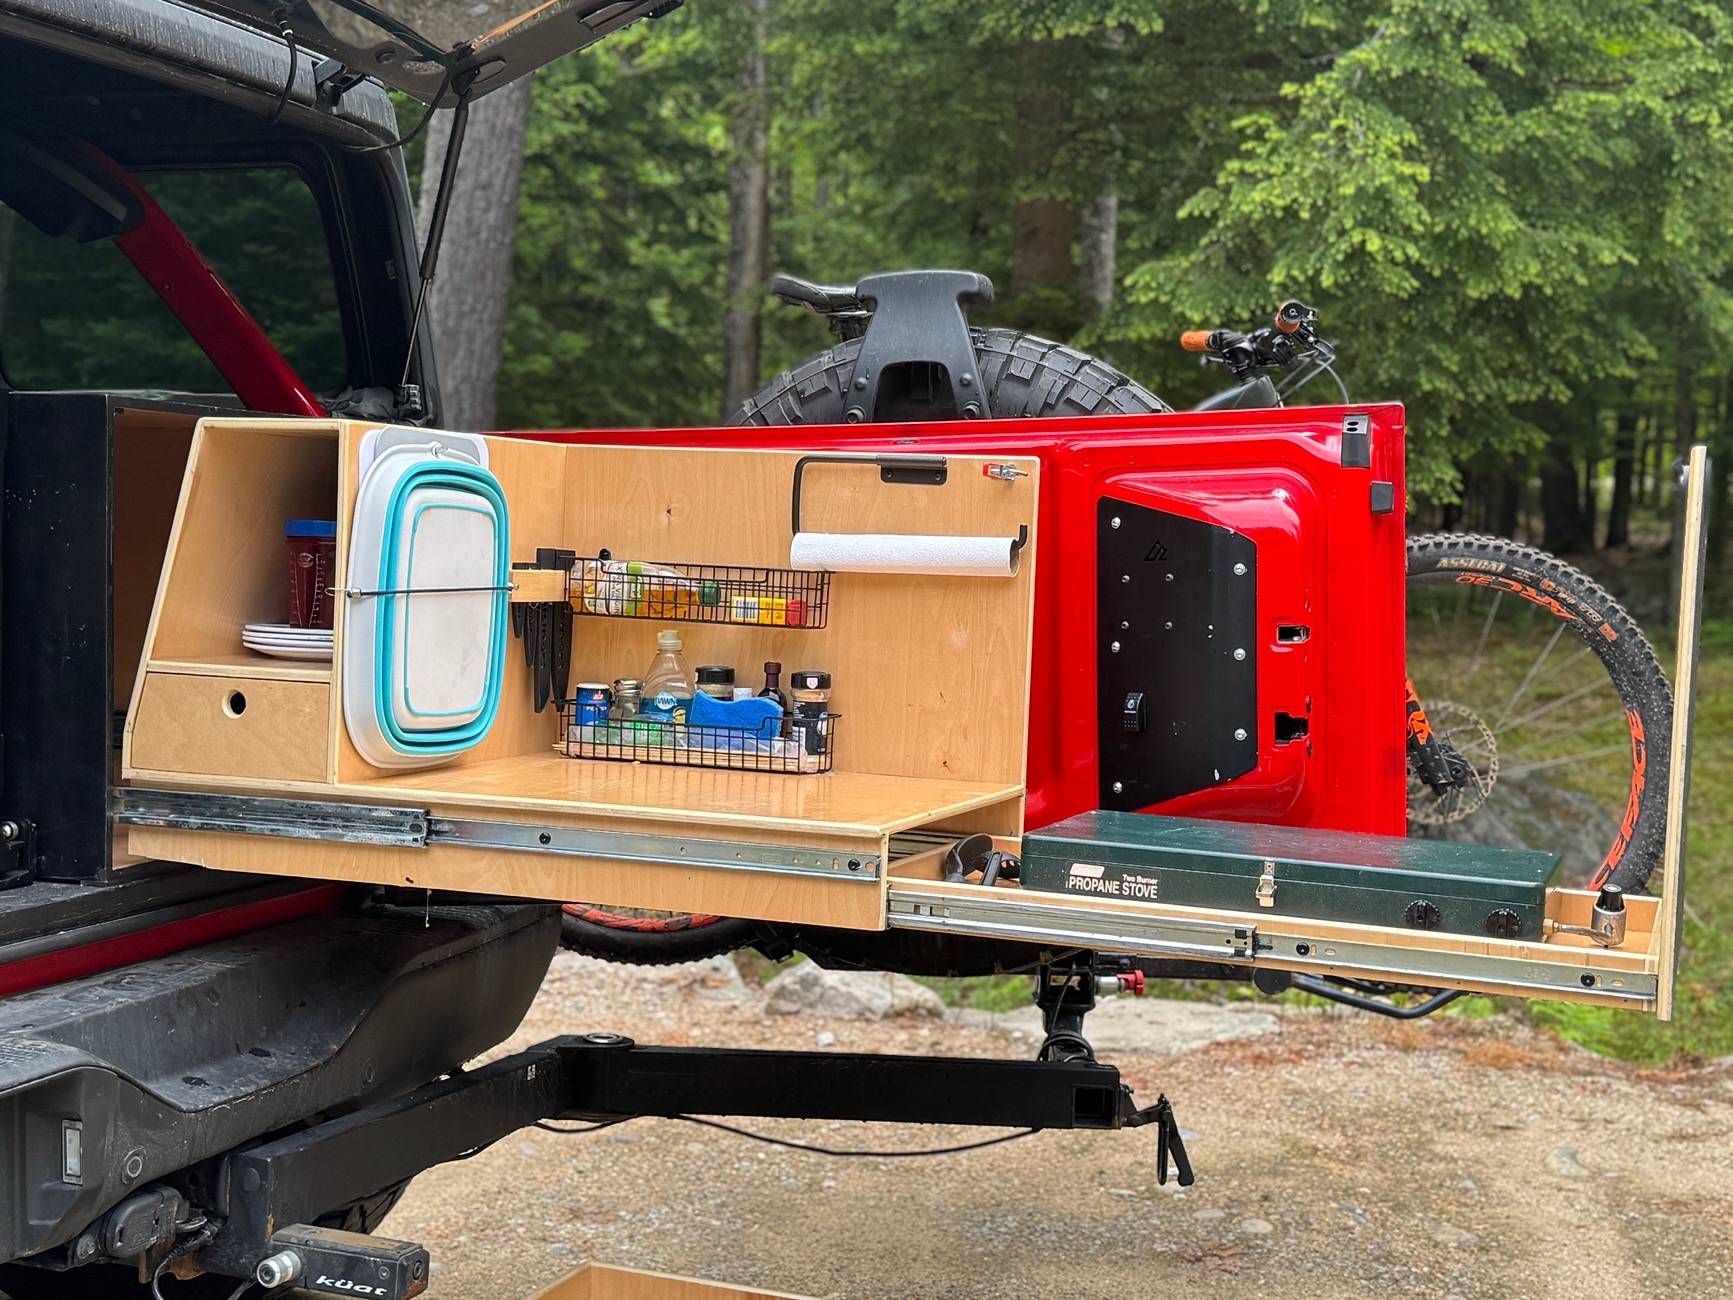
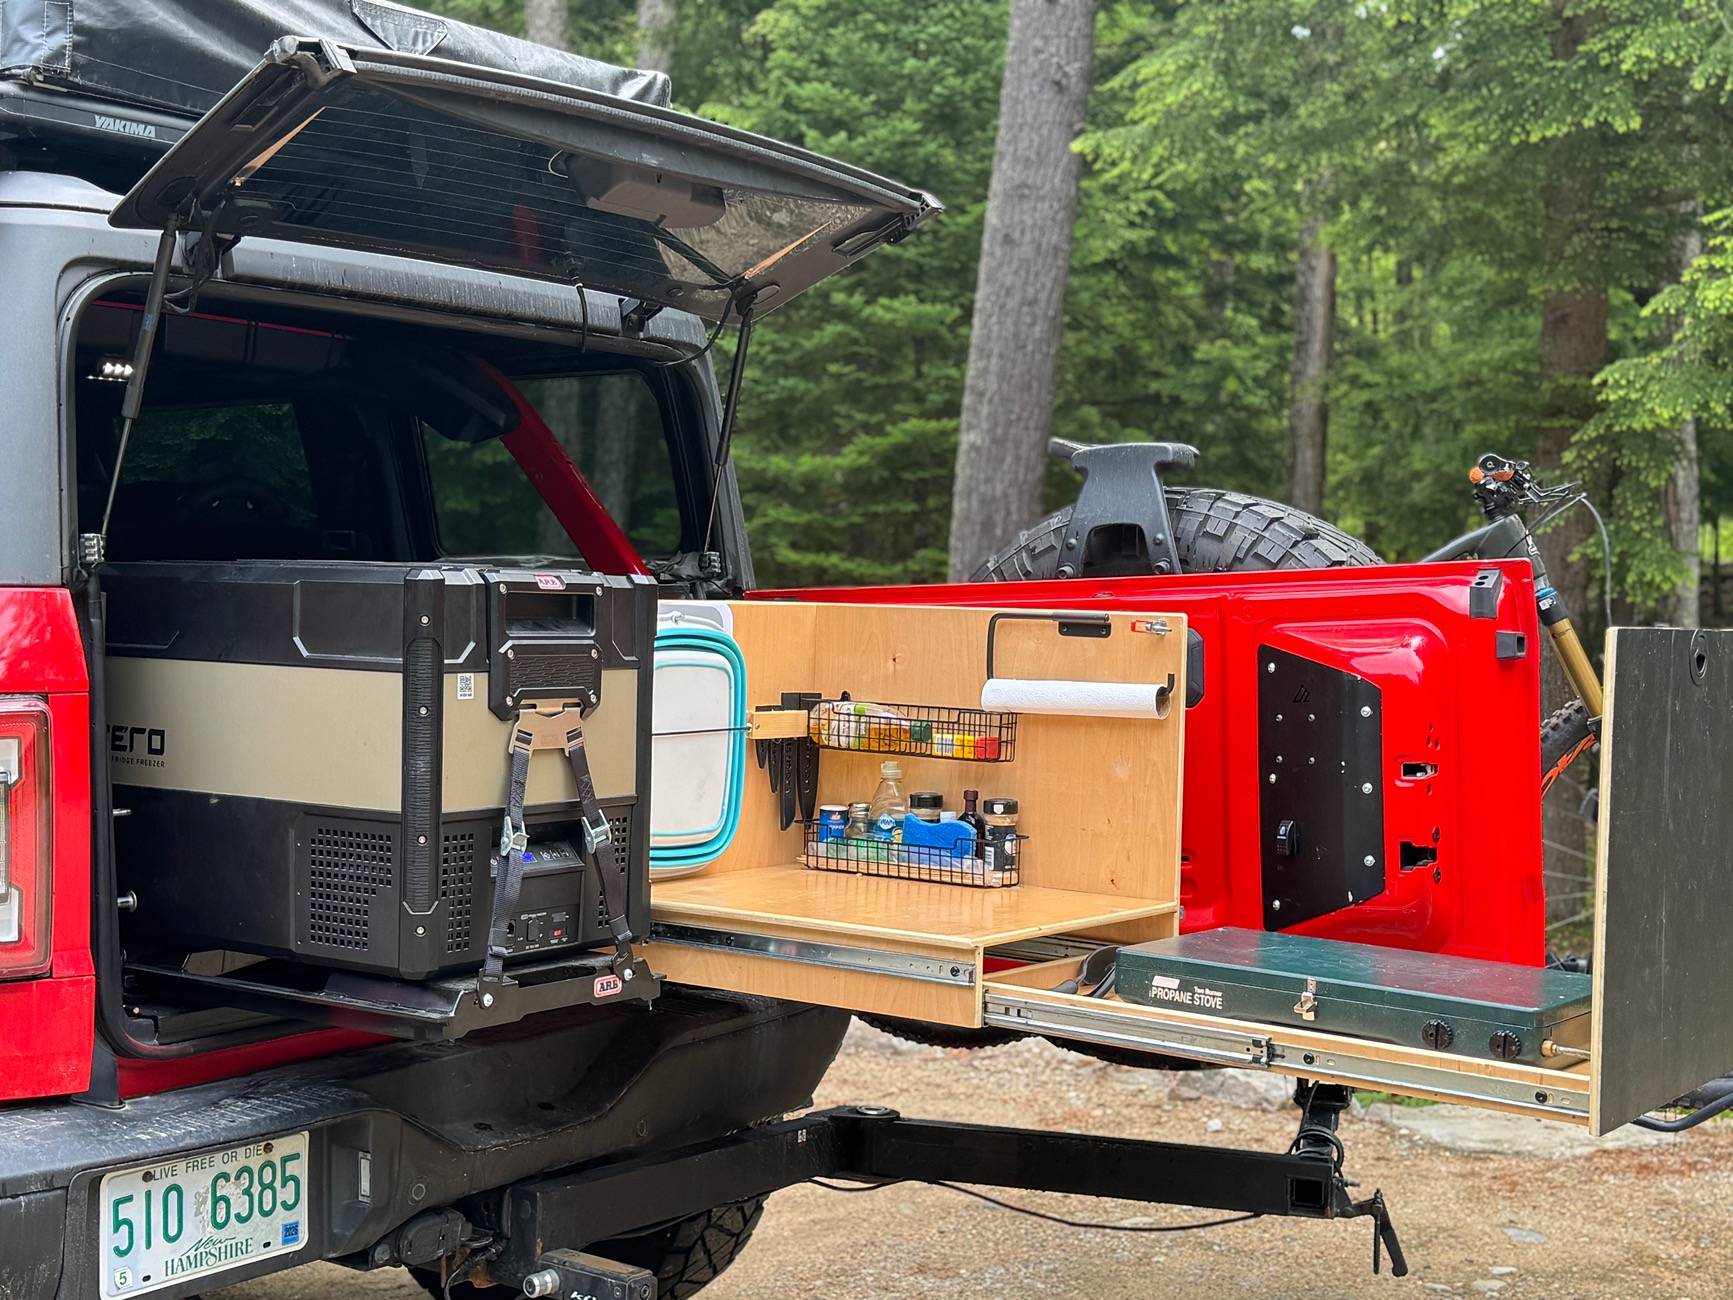
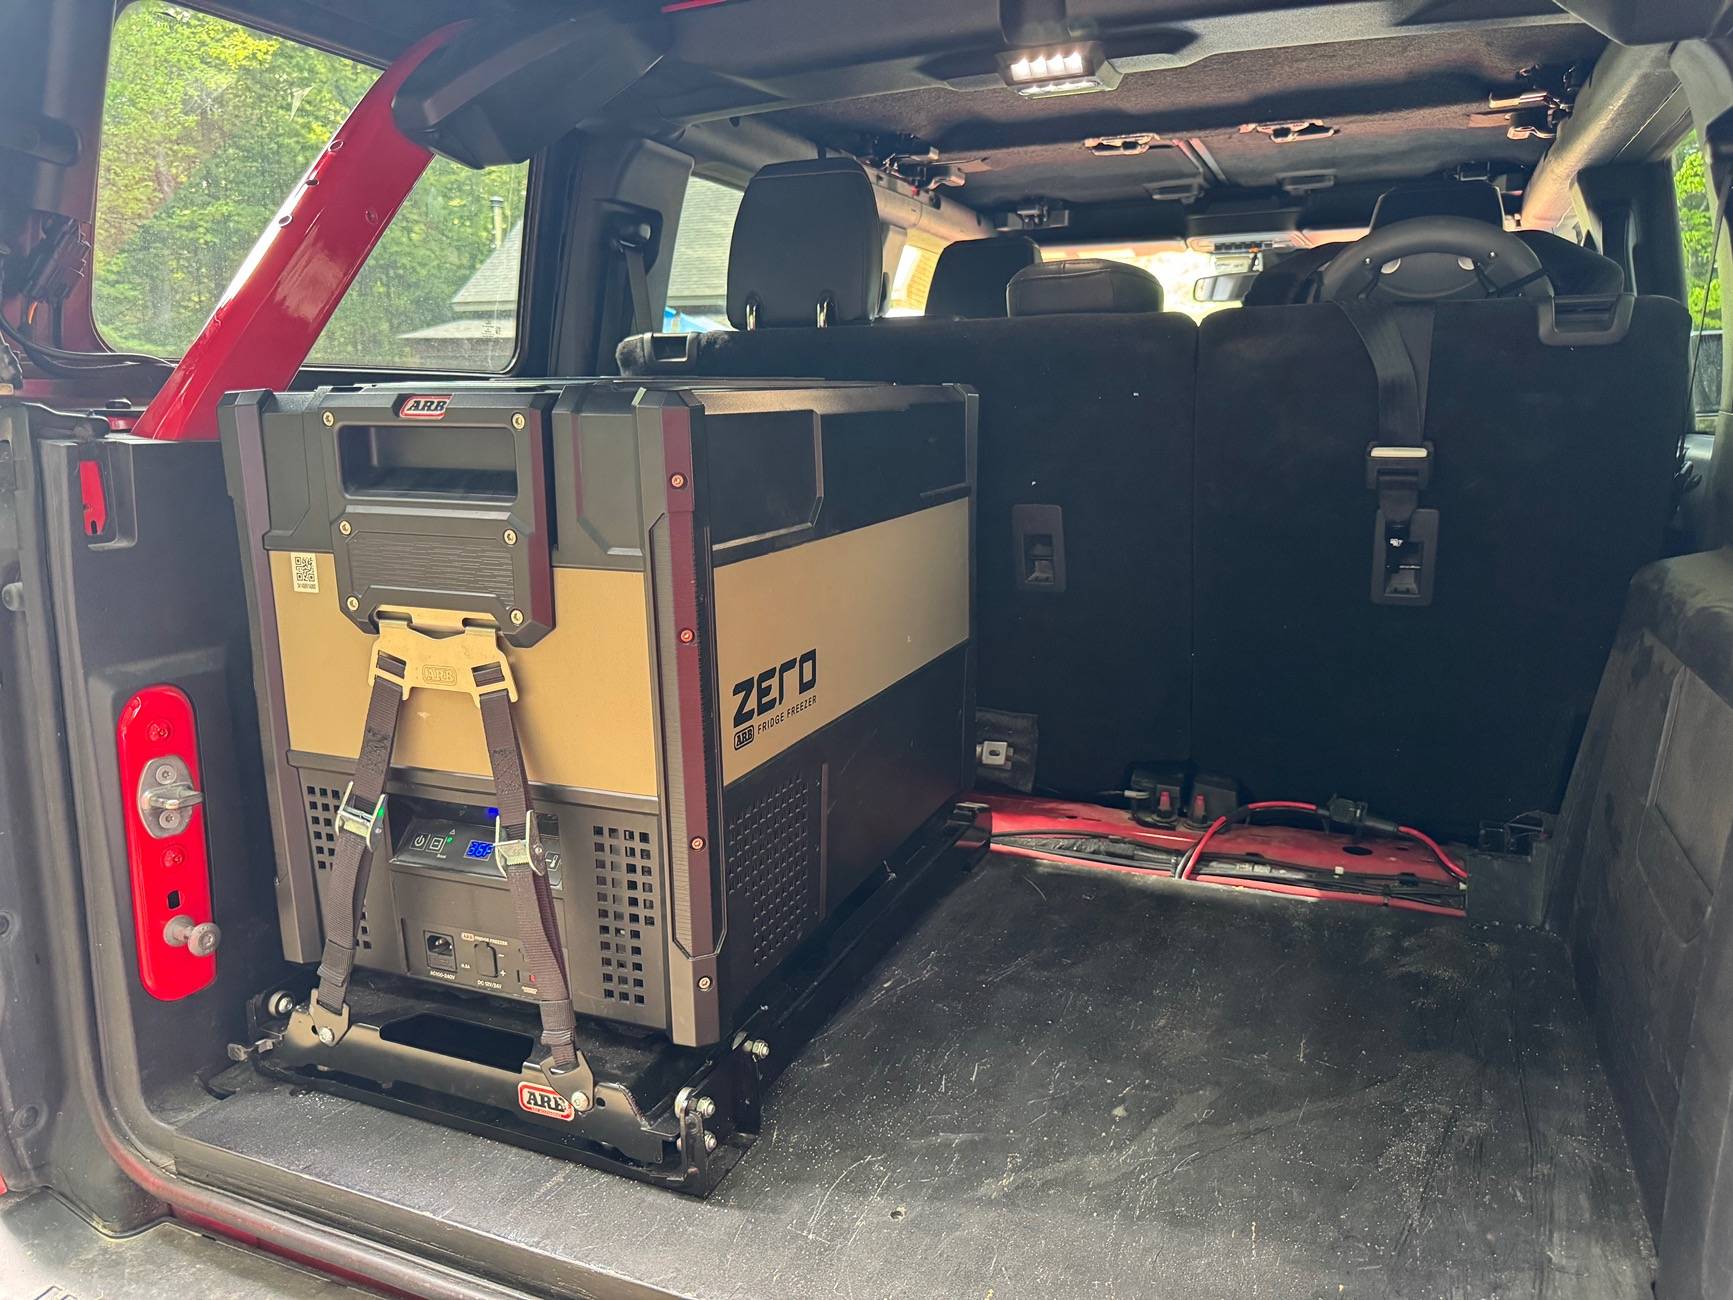
I had a kitchen in my 5th gen 4runner that had a similar design. I decided to follow my previous design after spending many hours on the forums seeing what others did. Most seemed to just use up a ton on space for the sake of “organizing” there stuff and have some cool drawers. The kitchen wastes no space. Is build from 1/2” birch plywood and a few coats of water based poly. It’s covered with Raptor liner. The dry goods box fits inside the kitchen box. Just pull the dry goods box out and now there is plenty of prep space. The little drawer holds all the utensils for a family of 4 to eat a meal and the open storage holds the pots and pans that fit a small stove. The fridge is a 47qt ARB on an ARB sliding drawer. all mounted on a floor plate with T nut fasteners just like a Goose Gear floor system.
Electrical:
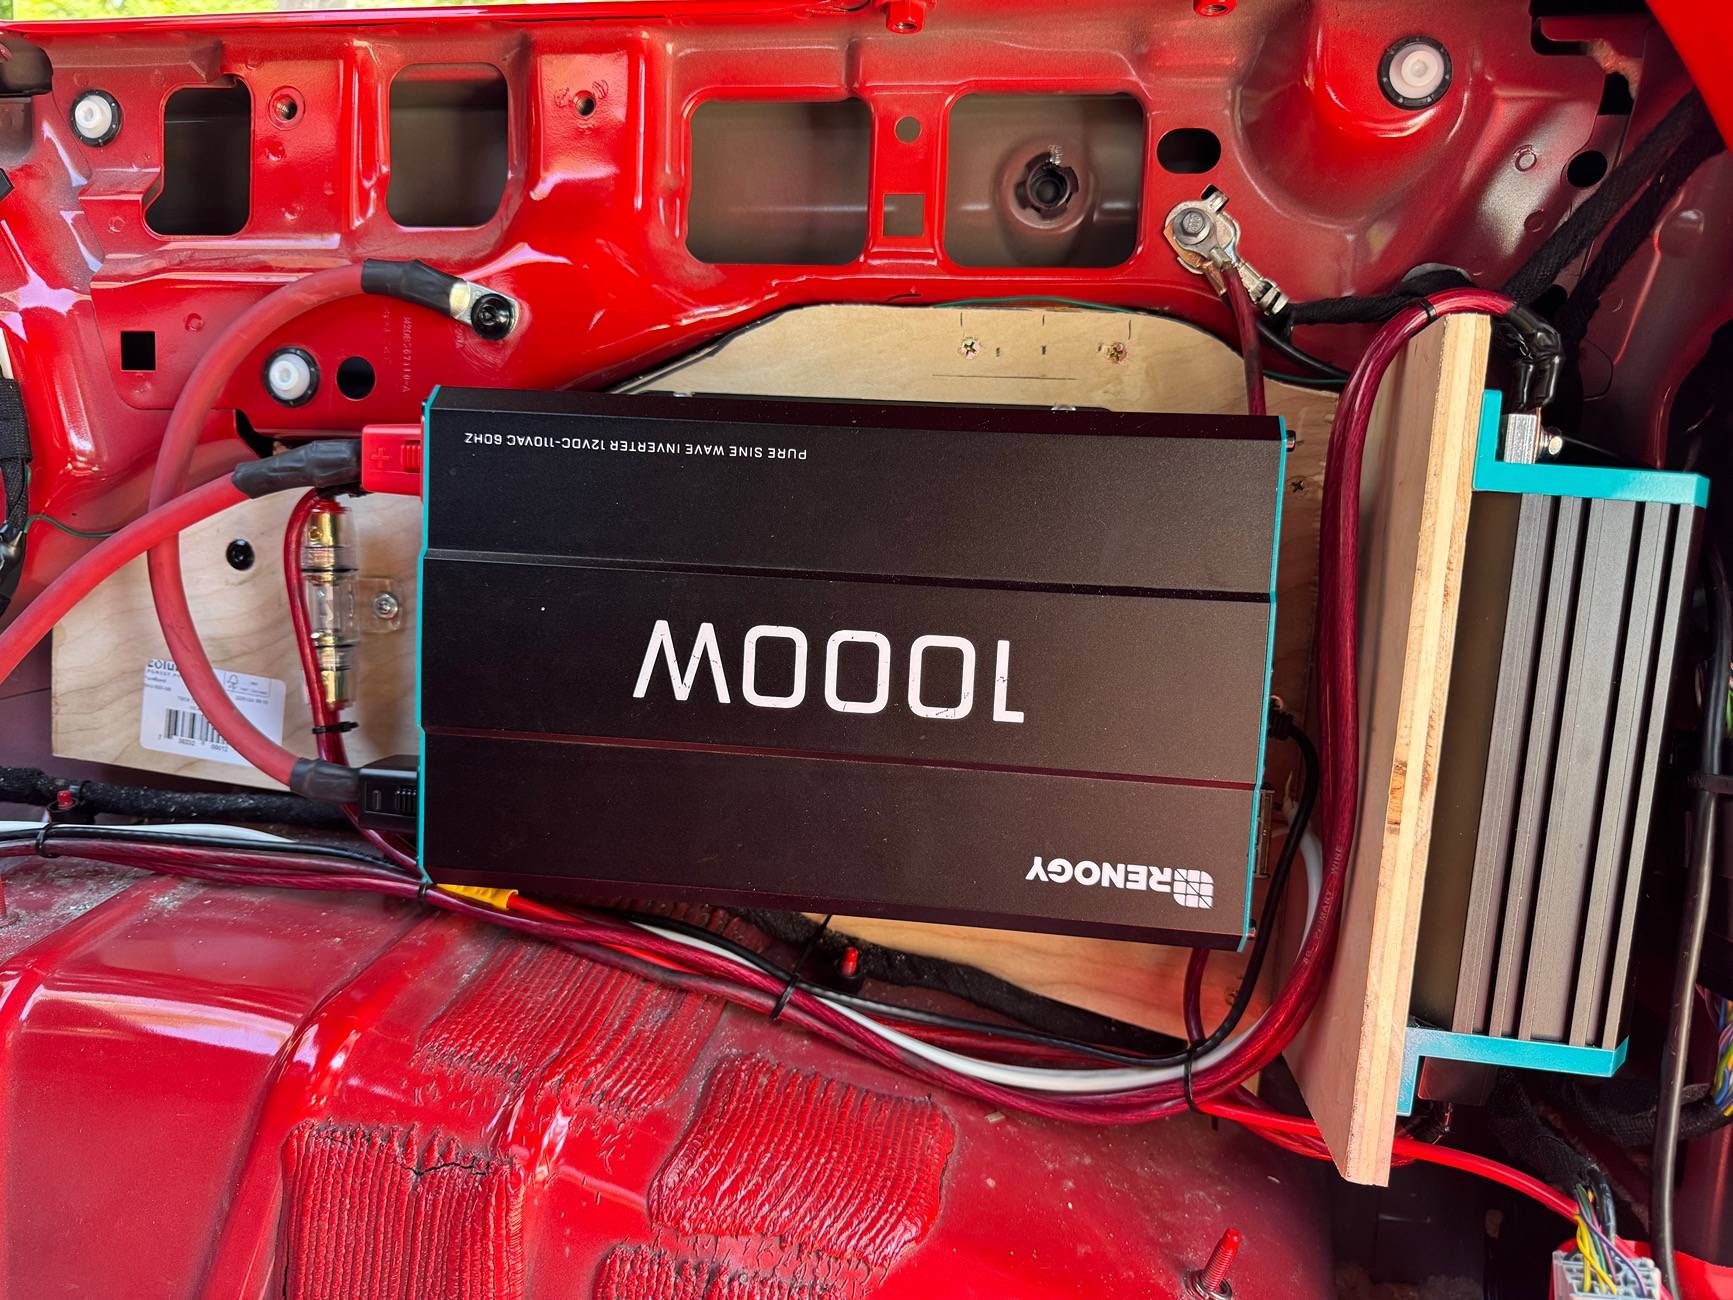
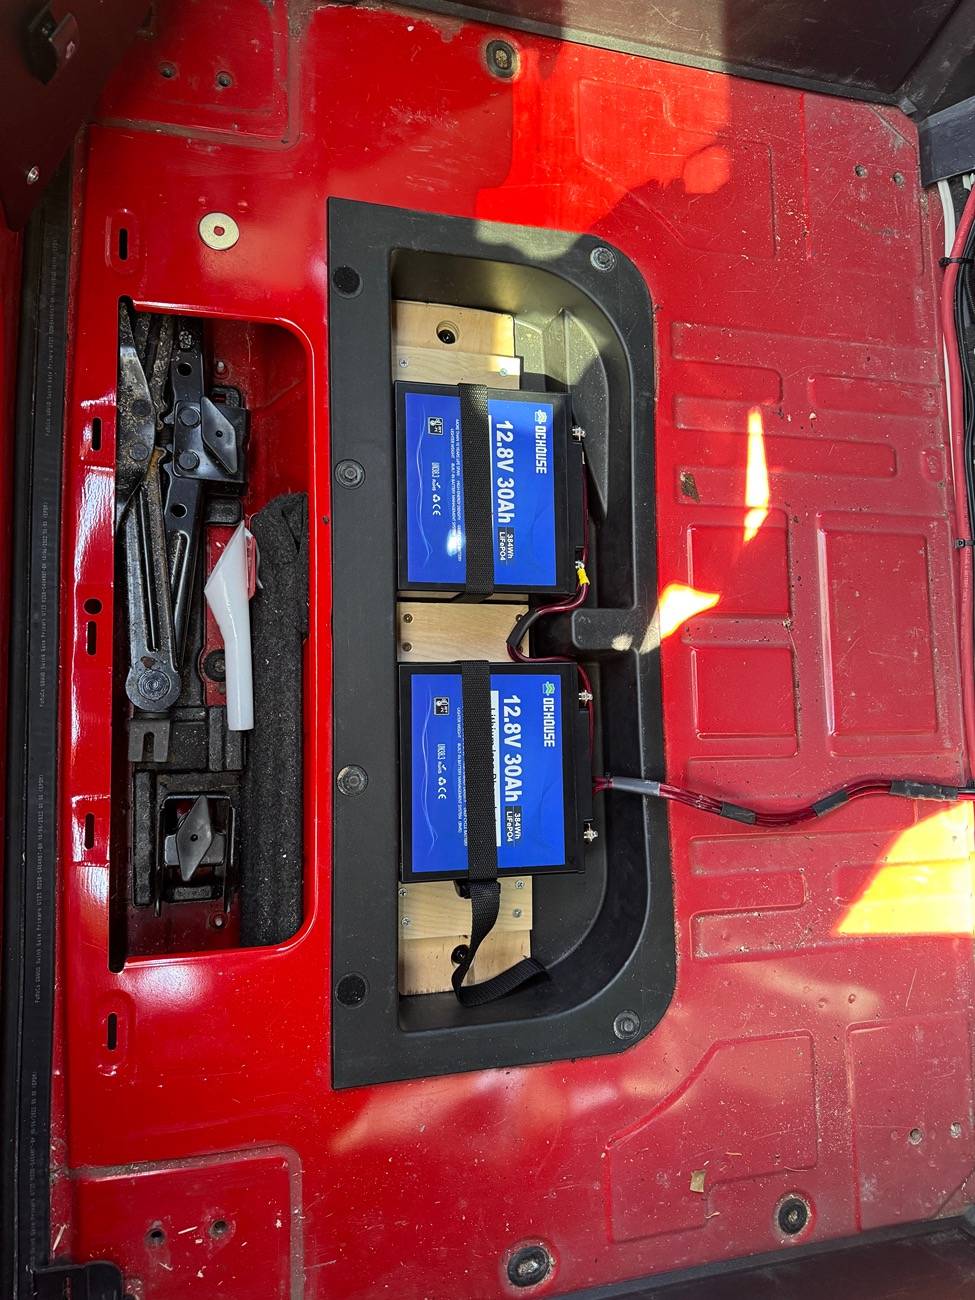
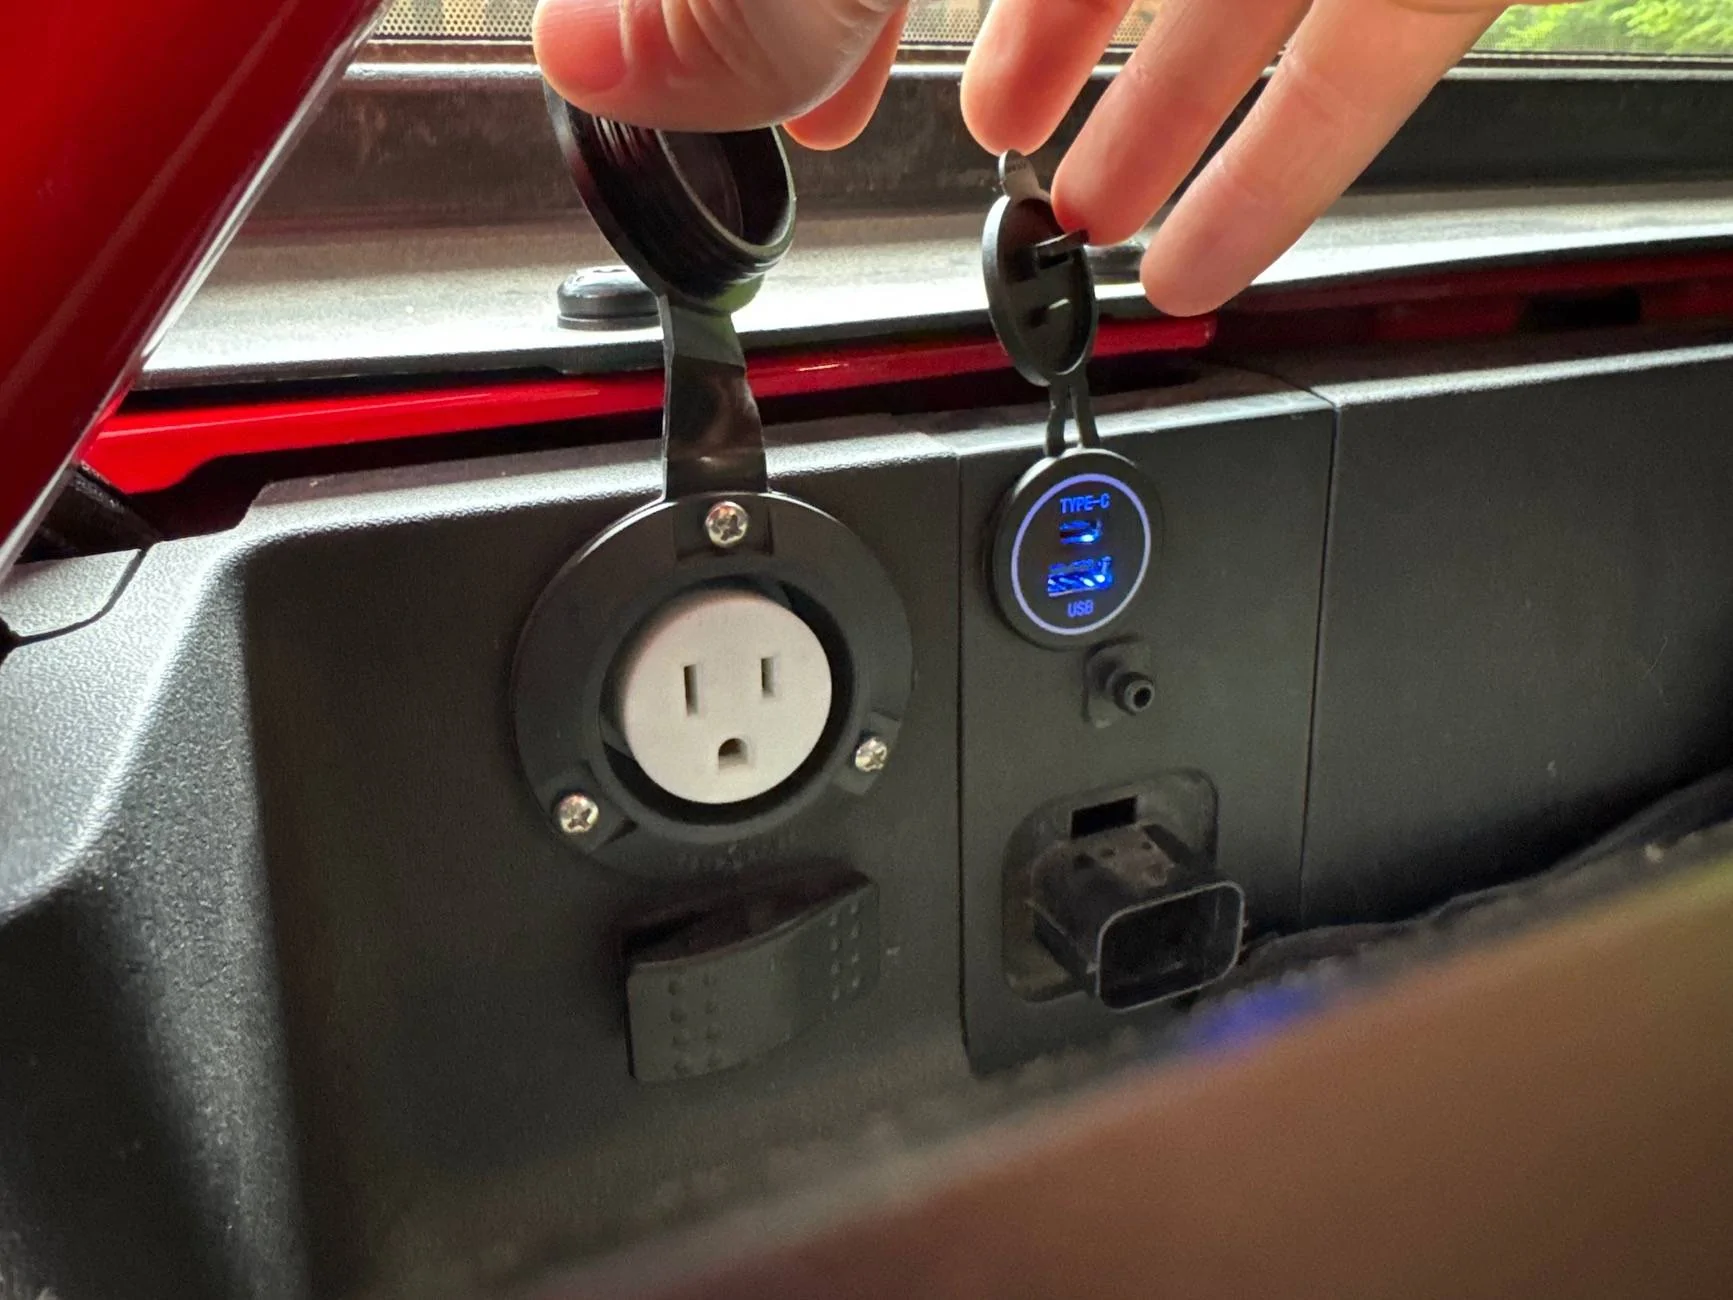
The fridge only draws .8Amp hours so for the first 2 summers it ran of the Bronco battery and I was just diligent to turn of the fridge if I wasn’t going to drive the Bronco for a few days. Now is wire to aux batteries. I was able to mount a Renogy 1000w inverter and 20amp DC to DC charger where the factory amp and sub would be. The inverter is used so infrequently that it’s just wired to the Bronco battery and I make sure it’s running if I use it. Usually I make a big smoothie in a blender before a bike race. In the storage well is 2 30Ahr batteries in parallel to power the fridge and the awning lights. I added power ports for the fridge, 2USBs and a singe 120v. I used 2 gauge OFC wire off the batter to the back to power the whole system.
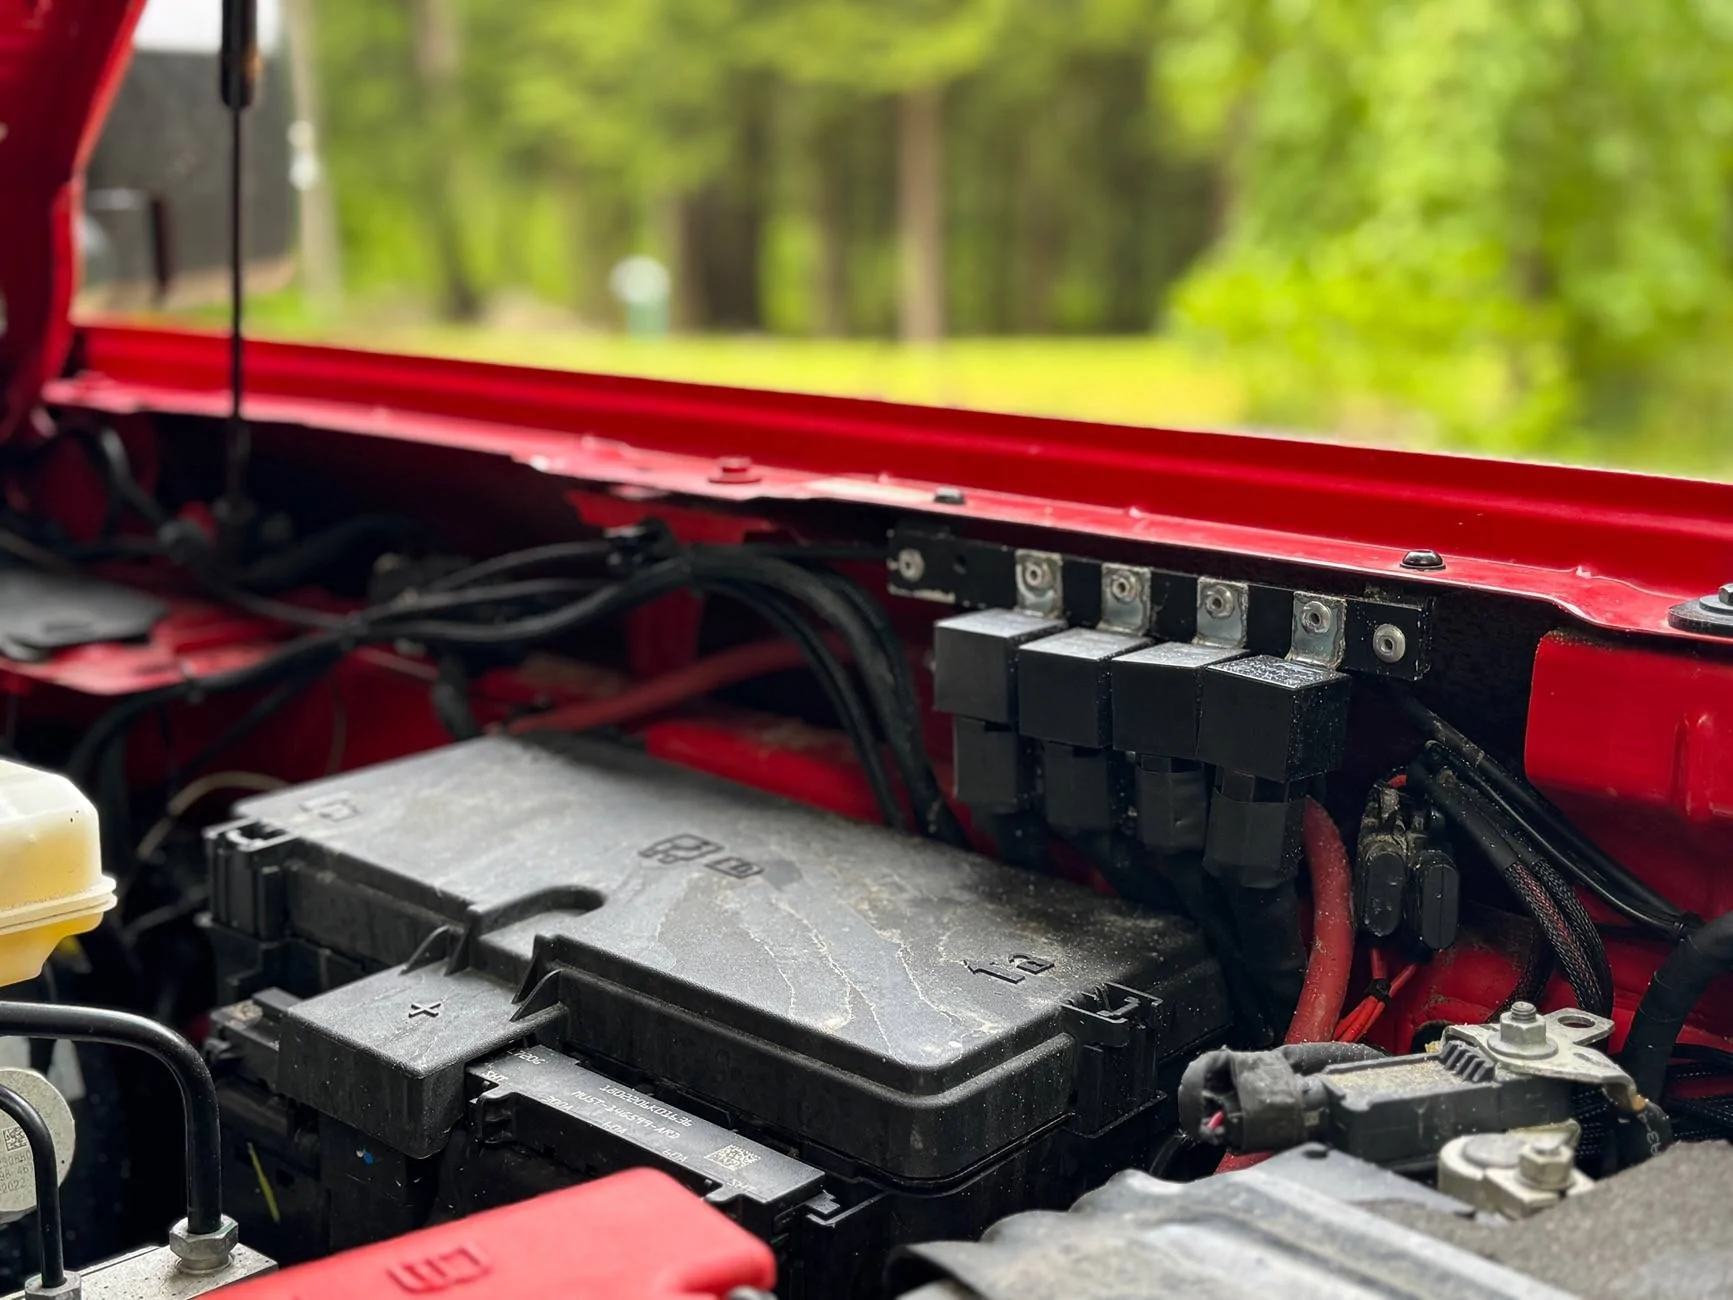
I know the Aux switches can handle the load of the lights but kept the relays for ease of wiring. I had to cut. Whole lot less and gives some extra protection
On Board Air:
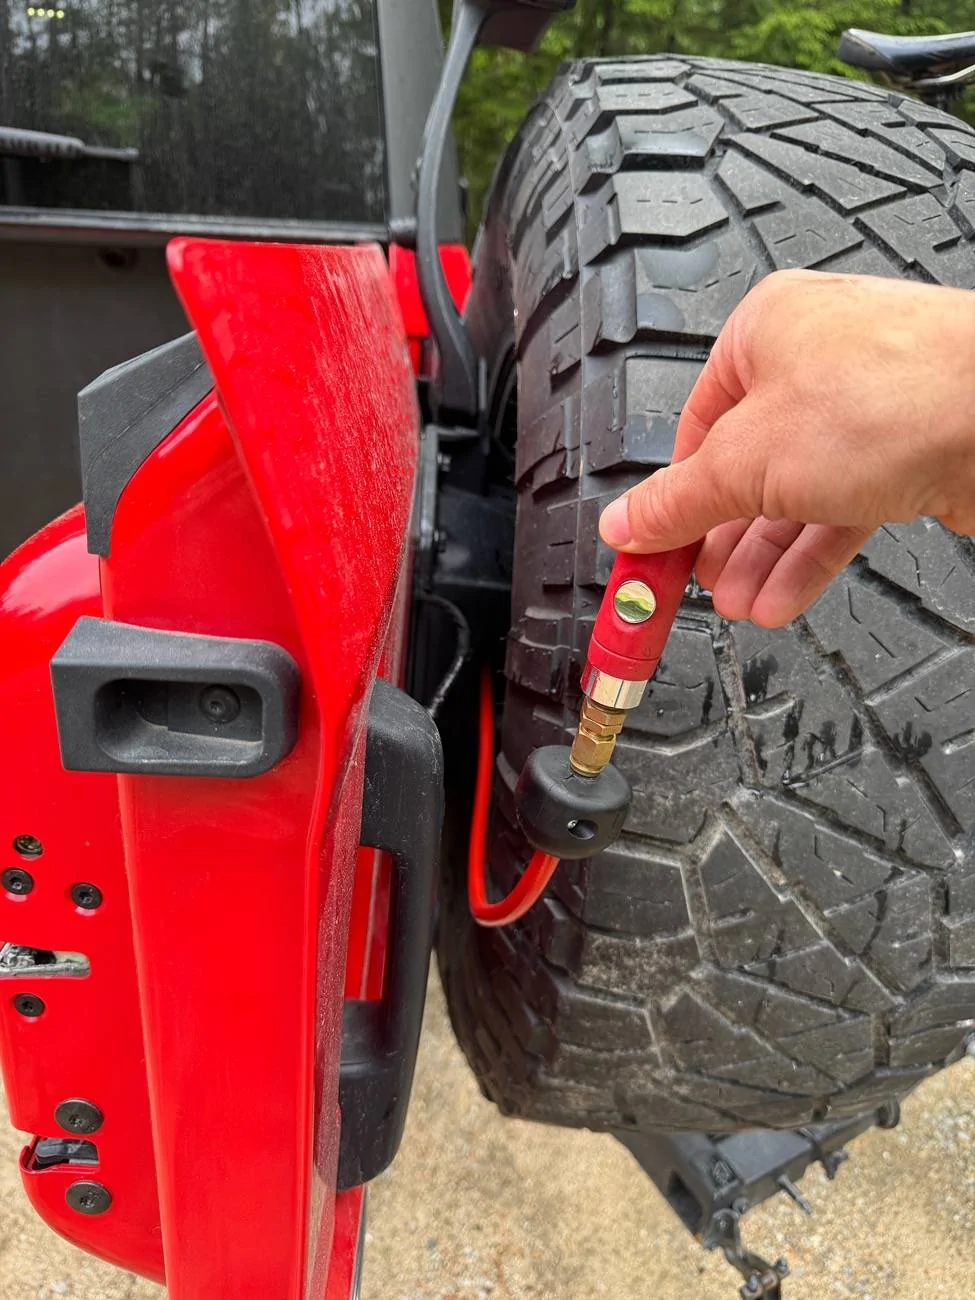
I like the American Adventure Lab ARB tailgate compressor mount but no the price tags for the entire kit. So I bought their blank tailgate panel and build my own system with an ARB “knockoff” from Amazon that is an ARB compressor without the ARB stickers on it for $130. I also wanted a hose real but those are stupid expensive until you figure out a $40 26’ 1/4” hose reel from Harbor Freight fits in the spare tire mount once it’s wall mount bracket is removed.
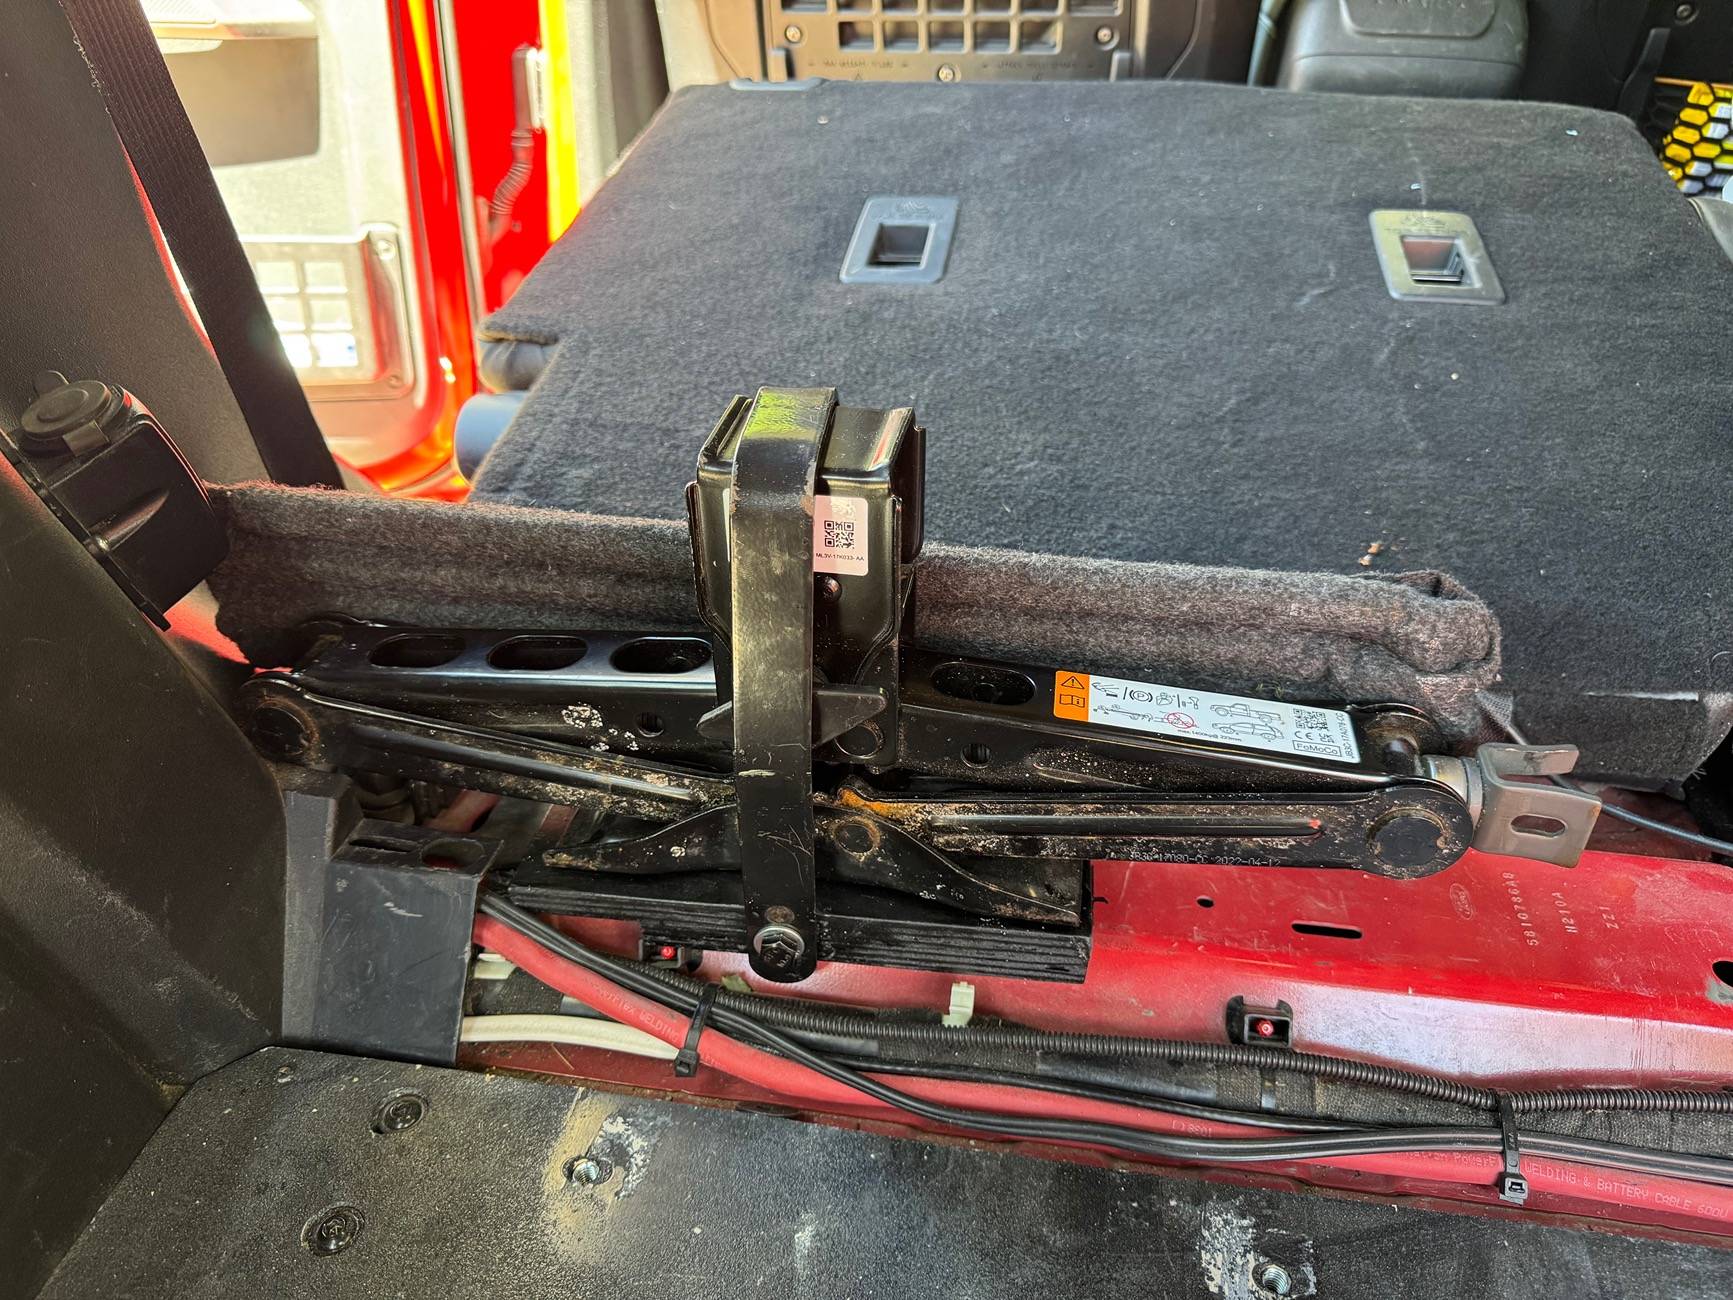
Last mod was moving the Jack since the floor plate is bolted down with all the kitchen stuff on it. So I built a mount that fits between the fridge and the back seat.
Load helpers:
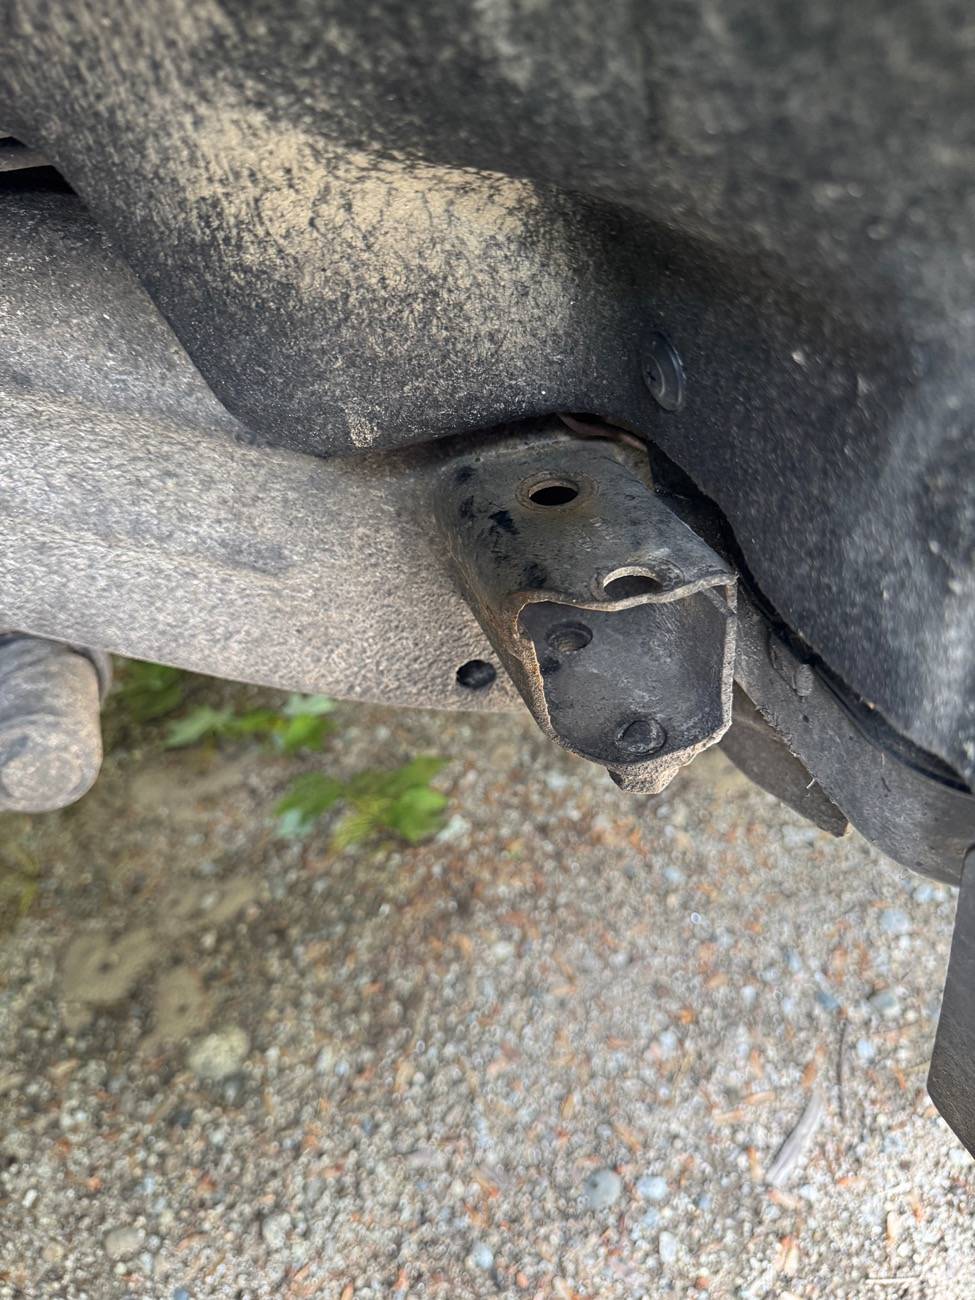
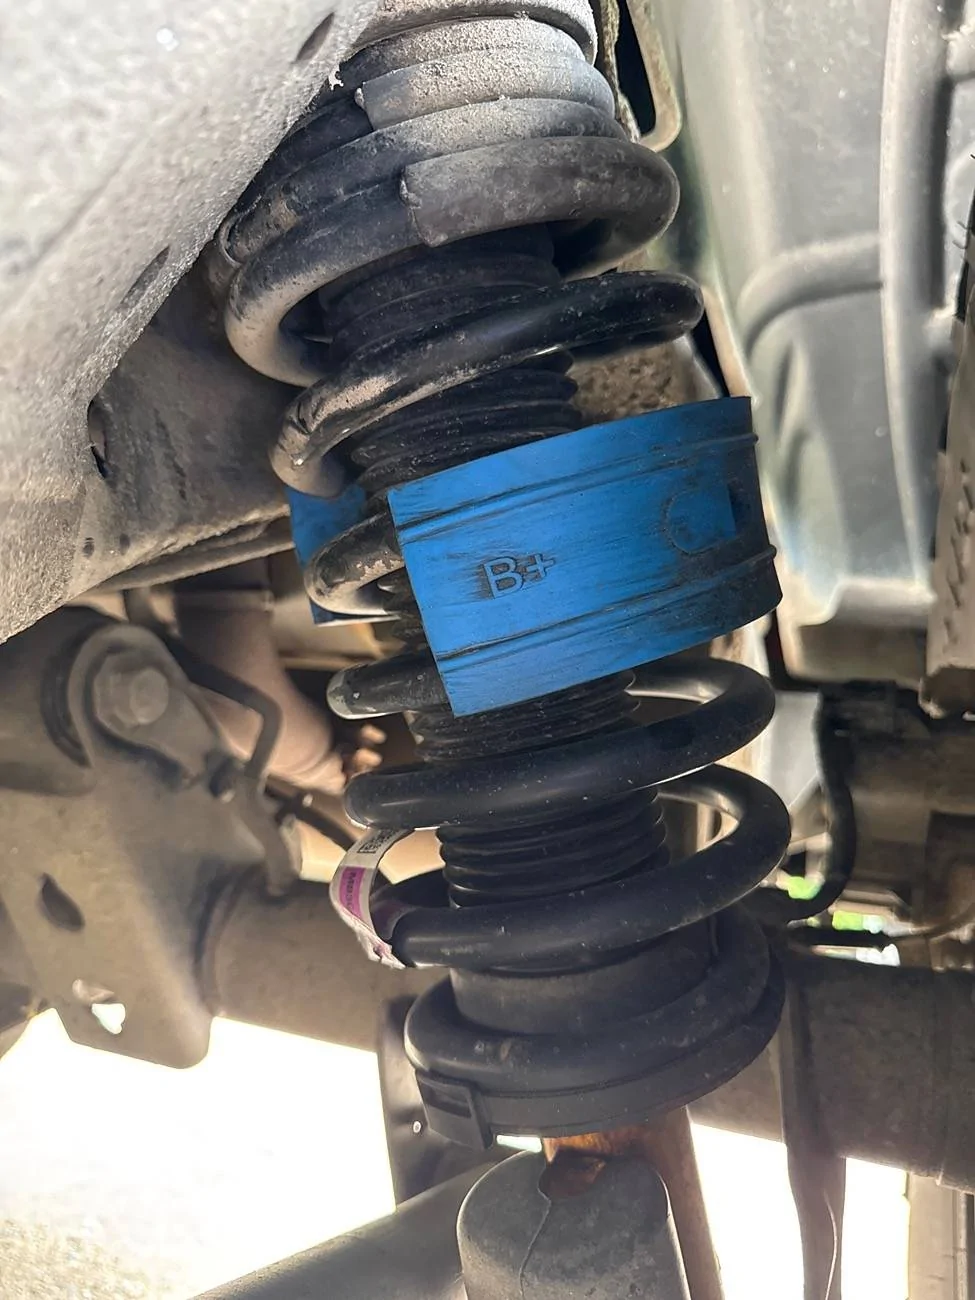
To help carry all the weight I added some load helpers from Amazon. It’s an easy $35 temporary fix until I can swap the springs out for Dobinsons that are sitting on the bench. With 50k miles on it already I may find some takeoff shocks and just add the Dobinsons and swap everything.
I hope this thread sheds some light on the fact that you don’t have to spend $$$$$ to have a fun functional “Overlander” with all the same features that the million dollar rigs have. I’m happy to go into more detail of stuff if you have questions
2022 Badlands (non-sas) purchased Oct 22
2.3M 7MT
Ford Performance Tune
B and M shifter
Catch can
IAG bolt on steps
Zone 3.5” lift on factory suspension
37/12.50r17 Nitto Ridge Grappler
Rhino wheels1:7x9.5 +6 offset
Yakima bike rack and Kuat swing out. (After a lot of internet searching the Kuat swing out has the widest swing so it allows the bike to be close to the spare tire but swing wide enough to clear the side of the Bronco. Also it opens to 120* which allows the tailgate to swing wide open.
Rough Country lighting in the modular bumper and ditch lights. I’m not racing Baja at night. They are plenty bright enough for cruising back roads
On the roof:
At the time I bought the Bronco there weren’t many options for roof platforms and what was available was too narrow for what I wanted. So I bought a Yakima 54”x84” platform and used 3 sets of Rhino rack feet. I went with the Yakima platform vs the Rhino because the load bars were perpendicular to the vehicle vs parallel. I felt it makes it easier to walk up there and mount the stuff I already had up there. I used the Rhino feet since they had the shortest stack height. I worked up the nut to drill the roof and figure out I could mount the feet around the most structurally parts of the roof. The most forward foot mounts right over the latch for the mid roof section and the rear feet land right where the factory rack feet sit. I now have a factory rack I may cut up and use the forward part as a4th mount


Mounted to the platform is a Yakima RTT and an OpenRoad 270* awning.
Next I needed storage on the platform and after looking at all the “overland” stuff I was not going to pay the overland tax. I went down to Home Depot with a tape measure and found the Husky bins fit the space I had left perfectly. I liked the quick on and off some of the premium storage bins but all that was out of the budget. I knew straps were going to be my only option so I grabbed some $8 straps, M8 t slot hooks and the sewing machine and got to work creating quick mounts for my bins. The rings give some leverage to pull down on and the just tie off the tails. I cut the straps to length and bar tacked with nylon thread in the sewing machine. The ends are secured through the hooks with some 1/4” threaded rod and nuts staked on them. You just push the loose strap though and pull the bolt out and everything is free.

The Kitchen:
I had a kitchen in my 5th gen 4runner that had a similar design. I decided to follow my previous design after spending many hours on the forums seeing what others did. Most seemed to just use up a ton on space for the sake of “organizing” there stuff and have some cool drawers. The kitchen wastes no space. Is build from 1/2” birch plywood and a few coats of water based poly. It’s covered with Raptor liner. The dry goods box fits inside the kitchen box. Just pull the dry goods box out and now there is plenty of prep space. The little drawer holds all the utensils for a family of 4 to eat a meal and the open storage holds the pots and pans that fit a small stove. The fridge is a 47qt ARB on an ARB sliding drawer. all mounted on a floor plate with T nut fasteners just like a Goose Gear floor system.
Electrical:
The fridge only draws .8Amp hours so for the first 2 summers it ran of the Bronco battery and I was just diligent to turn of the fridge if I wasn’t going to drive the Bronco for a few days. Now is wire to aux batteries. I was able to mount a Renogy 1000w inverter and 20amp DC to DC charger where the factory amp and sub would be. The inverter is used so infrequently that it’s just wired to the Bronco battery and I make sure it’s running if I use it. Usually I make a big smoothie in a blender before a bike race. In the storage well is 2 30Ahr batteries in parallel to power the fridge and the awning lights. I added power ports for the fridge, 2USBs and a singe 120v. I used 2 gauge OFC wire off the batter to the back to power the whole system.
I know the Aux switches can handle the load of the lights but kept the relays for ease of wiring. I had to cut. Whole lot less and gives some extra protection


On Board Air:
I like the American Adventure Lab ARB tailgate compressor mount but no the price tags for the entire kit. So I bought their blank tailgate panel and build my own system with an ARB “knockoff” from Amazon that is an ARB compressor without the ARB stickers on it for $130. I also wanted a hose real but those are stupid expensive until you figure out a $40 26’ 1/4” hose reel from Harbor Freight fits in the spare tire mount once it’s wall mount bracket is removed.

Last mod was moving the Jack since the floor plate is bolted down with all the kitchen stuff on it. So I built a mount that fits between the fridge and the back seat.
Load helpers:
To help carry all the weight I added some load helpers from Amazon. It’s an easy $35 temporary fix until I can swap the springs out for Dobinsons that are sitting on the bench. With 50k miles on it already I may find some takeoff shocks and just add the Dobinsons and swap everything.
I hope this thread sheds some light on the fact that you don’t have to spend $$$$$ to have a fun functional “Overlander” with all the same features that the million dollar rigs have. I’m happy to go into more detail of stuff if you have questions

Sponsored
Last edited: