Nice! I just finished installing the RPG Offroad stage 3 Bronco kit last weekend (the non-mid travel kit) with Fox 2.5 coil overs.
I'm kinda jelly of your mid travel kit.
I'm kinda jelly of your mid travel kit.
Sponsored
Thats an impressive build, Trailrax. I only use the Half-Rax (Photo) because i do beach day trips and take the top off. Also have a Besttop SkyRider. Is there an awning that will work with the half rack?The TrailRax Badlands Bronco Build!
Thank you to our partners, their products and brand will be mentioned below!
RPG OFFROAD
Advanced Fiberglass Concepts @ADV Fiberglass
Heretic Studio
Go Fast Campers
Method Wheels
Falken Tire
Rotopax
Rugged Radios
67 Designs
Dakota Lithum
REDARC
GP Factor
Goose Gear @goosegear
Equipt Expedition Outfitters
Alu-Cab / OK4WD
Lethal Performance @LethalPerformance
HEST
Below we will summarize the build with the specific products we used from each brand mentioned above. Be sure to check them all out! The links above are not affiliates but are just a quick way for your to get to products we use and save your time from researching what products to go with! Each specific product will have its own post following this, it will go into detail on why we went with it after our years of experience offroad!

Suspension
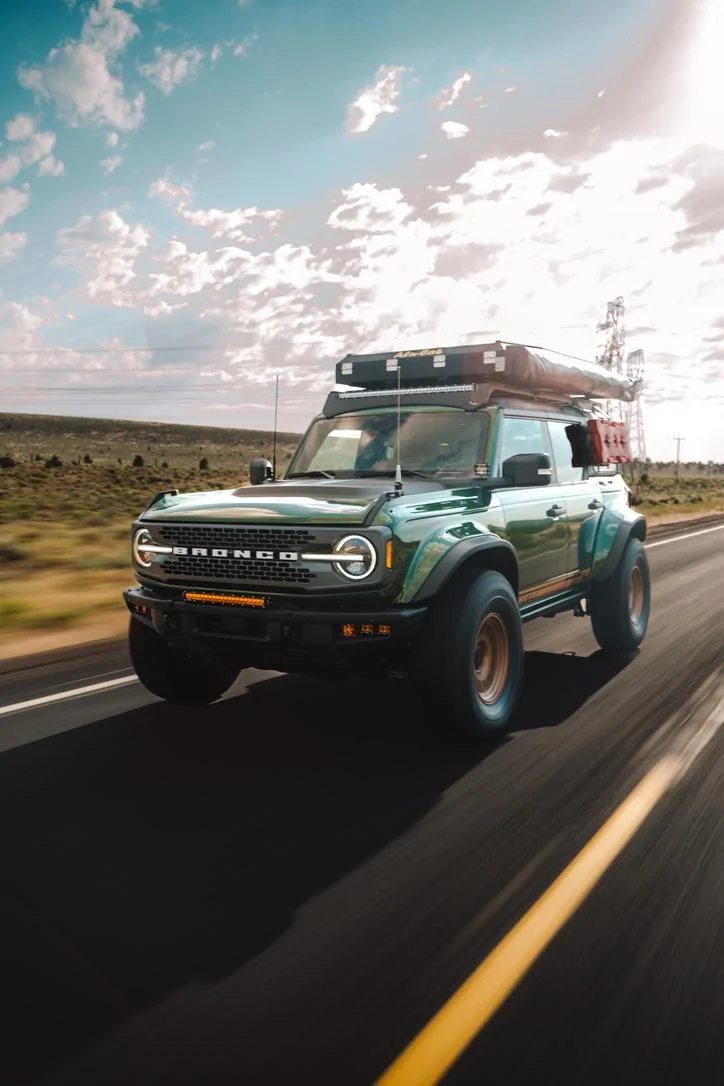
This Bronco is on an RPG Offroad Mid travel kit Which essentially widens the track of the Bronco by 6" total (3" per side) matching similar width numbers to the Bronco Raptor. The guys at RPG summarized this kit as a Raptor conversion system for those who have a Bronco that they wished they could have a Bronco Raptor. The kit is very well engineered and RPG offers many solutions from mild to wild. We opted for the two tube bypass Fox Performance 3.0 shock up front for some better control on the trail. Right next to it is a Fox Performance 2.5 coil over specifically tuned by the guys at RPG themselves and RCV front Axles making this system truly rides better than stock. For the Rear, we have the Fox performance 2.5 Coil overs, RPG Offroad Billet Lower links, RPG Offroad billet upper links.
Wheels and Tires
With our history with Falken tires on our rigs in the past, we knew that the Bronco needed a dependable tire that was both rugged and quiet on the road. Falken offered the new R/Ts and we knew we wanted them. We went with the 37x12.5x17 Falken Wildpeak R/Ts and we are so stoked to be using these, really quiet on the road and offroad, these things grip like no other! We are interested to see how they do in mud and snow. For wheels, we are huge fans of Method Wheels so we of course had to go with their bead grip tires in Bronze 706's

Fiberglass
Advanced Fiberglass was able to fit us in their busy schedule and installed their 8" kit front and rear on our Bronco to match the same new width with the mid Travel kit from RPG. we also got their heat extractor hood to keep the heat down in the engine bay.
Lighting
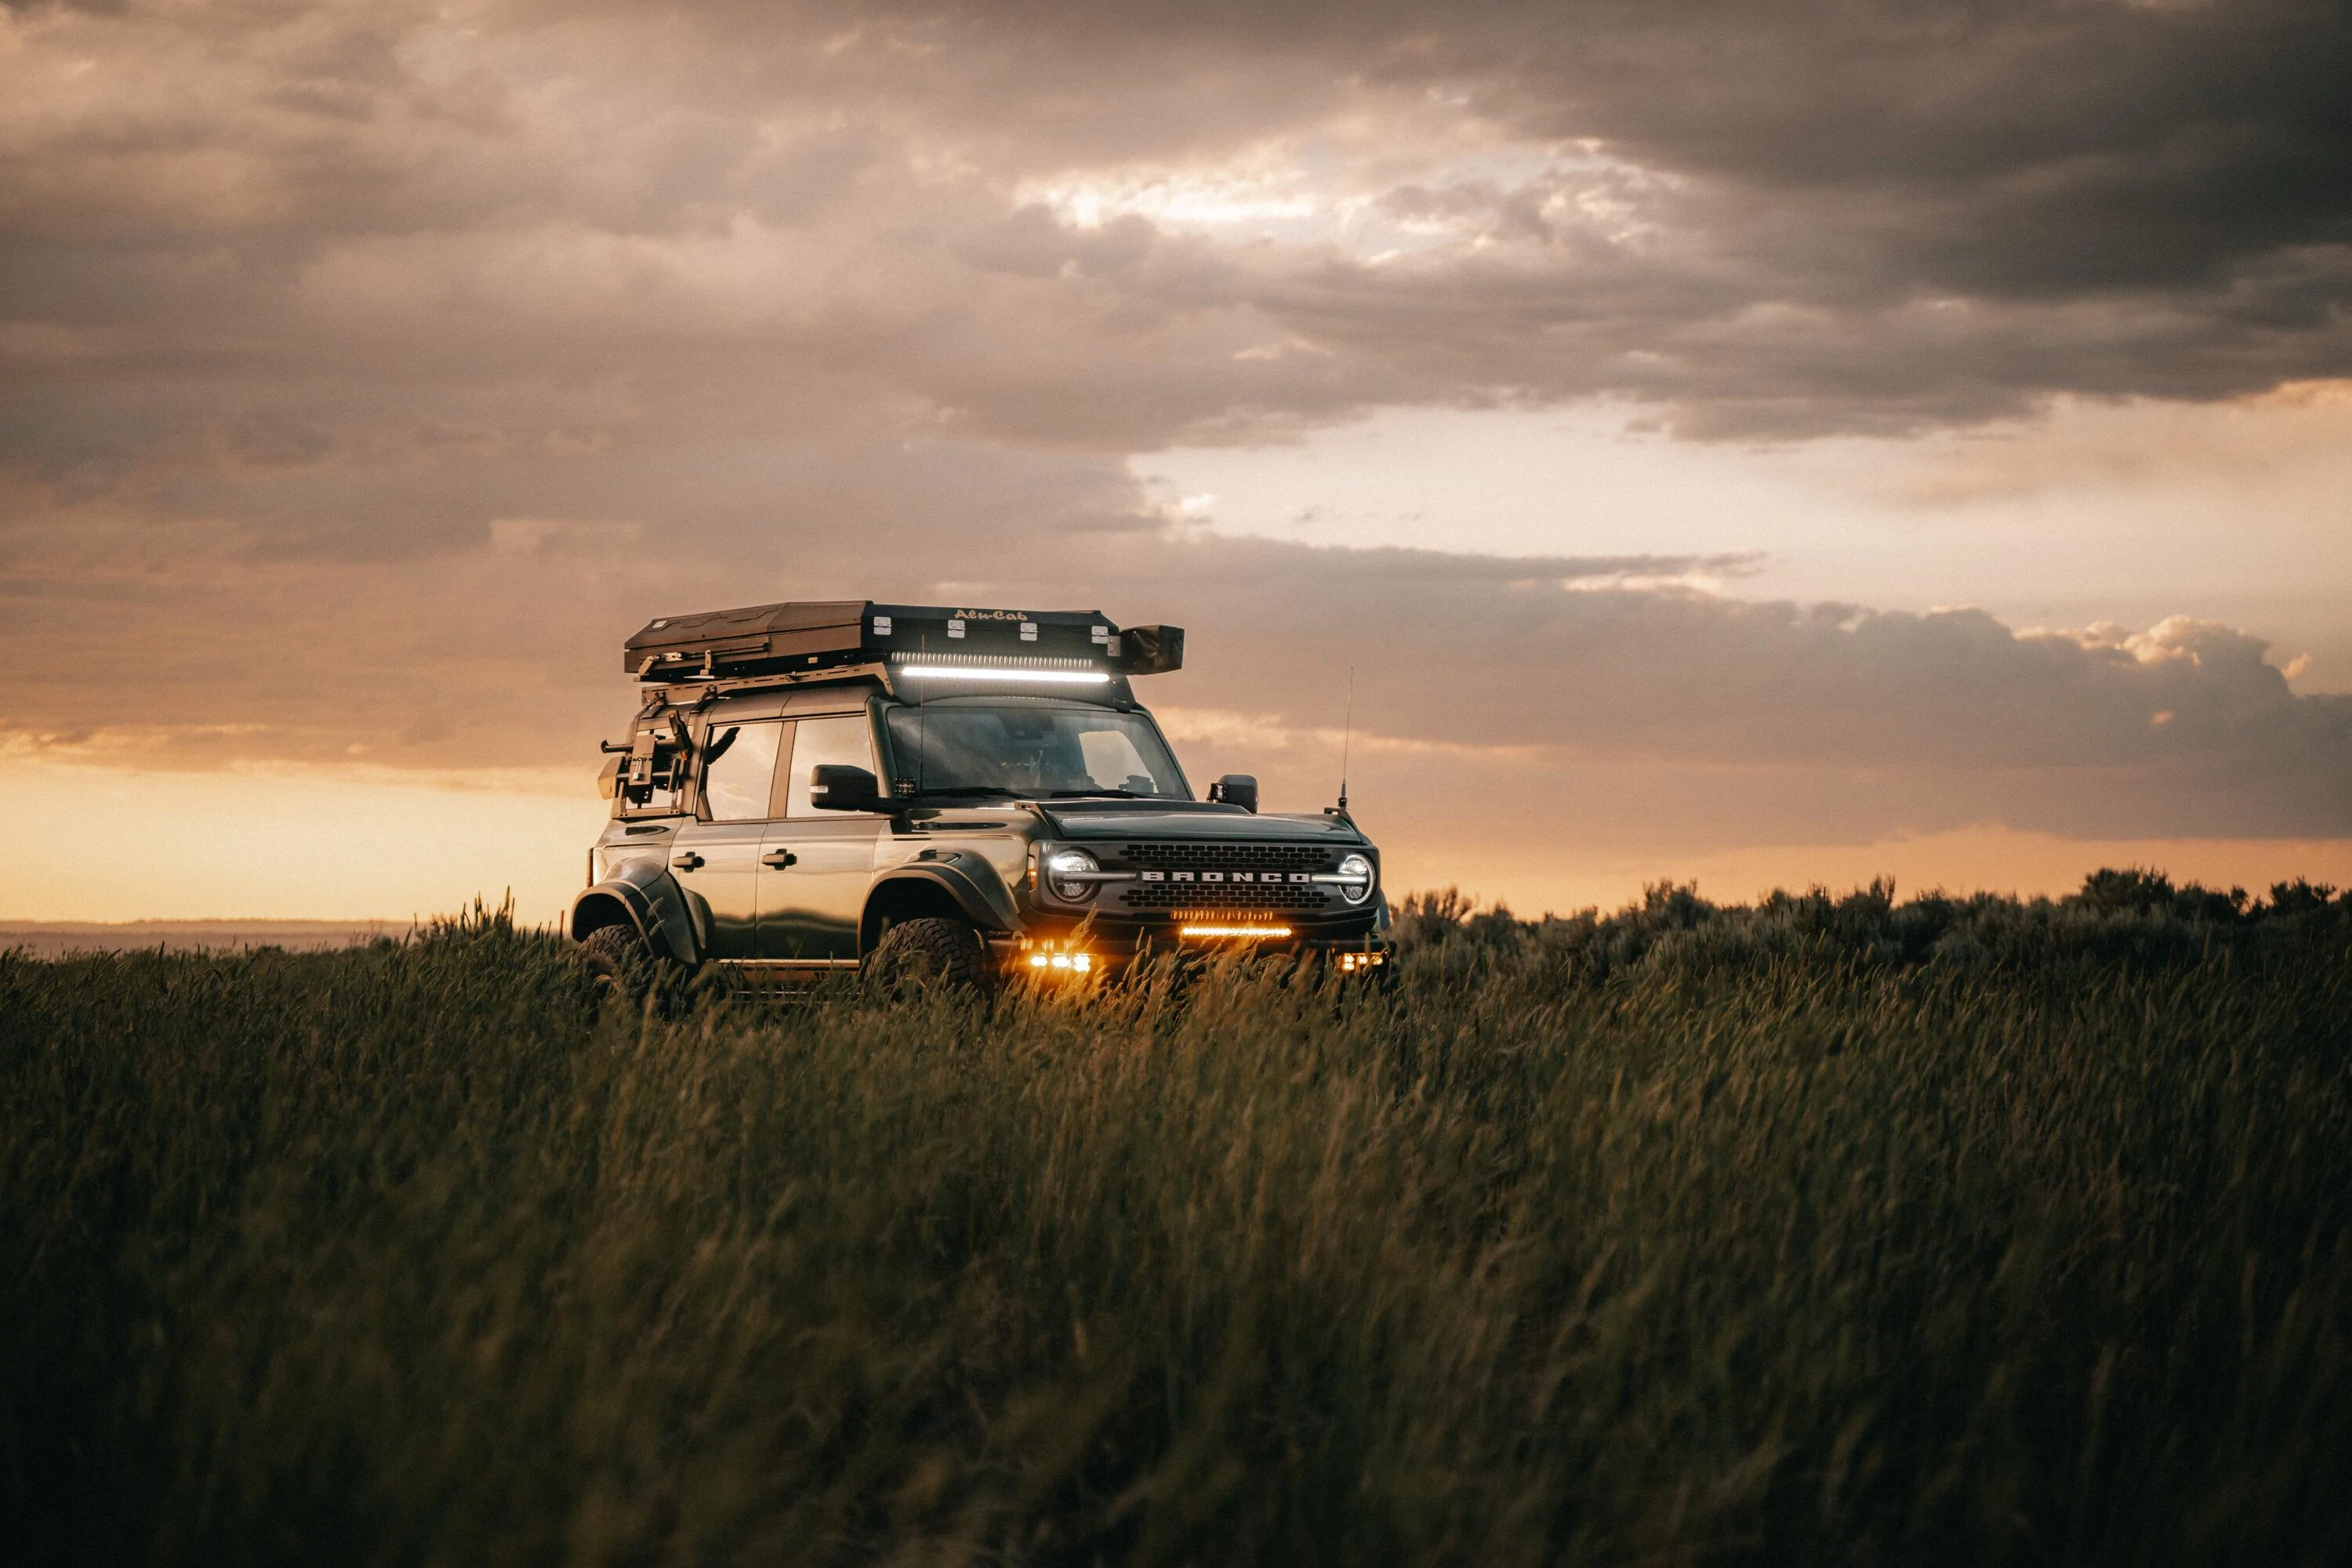
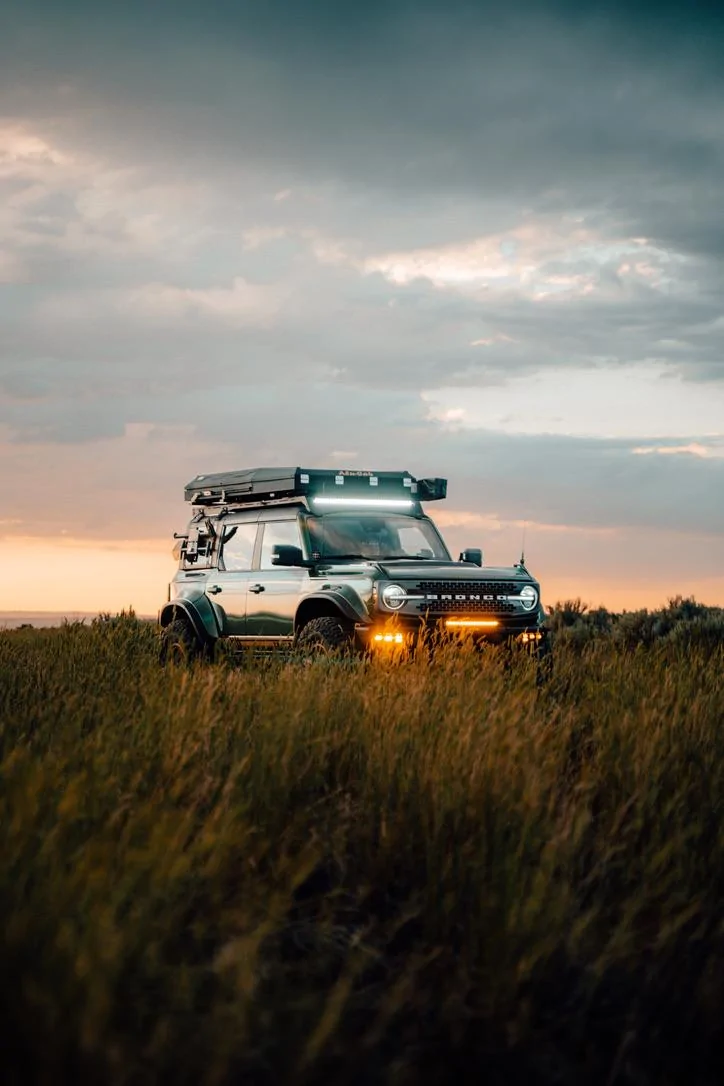
Heretic studio has always been our go to and will continue to be. We are running their 40" Bar on our rack with the 40" cut out deflector (clear combo lens), pair of quattros on the A pillar (clear combo), LED fog light kit (all Amber), 20" bumper light bar (amber), Dome lights on the rack, Dome lights for the rear window, Ba-2 flood amber for chase lights

Tents
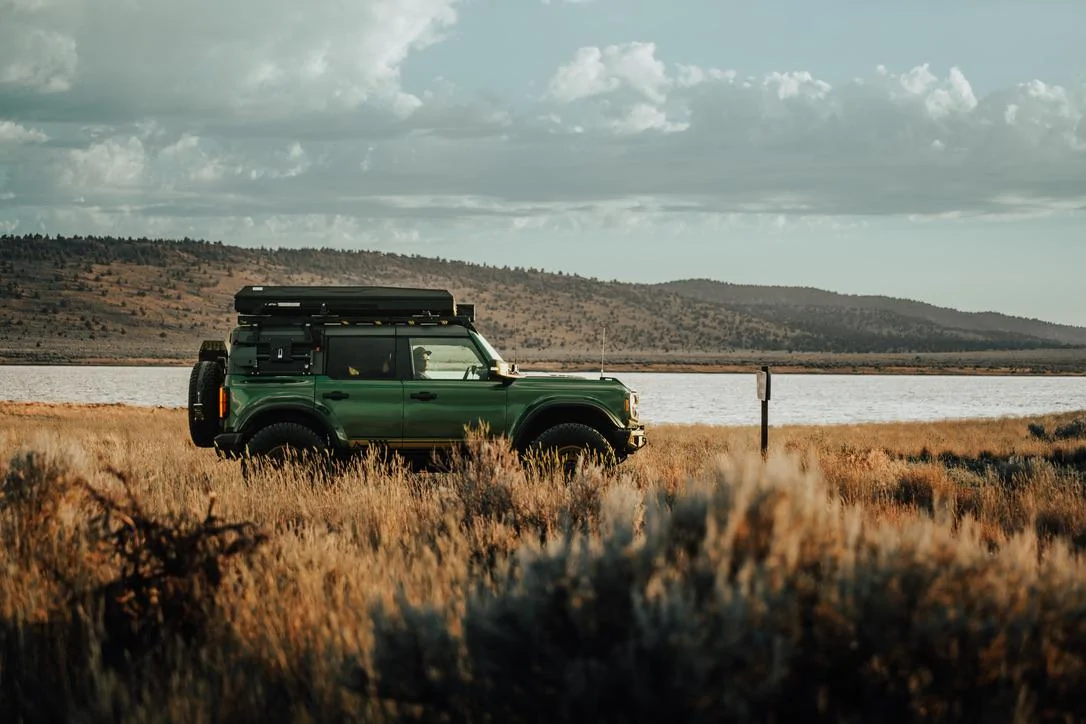
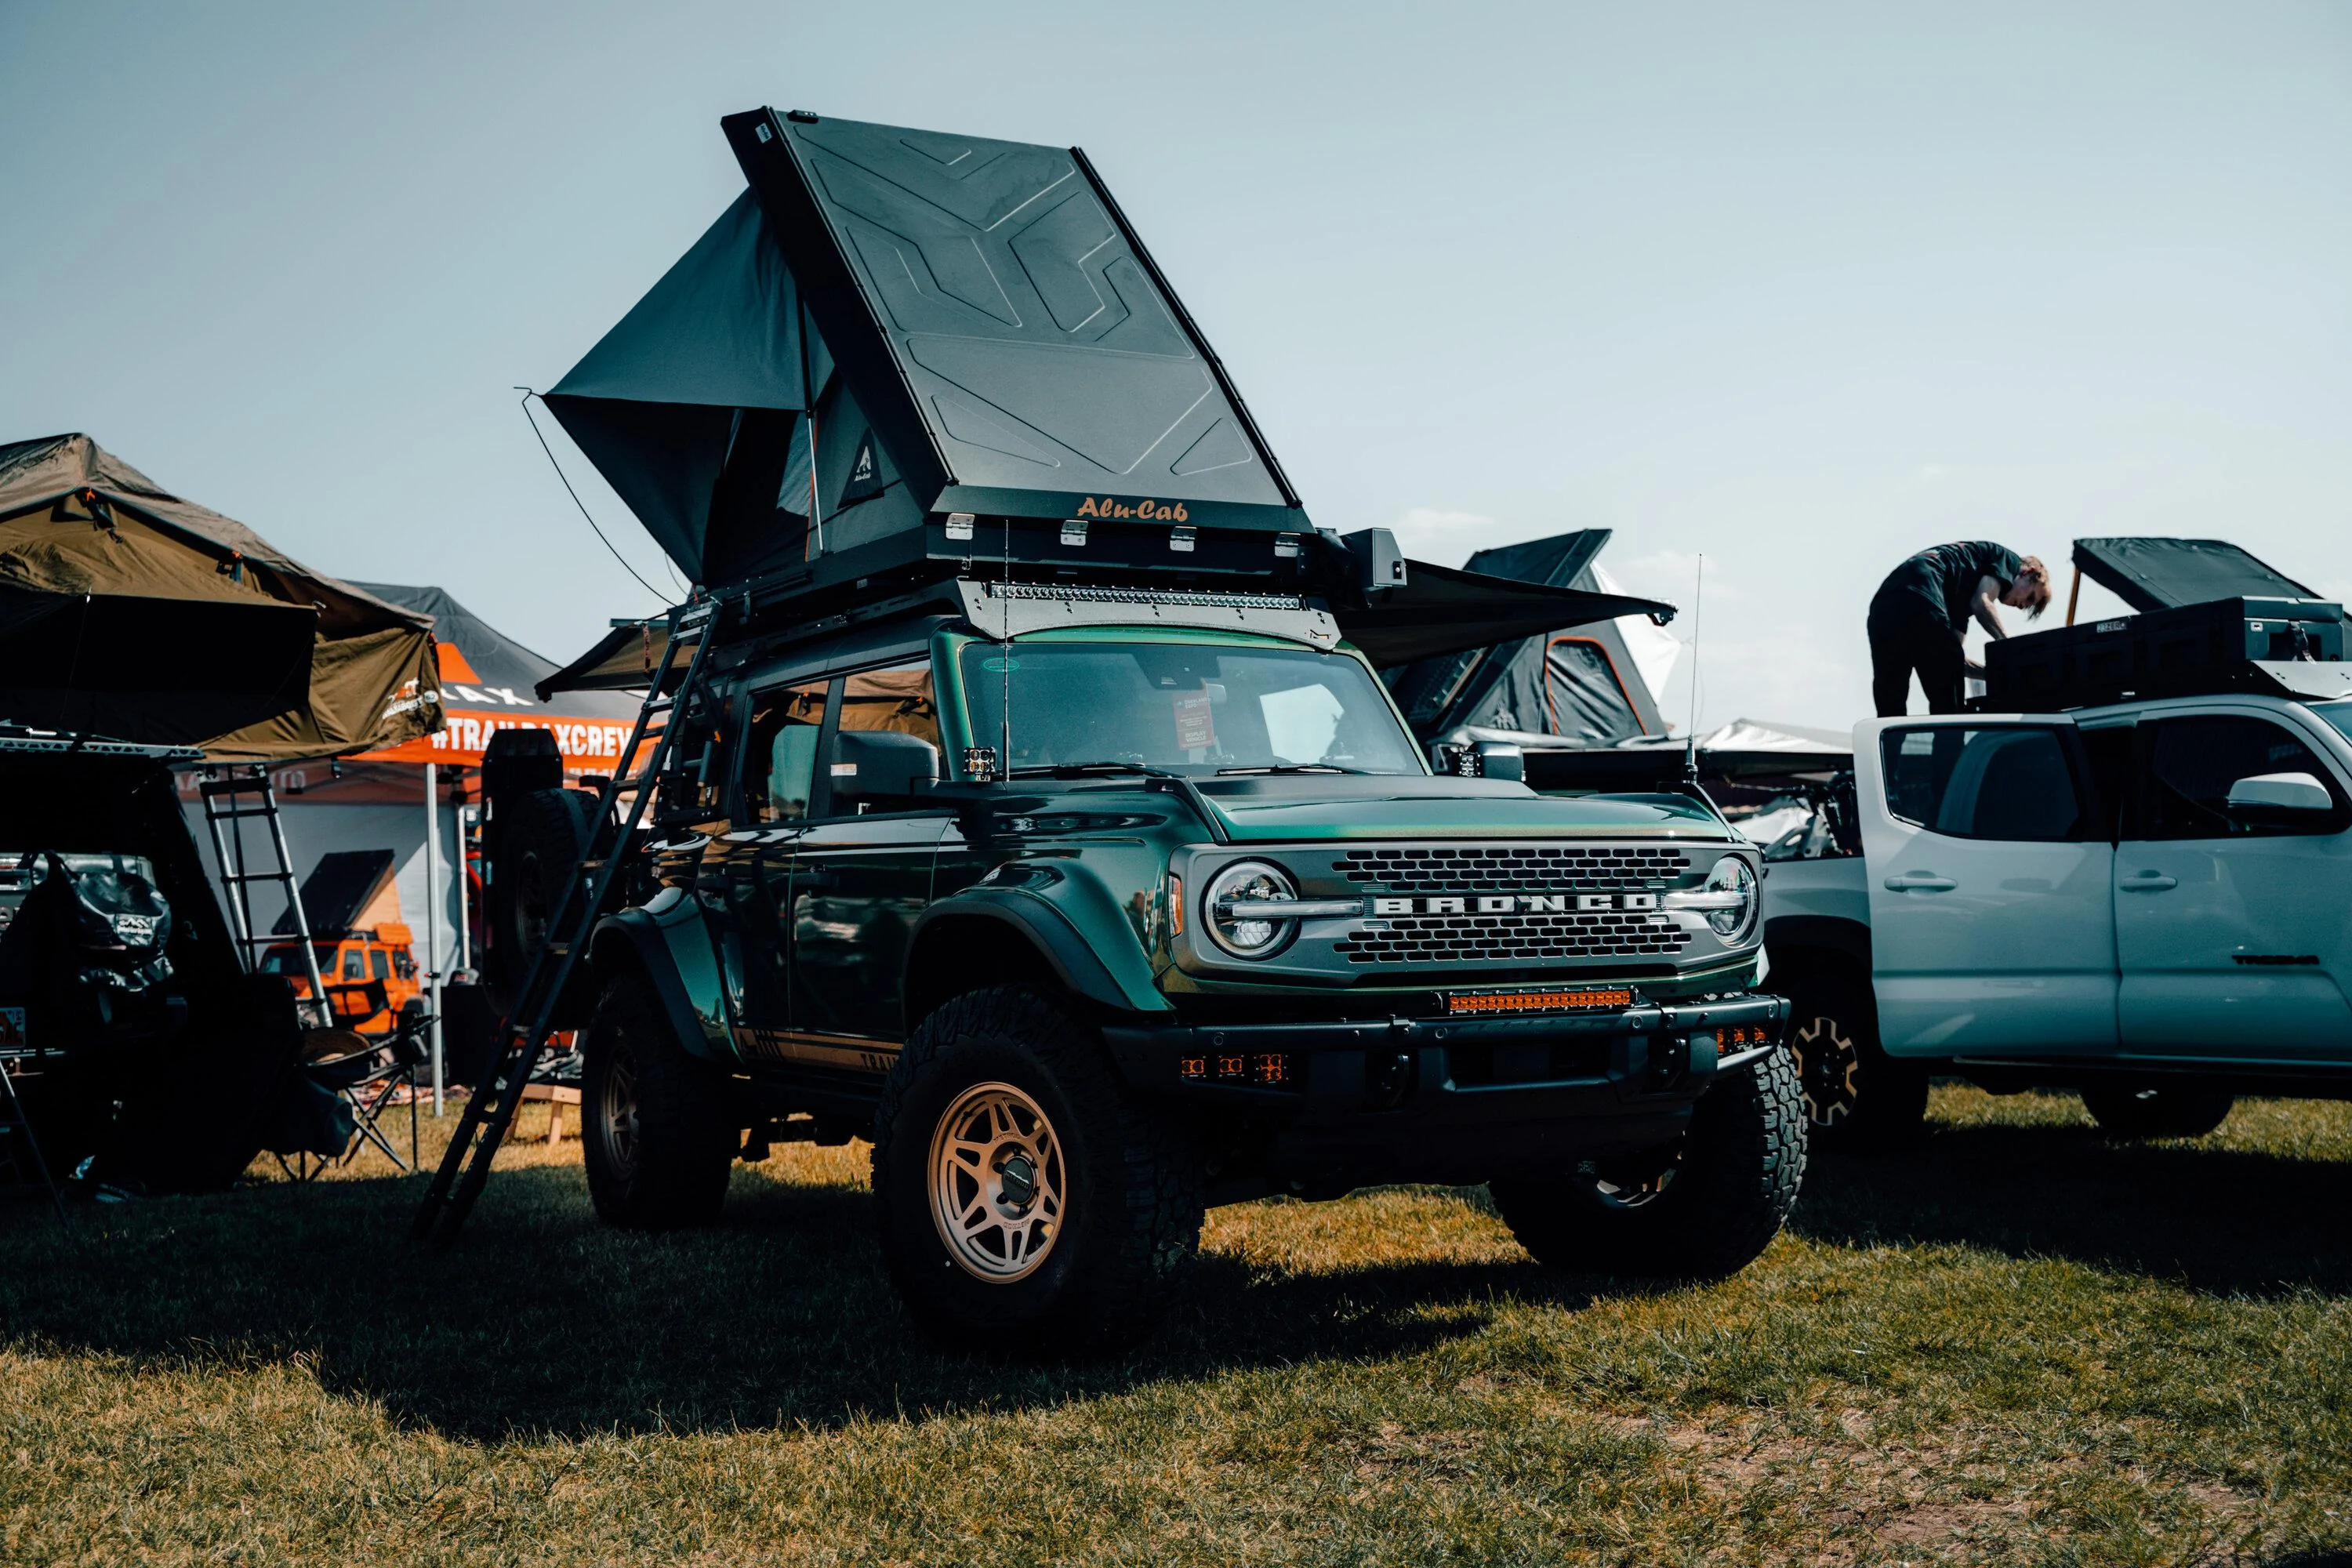
For weekender trips and when we are in need of a lighter set up, we opted for the Go Fast Camper Superlite V1, fantastic tent and highly recommend for Bronco owners that really like to push the envelope of their Bronco's capability offroad. For longer expedition like trips, OK4WD and Alu-Cab USA worked with us on getting their 3R. Lots of customers have asked about the Alu-cab 3R tents on our Bronco TRMR rack, we are happy to work with them as well as GP Factor to be coming out with a mounting kit very soon for 3R tents and similar for your Bronco TRMR Rack. We also mounted the 270 shadow awning LHS.
Communication
We are running a Yaesu FTM-400R with a removable face plate and Rugged Radios GMRS/VHF antenna. Our Radio has been MARs modded allowing us to communicate through both GMRS and HAM. We also mounted the radio on the rugged radios mount as well.
Interior
67 Designs made it easy to organize our cockpit with their Bronco rail, We used their G2 universal Phone mount, Tablet mount, and Magnetic mic mount on our Bronco rail which keeps everything within reach and organized in the cockpit, super happy with it!
Goose Gear
We opted for the Sleep and storage package for the Ford Bronco. We opted for the 1/3-2/3 grey great system and really expands the storage capabilities of the interior. One mention that was an after thought for us but can save a ton of headache for you... If you plan to run a table on your tailgate, get a 2/3-1/3 so your 2/3 drawer can open without hitting the table, when deployed.
Dual Battery system
We used a battery tray under the rear cargo tray that holds 4x Dakota Lithium 18Ah batteries all daisy chained to a REDARC BC/DC charger. This system has an input for solar, output for 2x 12v, output for 2x USB, output for Hella plug (national luna fridge), and output for battery voltage reader.
Storage
One of the easiest and cheapest solutions for storage that we added to the Bronco was the Blue Ridge Overland Bronco Attic, extremely useful of unused space in the bronco making this very valuable. The goose gear houses the ARB twin compressor behind the driver seat in the seat delete as well as tools and recovery gear both accessible from the top of the goose gear and side. It also is a place where we mounted our Blue sea fuse port for all our our output and inputs. In the modules, we house more recovery gear and tools on the smaller 1/3 drawer, then the 2/3 drawer houses our kitchen supplies organized by Step 22. On top of the modules in the rear, We went with the Alu-cab tilt slide due to the tilt factor and knowing the Bronco will be pretty tall. On top, Equipt expedition outfitters sourced us a National Luna fridge 50L Dual zone.
For those who think this build cannot add anything else more... we do have the last few finishing touches going together soon. That involves sliders, skid plates, and some PPF protection soon! Drop some comments and questions below on what you think of our build! Let us know if this inspired your build at all!
Great looking build! I'm very interested in the dual battery set up. Can you go into more detail on how you guys have it all wired up? Parts list? I do recognize the American Adventure Lab battery holders.
I'm planning on doing a somewhat similar dual battery setup to what Trailrax is describing. I've been compiling a list of things I'll need when I'm ready, I'd imagine Trailrax used a pretty similar parts list (broken down by component)...I was going to do a similar battery system, the wiring seemed daunting so in the end I simplified with A Dometic Frig and PLB40 Battery. Plan Solar panel on Roof HalfRax. As someone else said, I'd like to know more about your Battery/solar/frig install . . . And how/why its connected with car battery.
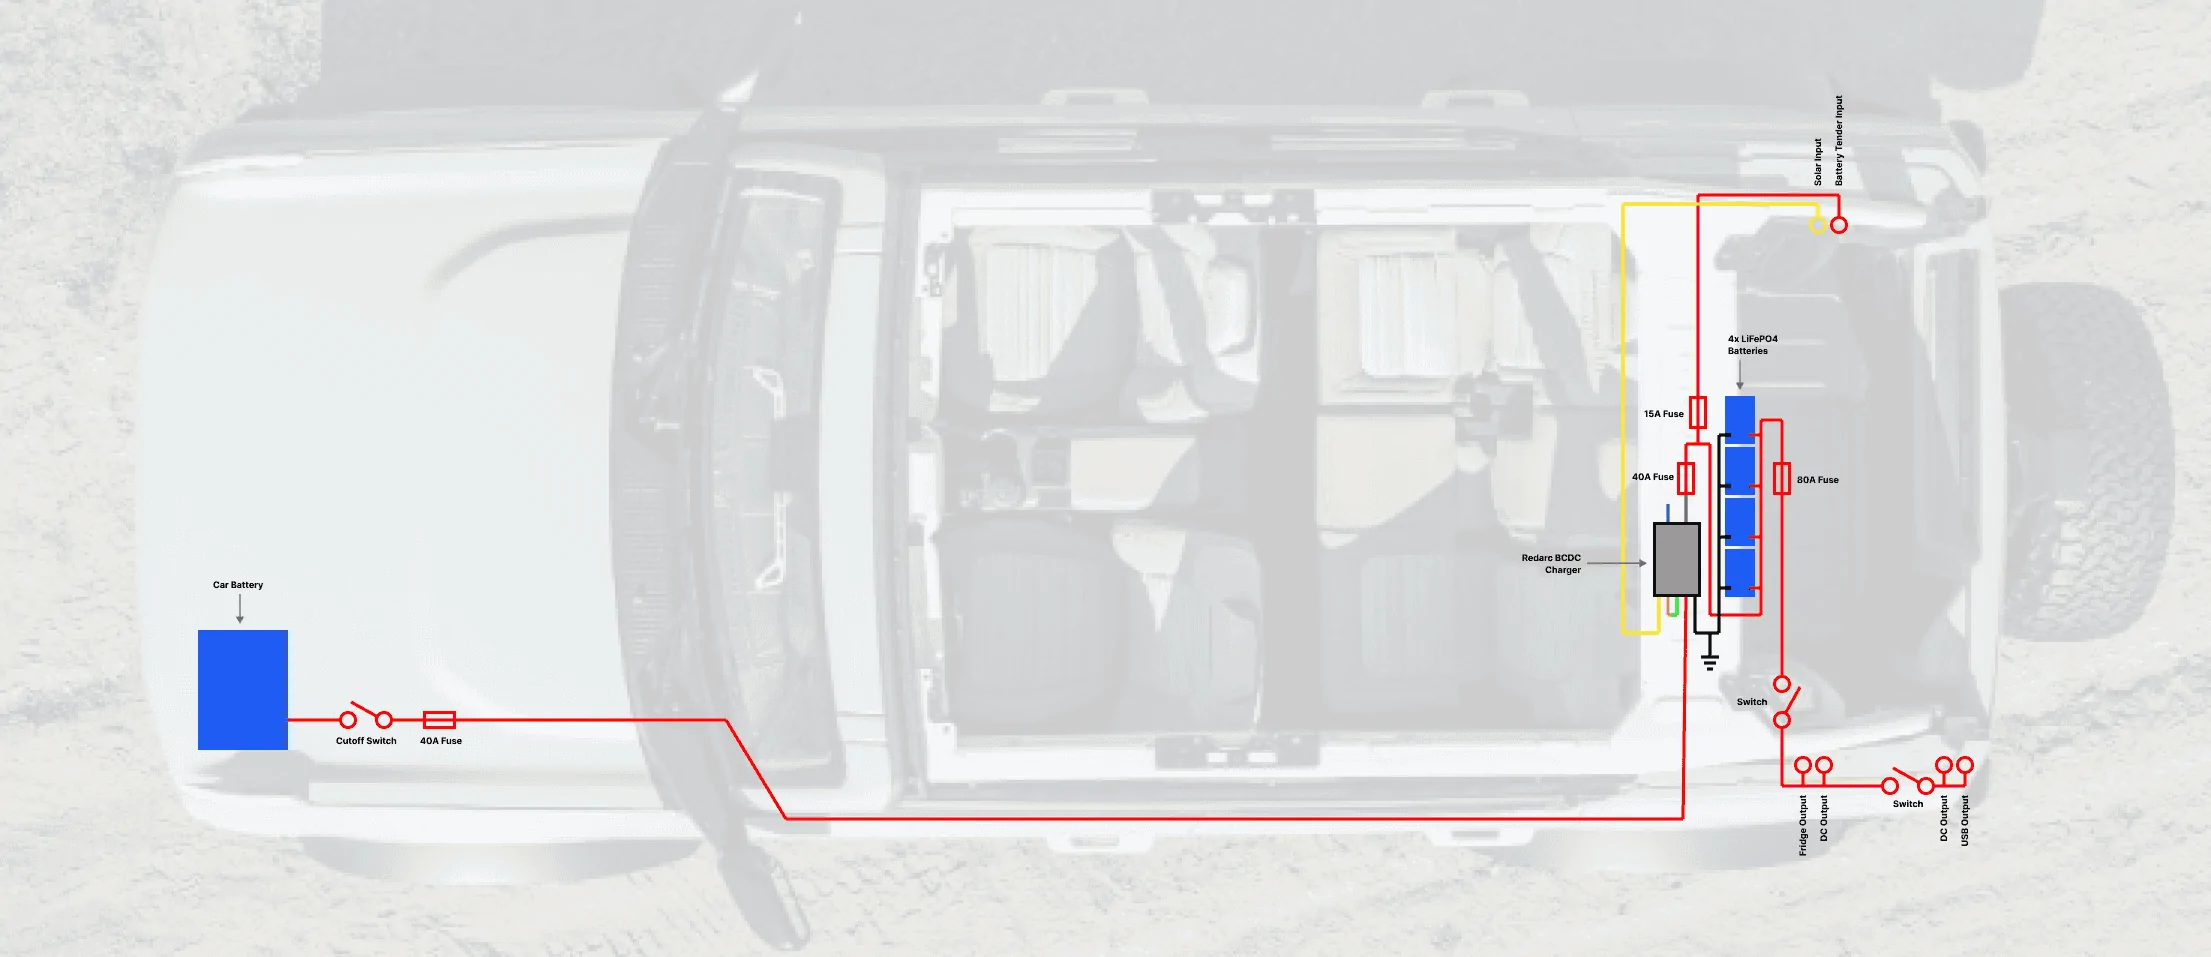
Very nice . . . A diagram! What prevents the Redarc charger from running down the car battery? Right now, the 12v OEM power feed at the back shuts off in an hour (although mine stopped putting out power, and the fuses are good.I'm planning on doing a somewhat similar dual battery setup to what Trailrax is describing. I've been compiling a list of things I'll need when I'm ready, I'd imagine Trailrax used a pretty similar parts list (broken down by component)...
Alternator Charging Source Hookup
This component provides a fused power source to the house battery with a master cutoff switch that allows you to completely disconnect the house battery charging setup.
House Battery and Charger
- AAL Battery Cutoff and Fuse Bracket
- Blue Sea Systems 6006 Cutoff Switch
- AAL MEGA Fuse Holder w/ 40A Fusehttps://americanadventurelab.com/product/wiring-kit-rear-mount/
- AAL Rear Mount Wiring Kit - runs the power line to the rear cargo area
This is the heart of the dual battery setup, consisting of the bank of batteries and the charger to manage the power input(s).
Other than these primary items, you'll want to be sure you have enough 4/6/8 AWG wiring, terminals, connectors, and heat shrink to get everything wired together securely. It also may be a smart idea to wrap some of the longer wires that are snaking around the frame in flexible conduit to prevent them from rubbing on sharp edges.
- AAL Bronco Cargo Floor Multi-Mount Bracket w/ BCDC Bracket
- Dakota Lithium 12V 18ah Battery (x4)
- AAL Battery Hold Down (x4)
- Battery Bank Bus Bar
- Redarc BCDC1225 Dual Input Battery Charger
- 40A Midi Fuse - to be placed between charger and batteries
- 80A Midi Fuse - to be placed on the "hot" wire coming off the batteries
With the above, you'll have a power source coming off of your battery bank that's essentially isolated from your vehicle's battery, providing 72ah of power. The Redarc BCDC charger also has an input for hooking up a solar panel, so you can keep the batteries topped off when you're at camp.
From here, you can wire in various types of plugs/ports to connect various devices. Some examples:
It may seem complicated, but in the end, you'll get a pretty robust system that (a) can be easily serviced if something goes bad (like one of the batteries dies), and (b) is completely hidden and out of the way.
- 12V Power Outlet w/ USB Ports
- Dometic Hardwiring Kit
- Power Inverter - convert DC to AC power
Here's a rough diagram of what I intend to build:

This setup you can do both overlanding or just weekend camping. I really don't see any gaps here.oh fantastic - so more of a camping build than overland
The Redarc will only operate when there’s a higher voltage coming off the vehicle’s battery (13.6V), usually indicating that the engine’s running and the alternator is doing its thing.Very nice . . . A diagram! What prevents the Redarc charger from running down the car battery? Right now, the 12v OEM power feed at the back shuts off in an hour (although mine stopped putting out power, and the fuses are good.
Here's another structural issue. How are you planning on running the solar panel feed wire to the redarc through the MIC top (I'm assuming the rear cap, mine stays on, will mount on half-rack)?The Redarc will only operate when there’s a higher voltage coming off the vehicle’s battery (13.6V), usually indicating that the engine’s running and the alternator is doing its thing.
I’m planning on packing a collapsible solar array that I’d set up once I get to camp. My roof rack will be full of gear, so I don’t think there will be enough room up there for a permanent fixture.Here's another structural issue. How are you planning on running the solar panel feed wire to the redarc through the MIC top (I'm assuming the rear cap, mine stays on, will mount on half-rack)?

The TrailRax Badlands Bronco Build!
Thank you to our partners, their products and brand will be mentioned below!
RPG OFFROAD
Advanced Fiberglass Concepts @ADV Fiberglass
Heretic Studio
Go Fast Campers
Method Wheels
Falken Tire
Rotopax
Rugged Radios
67 Designs
Dakota Lithum
REDARC
GP Factor
Goose Gear @goosegear
Equipt Expedition Outfitters
Alu-Cab / OK4WD
Lethal Performance @LethalPerformance
HEST
Below we will summarize the build with the specific products we used from each brand mentioned above. Be sure to check them all out! The links above are not affiliates but are just a quick way for your to get to products we use and save your time from researching what products to go with! Each specific product will have its own post following this, it will go into detail on why we went with it after our years of experience offroad!
Suspension
This Bronco is on an RPG Offroad Mid travel kit Which essentially widens the track of the Bronco by 6" total (3" per side) matching similar width numbers to the Bronco Raptor. The guys at RPG summarized this kit as a Raptor conversion system for those who have a Bronco that they wished they could have a Bronco Raptor. The kit is very well engineered and RPG offers many solutions from mild to wild. We opted for the two tube bypass Fox Performance 3.0 shock up front for some better control on the trail. Right next to it is a Fox Performance 2.5 coil over specifically tuned by the guys at RPG themselves and RCV front Axles making this system truly rides better than stock. For the Rear, we have the Fox performance 2.5 Coil overs, RPG Offroad Billet Lower links, RPG Offroad billet upper links.
Wheels and Tires
With our history with Falken tires on our rigs in the past, we knew that the Bronco needed a dependable tire that was both rugged and quiet on the road. Falken offered the new R/Ts and we knew we wanted them. We went with the 37x12.5x17 Falken Wildpeak R/Ts and we are so stoked to be using these, really quiet on the road and offroad, these things grip like no other! We are interested to see how they do in mud and snow. For wheels, we are huge fans of Method Wheels so we of course had to go with their bead grip tires in Bronze 706's
Fiberglass
Advanced Fiberglass was able to fit us in their busy schedule and installed their 8" kit front and rear on our Bronco to match the same new width with the mid Travel kit from RPG. we also got their heat extractor hood to keep the heat down in the engine bay.
Lighting
Heretic studio has always been our go to and will continue to be. We are running their 40" Bar on our rack with the 40" cut out deflector (clear combo lens), pair of quattros on the A pillar (clear combo), LED fog light kit (all Amber), 20" bumper light bar (amber), Dome lights on the rack, Dome lights for the rear window, Ba-2 flood amber for chase lights
Tents
For weekender trips and when we are in need of a lighter set up, we opted for the Go Fast Camper Superlite V1, fantastic tent and highly recommend for Bronco owners that really like to push the envelope of their Bronco's capability offroad. For longer expedition like trips, OK4WD and Alu-Cab USA worked with us on getting their 3R. Lots of customers have asked about the Alu-cab 3R tents on our Bronco TRMR rack, we are happy to work with them as well as GP Factor to be coming out with a mounting kit very soon for 3R tents and similar for your Bronco TRMR Rack. We also mounted the 270 shadow awning LHS.
Communication
We are running a Yaesu FTM-400R with a removable face plate and Rugged Radios GMRS/VHF antenna. Our Radio has been MARs modded allowing us to communicate through both GMRS and HAM. We also mounted the radio on the rugged radios mount as well.
Interior
67 Designs made it easy to organize our cockpit with their Bronco rail, We used their G2 universal Phone mount, Tablet mount, and Magnetic mic mount on our Bronco rail which keeps everything within reach and organized in the cockpit, super happy with it!
Goose Gear
We opted for the Sleep and storage package for the Ford Bronco. We opted for the 1/3-2/3 grey great system and really expands the storage capabilities of the interior. One mention that was an after thought for us but can save a ton of headache for you... If you plan to run a table on your tailgate, get a 2/3-1/3 so your 2/3 drawer can open without hitting the table, when deployed.
Dual Battery system
We used a battery tray under the rear cargo tray that holds 4x Dakota Lithium 18Ah batteries all daisy chained to a REDARC BC/DC charger. This system has an input for solar, output for 2x 12v, output for 2x USB, output for Hella plug (national luna fridge), and output for battery voltage reader.
Storage
One of the easiest and cheapest solutions for storage that we added to the Bronco was the Blue Ridge Overland Bronco Attic, extremely useful of unused space in the bronco making this very valuable. The goose gear houses the ARB twin compressor behind the driver seat in the seat delete as well as tools and recovery gear both accessible from the top of the goose gear and side. It also is a place where we mounted our Blue sea fuse port for all our our output and inputs. In the modules, we house more recovery gear and tools on the smaller 1/3 drawer, then the 2/3 drawer houses our kitchen supplies organized by Step 22. On top of the modules in the rear, We went with the Alu-cab tilt slide due to the tilt factor and knowing the Bronco will be pretty tall. On top, Equipt expedition outfitters sourced us a National Luna fridge 50L Dual zone.
For those who think this build cannot add anything else more... we do have the last few finishing touches going together soon. That involves sliders, skid plates, and some PPF protection soon! Drop some comments and questions below on what you think of our build! Let us know if this inspired your build at all!
Always!Haters gonna hate...
It's an insane build you got together. I particularly interested in the mid travel kit and fenders.
This bronco identifies as a Prerunner trophy Bronco with a tent and awning actually LOLThe addition of an awning makes it not an overland build??