
- First Name
- Brian
- Joined
- May 11, 2023
- Threads
- 4
- Messages
- 13
- Reaction score
- 129
- Location
- Pennsylvania
- Vehicle(s)
- 2023 Bronco Big Bend
- Your Bronco Model
- Big Bend
- Thread starter
- #1
Hi Bronco6G
This is my second post here, so hopefully this thread looks and helps as I intend.
I initially wanted to post this thread only once I was complete, but progress is going much better than expected and I thought others might benefit now rather than waiting- that and my projects always shift in priority so Im not sure when I will be able to jump back.
My goal was to add a rear electric locker but have it perform as factory as possible. Additionally, like most of my projects I want to stay as cheap as possible while also allowing me to tinker and learn along the way. So while this path may not be for everyone, it definitely is allowing me to learn as I go.
Ill break the the thread into three sections; User Interface, Electrical and Differential. At the current time of originally posting this, User Interface and Electrical are both done. While the differential install I have all the plans in place and all the materials- I just need to do the work.
Lets got into it…
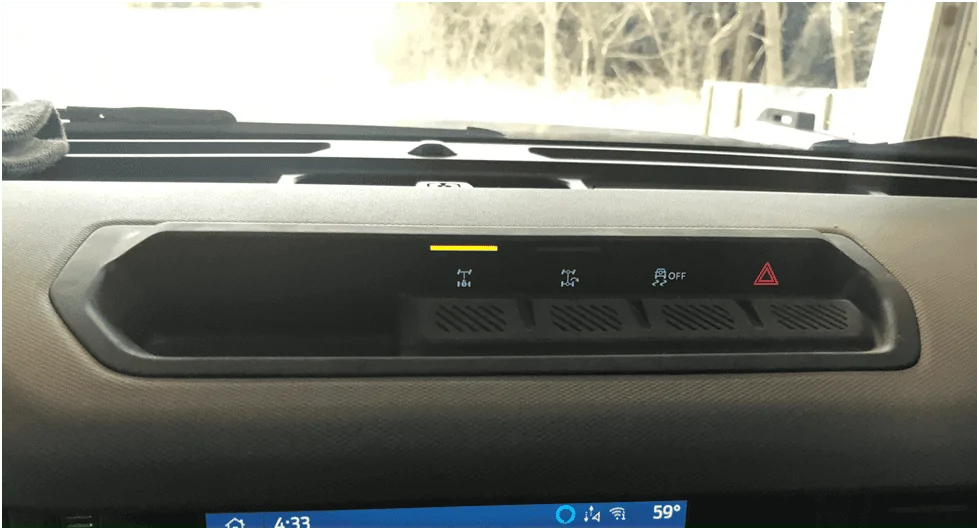
User Interface:
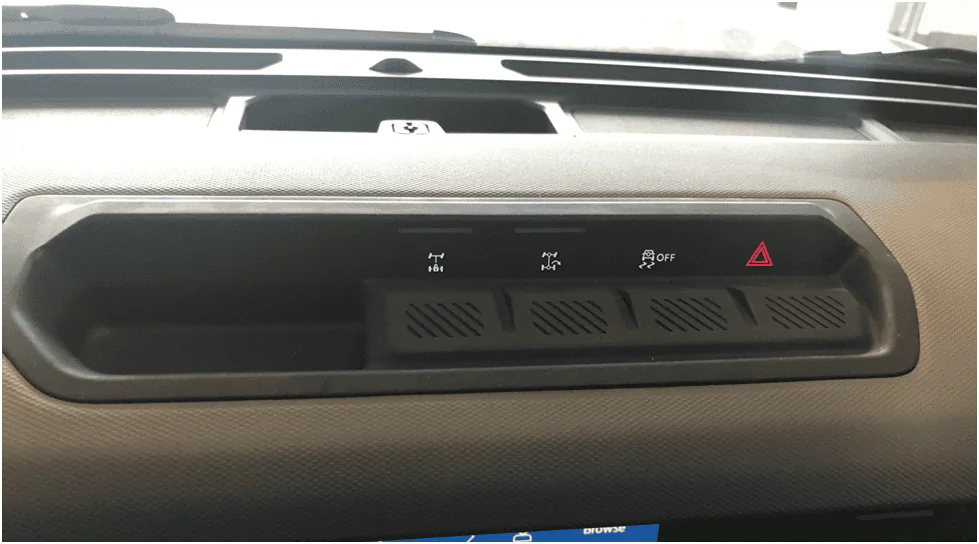
I purchased a used “Hero” switch with rear locker optinon from eBay for about $60. The install was super easy and I would suggest using some plastic interior pry tools.

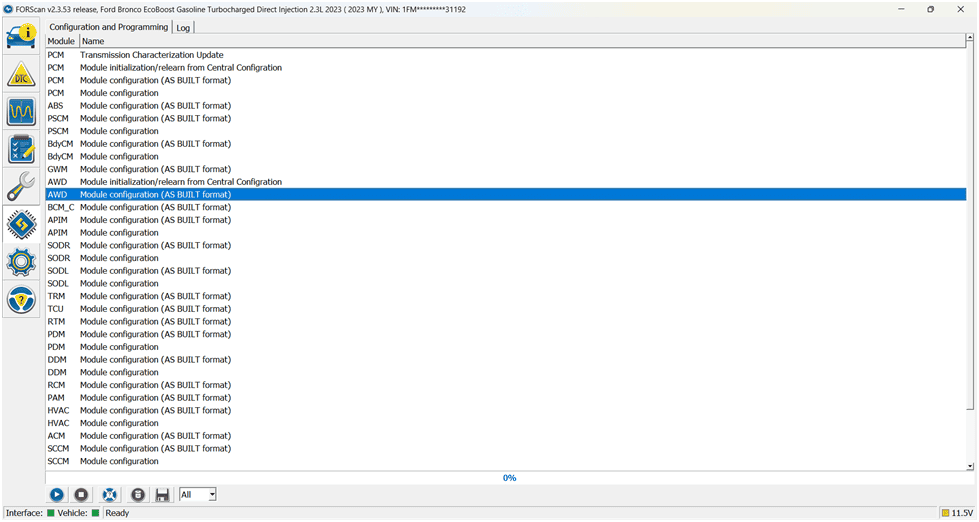
Next was to work with FORScan to get the switch turning on/off- as it will not just work once installed.
I needed to compare a VIN with rear locker only to my VIN without rear locker and determine which parameters needed to change in FORScan.
I searched for new vehicles at dealerships with rear locker only and pulled their VINs. Then I put my VIN and the other comparing vehicle VINs into this link below to pull the build info:
https://www.motorcraftservice.com/AsBuilt
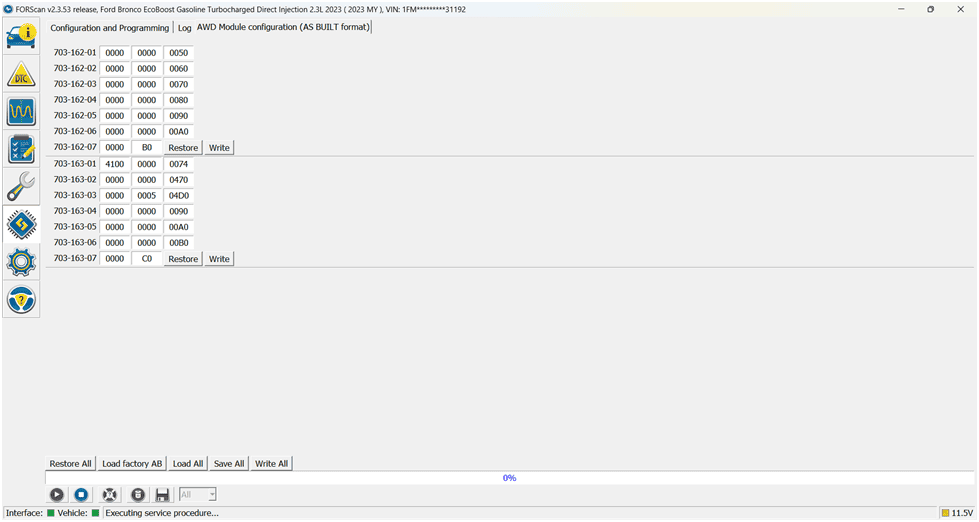
I found the only difference between my VIN and a same Bronco with rear locker was as follows:
My vehicle: 703-163-03 0000 0005 04D0
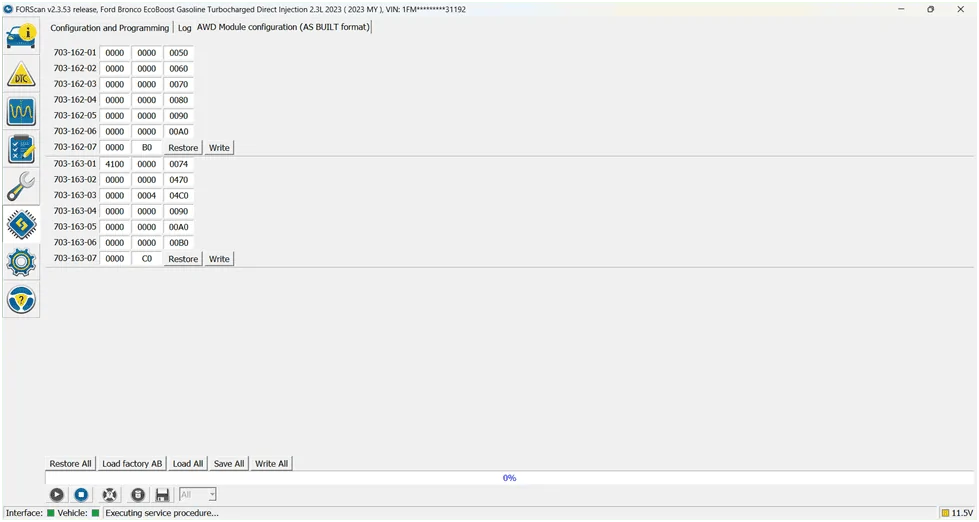
Rear Locker vehicle: 703-163-03 0000 0004 04C0
So I went into FORScan, found the AWD Module Configuration (AS BUILT format) and changed the above.

My Original:
After Change:
I then loaded the change to the vehicle and check the switch functionality- the switch lit up yellow but just for a few seconds. I suspect the computer pulls power if it does not detect a load- no load because there is no locker installed right now. I still call this a WIN!

Electrical:
EDIT: Thanks to another member for the advise, buying a complete rear harness will make this process much easier and for only $114- not a bad option.
The part number of the harness is MB3Z2C011BA.
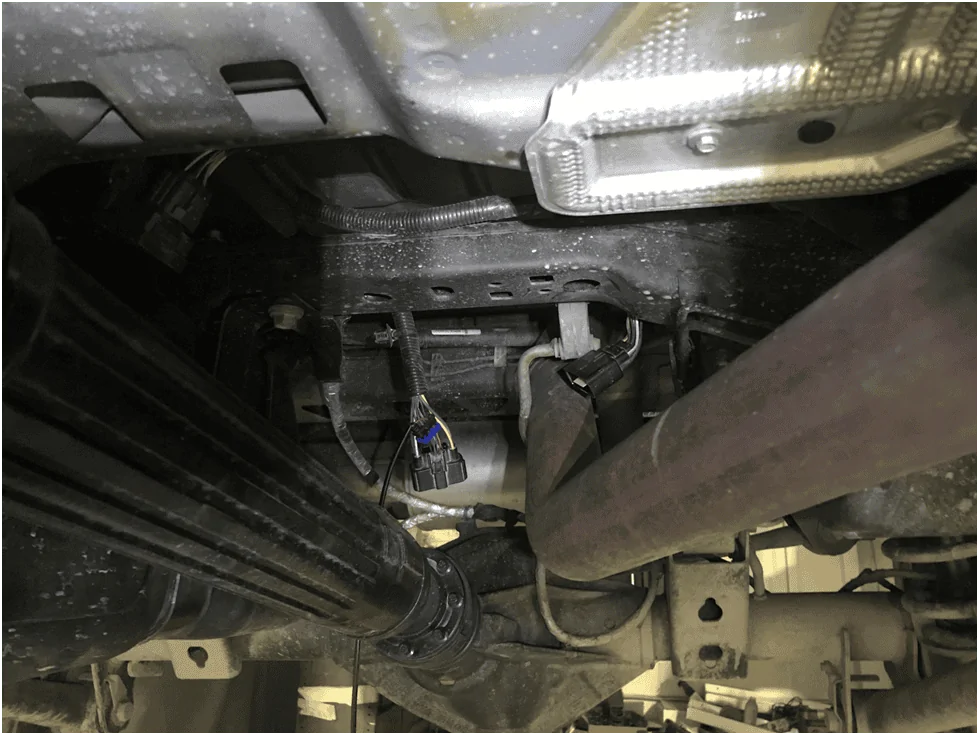
This is fairly easy now that I, unintentionally, explored all the connectors finding the simplest connector to access is all you need to access. The electrical can be done a number of different ways, again, I tried keeping this looking as factory as possible but you can also splice in your own wiring rather than running it through the below connector- this would be much easier than what I did.
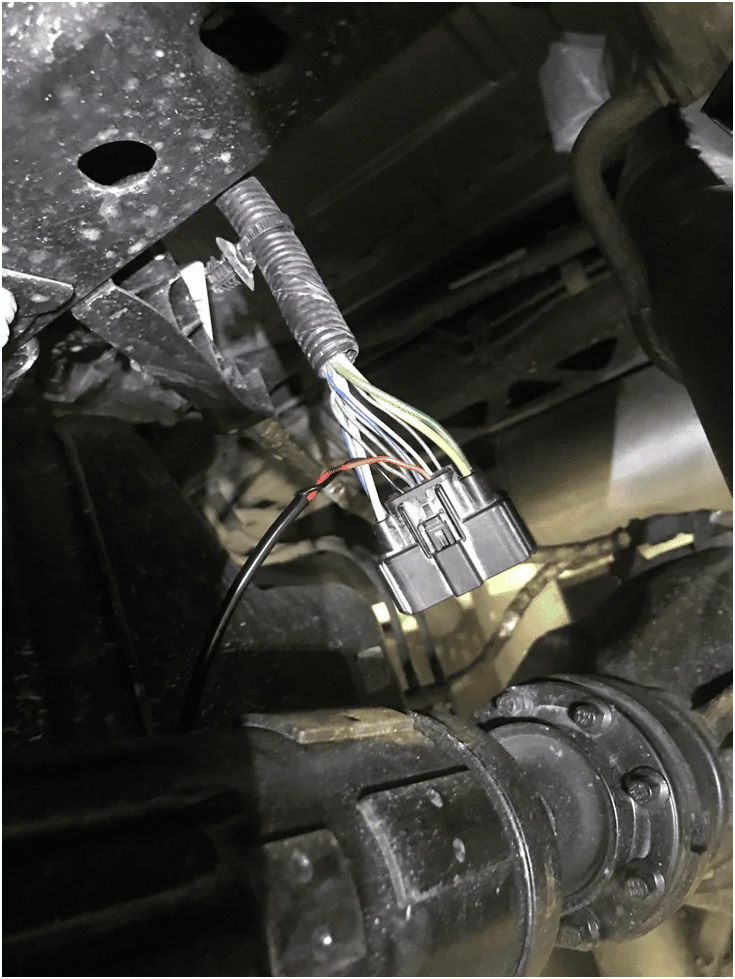
If you follow the electrical harness on the driver-side outer frame-rail it will eventually begin to cross over the exhaust. Before it crosses over to toward the driveshaft there is a connector hidden on the crossmember. You can disconnect the connector and pull both ends down- they are fastened with the push-in clips that are a pain to remove.

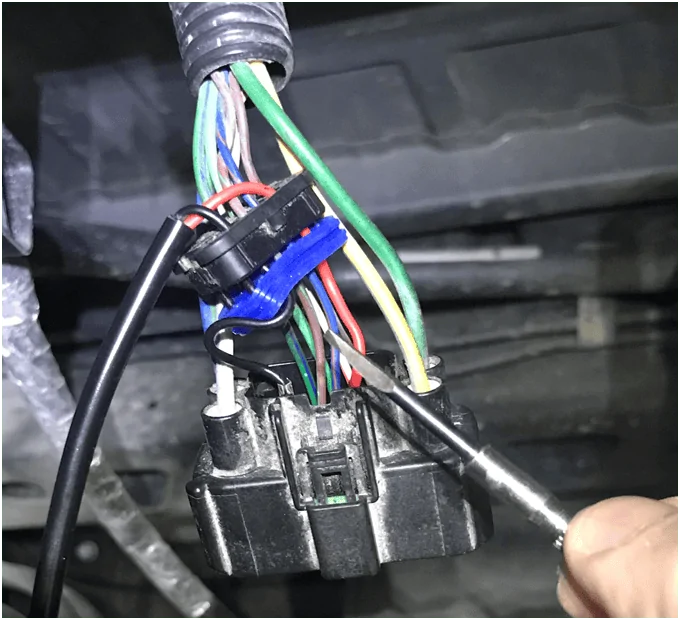
In the connector on the frame-rail side you will see two wires that do not extend to the other connector. The ones we are interested in for the locker are Blue/Orange and Green/Brown, they are separated by two other wires.
Here is where you can choose two paths; 1- cut those Blue/Orange and Green/Brown wires and splice in your own wiring to the differential or 2- Add pins to the connector that is missing the wiring- I decided the second option.
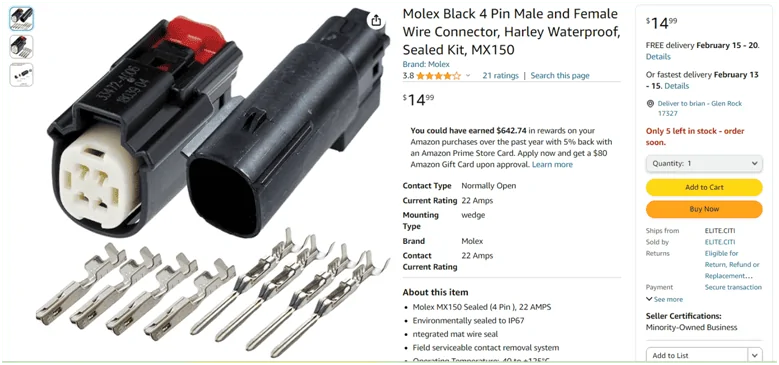
I purchased this connector hoping that the pins would work for this application. They were definitely tight but pushing them in with a very thin screwdriver worked.
https://www.amazon.com/gp/aw/d/B07HQ5FK14?psc=1&ref=ppx_pop_mob_b_asin_title
You’ll use two of the pins on the left in the below image.

With a small screwdriver, remove the black cover on the back of the connector missing the two wires for the locker. Once the cover is removed, gently pry the blue seal out of the way too. Then run your wires through the black cover and through the blue seal. If you are color coding your wires, I kept red to mate with the Blue/Orange wire as this is COIL+ and I had black to mate with the Green/Brown wire as this is COIL-. If you keep color coding consistent here it will help you later with the differential plug. Once you have the pins from the above link crimped to the wires, then you will want to seat them into the connector. I used a very thin screwdriver to press them in- they were tight.

I then reassembled everything in reverse order- blue seal, then back cover.

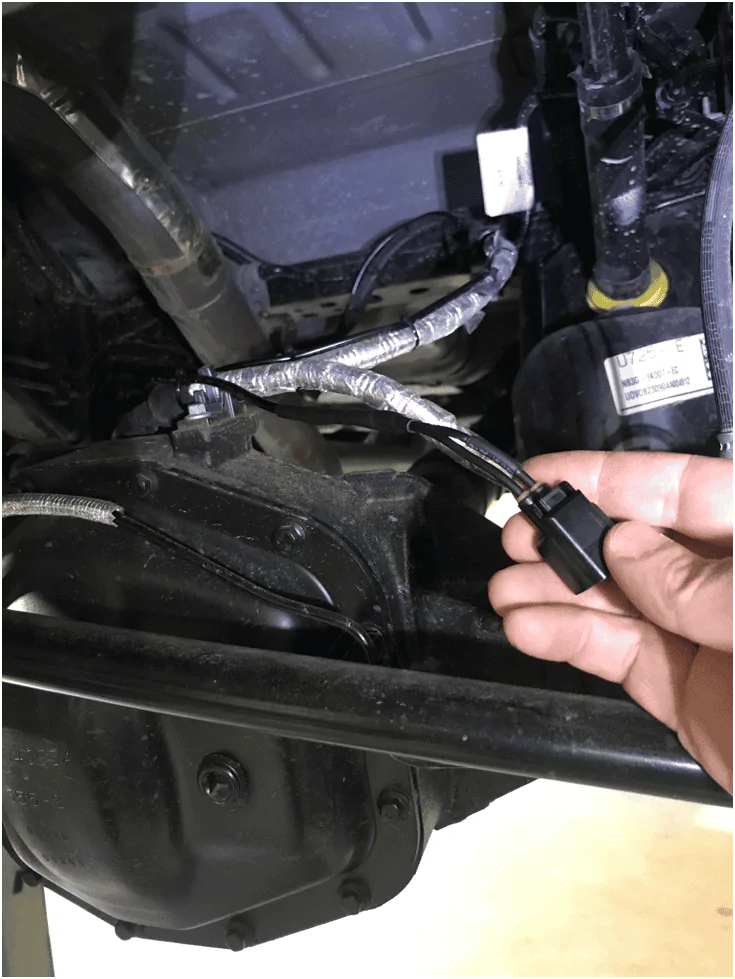
I then routed the wires along the harness running to the differential. I finished the wire bundle on the passenger-side of the differential.
You will need to purchase the connector that attaches to the differential. The part number I chose is 645-685. You can find it on amazon for about $15.

I then spliced the above connector into my wire bundle that I routed to the differential.
I was then able to connect this pigtail to the e-locker solenoid and confirmed the Hero switch engaged the solenoid.
Video of solenoid engagement with Hero Switch (not sure if this will upload properly):
Differential:
The differential should be fairly simple. You can find factory Ford Ranger electric lockers, even with my 4.46 ratio ring and pinion. I bought mine for roughly $400 with ring and pinion.
Researching the axle lengths I found that I will need different length axles. You can go to Yukon and buy chromoly axles, one of which will have to be cut to length or you can find the right size from a Bronco or Ranger.
Here is the rundown of axle lengths:
Bronco With Electric Locker: Left- 30.8”, Right-32.8”
Ranger With Electric Locker: Left- 31.1”, Right- 32.8”
Bronco W/O Electric Locker: Left- 31.6”, Right- 35.7”
Ranger W/O Electric Locker: Left- 31.9”, Right- 31.9”
I was actually able to find a removed axle from a Bronco (prior owner swapped with an e-locked axle). This axle cost me roughly $600 with; axle housing, differential/pinion (don’t plan to use) and axle shafts. As you can see from the above axle lengths, you can just cut the factory axle (non locked) shafts down to the proper E-locker length- this is what I will be doing.
You will then need a Dana/Spicer differential rebuild kit for the M220 differential. This will come with both the differential carrier bearings and the pinion bearings along with shims, slinger and seals. I think this kit usually runs about $200 but I found someone selling one on eBay for roughly $100.
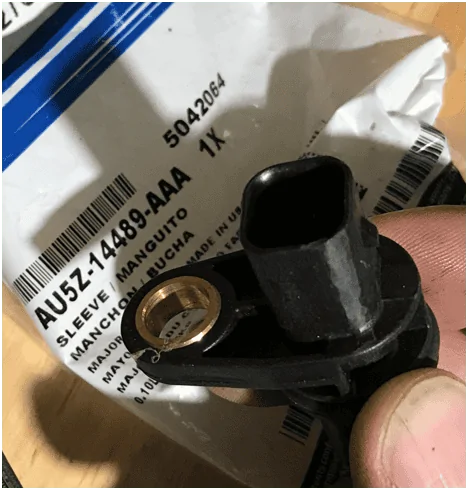
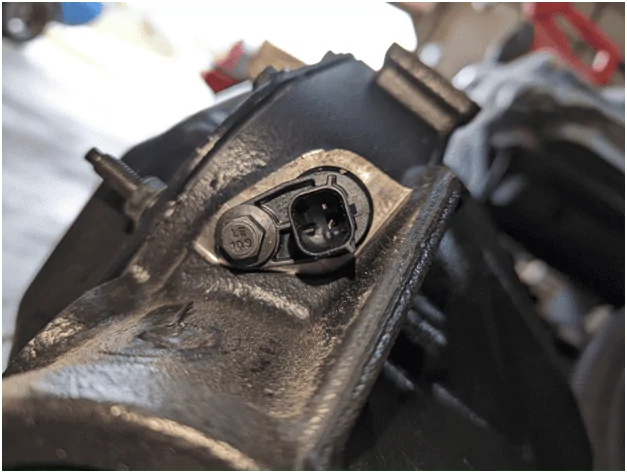
Before installing the locking differential you will want to buy the differential passthrough connector, you can get this directly through Ford, I found mine on eBay for $25. I had to shave it down a little to fit with the connector routed to the differential.

Then you will have to drill the axle housing to fit this connector. The below picture is a factory installed connector, I will take a picture once I have done this mod.

I have not started any of the above for the differential but when I do I will be sure to post my progress with pictures.
Total Cost Roll is roughly:
This is my second post here, so hopefully this thread looks and helps as I intend.
I initially wanted to post this thread only once I was complete, but progress is going much better than expected and I thought others might benefit now rather than waiting- that and my projects always shift in priority so Im not sure when I will be able to jump back.
My goal was to add a rear electric locker but have it perform as factory as possible. Additionally, like most of my projects I want to stay as cheap as possible while also allowing me to tinker and learn along the way. So while this path may not be for everyone, it definitely is allowing me to learn as I go.
Ill break the the thread into three sections; User Interface, Electrical and Differential. At the current time of originally posting this, User Interface and Electrical are both done. While the differential install I have all the plans in place and all the materials- I just need to do the work.
Lets got into it…
User Interface:
I purchased a used “Hero” switch with rear locker optinon from eBay for about $60. The install was super easy and I would suggest using some plastic interior pry tools.
Next was to work with FORScan to get the switch turning on/off- as it will not just work once installed.
I needed to compare a VIN with rear locker only to my VIN without rear locker and determine which parameters needed to change in FORScan.
I searched for new vehicles at dealerships with rear locker only and pulled their VINs. Then I put my VIN and the other comparing vehicle VINs into this link below to pull the build info:
https://www.motorcraftservice.com/AsBuilt
I found the only difference between my VIN and a same Bronco with rear locker was as follows:
My vehicle: 703-163-03 0000 0005 04D0
Rear Locker vehicle: 703-163-03 0000 0004 04C0
So I went into FORScan, found the AWD Module Configuration (AS BUILT format) and changed the above.
My Original:
After Change:
I then loaded the change to the vehicle and check the switch functionality- the switch lit up yellow but just for a few seconds. I suspect the computer pulls power if it does not detect a load- no load because there is no locker installed right now. I still call this a WIN!
Electrical:
EDIT: Thanks to another member for the advise, buying a complete rear harness will make this process much easier and for only $114- not a bad option.
The part number of the harness is MB3Z2C011BA.
This is fairly easy now that I, unintentionally, explored all the connectors finding the simplest connector to access is all you need to access. The electrical can be done a number of different ways, again, I tried keeping this looking as factory as possible but you can also splice in your own wiring rather than running it through the below connector- this would be much easier than what I did.
If you follow the electrical harness on the driver-side outer frame-rail it will eventually begin to cross over the exhaust. Before it crosses over to toward the driveshaft there is a connector hidden on the crossmember. You can disconnect the connector and pull both ends down- they are fastened with the push-in clips that are a pain to remove.
In the connector on the frame-rail side you will see two wires that do not extend to the other connector. The ones we are interested in for the locker are Blue/Orange and Green/Brown, they are separated by two other wires.
Here is where you can choose two paths; 1- cut those Blue/Orange and Green/Brown wires and splice in your own wiring to the differential or 2- Add pins to the connector that is missing the wiring- I decided the second option.
I purchased this connector hoping that the pins would work for this application. They were definitely tight but pushing them in with a very thin screwdriver worked.
https://www.amazon.com/gp/aw/d/B07HQ5FK14?psc=1&ref=ppx_pop_mob_b_asin_title
You’ll use two of the pins on the left in the below image.
With a small screwdriver, remove the black cover on the back of the connector missing the two wires for the locker. Once the cover is removed, gently pry the blue seal out of the way too. Then run your wires through the black cover and through the blue seal. If you are color coding your wires, I kept red to mate with the Blue/Orange wire as this is COIL+ and I had black to mate with the Green/Brown wire as this is COIL-. If you keep color coding consistent here it will help you later with the differential plug. Once you have the pins from the above link crimped to the wires, then you will want to seat them into the connector. I used a very thin screwdriver to press them in- they were tight.
I then reassembled everything in reverse order- blue seal, then back cover.
I then routed the wires along the harness running to the differential. I finished the wire bundle on the passenger-side of the differential.
You will need to purchase the connector that attaches to the differential. The part number I chose is 645-685. You can find it on amazon for about $15.
I then spliced the above connector into my wire bundle that I routed to the differential.
I was then able to connect this pigtail to the e-locker solenoid and confirmed the Hero switch engaged the solenoid.
Video of solenoid engagement with Hero Switch (not sure if this will upload properly):
Differential:
The differential should be fairly simple. You can find factory Ford Ranger electric lockers, even with my 4.46 ratio ring and pinion. I bought mine for roughly $400 with ring and pinion.
Researching the axle lengths I found that I will need different length axles. You can go to Yukon and buy chromoly axles, one of which will have to be cut to length or you can find the right size from a Bronco or Ranger.
Here is the rundown of axle lengths:
Bronco With Electric Locker: Left- 30.8”, Right-32.8”
Ranger With Electric Locker: Left- 31.1”, Right- 32.8”
Bronco W/O Electric Locker: Left- 31.6”, Right- 35.7”
Ranger W/O Electric Locker: Left- 31.9”, Right- 31.9”
I was actually able to find a removed axle from a Bronco (prior owner swapped with an e-locked axle). This axle cost me roughly $600 with; axle housing, differential/pinion (don’t plan to use) and axle shafts. As you can see from the above axle lengths, you can just cut the factory axle (non locked) shafts down to the proper E-locker length- this is what I will be doing.
You will then need a Dana/Spicer differential rebuild kit for the M220 differential. This will come with both the differential carrier bearings and the pinion bearings along with shims, slinger and seals. I think this kit usually runs about $200 but I found someone selling one on eBay for roughly $100.
Before installing the locking differential you will want to buy the differential passthrough connector, you can get this directly through Ford, I found mine on eBay for $25. I had to shave it down a little to fit with the connector routed to the differential.
Then you will have to drill the axle housing to fit this connector. The below picture is a factory installed connector, I will take a picture once I have done this mod.
I have not started any of the above for the differential but when I do I will be sure to post my progress with pictures.
Total Cost Roll is roughly:
- Hero Switch with Locker $60
- Pins for Factory Connector $15
- Wiring Connector $15
- Differential Connector $25
- Elocker with 4.46 Ring and Pinion $400
- Used Axle Assembly $600
- Differential Rebuild Kit $100
- Total: $1,215
Sponsored
Last edited:


") Thanks for putting in the research & sharing
Thanks for putting in the research & sharing 
 , 2024 Big Bend order in
