Sponsored

Sound System Upgrade Question

J_Meh_Cray_D

Badlands
Well-Known Member
First Name
Jeffrey
Joined
Feb 9, 2021
Threads
3
Messages
136
Reaction score
302
Location
North Carolina
Vehicle(s)
2017 Silverado Crew Cab
Your Bronco Model
Badlands
Clubs
 
I'm not an intelligent aftermarket system guy, but I know one and get good pricing. My question is whether it will be easier to upgrade the B&O or the standard system? If both require NavTV, then I guess it's better to get the speaker locations from the B&O/
Sponsored

 

LostInArizona

Badlands
Well-Known Member
First Name
Brandon
Joined
Feb 9, 2021
Threads
8
Messages
315
Reaction score
673
Location
Arizona
Vehicle(s)
2022 Badlands non-sas 2.7
Your Bronco Model
Badlands
Clubs
 
Factory speakers are almost never that good compared to aftermarket speakers. I will be replacing mine regardless, but I also didn't get the lux package so I'm not even getting the B&O. As a long time car audio enthusiast however I am 100% confident I can put something together that sounds 100 times better than either. Even just using the factory speaker level outputs and an LOC with a decent amp.
 
Last edited:

HotdogThud

Big Bend
Well-Known Member
Joined
Jan 14, 2021
Threads
23
Messages
2,382
Reaction score
13,213
Location
Arizona
Vehicle(s)
mk6 gti, '21 MoarDoor
Your Bronco Model
Big Bend
Clubs
 
did anyone ever figure out what the sizes of the speakers are in each slot, specifically, the ones down low in front of the door, and the rear cross-member ones?

I have a nice opportunity in that I'll be slowly converting the other car to track duty, which means I've got a full Dynaudio setup with matching amp that would probably fit nicely, assuming the speakers fit....
 

EquusBronsis

Outer Banks
Well-Known Member
Joined
Sep 7, 2020
Threads
28
Messages
391
Reaction score
718
Location
Santa Barbara
Vehicle(s)
2023 Porsche Macan GTS
Your Bronco Model
Outer Banks
Guessing front kick panels..5.25” or 6.5” round. Rear pods 4”.
 

Sponsored

Canonman11

Outer Banks
Well-Known Member
First Name
Tim
Joined
Jul 25, 2021
Threads
8
Messages
85
Reaction score
243
Location
Tampa, FL
Vehicle(s)
2021 Bronco
Your Bronco Model
Outer Banks
Clubs
 
@flip Afternoon Flip,
Can you post the following drawing
Loadspace Trim Panel - 5-Door (501-05 Interior Trim and Ornamentation, Removal and Installation).
Wanting to know the proper removal procedure for the rear panels Left and Right.

Tim
 

flip

Badlands
Well-Known Member
Base Sponsor (Level 1)
First Name
Phil
Joined
Jul 21, 2020
Threads
41
Messages
4,290
Reaction score
14,223
Location
IN
Website
www.ruxerparts.com
Vehicle(s)
Fords
Your Bronco Model
Badlands
Clubs
 
@flip Afternoon Flip,
Can you post the following drawing
Loadspace Trim Panel - 5-Door (501-05 Interior Trim and Ornamentation, Removal and Installation).
Wanting to know the proper removal procedure for the rear panels Left and Right.

Tim
I can tomorrow but it’s really easy. Remove load floor hold downs and tilt one side if the panel up, pull out. Remove prop rod cleat if soft top. Two small trim pieces behind roll bar in back where it disappears into the trim. These just pull out. Thin trim along back edge just pops off (friction clips).

Trim panels are not hard but require a little patience. Best if you have a trim panel popper but not required. I start in the back along right below where the prop rod cleat mounted. Gently pull out until you can get the panel tool in and gently start prying. There are a couple pin type clips that will eventually release. The others are a two piece that might separate, might not. Take your time and make sure you disconnect the proximity sensor on the left side and light, powerpoint on the right. Make sure to hook both back up when reassembling. Don’t ask me how I know this.

ETA: I didn’t break any clips or pins when I took them off the first time but will have my parts dept start stocking them. Better to have and not need, than need and not have.(y)
 
Last edited:

Canonman11

Outer Banks
Well-Known Member
First Name
Tim
Joined
Jul 25, 2021
Threads
8
Messages
85
Reaction score
243
Location
Tampa, FL
Vehicle(s)
2021 Bronco
Your Bronco Model
Outer Banks
Clubs
 
I can tomorrow but it’s really easy. Remove load floor hold downs and tilt one side if the panel up, pull out. Remove prop rod cleat if soft top. Two small trim pieces behind roll bar in back where it disappears into the trim. These just pull out. Thin trim along back edge just pops off (friction clips).

Trim panels are not hard but require a little patience. Best if you have a trim panel popper but not required. I start in the back along right below where the prop rod cleat mounted. Gently pull out until you can get the panel tool in and gently start prying. There are a couple pin type clips that will eventually release. The others are a two piece that might separate, might not. Take your time and make sure you disconnect the proximity sensor on the left side and light, powerpoint on the right. Make sure to hook both back up when reassembling. Don’t ask me how I know this.
Thanks sir. It does sound easy if you can post tomorrow I will keep with the other drawings you have posted. Good references for down the road lots of upgrades happening. As soon as parts arrive.. lol Have a great night.
 

flip

Badlands
Well-Known Member
Base Sponsor (Level 1)
First Name
Phil
Joined
Jul 21, 2020
Threads
41
Messages
4,290
Reaction score
14,223
Location
IN
Website
www.ruxerparts.com
Vehicle(s)
Fords
Your Bronco Model
Badlands
Clubs
 
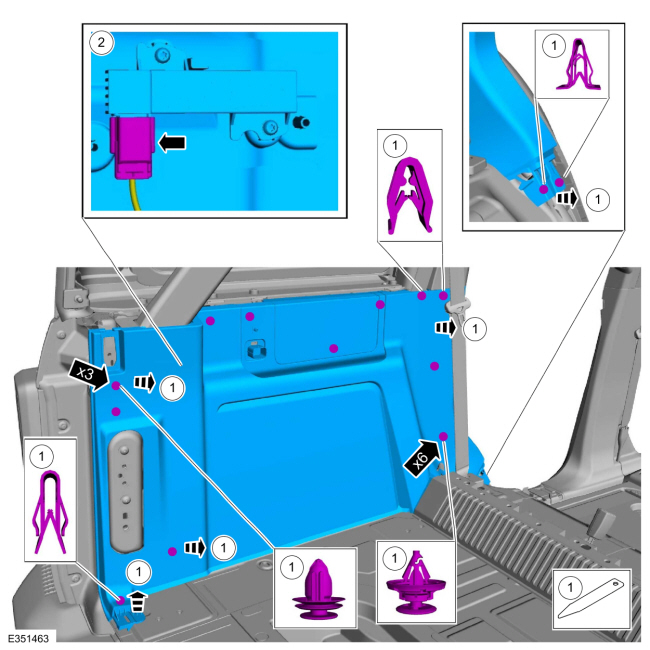
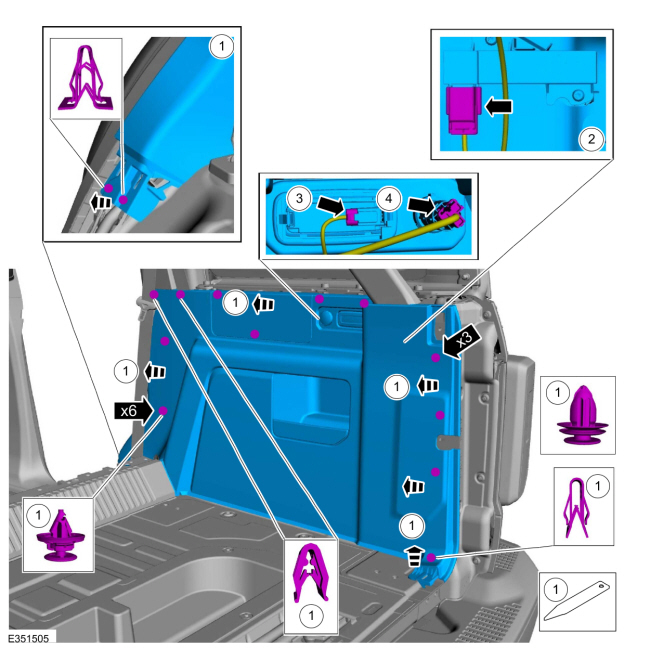
Loadspace Trim Panel - 5-Door
Special Tool(s) / General Equipment

Interior Trim Remover
Removal

NOTE:
Removal steps in this procedure may contain installation details.

  1. Remove the rear scuff plate trim panel.
    Refer to: Rear Scuff Plate Trim Panel (501-05 Interior Trim and Ornamentation, Removal and Installation).
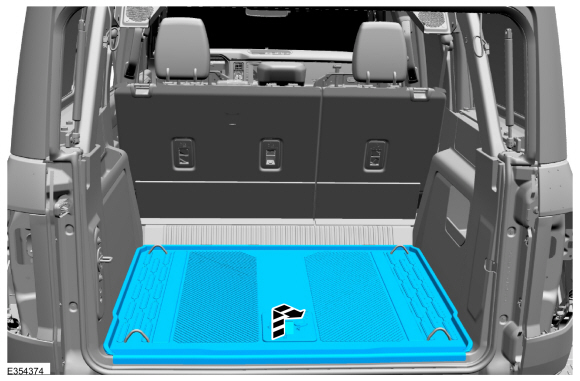
  1. Remove the load compartment floor covering mat.
Ford Bronco {thread} {filename}
  1. Release the clips and remove the loadspace scuff plate trim panel.
    Use the General Equipment: Interior Trim Remover
Ford Bronco {thread} {filename}
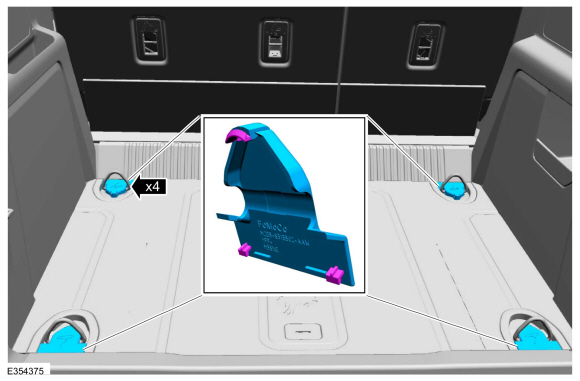
  1. Remove the load compartment floor covering tie down covers.
Ford Bronco {thread} {filename}
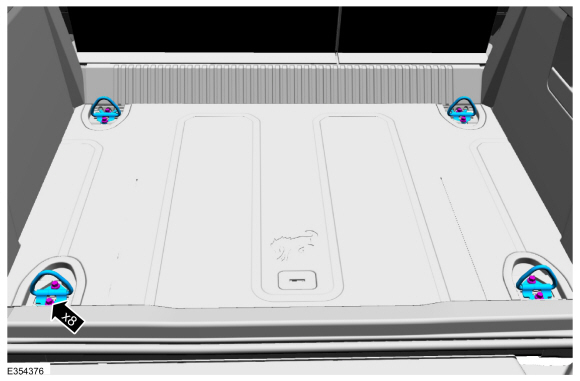
  1. Remove the bolts and the load compartment floor covering tie downs.
    Torque: 21 lb.ft (28 Nm)
Ford Bronco {thread} {filename}
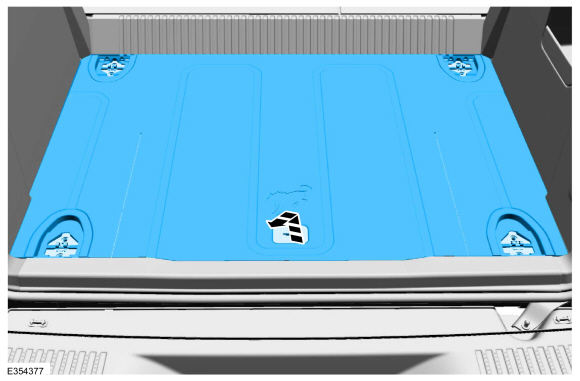
  1. Remove the load compartment floor covering.
Ford Bronco {thread} {filename}
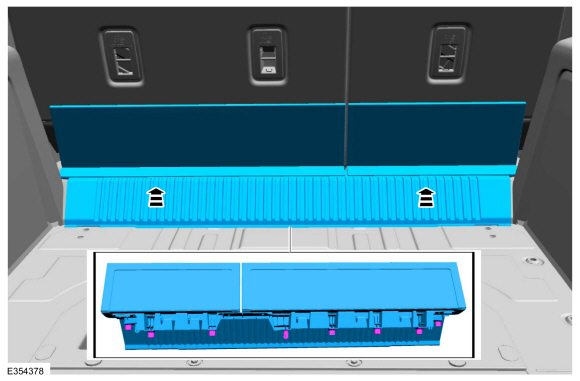
  1. Remove the rear cargo trim cover and gap hider.
Ford Bronco {thread} {filename}
Left hand side

  1. NOTE: Seats removed for clarity.
    Remove the loadspace trim panel.
    1. Release the clips.
      Use the General Equipment: Interior Trim Remover
    1. Disconnect the PATS rear antenna electrical connector.
Ford Bronco {thread} {filename}
Right hand side

  1. NOTE: Seats removed for clarity.
    Remove the loadspace trim panel.
    1. Release the clips.
      Use the General Equipment: Interior Trim Remover
    1. Disconnect the PATS rear antenna electrical connector.
    1. Disconnect the loadspace interior rear light electrical connector.
    1. Disconnect the power point electrical connector.
Ford Bronco {thread} {filename}
Installation

  1. NOTE: If installing a new loadspace trim panel, transfer parts as necessary.
    To install, reverse the removal procedure.
 

Canonman11

Outer Banks
Well-Known Member
First Name
Tim
Joined
Jul 25, 2021
Threads
8
Messages
85
Reaction score
243
Location
Tampa, FL
Vehicle(s)
2021 Bronco
Your Bronco Model
Outer Banks
Clubs
 
Loadspace Trim Panel - 5-Door
Special Tool(s) / General Equipment

Interior Trim Remover
Removal

NOTE:
Removal steps in this procedure may contain installation details.

  1. Remove the rear scuff plate trim panel.
    Refer to: Rear Scuff Plate Trim Panel (501-05 Interior Trim and Ornamentation, Removal and Installation).
  2. Remove the load compartment floor covering mat.
Ford Bronco {thread} {filename}
Ford Bronco Sound System Upgrade Question Hel
  1. Release the clips and remove the loadspace scuff plate trim panel.
    Use the General Equipment: Interior Trim Remover
Ford Bronco {thread} {filename}
Ford Bronco Sound System Upgrade Question Hel
  1. Remove the load compartment floor covering tie down covers.
Ford Bronco {thread} {filename}
Ford Bronco Sound System Upgrade Question Hel
  1. Remove the bolts and the load compartment floor covering tie downs.
    Torque: 21 lb.ft (28 Nm)
Ford Bronco {thread} {filename}
Ford Bronco Sound System Upgrade Question Hel
  1. Remove the load compartment floor covering.
Ford Bronco {thread} {filename}
Ford Bronco Sound System Upgrade Question Hel
  1. Remove the rear cargo trim cover and gap hider.
Ford Bronco {thread} {filename}
Ford Bronco Sound System Upgrade Question Hel
Left hand side

  1. NOTE: Seats removed for clarity.
    Remove the loadspace trim panel.
    1. Release the clips.
      Use the General Equipment: Interior Trim Remover
    1. Disconnect the PATS rear antenna electrical connector.
Ford Bronco {thread} {filename}
Ford Bronco Sound System Upgrade Question Hel
Right hand side

  1. NOTE: Seats removed for clarity.
    Remove the loadspace trim panel.
    1. Release the clips.
      Use the General Equipment: Interior Trim Remover
    1. Disconnect the PATS rear antenna electrical connector.
    1. Disconnect the loadspace interior rear light electrical connector.
    1. Disconnect the power point electrical connector.
Ford Bronco {thread} {filename}
Ford Bronco Sound System Upgrade Question Hel
Installation

  1. NOTE: If installing a new loadspace trim panel, transfer parts as necessary.
    To install, reverse the removal procedure.
Thanks for posting Flip. Helps a lot.

Tim
 

Sponsored

Topher

Outer Banks
Active Member
First Name
Christopher
Joined
Jul 29, 2020
Threads
2
Messages
26
Reaction score
16
Location
Pasadena, CA
Vehicle(s)
2023 4 door Outer Banks, Cactus Grey, MIC, LUX
Your Bronco Model
Outer Banks
OK, so I'm ordering the Lux and getting the B&O - Don't judge me. :rolleyes:

I have a large powered JBL sub that's been sitting around and am thinking about installing it in my OBX (if it ever arrives). My thought is that I could tap off of the installed 8" sub speaker cables and parallel them to the new sub since it has speaker level inputs. I think that will work, however....

Thoughts?
 

theweb

Outer Banks
New Member
First Name
Jonn
Joined
Jan 29, 2021
Threads
0
Messages
2
Reaction score
1
Location
Omaha, NE
Vehicle(s)
2021 Bronco OBX 4dr, 2020 Corvette, 1968 Corvette
Your Bronco Model
Outer Banks
OK, so I'm ordering the Lux and getting the B&O - Don't judge me. :rolleyes:

I have a large powered JBL sub that's been sitting around and am thinking about installing it in my OBX (if it ever arrives). My thought is that I could tap off of the installed 8" sub speaker cables and parallel them to the new sub since it has speaker level inputs. I think that will work, however....

Thoughts?
That is the route I am going, but with an amp and sub box. I have both inputs to the amp, was going to use the factory sub as well. The upgraded system is really under powered.
 

eduard4us

Outer Banks
Well-Known Member
First Name
Eduard
Joined
Mar 8, 2023
Threads
8
Messages
97
Reaction score
39
Location
Lancaster, PA
Vehicle(s)
Ford Bronco
Your Bronco Model
Outer Banks
Clubs
 
Does anyone know if the kick panel locations are sealed or infinite baffle?
Sponsored


Top